

Owners Manual
Page 3
... QUICK START GUIDE First, charge the battery 18 To configure display language and clock settings ..... 19 To record an image 20 To view a recorded image 21 To delete an image 21 22 GETTING READY About This Manual 22 General Guide 23 Camera 23 USB Cradle 25 Monitor Screen Contents 26 REC Mode 26 PLAY Mode 28 Changing the Contents of the Monitor Screen 30 Attaching the Strap 31 Power Requirements 32 Loading the Rechargeable Battery 32 To charge...
... QUICK START GUIDE First, charge the battery 18 To configure display language and clock settings ..... 19 To record an image 20 To view a recorded image 21 To delete an image 21 22 GETTING READY About This Manual 22 General Guide 23 Camera 23 USB Cradle 25 Monitor Screen Contents 26 REC Mode 26 PLAY Mode 28 Changing the Contents of the Monitor Screen 30 Attaching the Strap 31 Power Requirements 32 Loading the Rechargeable Battery 32 To charge...

Owners Manual
Page 4
... Image Size 68 Specifying Image Quality 69 71 OTHER RECORDING FUNCTIONS Selecting the Focus Mode 71 Using Auto Focus 72 Using the Macro Mode 75 Using Pan Focus 76 Using the Infinity Mode 76 Using Manual Focus 77 Using Focus Lock 78 Exposure Compensation (EV Shift 79 Adjusting White Balance 81 Configuring the White Balance Setting Manually 82 Recording Consecutive Images (Continuous Shutter Mode 84 BEST SHOT Mode for Snapshots and Movies ......... 85 Displaying Sample Scenes Individually 87 Creating Your Own BEST SHOT Setup 88 To delete a BEST SHOT user setup...
... Image Size 68 Specifying Image Quality 69 71 OTHER RECORDING FUNCTIONS Selecting the Focus Mode 71 Using Auto Focus 72 Using the Macro Mode 75 Using Pan Focus 76 Using the Infinity Mode 76 Using Manual Focus 77 Using Focus Lock 78 Exposure Compensation (EV Shift 79 Adjusting White Balance 81 Configuring the White Balance Setting Manually 82 Recording Consecutive Images (Continuous Shutter Mode 84 BEST SHOT Mode for Snapshots and Movies ......... 85 Displaying Sample Scenes Individually 87 Creating Your Own BEST SHOT Setup 88 To delete a BEST SHOT user setup...

Owners Manual
Page 5
... Turning Image Review On and Off 114 Using Icon Help 114 Specifying Power On Default Settings 115 Specifying ISO Sensitivity 117 Selecting the Metering Mode 118 Using the Filter Function 119 Specifying Outline Sharpness 120 Specifying Color Saturation 120 Specifying Contrast 121 Resetting the Camera 121 122 PLAYBACK Basic Playback Operation 122 Playing an Audio Snapshot 123 Zooming the Display Image 124 Resizing an Image 125 Cropping an Image 126 Playing and Editing a Movie 128 Playing a Movie 128 Playing Back a Movie...
... Turning Image Review On and Off 114 Using Icon Help 114 Specifying Power On Default Settings 115 Specifying ISO Sensitivity 117 Selecting the Metering Mode 118 Using the Filter Function 119 Specifying Outline Sharpness 120 Specifying Color Saturation 120 Specifying Contrast 121 Resetting the Camera 121 122 PLAYBACK Basic Playback Operation 122 Playing an Audio Snapshot 123 Zooming the Display Image 124 Resizing an Image 125 Cropping an Image 126 Playing and Editing a Movie 128 Playing a Movie 128 Playing Back a Movie...

Owners Manual
Page 6
... Time settings 162 Editing the Date and Time of an Image 163 Changing the Display Language 164 Changing the Brightness of the Monitor Screen ..... 165 Changing the USB Port Protocol 165 Configuring [ ] (REC) and [ ] (PLAY) Power On/Off Functions 166 Formatting Built-in Memory 167 169 USING A MEMORY CARD Using a Memory Card 170 To insert a memory card into the camera 170 To replace the memory card 171 Formatting a Memory Card 172 Copying Files 173 To copy all the files in built-in memory to a memory card 174 To copy a specific file from a memory card...
... Time settings 162 Editing the Date and Time of an Image 163 Changing the Display Language 164 Changing the Brightness of the Monitor Screen ..... 165 Changing the USB Port Protocol 165 Configuring [ ] (REC) and [ ] (PLAY) Power On/Off Functions 166 Formatting Built-in Memory 167 169 USING A MEMORY CARD Using a Memory Card 170 To insert a memory card into the camera 170 To replace the memory card 171 Formatting a Memory Card 172 Copying Files 173 To copy all the files in built-in memory to a memory card 174 To copy a specific file from a memory card...

Owners Manual
Page 7
... User Registration 218 Exiting the Menu Application 218 Using the Camera with a Macintosh Computer ....... 219 About the bundled CD-ROM 219 Computer System Requirements 220 Managing Images on a Macintosh 221 Playing Back a Movie on your Macintosh 222 Viewing User Documentation (PDF Files) 224 To register as a camera user 224 225 APPENDIX Menu Reference 225 Indicator Lamp Reference 228 Troubleshooting Guide 231 If you have problems installing the USB driver... 236 Display Messages 237 Specifications...
... User Registration 218 Exiting the Menu Application 218 Using the Camera with a Macintosh Computer ....... 219 About the bundled CD-ROM 219 Computer System Requirements 220 Managing Images on a Macintosh 221 Playing Back a Movie on your Macintosh 222 Viewing User Documentation (PDF Files) 224 To register as a camera user 224 225 APPENDIX Menu Reference 225 Indicator Lamp Reference 228 Troubleshooting Guide 231 If you have problems installing the USB driver... 236 Display Messages 237 Specifications...

Owners Manual
Page 8
shall not be trademarks or service marks of others. • Photo Loader and Photohands are subject to the use of malfunction, repairs, or battery replacement. assumes no responsibility for any damage or loss resulting from the use of this User's Guide may differ somewhat by third parties which may also be held liable for any damages or losses suffered by...
shall not be trademarks or service marks of others. • Photo Loader and Photohands are subject to the use of malfunction, repairs, or battery replacement. assumes no responsibility for any damage or loss resulting from the use of this User's Guide may differ somewhat by third parties which may also be held liable for any damages or losses suffered by...

Owners Manual
Page 11
... on overall image brightness, which helps to make searching for a particular file quicker and easier. • World Time (page 162) A simple operation sets the current time for printing by professional print services. 11 B You can also be printed easily in 32 time zones. • Support for SD memory cards and MMC (MultiMedia Cards) for printing. • Audio Snapshot mode (page 106) Use this mode to start recording a movie, without any troublesome mode changes. INTRODUCTION • Movie button (pages...
... on overall image brightness, which helps to make searching for a particular file quicker and easier. • World Time (page 162) A simple operation sets the current time for printing by professional print services. 11 B You can also be printed easily in 32 time zones. • Support for SD memory cards and MMC (MultiMedia Cards) for printing. • Audio Snapshot mode (page 106) Use this mode to start recording a movie, without any troublesome mode changes. INTRODUCTION • Movie button (pages...
Owners Manual
Page 43
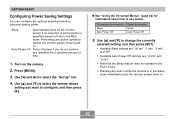
...", and "Off". • Available Auto Power Off settings are: "2 min" and "5 min". • Note that the Sleep feature does not operate in the PLAY mode. • Pressing any button while the camera is performed for a specified amount of time. 1. Auto Power Off : Turns off the monitor screen if no operation is in the REC mode. Turn on . Use [̇] and [̈] to conserve battery power. Use [̆] and [̄] to...
...", and "Off". • Available Auto Power Off settings are: "2 min" and "5 min". • Note that the Sleep feature does not operate in the PLAY mode. • Pressing any button while the camera is performed for a specified amount of time. 1. Auto Power Off : Turns off the monitor screen if no operation is in the REC mode. Turn on . Use [̇] and [̈] to conserve battery power. Use [̆] and [̄] to...
Owners Manual
Page 75
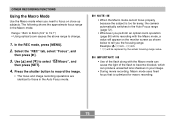
... macro recording. 75 OTHER RECORDING FUNCTIONS Using the Macro Mode Use the Macro mode when you need to focus on the monitor screen as shown below to tell you perform an optical zoom operation (page 56) while recording with the Macro mode can cause the light of the flash along with the Macro mode, a value will be replaced by the actual focusing range value. In the REC mode, press [MENU]. 2. Press the shutter button to record the image. • The focus...
... macro recording. 75 OTHER RECORDING FUNCTIONS Using the Macro Mode Use the Macro mode when you need to focus on the monitor screen as shown below to tell you perform an optical zoom operation (page 56) while recording with the Macro mode can cause the light of the flash along with the Macro mode, a value will be replaced by the actual focusing range value. In the REC mode, press [MENU]. 2. Press the shutter button to record the image. • The focus...

Owners Manual
Page 115
... SHOT mode, flash mode, focus mode, white balance mode, ISO sensitivity, AF Area, metering, self-timer, flash intensity, digital zoom mode, manual focus position and zoom position. The following table shows what happens when you turn mode memory on mode memory for a mode tells the camera to select the setting you want, and then press [SET]. OTHER RECORDING FUNCTIONS 3. To do not appear on the monitor screen. White Balance AWB icon (page 82) Specifying Power On Default Settings The camera's "mode memory" feature lets you select an icon on the display while Icon Help...
... SHOT mode, flash mode, focus mode, white balance mode, ISO sensitivity, AF Area, metering, self-timer, flash intensity, digital zoom mode, manual focus position and zoom position. The following table shows what happens when you turn mode memory on mode memory for a mode tells the camera to select the setting you want, and then press [SET]. OTHER RECORDING FUNCTIONS 3. To do not appear on the monitor screen. White Balance AWB icon (page 82) Specifying Power On Default Settings The camera's "mode memory" feature lets you select an icon on the display while Icon Help...
Owners Manual
Page 116
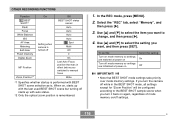
... you switched to change, and then press [̈]. 4. When on, starts up with the last used BEST SHOT scene but turning off starts up with BEST SHOT scene selection as-is. OTHER RECORDING FUNCTIONS Function BEST SHOT*1 Flash Focus White Balance ISO AF Area Metering Self-timer Flash Intensity Digital Zoom On Setting when camera is turned off MF Position Zoom Position*2 Off BEST SHOT status cancel Auto Auto Auto Auto Spot Multi Off 0 On Last Auto Focus position that BEST SHOT mode settings take priority over mode memory settings.
... you switched to change, and then press [̈]. 4. When on, starts up with the last used BEST SHOT scene but turning off starts up with BEST SHOT scene selection as-is. OTHER RECORDING FUNCTIONS Function BEST SHOT*1 Flash Focus White Balance ISO AF Area Metering Self-timer Flash Intensity Digital Zoom On Setting when camera is turned off MF Position Zoom Position*2 Off BEST SHOT status cancel Auto Auto Auto Auto Spot Multi Off 0 On Last Auto Focus position that BEST SHOT mode settings take priority over mode memory settings.
Owners Manual
Page 139
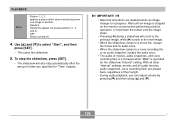
... effect when transitioning from one image to select "Start", and then press [SET]. • This starts the slideshow. 5. IMPORTANT! • Note that all audio (movies, audio snapshots, voice recording files) are disabled while an image change is specified for "Time" elapses. With all other "Interval" settings, movies and all buttons are played back, regardless of movies, audio snapshots, and voice recording files is not played when "MAX" is in progress...
... effect when transitioning from one image to select "Start", and then press [SET]. • This starts the slideshow. 5. IMPORTANT! • Note that all audio (movies, audio snapshots, voice recording files) are disabled while an image change is specified for "Time" elapses. With all other "Interval" settings, movies and all buttons are played back, regardless of movies, audio snapshots, and voice recording files is not played when "MAX" is in progress...
Owners Manual
Page 145
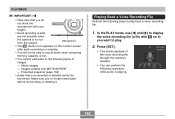
... [SET]. • This starts playback of images. - Microphone • The (Audio) icon appears on it . Playing Back a Voice Recording File Perform the following steps to play . 2. Images created with on the monitor screen after audio recording is complete. • You will not be recovered. Movie images - In the PLAY mode, use [̇] and [̈] to display the voice recording file (a file with MOTION PRINT - Make sure you no longer need audio before re-recording or deleting...
... [SET]. • This starts playback of images. - Microphone • The (Audio) icon appears on it . Playing Back a Voice Recording File Perform the following steps to play . 2. Images created with on the monitor screen after audio recording is complete. • You will not be recovered. Movie images - In the PLAY mode, use [̇] and [̈] to display the voice recording file (a file with MOTION PRINT - Make sure you no longer need audio before re-recording or deleting...
Owners Manual
Page 149
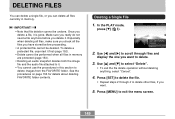
... the PLAY mode, press [̄] ( ). 2. Use [̇] and [̈] to scroll through 4 to delete other files, if you want to delete. 3. Press [SET] to delete the file. • Repeat steps 2 through files and display the one you want . 5. Use [̆] and [̄] to exit the menu screen. 149 Especially when deleting all files, make sure you check all the files you have stored before you delete it. Deleting a Single File 1. To delete a protected file...
... the PLAY mode, press [̄] ( ). 2. Use [̇] and [̈] to scroll through 4 to delete other files, if you want to delete. 3. Press [SET] to delete the file. • Repeat steps 2 through files and display the one you want . 5. Use [̆] and [̄] to exit the menu screen. 149 Especially when deleting all files, make sure you check all the files you have stored before you delete it. Deleting a Single File 1. To delete a protected file...
Owners Manual
Page 167
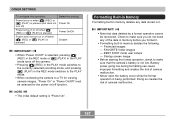
... memory deletes any of camera malfunction. 167 Protected images - BEST SHOT mode user setups - Battery power going low during formatting can cause improper formatting and creates the risk of camera malfunction. • Never open the battery cover while the format operation is not low. FAVORITE folder images - Doing so creates the risk of the data in the REC mode switches to the PLAY mode. • When connecting the camera to make sure that data deleted by a format operation cannot be selected for viewing camera images, "Power...
... memory deletes any of camera malfunction. 167 Protected images - BEST SHOT mode user setups - Battery power going low during formatting can cause improper formatting and creates the risk of camera malfunction. • Never open the battery cover while the format operation is not low. FAVORITE folder images - Doing so creates the risk of the data in the REC mode switches to the PLAY mode. • When connecting the camera to make sure that data deleted by a format operation cannot be selected for viewing camera images, "Power...

Owners Manual
Page 187
...-in memory to a computer, make sure there is supported. If you do, the computer will not be used with a computer that the battery is fully charged. • If you are using battery power without installing the USB driver first. • USB driver installation is not required in the camera before installing the USB driver onto the computer. Use of Windows 98SE and 98. Do not connect the camera to power down data transfer and even cause operational problems...
...-in memory to a computer, make sure there is supported. If you do, the computer will not be used with a computer that the battery is fully charged. • If you are using battery power without installing the USB driver first. • USB driver installation is not required in the camera before installing the USB driver onto the computer. Use of Windows 98SE and 98. Do not connect the camera to power down data transfer and even cause operational problems...

Owners Manual
Page 188
... 98. On the menu screen that the example installation presented here uses Windows 98. What you should do first depends on your computer screen to complete the installation. • The following steps show installation under the English version of your computer is not required, so jump directly to install the USB driver. • Note that appears, click "English". 4. Windows 98SE/98 Users • Start from step 2 to...
... 98. On the menu screen that the example installation presented here uses Windows 98. What you should do first depends on your computer screen to complete the installation. • The following steps show installation under the English version of your computer is not required, so jump directly to install the USB driver. • Note that appears, click "English". 4. Windows 98SE/98 Users • Start from step 2 to...

Owners Manual
Page 204
... need to a computer for using computer running under Windows (see below . Install the USB driver Type B (page 186). Use the USB cradle to establish a connection between the camera and computer. USB driver Type B Management of images transferred to a computer Photo Loader 2.3 * DirectX 9.0c CD-ROM Software Supported Windows Versions XP/2000/Me 98SE/98 XP/2000/Me/98SE/98 Required Operation Use the USB cradle to establish a connection between the camera and computer. Install Photo...
... need to a computer for using computer running under Windows (see below . Install the USB driver Type B (page 186). Use the USB cradle to establish a connection between the camera and computer. USB driver Type B Management of images transferred to a computer Photo Loader 2.3 * DirectX 9.0c CD-ROM Software Supported Windows Versions XP/2000/Me 98SE/98 XP/2000/Me/98SE/98 Required Operation Use the USB cradle to establish a connection between the camera and computer. Install Photo...
Owners Manual
Page 230
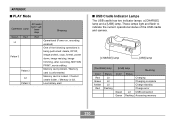
...Color Status Charging Charging complete Charge standby Charge error Green Lit USB connection Green Flashing Accessing memory 230 These lamps light and flash to indicate the current operational status of the following operations is being performed: delete, DPOF, Pattern 3 image protect, copy, format, power down, image resizing, image trimming, after recording, MOTION PRINT, movie editing Pattern 2 Memory card problem / Memory card is full. Pattern 3 Low battery alert I PLAY Mode Operation Lamp AF assist light / self- Memory card is locked. / Cannot Lit create folder...
...Color Status Charging Charging complete Charge standby Charge error Green Lit USB connection Green Flashing Accessing memory 230 These lamps light and flash to indicate the current operational status of the following operations is being performed: delete, DPOF, Pattern 3 image protect, copy, format, power down, image resizing, image trimming, after recording, MOTION PRINT, movie editing Pattern 2 Memory card problem / Memory card is full. Pattern 3 Low battery alert I PLAY Mode Operation Lamp AF assist light / self- Memory card is locked. / Cannot Lit create folder...

Owners Manual
Page 235
... the computer is not accessing camera memory, disconnect the USB cable. 1) Check the connection between the camera and USB cradle. 2) Check all connections. 3) Install the USB driver on your computer (page 186). 4) Press the [USB] button on the USB cradle. 2) USB cable is not connected securely. 3) USB driver is not installed. 4) Camera is not set securely on the USB cradle. Cannot transfer files over a USB connection. 1) Camera is turned off . Action Remove the battery from the camera, reinsert it, and then try...
... the computer is not accessing camera memory, disconnect the USB cable. 1) Check the connection between the camera and USB cradle. 2) Check all connections. 3) Install the USB driver on your computer (page 186). 4) Press the [USB] button on the USB cradle. 2) USB cable is not connected securely. 3) USB driver is not installed. 4) Camera is not set securely on the USB cradle. Cannot transfer files over a USB connection. 1) Camera is turned off . Action Remove the battery from the camera, reinsert it, and then try...


