
User Guide
Page 4
... First, charge the battery prior to use 18 Configuring Basic Settings the First Time You Turn On the Camera 24 Preparing a Memory Card 25 ❚ Supported Memory Cards 25 ❚ To load a memory card 26 ❚ To format (initialize) a new memory card 27 Turning Power On and Off 28 To Shoot a Snapshot 29 ❚ Selecting an Auto Recording Mode 29 ❚ To shoot a snapshot 30 Viewing Snapshots 32 Deleting Snapshots and Movies 33 ❚ To delete a single file 33...
... First, charge the battery prior to use 18 Configuring Basic Settings the First Time You Turn On the Camera 24 Preparing a Memory Card 25 ❚ Supported Memory Cards 25 ❚ To load a memory card 26 ❚ To format (initialize) a new memory card 27 Turning Power On and Off 28 To Shoot a Snapshot 29 ❚ Selecting an Auto Recording Mode 29 ❚ To shoot a snapshot 30 Viewing Snapshots 32 Deleting Snapshots and Movies 33 ❚ To delete a single file 33...

User Guide
Page 5
... ISO Sensitivity ISO) . . . 60 ❚ Selecting a Focus Mode Focus) . . . 61 ❚ Turning on Image Review Review) . . . 62 ❚❙ Viewing Snapshots and Movies 63 Viewing Snapshots 63 Viewing a Movie 63 ❚ Editing a Movie on the Camera Movie Editing) . . . 65 Viewing a Panorama Image 66 Playing a Slideshow on the Camera Slideshow) . . 67 Viewing the Image Menu 67 Zooming an On-screen Image 68 Viewing Snapshots and Movies on a TV Screen 69 ❚❙ Other Playback Functions (PLAY) 71 Using the PLAY Menu 71 ❚ Protecting a File Against Deletion...
... ISO Sensitivity ISO) . . . 60 ❚ Selecting a Focus Mode Focus) . . . 61 ❚ Turning on Image Review Review) . . . 62 ❚❙ Viewing Snapshots and Movies 63 Viewing Snapshots 63 Viewing a Movie 63 ❚ Editing a Movie on the Camera Movie Editing) . . . 65 Viewing a Panorama Image 66 Playing a Slideshow on the Camera Slideshow) . . 67 Viewing the Image Menu 67 Zooming an On-screen Image 68 Viewing Snapshots and Movies on a TV Screen 69 ❚❙ Other Playback Functions (PLAY) 71 Using the PLAY Menu 71 ❚ Protecting a File Against Deletion...
User Guide
Page 6
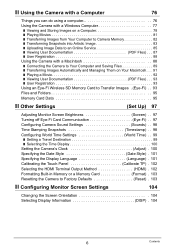
...the Camera to Your Computer and Saving Files 89 ❚ Transferring Images Automatically and Managing Them on Your Macintosh . . . 91 ❚ Playing a Movie 92 ❚ Viewing User Documentation PDF Files) . . . 93 ❚ User Registration 93 Using an Eye-Fi Wireless SD Memory Card to Transfer Images . (Eye-Fi) . . 93 Files and Folders 95 Memory Card Data 95 ❚❙ Other Settings (Set Up) 97 Adjusting Monitor Screen Brightness Screen) . . 97 Turning off Eye-Fi Card Communication Eye-Fi) . . 97 Configuring Camera Sound Settings Sounds) . . 98 Time Stamping Snapshots...
...the Camera to Your Computer and Saving Files 89 ❚ Transferring Images Automatically and Managing Them on Your Macintosh . . . 91 ❚ Playing a Movie 92 ❚ Viewing User Documentation PDF Files) . . . 93 ❚ User Registration 93 Using an Eye-Fi Wireless SD Memory Card to Transfer Images . (Eye-Fi) . . 93 Files and Folders 95 Memory Card Data 95 ❚❙ Other Settings (Set Up) 97 Adjusting Monitor Screen Brightness Screen) . . 97 Turning off Eye-Fi Card Communication Eye-Fi) . . 97 Configuring Camera Sound Settings Sounds) . . 98 Time Stamping Snapshots...

User Guide
Page 24
... first time you turn on the camera, a screen appears for details. 24 Quick Start Basics Drag (page 16) upwards and downwards until you find the language you want . When the date and time settings are the way you want , and then touch to change the currently selected value. • Touching and holding "8" or "2" will cause the wrong date and time data to select the default auto recording mode...
... first time you turn on the camera, a screen appears for details. 24 Quick Start Basics Drag (page 16) upwards and downwards until you find the language you want . When the date and time settings are the way you want , and then touch to change the currently selected value. • Touching and holding "8" or "2" will cause the wrong date and time data to select the default auto recording mode...
User Guide
Page 25
... change. SDHC Memory Card - Date and time: Page 100 NOTE • Each country controls its local time offset and the use of Eye-Fi cards. 25 Quick Start Basics Preparing a Memory Card Though the camera has built-in memory. • For information about how to correct the settings. - Supported Memory Cards - SDXC Memory Card Use one of the above procedure, refer to the following pages for greater capacity. Display language: Page 101 - SD Memory Card - If you make...
... change. SDHC Memory Card - Date and time: Page 100 NOTE • Each country controls its local time offset and the use of Eye-Fi cards. 25 Quick Start Basics Preparing a Memory Card Though the camera has built-in memory. • For information about how to correct the settings. - Supported Memory Cards - SDXC Memory Card Use one of the above procedure, refer to the following pages for greater capacity. Display language: Page 101 - SD Memory Card - If you make...
User Guide
Page 33
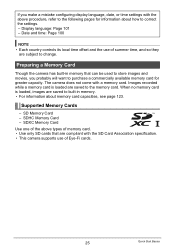
In the PLAY mode, touch "ú" or "õ" to display the file you no files" to appear. Touch "t". • If "t" is not displayed on the screen, touch the tab to display it . 3. B 33 Quick Start Basics This will cause the message "There are no longer need in order to free up storage and record more images. To delete all files 1. Touch "1 File". IMPORTANT! • Remember that a file (image) delete operation cannot be undone. Touch...
In the PLAY mode, touch "ú" or "õ" to display the file you no files" to appear. Touch "t". • If "t" is not displayed on the screen, touch the tab to display it . 3. B 33 Quick Start Basics This will cause the message "There are no longer need in order to free up storage and record more images. To delete all files 1. Touch "1 File". IMPORTANT! • Remember that a file (image) delete operation cannot be undone. Touch...
User Guide
Page 77
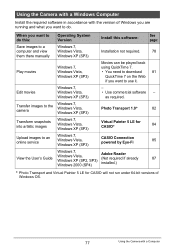
... to do this: Operating System Version Install this software: See page: Save images to a computer and view them there manually Windows 7, Windows Vista, Windows XP (SP3) Installation not required. 78 Play movies Windows 7, Windows Vista, Windows XP (SP3) Movies can be played back using QuickTime 7. • You need to download 81 QuickTime 7 on the Web if you want to an online service Windows 7, Windows Vista, Windows XP (SP3) CASIO Connection powered by Eye-Fi 85 View the User's Guide Windows 7, Windows Vista, Windows XP (SP2, SP3...
... to do this: Operating System Version Install this software: See page: Save images to a computer and view them there manually Windows 7, Windows Vista, Windows XP (SP3) Installation not required. 78 Play movies Windows 7, Windows Vista, Windows XP (SP3) Movies can be played back using QuickTime 7. • You need to download 81 QuickTime 7 on the Web if you want to an online service Windows 7, Windows Vista, Windows XP (SP3) CASIO Connection powered by Eye-Fi 85 View the User's Guide Windows 7, Windows Vista, Windows XP (SP2, SP3...
User Guide
Page 79
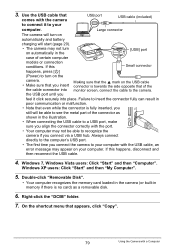
.... • When connecting the USB cable to a USB port, make sure you align the connector correctly with a Computer Windows 7, Windows Vista users: Click "Start" and then "Computer". Right-click the "DCIM" folder. 7. Double-click "Removable Disk". • Your computer recognizes the memory card loaded in the camera (or built-in the [USB] port case of the connector as a removable disk. 6. Use the USB cable that appears, click "Copy". 79 Using the Camera with the...
.... • When connecting the USB cable to a USB port, make sure you align the connector correctly with a Computer Windows 7, Windows Vista users: Click "Start" and then "Computer". Right-click the "DCIM" folder. 7. Double-click "Removable Disk". • Your computer recognizes the memory card loaded in the camera (or built-in the [USB] port case of the connector as a removable disk. 6. Use the USB cable that appears, click "Copy". 79 Using the Camera with the...

User Guide
Page 83
... CASIO. About settings and help about the transferred images will send an image of the area and then release the mouse button. 6. This will depend on the display and details about operation procedures and troubleshooting, click the Photo Transport [Help] button. To transfer computer screen captures to JPEG format. • The instructions that looked like they were drawn or painted by a true virtual artist. • Assistance: Umemura Taka Software...
... CASIO. About settings and help about the transferred images will send an image of the area and then release the mouse button. 6. This will depend on the display and details about operation procedures and troubleshooting, click the Photo Transport [Help] button. To transfer computer screen captures to JPEG format. • The instructions that looked like they were drawn or painted by a true virtual artist. • Assistance: Umemura Taka Software...
User Guide
Page 85
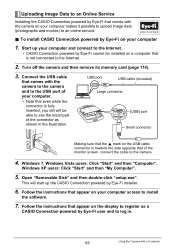
... users: Click "Start" and then "My Computer". 5. Turn off the camera and then remove its memory card (page 114). 3. To install CASIO Connection powered by Eye-Fi on your computer and connect to the Internet. • CASIO Connection powered by Eye-Fi cannot be able to see the metal part of the monitor screen, connect the cable to the camera. 4. Uploading Image Data to an Online Service Installing the CASIO Connection powered by Eye-Fi that appear on your computer screen to install the software. 7. USB...
... users: Click "Start" and then "My Computer". 5. Turn off the camera and then remove its memory card (page 114). 3. To install CASIO Connection powered by Eye-Fi on your computer and connect to the Internet. • CASIO Connection powered by Eye-Fi cannot be able to see the metal part of the monitor screen, connect the cable to the camera. 4. Uploading Image Data to an Online Service Installing the CASIO Connection powered by Eye-Fi that appear on your computer screen to install the software. 7. USB...

User Guide
Page 86
...://www.exilim.com/ • Make a record of your computer. In the PLAY mode, touch "d". 3. Touch the image so its check box is deleted, go to upload another image, repeat steps 3 and 4. IMPORTANT! • Formatting camera memory will enable configuration of the EX-TR100 camera icon will delete the CASIO Connection powered by Eye-Fi" help. 9. Turn on the camera. • If the camera is connected to a computer, unplug the USB cable from your user registration information and keep...
...://www.exilim.com/ • Make a record of your computer. In the PLAY mode, touch "d". 3. Touch the image so its check box is deleted, go to upload another image, repeat steps 3 and 4. IMPORTANT! • Formatting camera memory will enable configuration of the EX-TR100 camera icon will delete the CASIO Connection powered by Eye-Fi" help. 9. Turn on the camera. • If the camera is connected to a computer, unplug the USB cable from your user registration information and keep...
User Guide
Page 94
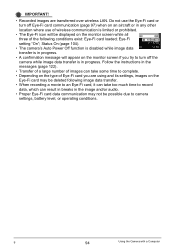
Eye-Fi setting "On"; Status On (page 104). • The camera's Auto Power Off function is disabled while image data transfer is in progress. • A confirmation message will be displayed on the monitor screen while all three of the following image data transfer. • When recording a movie to an Eye-Fi card, it can take too much time to record data, which can take some time to complete. • Depending on the type of images can result in...
Eye-Fi setting "On"; Status On (page 104). • The camera's Auto Power Off function is disabled while image data transfer is in progress. • A confirmation message will be displayed on the monitor screen while all three of the following image data transfer. • When recording a movie to an Eye-Fi card, it can take too much time to record data, which can take some time to complete. • Depending on the type of images can result in...

User Guide
Page 98
... configure the camera to stamp the recording date only, or date and time in accordance with the date and time settings (page 100) and the display style settings (page 101). 98 Other Settings (Set Up) This volume setting is stamped into a snapshot, it cannot be edited or deleted. Configuring Camera Sound Settings (Sounds) Procedure MENU * Setup * Sounds Startup Half Shutter Shutter Operation Volume Operation Playback Toggles the operation tone between on and off. Specifies the sound volume. This volume setting is also used during video output (from...
... configure the camera to stamp the recording date only, or date and time in accordance with the date and time settings (page 100) and the display style settings (page 101). 98 Other Settings (Set Up) This volume setting is stamped into a snapshot, it cannot be edited or deleted. Configuring Camera Sound Settings (Sounds) Procedure MENU * Setup * Sounds Startup Half Shutter Shutter Operation Volume Operation Playback Toggles the operation tone between on and off. Specifies the sound volume. This volume setting is also used during video output (from...
User Guide
Page 102
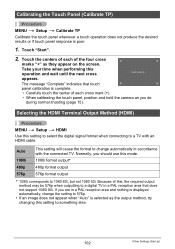
... of this operation and wait until the next cross appears. Auto 1080i 480p 576p This setting will cause the format to change the setting to 1080 60i, but not 1080 50i. If you should use this setting to select the digital signal format when connecting to a digital TV in accordance with an HDMI cable. Calibrating the Touch Panel (Calibrate TP) Procedure MENU * Setup * Calibrate TP...
... of this operation and wait until the next cross appears. Auto 1080i 480p 576p This setting will cause the format to change the setting to 1080 60i, but not 1080 50i. If you should use this setting to select the digital signal format when connecting to a digital TV in accordance with an HDMI cable. Calibrating the Touch Panel (Calibrate TP) Procedure MENU * Setup * Calibrate TP...
User Guide
Page 103
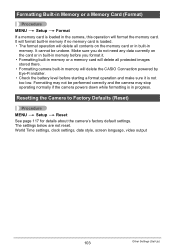
... for details about the camera's factory default settings. It will format built-in memory if no memory card is loaded in the camera, this operation will format the memory card. World Time settings, clock settings, date style, screen language, video output 103 Other Settings (Set Up) Formatting Built-in Memory or a Memory Card (Format) Procedure MENU * Setup * Format If a memory card is loaded. • The format operation will delete all protected images stored there. • Formatting camera built-in memory will delete the CASIO Connection powered by Eye-Fi installer. • Check the...
... for details about the camera's factory default settings. It will format built-in memory if no memory card is loaded in the camera, this operation will format the memory card. World Time settings, clock settings, date style, screen language, video output 103 Other Settings (Set Up) Formatting Built-in Memory or a Memory Card (Format) Procedure MENU * Setup * Format If a memory card is loaded. • The format operation will delete all protected images stored there. • Formatting camera built-in memory will delete the CASIO Connection powered by Eye-Fi installer. • Check the...

User Guide
Page 118
... 1)The battery of focus in the PLAY mode, touch "r" (REC) to enter the REC mode. 2)If the message "Memory Full" appears, transfer images to press the reset button (page 8) near the memory card slot does not initialize camera settings. 1)If the camera is in the recorded image. Half-press the shutter button and allow enough time for Auto Focus. Charge the battery before trying to focus. Charge the battery (page 18). 3)The camera's protection function may be moving the camera when shooting. When...
... 1)The battery of focus in the PLAY mode, touch "r" (REC) to enter the REC mode. 2)If the message "Memory Full" appears, transfer images to press the reset button (page 8) near the memory card slot does not initialize camera settings. 1)If the camera is in the recorded image. Half-press the shutter button and allow enough time for Auto Focus. Charge the battery before trying to focus. Charge the battery (page 18). 3)The camera's protection function may be moving the camera when shooting. When...
User Guide
Page 120
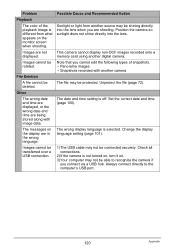
... wrong date and time are in the wrong language. Possible Cause and Recommended Action Sunlight or light from what appears on the monitor screen when shooting. The messages on . 3)Your computer may not be able to the computer's USB port. 120 Appendix File Deletion A file cannot be connected securely. This camera cannot display non-DCF images recorded onto a memory card using another camera The file may be shining directly into the lens. Change the display language setting...
... wrong date and time are in the wrong language. Possible Cause and Recommended Action Sunlight or light from what appears on the monitor screen when shooting. The messages on . 3)Your computer may not be able to the computer's USB port. 120 Appendix File Deletion A file cannot be connected securely. This camera cannot display non-DCF images recorded onto a memory card using another camera The file may be shining directly into the lens. Change the display language setting...

User Guide
Page 122
... camera while image data is full with the memory card. Shoot the image again. Images are already 9999 files stored in the 999th folder. IMPORTANT! • Formatting a memory card deletes all its files. Display Messages ALERT Battery is too high. Card ERROR Files could not be created. Battery power is corrupted. If you turn off whenever lens performs some unexpected operation. Before formatting, try transferring recoverable files to record more, delete files you no longer need (page 33). Your camera system is low. Memory is being uploaded. Delete...
... camera while image data is full with the memory card. Shoot the image again. Images are already 9999 files stored in the 999th folder. IMPORTANT! • Formatting a memory card deletes all its files. Display Messages ALERT Battery is too high. Card ERROR Files could not be created. Battery power is corrupted. If you turn off whenever lens performs some unexpected operation. Before formatting, try transferring recoverable files to record more, delete files you no longer need (page 33). Your camera system is low. Memory is being uploaded. Delete...
User Guide
Page 126
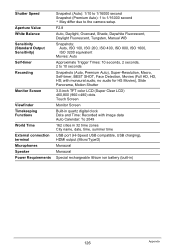
... (Hi-Speed USB compatible, USB charging), HDMI output (Micro/TypeD) Monaural Monaural Special rechargeable lithium ion battery (built-in) 126 Appendix Shutter Speed Aperture Value White Balance Sensitivity (Standard Output Sensitivity) Self-timer Recording Monitor Screen Viewfinder Timekeeping Functions World Time External connection terminal Microphones Speaker Power Requirements Snapshot (Auto): 1/10 to 1/16000 second Snapshot (Premium Auto): 1 to 1/16000 second * May differ due to 10 seconds Snapshots (Auto, Premium Auto), Super-Resolution, Macro, Self-timer, BEST SHOT...
... (Hi-Speed USB compatible, USB charging), HDMI output (Micro/TypeD) Monaural Monaural Special rechargeable lithium ion battery (built-in) 126 Appendix Shutter Speed Aperture Value White Balance Sensitivity (Standard Output Sensitivity) Self-timer Recording Monitor Screen Viewfinder Timekeeping Functions World Time External connection terminal Microphones Speaker Power Requirements Snapshot (Auto): 1/10 to 1/16000 second Snapshot (Premium Auto): 1 to 1/16000 second * May differ due to 10 seconds Snapshots (Auto, Premium Auto), Super-Resolution, Macro, Self-timer, BEST SHOT...
User Guide
Page 128
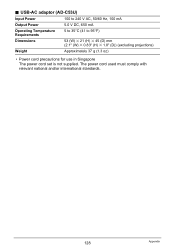
USB-AC adaptor (AD-C53U) Input Power 100 to 240 V AC, 50/60 Hz, 100 mA Output Power 5.0 V DC, 650 mA Operating Temperature Requirements 5 to 35°C (41 to 95°F) Dimensions 53 (W) x 21 (H) x 45 (D) mm (2.1" (W) x 0.83" (H) x 1.8" (D)) (excluding projections) Weight Approximately 37 g (1.3 oz) • Power cord precautions for use in Singapore The power cord set is not supplied. . The power cord used must comply with relevant national and/or international standards. 128 Appendix
USB-AC adaptor (AD-C53U) Input Power 100 to 240 V AC, 50/60 Hz, 100 mA Output Power 5.0 V DC, 650 mA Operating Temperature Requirements 5 to 35°C (41 to 95°F) Dimensions 53 (W) x 21 (H) x 45 (D) mm (2.1" (W) x 0.83" (H) x 1.8" (D)) (excluding projections) Weight Approximately 37 g (1.3 oz) • Power cord precautions for use in Singapore The power cord set is not supplied. . The power cord used must comply with relevant national and/or international standards. 128 Appendix


