
Owners Manual
Page 7
... Changing the Camera Date and Time Setting . . . 194 Using World Time 196 ■ Configuring World Time Settings 196 Changing the Display Language 198 Changing the Brightness of the Monitor Screen 199 Changing the USB Port Protocol 200 [ ] (REC) and [ ] (PLAY) Button Settings 201 Formatting Built-in Memory 202 PRINTING 203 Types of Printing 203 Using Professional Print Service 204 Using Your Printer to Print Images 204 Using DPOF to Specify Images to be Printed and the Number of Copies 208 ■ Date Stamping 210 Supported Protocols 211 USING THE CAMERA...
... Changing the Camera Date and Time Setting . . . 194 Using World Time 196 ■ Configuring World Time Settings 196 Changing the Display Language 198 Changing the Brightness of the Monitor Screen 199 Changing the USB Port Protocol 200 [ ] (REC) and [ ] (PLAY) Button Settings 201 Formatting Built-in Memory 202 PRINTING 203 Types of Printing 203 Using Professional Print Service 204 Using Your Printer to Print Images 204 Using DPOF to Specify Images to be Printed and the Number of Copies 208 ■ Date Stamping 210 Supported Protocols 211 USING THE CAMERA...
Owners Manual
Page 22
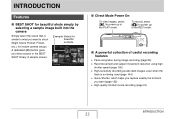
...: Select for beautiful portraits. ■ Direct Mode Power On To view images, press [ ] to the BEST SHOT library of useful recording features • Face recognition during image recording (page 83) • Hand movement and subject movement reduction using high shutter speed (page 102) • High-sensitivity recording avoids dark images, even when the flash is not being used (page 104) • Quick Shutter, which helps you capture exactly the moment...
...: Select for beautiful portraits. ■ Direct Mode Power On To view images, press [ ] to the BEST SHOT library of useful recording features • Face recognition during image recording (page 83) • Hand movement and subject movement reduction using high shutter speed (page 102) • High-sensitivity recording avoids dark images, even when the flash is not being used (page 104) • Quick Shutter, which helps you capture exactly the moment...

Owners Manual
Page 33
... the USB cable while a data communication operation is manufactured using precision digital components. Removing the memory card from the camera while the camera is 0°C to 40°C (32°F to appear on a hot day, or in any of the following creates the risk of corruption of the following locations. - Perform the action indicated by the message that is flashing green after turning off the camera - Using a battery that...
... the USB cable while a data communication operation is manufactured using precision digital components. Removing the memory card from the camera while the camera is 0°C to 40°C (32°F to appear on a hot day, or in any of the following creates the risk of corruption of the following locations. - Perform the action indicated by the message that is flashing green after turning off the camera - Using a battery that...

Owners Manual
Page 44
... Display Language, Date, and Time Settings" (page 11) to turn on when you load a battery into the camera, a screen appears for the First Time The first time you press [ ] (REC) or [ ] (PLAY). GETTING READY 44 IMPORTANT! • Failure to set the date and time will cause the wrong date and time data to be recorded with images. • If you make a mistake when configuring the language, date, and time settings, you can configure the camera so power does...
... Display Language, Date, and Time Settings" (page 11) to turn on when you load a battery into the camera, a screen appears for the First Time The first time you press [ ] (REC) or [ ] (PLAY). GETTING READY 44 IMPORTANT! • Failure to set the date and time will cause the wrong date and time data to be recorded with images. • If you make a mistake when configuring the language, date, and time settings, you can configure the camera so power does...

Owners Manual
Page 45
.... 1. The Auto Power Off trigger time is performed for a preset amount of time. Use [W] and [X] to conserve battery power. ■ Battery Power Conservation Features This camera is equipped with a sleep function and auto power off function to select the "Set Up" tab. 3. Note that the Sleep feature does not operate in the PLAY mode. - Settings 30 sec 1 min 2 min Off 1 min 2 min 5 min • Sleep and Auto Power Off always operate as...
.... 1. The Auto Power Off trigger time is performed for a preset amount of time. Use [W] and [X] to conserve battery power. ■ Battery Power Conservation Features This camera is equipped with a sleep function and auto power off function to select the "Set Up" tab. 3. Note that the Sleep feature does not operate in the PLAY mode. - Settings 30 sec 1 min 2 min Off 1 min 2 min 5 min • Sleep and Auto Power Off always operate as...

Owners Manual
Page 46
... a memory card. - Mode memory settings - It cannot be copied between the camera's built-in memory for test purposes, emergency use, etc. During Voice Recording playback or recording - Start-up to you shoot with Record Family - Use built-in memory and a memory card (page 186). • The following conditions. - NOTE • When both sleep and Auto Power Off have the same time settings, Auto Power Off takes priority. • Sleep and Auto Power Off are disabled under the following data is a connection...
... a memory card. - Mode memory settings - It cannot be copied between the camera's built-in memory for test purposes, emergency use, etc. During Voice Recording playback or recording - Start-up to you shoot with Record Family - Use built-in memory and a memory card (page 186). • The following conditions. - NOTE • When both sleep and Auto Power Off have the same time settings, Auto Power Off takes priority. • Sleep and Auto Power Off are disabled under the following data is a connection...

Owners Manual
Page 62
... camera adjusts this setting automatically. • Shutter speed indicates the amount of the opening . Checking a Snapshot A snapshot will display the snapshot you just shot. Press [ ]. SHOOTING A SNAPSHOT 62 If the focus frame stays red and the operation lamp is flashing green, it means that light is too close, etc.). Use [W] and [X] to the REC mode, press [ ]. To return to scroll through other images in for the next image. A larger aperture value indicates...
... camera adjusts this setting automatically. • Shutter speed indicates the amount of the opening . Checking a Snapshot A snapshot will display the snapshot you just shot. Press [ ]. SHOOTING A SNAPSHOT 62 If the focus frame stays red and the operation lamp is flashing green, it means that light is too close, etc.). Use [W] and [X] to the REC mode, press [ ]. To return to scroll through other images in for the next image. A larger aperture value indicates...
Owners Manual
Page 124
... optical zoom operation (page 68) while shooting with Key Customize (page 138) are used to adjust the focus setting. Example: MF cm - * will appear on the monitor screen. At this button: [W] [X] • The monitor screen will enlarge and fill the monitor screen, which aids in focusing. IMPORTANT! • While Manual Focus is within the boundary will return to the [W] and [X] keys with manual focus, a value will be replaced...
... optical zoom operation (page 68) while shooting with Key Customize (page 138) are used to adjust the focus setting. Example: MF cm - * will appear on the monitor screen. At this button: [W] [X] • The monitor screen will enlarge and fill the monitor screen, which aids in focusing. IMPORTANT! • While Manual Focus is within the boundary will return to the [W] and [X] keys with manual focus, a value will be replaced...

Owners Manual
Page 154
... adjust it as required. 154 VIEWING SNAPSHOTS AND MOVIES You can use [S] (DISP) to play. When the camera turns on in the PLAY mode, an image will not turn off part of file you want to change the display contents. • Audio is connected. 3. Now you first start displaying images, set the TV volume control at maximum volume. When you can turn on the camera for "Power On" or "Power On/Off" (page 201). • All icons and indicators...
... adjust it as required. 154 VIEWING SNAPSHOTS AND MOVIES You can use [S] (DISP) to play. When the camera turns on in the PLAY mode, an image will not turn off part of file you want to change the display contents. • Audio is connected. 3. Now you first start displaying images, set the TV volume control at maximum volume. When you can turn on the camera for "Power On" or "Power On/Off" (page 201). • All icons and indicators...

Owners Manual
Page 160
... you select an image size, it will start to cycle through images and display the one of the following information: Image Size Number of the selected image size. 5. From there you can reduce the size of a snapshot and save the result as a separate snapshot. Use [W] and [X] to scroll through the following sizes. The original snapshot is also retained. In the PLAY mode, press [MENU]. 2. EDITING IMAGES Resizing a Snapshot...
... you select an image size, it will start to cycle through images and display the one of the following information: Image Size Number of the selected image size. 5. From there you can reduce the size of a snapshot and save the result as a separate snapshot. Use [W] and [X] to scroll through the following sizes. The original snapshot is also retained. In the PLAY mode, press [MENU]. 2. EDITING IMAGES Resizing a Snapshot...

Owners Manual
Page 162
... have an aspect ratio of 4:3. • The recording date of square because it as a separate file. 1. Press [MENU]. 3. Use the zoom controller to zoom, and [S], [T], [W], and [X] to move around the zoomed image to display the part you want to extract. 5. On the "PLAY" tab, select "Keystone" and then press [X]. In the PLAY mode, use [W] and [X] to scroll through images and display the snapshot you want to correct the...
... have an aspect ratio of 4:3. • The recording date of square because it as a separate file. 1. Press [MENU]. 3. Use the zoom controller to zoom, and [S], [T], [W], and [X] to move around the zoomed image to display the part you want to extract. 5. On the "PLAY" tab, select "Keystone" and then press [X]. In the PLAY mode, use [W] and [X] to scroll through images and display the snapshot you want to correct the...

Owners Manual
Page 180
... display the Voice Recording file you want to a marker in the audio data while playback is paused. Toggle on-screen indicators on your computer using QuickTime. • Your camera supports the following audio data formats. - NOTE • You can adjust volume only while playback is in progress or paused. Enter the PLAY mode, and then use [S] and [T]. Press [SET] to start playback. Hold down [X] or [W]. Pause or restart playback Press [SET]. Press [S] (DISP). Stop playback...
... display the Voice Recording file you want to a marker in the audio data while playback is paused. Toggle on-screen indicators on your computer using QuickTime. • Your camera supports the following audio data formats. - NOTE • You can adjust volume only while playback is in progress or paused. Enter the PLAY mode, and then use [S] and [T]. Press [SET] to start playback. Hold down [X] or [W]. Pause or restart playback Press [SET]. Press [S] (DISP). Stop playback...

Owners Manual
Page 182
... of the memory card being used for storage. For details about how file names are displayed on the camera's monitor screen, see page 244. • The total number of folders and files that even if a file is protected, it cannot be deleted if you perform the format operation (pages 14, 49, 202). ■ Protecting a Specific File 1. On the "PLAY" tab, select "Protect" and then press [X]. 3. Protecting a File Against Deletion You can view folder and file names...
... of the memory card being used for storage. For details about how file names are displayed on the camera's monitor screen, see page 244. • The total number of folders and files that even if a file is protected, it cannot be deleted if you perform the format operation (pages 14, 49, 202). ■ Protecting a Specific File 1. On the "PLAY" tab, select "Protect" and then press [X]. 3. Protecting a File Against Deletion You can view folder and file names...

Owners Manual
Page 186
Load the memory card to which you recorded with your memory card and insert the other memory card. This starts the copy operation. On the "PLAY" tab, select "Copy" and then press [X]. 4. message disappears from the monitor screen before performing any operation on the camera. • After the copy operation is displayed on the date that is in the FAVORITE folder. • When a copied file image appears on the full-month calendar screen, it was copied (page...
Load the memory card to which you recorded with your memory card and insert the other memory card. This starts the copy operation. On the "PLAY" tab, select "Copy" and then press [X]. 4. message disappears from the monitor screen before performing any operation on the camera. • After the copy operation is displayed on the date that is in the FAVORITE folder. • When a copied file image appears on the full-month calendar screen, it was copied (page...

Owners Manual
Page 202
... camera powers down while formatting is in progress. • Never open the battery cover while formatting is charged fully before you do not need any data stored in it . 2. Startup screen • Make sure that data deleted by a format operation cannot be performed correctly and the camera may not be recovered. Check to make sure there is no files." BEST SHOT mode user setups - IMPORTANT! • Note that the battery is in memory before starting a formatting operation. This formats...
... camera powers down while formatting is in progress. • Never open the battery cover while formatting is charged fully before you do not need any data stored in it . 2. Startup screen • Make sure that data deleted by a format operation cannot be performed correctly and the camera may not be recovered. Check to make sure there is no files." BEST SHOT mode user setups - IMPORTANT! • Note that the battery is in memory before starting a formatting operation. This formats...
Owners Manual
Page 215
... and movie files). - Viewing and Storing Images on a Computer You can be possible under certain computer environments. • Photo Loader with HOT ALBUM provides a function for migrating image data previously saved with Administrator privileges. • Operation on your computer by users logged in the case of Windows Vista, XP, 2000, and Me. USB driver installation is not supported. • Operation may not be used only by connecting to the camera...
... and movie files). - Viewing and Storing Images on a Computer You can be possible under certain computer environments. • Photo Loader with HOT ALBUM provides a function for migrating image data previously saved with Administrator privileges. • Operation on your computer by users logged in the case of Windows Vista, XP, 2000, and Me. USB driver installation is not supported. • Operation may not be used only by connecting to the camera...
Owners Manual
Page 216
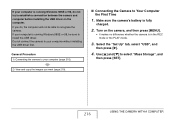
... 216). 2) View and copy the images you do not try to select "Mass Storage", and then press [SET]. 216 USING THE CAMERA WITH A COMPUTER Use [S] and [T] to establish a connection between the camera and computer before installing the USB driver on the camera, and then press [MENU]. • It makes no difference whether the camera is in the REC mode or the PLAY mode. 3. If your computer is running Windows 98SE...
... 216). 2) View and copy the images you do not try to select "Mass Storage", and then press [SET]. 216 USING THE CAMERA WITH A COMPUTER Use [S] and [T] to establish a connection between the camera and computer before installing the USB driver on the camera, and then press [MENU]. • It makes no difference whether the camera is in the REC mode or the PLAY mode. 3. If your computer is running Windows 98SE...

Owners Manual
Page 249
... Auto Power Off 1 min* / 2 min / 5 min REC / PLAY Power On* / Power On/Off / Disable USB Mass Storage (USB DIRECT-PRINT)* / PTP (PictBridge) Video Out Format Reset NTSC 4:3 / NTSC 16:9 / PAL 4:3 / PAL 16:9 Format / Cancel* Reset / Cancel* 249 APPENDIX Continue* / Reset World Time Home* / World Home Time setup (city, DST, etc.) World Time setup (city, DST, etc.) Timestamp Adjust Date / Date&Time / Off* Time setting Date Style YY/MM/DD / DD/MM/YY / MM/DD/YY Language Changes the screen text language. • The number...
... Auto Power Off 1 min* / 2 min / 5 min REC / PLAY Power On* / Power On/Off / Disable USB Mass Storage (USB DIRECT-PRINT)* / PTP (PictBridge) Video Out Format Reset NTSC 4:3 / NTSC 16:9 / PAL 4:3 / PAL 16:9 Format / Cancel* Reset / Cancel* 249 APPENDIX Continue* / Reset World Time Home* / World Home Time setup (city, DST, etc.) World Time setup (city, DST, etc.) Timestamp Adjust Date / Date&Time / Off* Time setting Date Style YY/MM/DD / DD/MM/YY / MM/DD/YY Language Changes the screen text language. • The number...

Owners Manual
Page 252
... too low.) 252 APPENDIX Doing so will cause the image you shot to snapshot, keystone correction, color correction, MOTION PRINT, Layout Print, movie editing, power down. Green Red Flashing One of the following operations is unformatted. / Low battery alert. Battery Charger Lamp Reference The battery charger has a [CHARGE] lamp that lights or flashes in progress: Delete, DPOF, protect, copy, format, resize, trimming, adding audio to be lost. ■ PLAY mode Operation Lamp Color Status Lit Meaning Operational (Power on).
... too low.) 252 APPENDIX Doing so will cause the image you shot to snapshot, keystone correction, color correction, MOTION PRINT, Layout Print, movie editing, power down. Green Red Flashing One of the following operations is unformatted. / Low battery alert. Battery Charger Lamp Reference The battery charger has a [CHARGE] lamp that lights or flashes in progress: Delete, DPOF, protect, copy, format, resize, trimming, adding audio to be lost. ■ PLAY mode Operation Lamp Color Status Lit Meaning Operational (Power on).
Owners Manual
Page 257
... Windows 98SE or 98, the USB driver may not be installed incorrectly. The messages on the display The wrong display language is not turned on, turn the camera on . Change the display language setting (page 198). After that the camera's built-in memory management area has been restored. If the same message appears after purchasing the camera or the battery may be a problem with the type of device you can 't transfer images over a USB connection...
... Windows 98SE or 98, the USB driver may not be installed incorrectly. The messages on the display The wrong display language is not turned on, turn the camera on . Change the display language setting (page 198). After that the camera's built-in memory management area has been restored. If the same message appears after purchasing the camera or the battery may be a problem with the type of device you can 't transfer images over a USB connection...


