
User Manual
Page 4
... delete a single file 29 ❚ To delete all files 29 Snapshot Shooting Precautions 30 ❚ Auto Focus Restrictions 30 ❚❙ Snapshot Tutorial 31 Using the Control Panel 31 Changing the Image Size Size) . . 32 Using Flash Flash) . . 36 Using the Self-timer Self-timer) . . 38 Specifying the Auto Focus Area AF Area) . . 39 Specifying ISO Sensitivity ISO) . . 41 Using the easy Mode easy Mode) . . 42 Using Face Detection Face Detection) . . 44 Changing the Control Panel Date/Time Style 45 Shooting with Zoom 45 ❚ Optical Zoom and Digital Zoom Switch Point...
... delete a single file 29 ❚ To delete all files 29 Snapshot Shooting Precautions 30 ❚ Auto Focus Restrictions 30 ❚❙ Snapshot Tutorial 31 Using the Control Panel 31 Changing the Image Size Size) . . 32 Using Flash Flash) . . 36 Using the Self-timer Self-timer) . . 38 Specifying the Auto Focus Area AF Area) . . 39 Specifying ISO Sensitivity ISO) . . 41 Using the easy Mode easy Mode) . . 42 Using Face Detection Face Detection) . . 44 Changing the Control Panel Date/Time Style 45 Shooting with Zoom 45 ❚ Optical Zoom and Digital Zoom Switch Point...
User Manual
Page 6
... Zooming an On-screen Image 72 Displaying the Image Menu 72 Viewing Snapshots and Movies on a TV Screen 73 ❚❙ Other Playback Functions (PLAY) 75 Playing a Slideshow on the Camera Slideshow) . . 75 Using Red Eye Correction Red Eye) . . 76 Selecting Images for Printing DPOF Printing) . . 76 Protecting a File Against Deletion Protect) . . 77 Rotating an Image Rotation) . . 78 Resizing a Snapshot Resize) . . 78 Cropping a Snapshot Trimming) . . 79 Adding Audio to a Snapshot Dubbing) . . 79 ❚ To play snapshot audio 80 Copying Files Copy...
... Zooming an On-screen Image 72 Displaying the Image Menu 72 Viewing Snapshots and Movies on a TV Screen 73 ❚❙ Other Playback Functions (PLAY) 75 Playing a Slideshow on the Camera Slideshow) . . 75 Using Red Eye Correction Red Eye) . . 76 Selecting Images for Printing DPOF Printing) . . 76 Protecting a File Against Deletion Protect) . . 77 Rotating an Image Rotation) . . 78 Resizing a Snapshot Resize) . . 78 Cropping a Snapshot Trimming) . . 79 Adding Audio to a Snapshot Dubbing) . . 79 ❚ To play snapshot audio 80 Copying Files Copy...
User Manual
Page 7
... World Time Settings World Time) . 110 Time Stamping Snapshots Timestamp) . .111 Setting the Camera's Clock Adjust) . .111 Specifying the Date Style Date Style) . 112 Specifying the Display Language Language) . 112 Configuring Sleep State Settings Sleep) . 113 Configuring Auto Power Settings Auto Power Off) . 113 Configuring [r] and [p] Settings REC/PLAY) . 114 Configuring USB Protocol Settings USB) . 114 Selecting the Screen Aspect Ratio and Video Output System Video Out) . 115 Formatting Built-in Memory or a Memory Card Format) . 116 Resetting the Camera to Factory Defaults Reset...
... World Time Settings World Time) . 110 Time Stamping Snapshots Timestamp) . .111 Setting the Camera's Clock Adjust) . .111 Specifying the Date Style Date Style) . 112 Specifying the Display Language Language) . 112 Configuring Sleep State Settings Sleep) . 113 Configuring Auto Power Settings Auto Power Off) . 113 Configuring [r] and [p] Settings REC/PLAY) . 114 Configuring USB Protocol Settings USB) . 114 Selecting the Screen Aspect Ratio and Video Output System Video Out) . 115 Formatting Built-in Memory or a Memory Card Format) . 116 Resetting the Camera to Factory Defaults Reset...
User Manual
Page 19
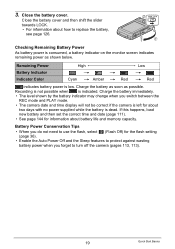
... by the battery indicator may change when you switch between the REC mode and PLAY mode. • The camera date and time display will not be correct if the camera is left for the flash setting (page 36). • Enable the Auto Power Off and the Sleep features to protect against wasting battery power when you do not need to use the flash, select ? (Flash Off) for about battery life and memory capacity. 3. Charge the battery as...
... by the battery indicator may change when you switch between the REC mode and PLAY mode. • The camera date and time display will not be correct if the camera is left for the flash setting (page 36). • Enable the Auto Power Off and the Sleep features to protect against wasting battery power when you do not need to use the flash, select ? (Flash Off) for about battery life and memory capacity. 3. Charge the battery as...

User Manual
Page 20
... press [SET]. Configuring Basic Settings the First Time You Turn On the Camera The first time you load a battery into the camera, a screen appears for the Japanese market. IMPORTANT! • A screen for language selection will cause the wrong date and time data to be included with images. Use [8], [2], [4], and [6] to select "Apply" and then press [SET]. To change and then use [4] and [6] to select the language you select may not support display language selection...
... press [SET]. Configuring Basic Settings the First Time You Turn On the Camera The first time you load a battery into the camera, a screen appears for the Japanese market. IMPORTANT! • A screen for language selection will cause the wrong date and time data to be included with images. Use [8], [2], [4], and [6] to select "Apply" and then press [SET]. To change and then use [4] and [6] to select the language you select may not support display language selection...
User Manual
Page 29
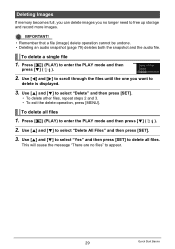
... PLAY mode and then press [2] ( ). 2. Deleting Images If memory becomes full, you can delete images you want to delete is displayed. 3. IMPORTANT! • Remember that a file (image) delete operation cannot be undone. • Deleting an audio snapshot (page 79) deletes both the snapshot and the audio file. Press [p] (PLAY) to enter the PLAY mode and then press [2] ( ). 2. This will cause the message "There are no longer need to free up storage and record more images...
... PLAY mode and then press [2] ( ). 2. Deleting Images If memory becomes full, you can delete images you want to delete is displayed. 3. IMPORTANT! • Remember that a file (image) delete operation cannot be undone. • Deleting an audio snapshot (page 79) deletes both the snapshot and the audio file. Press [p] (PLAY) to enter the PLAY mode and then press [2] ( ). 2. This will cause the message "There are no longer need to free up storage and record more images...
User Manual
Page 31
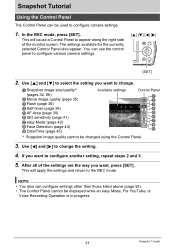
...-timer (page 38) 5AF Area (page 39) 6ISO sensitivity (page 41) 7easy Mode (page 42) 8Face Detection (page 44) 9Date/Time (page 45) Available settings Control Panel 1 2 3 4 5 6 7 8 9 * Snapshot image quality cannot be changed using the Control Panel. 3. This will cause a Control Panel to configure various camera settings. [8] [2] [4] [6] [SET] 2. After all of the monitor screen. Use [8] and [2] to select the setting you want to change the setting. 4. Snapshot Tutorial Using the Control...
...-timer (page 38) 5AF Area (page 39) 6ISO sensitivity (page 41) 7easy Mode (page 42) 8Face Detection (page 44) 9Date/Time (page 45) Available settings Control Panel 1 2 3 4 5 6 7 8 9 * Snapshot image quality cannot be changed using the Control Panel. 3. This will cause a Control Panel to configure various camera settings. [8] [2] [4] [6] [SET] 2. After all of the monitor screen. Use [8] and [2] to select the setting you want to change the setting. 4. Snapshot Tutorial Using the Control...
User Manual
Page 51
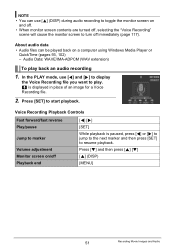
... press [SET] to start playback. About audio data • Audio files can use [4] and [6] to display the Voice Recording file you want to turn off immediately (page 117). Voice Recording Playback Controls Fast forward/fast reverse Play/pause Jump to marker Volume adjustment Monitor screen on/off , selecting the "Voice Recording" scene will cause the monitor screen to play back an audio recording 1. Press [2] and then press [8] [2] [8] (DISP) [MENU] 51 Recording Movie Images and Audio...
... press [SET] to start playback. About audio data • Audio files can use [4] and [6] to display the Voice Recording file you want to turn off immediately (page 117). Voice Recording Playback Controls Fast forward/fast reverse Play/pause Jump to marker Volume adjustment Monitor screen on/off , selecting the "Voice Recording" scene will cause the monitor screen to play back an audio recording 1. Press [2] and then press [8] [2] [8] (DISP) [MENU] 51 Recording Movie Images and Audio...
User Manual
Page 64
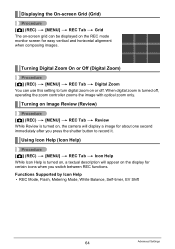
...Functions Supported by Icon Help • REC Mode, Flash, Metering Mode, White Balance, Self-timer, EV Shift 64 Advanced Settings When digital zoom is turned on, a textual description will display a image for certain icons when you press the shutter button to turn digital zoom on or off , operating the zoom controller zooms the image with optical zoom only. Turning Digital Zoom On or Off (Digital Zoom) Procedure [r] (REC) * [MENU] * REC Tab * Digital Zoom You can be displayed on the REC mode monitor screen for easy vertical and horizontal alignment when composing images. Using Icon...
...Functions Supported by Icon Help • REC Mode, Flash, Metering Mode, White Balance, Self-timer, EV Shift 64 Advanced Settings When digital zoom is turned on, a textual description will display a image for certain icons when you press the shutter button to turn digital zoom on or off , operating the zoom controller zooms the image with optical zoom only. Turning Digital Zoom On or Off (Digital Zoom) Procedure [r] (REC) * [MENU] * REC Tab * Digital Zoom You can be displayed on the REC mode monitor screen for easy vertical and horizontal alignment when composing images. Using Icon...
User Manual
Page 81
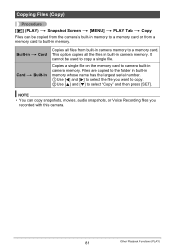
... built-in memory whose name has the largest serial number. 1Use [4] and [6] to select the file you recorded with this camera. 81 Other Playback Functions (PLAY) Copies a single file on the memory card to camera built-in camera memory. This option copies all files from a memory card to built-in memory. Copying Files (Copy) Procedure [p] (PLAY) * Snapshot Screen * [MENU] * PLAY Tab * Copy Files can copy snapshots, movies, audio snapshots, or Voice Recording files you want to copy. 2Use [8] and [2] to select "Copy" and then press [SET].
... built-in memory whose name has the largest serial number. 1Use [4] and [6] to select the file you recorded with this camera. 81 Other Playback Functions (PLAY) Copies a single file on the memory card to camera built-in camera memory. This option copies all files from a memory card to built-in memory. Copying Files (Copy) Procedure [p] (PLAY) * Snapshot Screen * [MENU] * PLAY Tab * Copy Files can copy snapshots, movies, audio snapshots, or Voice Recording files you want to copy. 2Use [8] and [2] to select "Copy" and then press [SET].
User Manual
Page 113
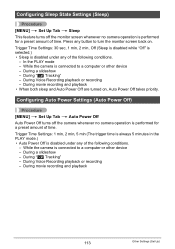
... movie recording and playback 113 Other Settings (Set Up) During a slideshow - Configuring Sleep State Settings (Sleep) Procedure [MENU] * Set Up Tab * Sleep This feature turns off the camera whenever no camera operation is performed for a preset amount of time. In the PLAY mode - During "Ë Tracking" - During a slideshow - Press any button to a computer or other device - Configuring Auto Power Settings (Auto Power Off) Procedure [MENU] * Set Up Tab * Auto Power Off Auto Power Off turns off the monitor screen...
... movie recording and playback 113 Other Settings (Set Up) During a slideshow - Configuring Sleep State Settings (Sleep) Procedure [MENU] * Set Up Tab * Sleep This feature turns off the camera whenever no camera operation is performed for a preset amount of time. In the PLAY mode - During "Ë Tracking" - During a slideshow - Press any button to a computer or other device - Configuring Auto Power Settings (Auto Power Off) Procedure [MENU] * Set Up Tab * Auto Power Off Auto Power Off turns off the monitor screen...
User Manual
Page 114
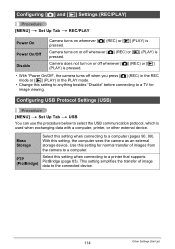
Camera turns on or off when you press [r] (REC) in the REC mode or [p] (PLAY) in the PLAY mode. • Change this setting to anything besides "Disable" before connecting to a TV for normal transfer of image data to the connected device. 114 Other Settings (Set Up) Configuring USB Protocol Settings (USB) Procedure [MENU] * Set Up Tab * USB You can use the procedure below to a printer that supports PictBridge (page 83). With this setting when connecting to select the...
Camera turns on or off when you press [r] (REC) in the REC mode or [p] (PLAY) in the PLAY mode. • Change this setting to anything besides "Disable" before connecting to a TV for normal transfer of image data to the connected device. 114 Other Settings (Set Up) Configuring USB Protocol Settings (USB) Procedure [MENU] * Set Up Tab * USB You can use the procedure below to a printer that supports PictBridge (page 83). With this setting when connecting to select the...
User Manual
Page 116
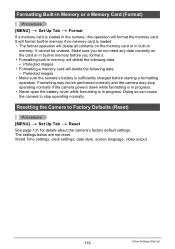
... * Format If a memory card is loaded in the camera, this operation will delete the following data. - Make sure you do not need any data currently on the memory card or in built-in memory will delete the following data. - Formatting may not be undone. It will format built-in memory if no memory card is sufficiently charged before you format it. • Formatting built-in memory. The settings below are not reset. World Time settings, clock settings, date style, screen language, video output...
... * Format If a memory card is loaded in the camera, this operation will delete the following data. - Make sure you do not need any data currently on the memory card or in built-in memory will delete the following data. - Formatting may not be undone. It will format built-in memory if no memory card is sufficiently charged before you format it. • Formatting built-in memory. The settings below are not reset. World Time settings, clock settings, date style, screen language, video output...
User Manual
Page 129
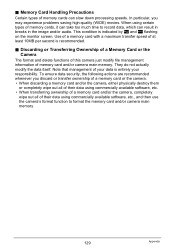
... second is indicated by » and Y flashing on the monitor screen. Discarding or Transferring Ownership of a Memory Card or the Camera The format and delete functions of this camera just modify file management information of your data is entirely your responsibility. . Use of a memory card with a maximum transfer speed of memory cards, it can take too much time to format the memory card and/or camera main memory. 129 Appendix Memory Card Handling Precautions Certain types of memory cards can result...
... second is indicated by » and Y flashing on the monitor screen. Discarding or Transferring Ownership of a Memory Card or the Camera The format and delete functions of this camera just modify file management information of your data is entirely your responsibility. . Use of a memory card with a maximum transfer speed of memory cards, it can take too much time to format the memory card and/or camera main memory. 129 Appendix Memory Card Handling Precautions Certain types of memory cards can result...
User Manual
Page 133
... subject may not be in the PLAY mode, press [r] (REC) to enter the REC mode. 2)If the flash is charging, wait until the charge operation finishes. 3)If the message "Memory Full" appears, transfer images to be dead. Charge the battery (page 15). 3)The camera's protection function may be replaced. Power will not turn on . 2)The battery may have activated (page 113). Charge the battery (page 15). Image Recording Image is not recorded when the shutter button is pressed.
... subject may not be in the PLAY mode, press [r] (REC) to enter the REC mode. 2)If the flash is charging, wait until the charge operation finishes. 3)If the message "Memory Full" appears, transfer images to be dead. Charge the battery (page 15). 3)The camera's protection function may be replaced. Power will not turn on . 2)The battery may have activated (page 113). Charge the battery (page 15). Image Recording Image is not recorded when the shutter button is pressed.
User Manual
Page 134
.... Use a light or some other means to a different flash mode (page 36) or select a different BEST SHOT scene (page 52). Use Auto Focus for illumination. 3)Shooting with a high ISO sensitivity setting or with the Lighting feature can use the camera for a dark subject, which can cause a vertical band to another mode (page 36). 2)If the battery is dead, charge it is recorded in the monitor screen image. In this case, turn...
.... Use a light or some other means to a different flash mode (page 36) or select a different BEST SHOT scene (page 52). Use Auto Focus for illumination. 3)Shooting with a high ISO sensitivity setting or with the Lighting feature can use the camera for a dark subject, which can cause a vertical band to another mode (page 36). 2)If the battery is dead, charge it is recorded in the monitor screen image. In this case, turn...
User Manual
Page 135
... Recommended Action A recorded image was not saved. 1)Camera power may have removed the memory card from the camera before the save operation was complete, which will result in the image not being saved. The zoom bar indicates zoom only up to the + side (page 67). Night shots come out bad. Digital zoom (including HD zoom) does not work. recording. 2)The lens may be possible because the subject is complete. Change the flash mode setting to < (Flash On) for...
... Recommended Action A recorded image was not saved. 1)Camera power may have removed the memory card from the camera before the save operation was complete, which will result in the image not being saved. The zoom bar indicates zoom only up to the + side (page 67). Night shots come out bad. Digital zoom (including HD zoom) does not work. recording. 2)The lens may be possible because the subject is complete. Change the flash mode setting to < (Flash On) for...
User Manual
Page 136
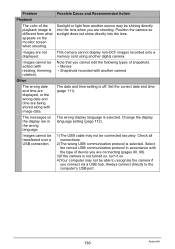
... another camera The date and time setting is selected. Note that you connect via a USB hub. Possible Cause and Recommended Action Sunlight or light from what appears on . 4)Your computer may be shining directly into the lens. The wrong display language is off. This camera cannot display non-DCF images recorded onto a memory card using another source may not be transferred over a USB connection. Problem Playback The color of the playback image is selected. Images cannot be connected...
... another camera The date and time setting is selected. Note that you connect via a USB hub. Possible Cause and Recommended Action Sunlight or light from what appears on . 4)Your computer may be shining directly into the lens. The wrong display language is off. This camera cannot display non-DCF images recorded onto a memory card using another source may not be transferred over a USB connection. Problem Playback The color of the playback image is selected. Images cannot be connected...
User Manual
Page 138
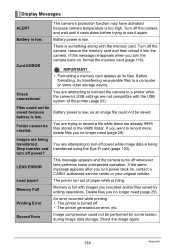
...to use it into the camera. The printer ran out of the printer (page 83). Printing Error An error occurred while printing. • The printer is turned off power? Shoot the image again. 138 Appendix Display Messages ALERT The camera's protection function may have activated because camera temperature is low. Battery power is low. IMPORTANT! • Formatting a memory card deletes all its files. Check connections! Files could not be saved because Battery power is being transferred. LENS ERROR This message appears and the camera turns off power while image data is...
...to use it into the camera. The printer ran out of the printer (page 83). Printing Error An error occurred while printing. • The printer is turned off power? Shoot the image again. 138 Appendix Display Messages ALERT The camera's protection function may have activated because camera temperature is low. Battery power is low. IMPORTANT! • Formatting a memory card deletes all its files. Check connections! Files could not be saved because Battery power is being transferred. LENS ERROR This message appears and the camera turns off power while image data is...
User Manual
Page 145
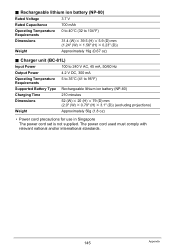
... mAh Operating Temperature 0 to 40°C (32 to 95°F) Requirements Supported Battery Type Rechargeable lithium ion battery (NP-80) Charging Time 210 minutes Dimensions 52 (W) x 20 (H) x 79 (D) mm (2.0" (W) x 0.79" (H) x 3.1" (D)) (excluding projections) Weight Approximately 50g (1.8 oz) • Power cord precautions for use in Singapore The power cord set is not supplied. . The power cord used must comply with relevant national and/or international standards. 145 Appendix Charger...
... mAh Operating Temperature 0 to 40°C (32 to 95°F) Requirements Supported Battery Type Rechargeable lithium ion battery (NP-80) Charging Time 210 minutes Dimensions 52 (W) x 20 (H) x 79 (D) mm (2.0" (W) x 0.79" (H) x 3.1" (D)) (excluding projections) Weight Approximately 50g (1.8 oz) • Power cord precautions for use in Singapore The power cord set is not supplied. . The power cord used must comply with relevant national and/or international standards. 145 Appendix Charger...


