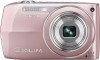
Owners Manual
Page 7
...131 ❚ Connecting the Camera to Your Computer and Saving Files 131 ❚ Transferring Images Automatically and Managing Them on Your Macintosh. . 134 ❚ Playing a Movie 134 ❚ Viewing User Documentation PDF Files) . . 135 ❚ User Registration 135 Using an Eye-Fi Wireless SD Memory Card to Transfer Images . (Eye-Fi) . 135 Files and Folders 137 Memory Card Data 138 ❚❙ Other Settings (Set Up) 140 Adjusting Monitor Screen Brightness Screen) . 140 Turning off Eye-Fi Card Communication Eye-Fi) . 140 Configuring Camera Sound Settings Sounds) . 141...
...131 ❚ Connecting the Camera to Your Computer and Saving Files 131 ❚ Transferring Images Automatically and Managing Them on Your Macintosh. . 134 ❚ Playing a Movie 134 ❚ Viewing User Documentation PDF Files) . . 135 ❚ User Registration 135 Using an Eye-Fi Wireless SD Memory Card to Transfer Images . (Eye-Fi) . 135 Files and Folders 137 Memory Card Data 138 ❚❙ Other Settings (Set Up) 140 Adjusting Monitor Screen Brightness Screen) . 140 Turning off Eye-Fi Card Communication Eye-Fi) . 140 Configuring Camera Sound Settings Sounds) . 141...
Owners Manual
Page 17
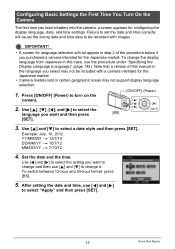
... then press [BS] [SET]. 3. Use [4] and [6] to select the SET language you load a battery into the camera, a screen appears for language selection will cause the wrong date and time data to select "Apply" and then press [SET]. 17 Quick Start Basics To switch between 12-hour and 24-hour format, press [BS]. 5. IMPORTANT! • A screen for configuring the display language, date, and time settings. Use [8] and [2] to turn on the camera. [ON/OFF] (Power) 2. Example: July, 10...
... then press [BS] [SET]. 3. Use [4] and [6] to select the SET language you load a battery into the camera, a screen appears for language selection will cause the wrong date and time data to select "Apply" and then press [SET]. 17 Quick Start Basics To switch between 12-hour and 24-hour format, press [BS]. 5. IMPORTANT! • A screen for configuring the display language, date, and time settings. Use [8] and [2] to turn on the camera. [ON/OFF] (Power) 2. Example: July, 10...
Owners Manual
Page 28
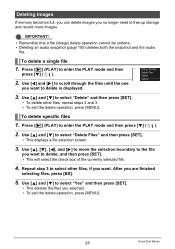
... . Press [p] (PLAY) to select other files, repeat steps 2 and 3. • To exit the delete operation, press [MENU]. To delete specific files 1. Deleting Images If memory becomes full, you can delete images you no longer need to select "Yes" and then press [SET]. • This deletes the files you selected. • To exit the delete operation, press [MENU]. 28 Quick Start Basics Use [8] and [2] to free up storage and record more images. IMPORTANT! • Remember that a file (image) delete operation cannot be...
... . Press [p] (PLAY) to select other files, repeat steps 2 and 3. • To exit the delete operation, press [MENU]. To delete specific files 1. Deleting Images If memory becomes full, you can delete images you no longer need to select "Yes" and then press [SET]. • This deletes the files you selected. • To exit the delete operation, press [MENU]. 28 Quick Start Basics Use [8] and [2] to free up storage and record more images. IMPORTANT! • Remember that a file (image) delete operation cannot be...
Owners Manual
Page 53
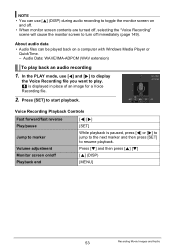
... marker Volume adjustment Monitor screen on and off. • When monitor screen contents are turned off, selecting the "Voice Recording" scene will cause the monitor screen to play back an audio recording 1. Press [SET] to resume playback. About audio data • Audio files can use [4] and [6] to display the Voice Recording file you want to turn off Playback end [4] [6] [SET] While playback is displayed in place of an image for a Voice Recording file. 2. In the PLAY mode, use...
... marker Volume adjustment Monitor screen on and off. • When monitor screen contents are turned off, selecting the "Voice Recording" scene will cause the monitor screen to play back an audio recording 1. Press [SET] to resume playback. About audio data • Audio files can use [4] and [6] to display the Voice Recording file you want to turn off Playback end [4] [6] [SET] While playback is displayed in place of an image for a Voice Recording file. 2. In the PLAY mode, use...
Owners Manual
Page 57
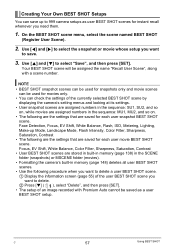
... saved as user BEST SHOT scenes for instant recall whenever you need them. 1. Face Detection, Focus, EV Shift, White Balance, Flash, ISO, Metering, Lighting, Make-up to 999 camera setups as a user BEST SHOT setup. Focus, EV Shift, White Balance, Color Filter, Sharpness, Saturation, Contrast • User BEST SHOT scenes are saved for each user movie BEST SHOT scene. On the BEST SHOT scene menu, select the scene named BEST SHOT (Register User Scene). 2. Use [4] and [6] to select the snapshot or movie whose setup...
... saved as user BEST SHOT scenes for instant recall whenever you need them. 1. Face Detection, Focus, EV Shift, White Balance, Flash, ISO, Metering, Lighting, Make-up to 999 camera setups as a user BEST SHOT setup. Focus, EV Shift, White Balance, Color Filter, Sharpness, Saturation, Contrast • User BEST SHOT scenes are saved for each user movie BEST SHOT scene. On the BEST SHOT scene menu, select the scene named BEST SHOT (Register User Scene). 2. Use [4] and [6] to select the snapshot or movie whose setup...
Owners Manual
Page 64
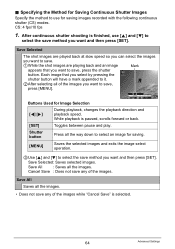
... continuous shutter shooting is selected. 64 Advanced Settings Buttons Used for saving. [MENU] Saves the selected images and exits the image select operation. 3Use [8] and [2] to select the save method you want and then press [SET]. Save Selected: Saves selected images. Save All Saves all the way down to save , press the shutter button. Cancel Save : Does not save any of the images while "Cancel Save" is finished, use for saving images recorded with the following continuous shutter (CS) modes. Shutter button Press all the images...
... continuous shutter shooting is selected. 64 Advanced Settings Buttons Used for saving. [MENU] Saves the selected images and exits the image select operation. 3Use [8] and [2] to select the save method you want and then press [SET]. Save Selected: Saves selected images. Save All Saves all the way down to save , press the shutter button. Cancel Save : Does not save any of the images while "Cancel Save" is finished, use for saving images recorded with the following continuous shutter (CS) modes. Shutter button Press all the images...
Owners Manual
Page 73
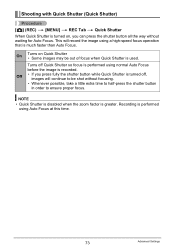
Shooting with Quick Shutter (Quick Shutter) Procedure [r] (REC) * [MENU] * REC Tab * Quick Shutter When Quick Shutter is turned on Quick Shutter • Some images may be shot without waiting for Auto Focus. On Turns on , you press fully the shutter button while Quick Shutter is turned off Quick Shutter so focus is performed using Auto Focus at this time. 73 Advanced Settings Turns off , images will record the image using a high-speed focus operation that is performed using normal Auto Focus before the image is greater. NOTE • Quick Shutter is disabled when the zoom...
Shooting with Quick Shutter (Quick Shutter) Procedure [r] (REC) * [MENU] * REC Tab * Quick Shutter When Quick Shutter is turned on Quick Shutter • Some images may be shot without waiting for Auto Focus. On Turns on , you press fully the shutter button while Quick Shutter is turned off Quick Shutter so focus is performed using Auto Focus at this time. 73 Advanced Settings Turns off , images will record the image using a high-speed focus operation that is performed using normal Auto Focus before the image is greater. NOTE • Quick Shutter is disabled when the zoom...
Owners Manual
Page 92
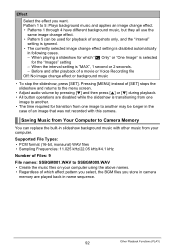
... the menu screen. • Adjust audio volume by pressing [2] and then press [8] or [2] during playback. • All button operations are played back in name sequence. 92 Other Playback Functions (PLAY) Pressing [MENU] instead of Files: 9 File names: SSBGM001.WAV to another . • The time required for the "Images" setting - When the interval setting is transitioning from one image to SSBGM009.WAV • Create the music files on your computer. Supported File Types...
... the menu screen. • Adjust audio volume by pressing [2] and then press [8] or [2] during playback. • All button operations are played back in name sequence. 92 Other Playback Functions (PLAY) Pressing [MENU] instead of Files: 9 File names: SSBGM001.WAV to another . • The time required for the "Images" setting - When the interval setting is transitioning from one image to SSBGM009.WAV • Create the music files on your computer. Supported File Types...
Owners Manual
Page 103
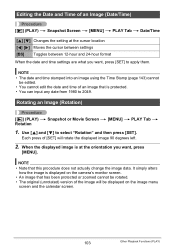
... Screen * [MENU] * PLAY Tab * Date/Time [8] [2] Changes the setting at the orientation you want , press [MENU]. Each press of [SET] will be displayed on the image menu screen and the calendar screen. 103 Other Playback Functions (PLAY) NOTE • Note that has been protected or zoomed cannot be edited. • You cannot edit the date and time of the image will rotate the displayed image 90 degrees left. 2. NOTE • The date and time stamped into an image using...
... Screen * [MENU] * PLAY Tab * Date/Time [8] [2] Changes the setting at the orientation you want , press [MENU]. Each press of [SET] will be displayed on the image menu screen and the calendar screen. 103 Other Playback Functions (PLAY) NOTE • Note that has been protected or zoomed cannot be edited. • You cannot edit the date and time of the image will rotate the displayed image 90 degrees left. 2. NOTE • The date and time stamped into an image using...
Owners Manual
Page 106
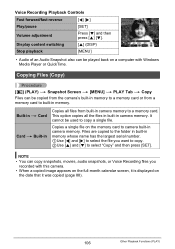
... a copied image appears on the full-month calendar screen, it was copied (page 88). 106 Other Playback Functions (PLAY) It cannot be used to select "Copy" and then press [SET]. Voice Recording Playback Controls Fast forward/fast reverse [4] [6] Play/pause [SET] Volume adjustment Press [2] and then press [8] [2]. Built-in * Card Card * Built-in Copies all the files in built-in memory. Copies a single file on the date that it is displayed on the memory card to built-in camera memory.
... a copied image appears on the full-month calendar screen, it was copied (page 88). 106 Other Playback Functions (PLAY) It cannot be used to select "Copy" and then press [SET]. Voice Recording Playback Controls Fast forward/fast reverse [4] [6] Play/pause [SET] Volume adjustment Press [2] and then press [8] [2]. Built-in * Card Card * Built-in Copies all the files in built-in memory. Copies a single file on the date that it is displayed on the memory card to built-in camera memory.
Owners Manual
Page 146
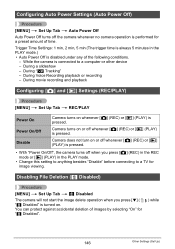
.../Off", the camera turns off when you press [2] ( "Ü Disabled" is turned on. Camera turns on whenever [r] (REC) or [p] (PLAY) is connected to a TV for image viewing. While the camera is pressed. During movie recording and playback Configuring [r] and [p] Settings (REC/PLAY) Procedure [MENU] * Set Up Tab * REC/PLAY Power On Power On/Off Disable Camera turns on or off the camera whenever no camera operation is disabled under any of time. You can protect against accidental deletion of images by selecting...
.../Off", the camera turns off when you press [2] ( "Ü Disabled" is turned on. Camera turns on whenever [r] (REC) or [p] (PLAY) is connected to a TV for image viewing. While the camera is pressed. During movie recording and playback Configuring [r] and [p] Settings (REC/PLAY) Procedure [MENU] * Set Up Tab * REC/PLAY Power On Power On/Off Disable Camera turns on or off the camera whenever no camera operation is disabled under any of time. You can protect against accidental deletion of images by selecting...
Owners Manual
Page 147
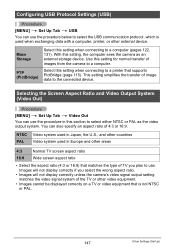
... PAL Video system used when exchanging data with a computer, printer, or other areas 4:3 16:9 Normal TV screen aspect ratio Wide screen aspect ratio • Select the aspect ratio (4:3 or 16:9) that supports PictBridge (page 115). Use this setting for normal transfer of TV you select the wrong aspect ratio. • Images will not display correctly unless the camera's video signal output setting matches the video signal...
... PAL Video system used when exchanging data with a computer, printer, or other areas 4:3 16:9 Normal TV screen aspect ratio Wide screen aspect ratio • Select the aspect ratio (4:3 or 16:9) that supports PictBridge (page 115). Use this setting for normal transfer of TV you select the wrong aspect ratio. • Images will not display correctly unless the camera's video signal output setting matches the video signal...
Owners Manual
Page 148
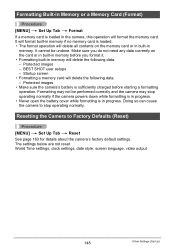
... formatting operation. Protected images • Make sure the camera's battery is loaded. • The format operation will delete the following data. - Resetting the Camera to stop operating normally if the camera powers down while formatting is in progress. • Never open the battery cover while formatting is loaded in memory. Protected images - Startup screen • Formatting a memory card will format the memory card. World Time settings, clock settings, date style, screen language, video output 148 Other Settings (Set Up) BEST SHOT user setups - Formatting...
... formatting operation. Protected images • Make sure the camera's battery is loaded. • The format operation will delete the following data. - Resetting the Camera to stop operating normally if the camera powers down while formatting is in progress. • Never open the battery cover while formatting is loaded in memory. Protected images - Startup screen • Formatting a memory card will format the memory card. World Time settings, clock settings, date style, screen language, video output 148 Other Settings (Set Up) BEST SHOT user setups - Formatting...

Owners Manual
Page 166
... the PLAY mode, press [r] (REC) to enter the REC mode. 2)If the flash is charging, wait until it cools down . Purchase a separately available CASIO NP-110 rechargeable lithium ion battery. 1)Auto Power Off may have activated (page 146). Half-press the shutter button and allow enough time for Auto Focus. Charge the battery (page 14). 3)The camera's protection function may have activated because camera temperature is compatible with Anti Shake or use...
... the PLAY mode, press [r] (REC) to enter the REC mode. 2)If the flash is charging, wait until it cools down . Purchase a separately available CASIO NP-110 rechargeable lithium ion battery. 1)Auto Power Off may have activated (page 146). Half-press the shutter button and allow enough time for Auto Focus. Charge the battery (page 14). 3)The camera's protection function may have activated because camera temperature is compatible with Anti Shake or use...

Owners Manual
Page 167
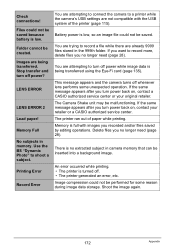
.... Camera powers down during Selftimer countdown. Use the ´ (Macro) for non-flash shots. In this case, turn on the monitor screen and the flash does not fire. Use a light or some other means to shoot in digital noise. Contact a CASIO authorized service center or your original retailer. There is located inside the focus frame. Note that uses ? (Flash Off) is selected, change to another mode (page 35). 2)If the battery...
.... Camera powers down during Selftimer countdown. Use the ´ (Macro) for non-flash shots. In this case, turn on the monitor screen and the flash does not fire. Use a light or some other means to shoot in digital noise. Contact a CASIO authorized service center or your original retailer. There is located inside the focus frame. Note that uses ? (Flash Off) is selected, change to another mode (page 35). 2)If the battery...
Owners Manual
Page 168
... A recorded image was not saved. 1)Camera power may have removed the memory card from the camera before the save operation was complete, which will cause the camera's face detection setting to change the face detection setting again after turn on default setting (page 75). If the battery indicator shows , charge the battery as soon as possible (page 16). 2)You may be disabled. Turn off . Night shots come out bad. You can cause underexposure of 5.0. 1)The digital zoom setting...
... A recorded image was not saved. 1)Camera power may have removed the memory card from the camera before the save operation was complete, which will cause the camera's face detection setting to change the face detection setting again after turn on default setting (page 75). If the battery indicator shows , charge the battery as soon as possible (page 16). 2)You may be disabled. Turn off . Night shots come out bad. You can cause underexposure of 5.0. 1)The digital zoom setting...
Owners Manual
Page 169
... screen (pages 100, 101). File Deletion A file cannot be deleted. 1)The file may be protected. Auto Shutter may be edited (with Layout Print, resizing, trimming, keystone correction, color restoration, date/ time editing, rotation). 1)Note that you are not displayed. The image is out of the playback image is different from another source may be shining directly into the lens. recording. 2)The lens may not be dirty. Images are shooting. Images cannot be "On". Change the setting...
... screen (pages 100, 101). File Deletion A file cannot be deleted. 1)The file may be protected. Auto Shutter may be edited (with Layout Print, resizing, trimming, keystone correction, color restoration, date/ time editing, rotation). 1)Note that you are not displayed. The image is out of the playback image is different from another source may be shining directly into the lens. recording. 2)The lens may not be dirty. Images are shooting. Images cannot be "On". Change the setting...

Owners Manual
Page 170
... is not turned on, turn the camera on, it on . 1)You did not configure initial settings after you turn it means that , configure each setting. If the same message appears after purchasing the camera or the camera may not be a problem with a dead battery. Images cannot be transferred over a USB connection. 1)The USB cable may have been left with the camera's memory data. Set the correct date and time (page 144). Change the display language setting (page...
... is not turned on, turn the camera on, it on . 1)You did not configure initial settings after you turn it means that , configure each setting. If the same message appears after purchasing the camera or the camera may not be a problem with a dead battery. Images cannot be transferred over a USB connection. 1)The USB cable may have been left with the camera's memory data. Set the correct date and time (page 144). Change the display language setting (page...
Owners Manual
Page 172
... turned off whenever lens performs some reason during image data storage. Delete files you recorded and/or files saved by editing operations. Memory Full No subjects in memory. You are being transferred using the Eye-Fi card (page 135). An error occurred while printing. • The printer is no extracted subject in the 999th folder. If you want to shoot a subject. If the same message appears after you no longer need (page 28). Memory...
... turned off whenever lens performs some reason during image data storage. Delete files you recorded and/or files saved by editing operations. Memory Full No subjects in memory. You are being transferred using the Eye-Fi card (page 135). An error occurred while printing. • The printer is no extracted subject in the 999th folder. If you want to shoot a subject. If the same message appears after you no longer need (page 28). Memory...
Owners Manual
Page 180
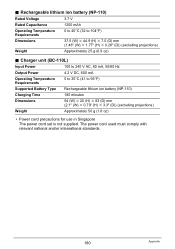
... Appendix Rechargeable lithium ion battery (NP-110) Rated Voltage 3.7 V Rated Capacitance 1200 mAh Operating Temperature Requirements 0 to 40°C (32 to 95°F) Supported Battery Type Rechargeable lithium ion battery (NP-110) Charging Time 180 minutes Dimensions 54 (W) x 20 (H) x 83 (D) mm (2.1" (W) x 0.79" (H) x 3.3" (D)) (excluding projections) Weight Approximately 50 g (1.8 oz) • Power cord precautions for use in Singapore The power cord set is not supplied.
... Appendix Rechargeable lithium ion battery (NP-110) Rated Voltage 3.7 V Rated Capacitance 1200 mAh Operating Temperature Requirements 0 to 40°C (32 to 95°F) Supported Battery Type Rechargeable lithium ion battery (NP-110) Charging Time 180 minutes Dimensions 54 (W) x 20 (H) x 83 (D) mm (2.1" (W) x 0.79" (H) x 3.3" (D)) (excluding projections) Weight Approximately 50 g (1.8 oz) • Power cord precautions for use in Singapore The power cord set is not supplied.


