
Owners Manual
Page 7
...131 ❚ Connecting the Camera to Your Computer and Saving Files 131 ❚ Transferring Images Automatically and Managing Them on Your Macintosh. . 134 ❚ Playing a Movie 134 ❚ Viewing User Documentation PDF Files) . . 135 ❚ User Registration 135 Using an Eye-Fi Wireless SD Memory Card to Transfer Images . (Eye-Fi) . 135 Files and Folders 137 Memory Card Data 138 ❚❙ Other Settings (Set Up) 140 Adjusting Monitor Screen Brightness Screen) . 140 Turning off Eye-Fi Card Communication Eye-Fi) . 140 Configuring Camera Sound Settings Sounds) . 141...
...131 ❚ Connecting the Camera to Your Computer and Saving Files 131 ❚ Transferring Images Automatically and Managing Them on Your Macintosh. . 134 ❚ Playing a Movie 134 ❚ Viewing User Documentation PDF Files) . . 135 ❚ User Registration 135 Using an Eye-Fi Wireless SD Memory Card to Transfer Images . (Eye-Fi) . 135 Files and Folders 137 Memory Card Data 138 ❚❙ Other Settings (Set Up) 140 Adjusting Monitor Screen Brightness Screen) . 140 Turning off Eye-Fi Card Communication Eye-Fi) . 140 Configuring Camera Sound Settings Sounds) . 141...
Owners Manual
Page 17
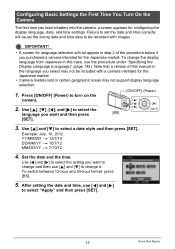
...]. 5. IMPORTANT! • A screen for the Japanese market. • Camera models sold in this manual in the language you select may not be recorded with a camera intended for language selection will cause the wrong date and time data to change the display language from Japanese in certain geographic areas may not support display language selection. 1. Use [8], [2], [4], and [6] to turn on the camera. [ON/OFF] (Power) 2. To change it. Press [ON/OFF] (Power) to select the SET language...
...]. 5. IMPORTANT! • A screen for the Japanese market. • Camera models sold in this manual in the language you select may not be recorded with a camera intended for language selection will cause the wrong date and time data to change the display language from Japanese in certain geographic areas may not support display language selection. 1. Use [8], [2], [4], and [6] to turn on the camera. [ON/OFF] (Power) 2. To change it. Press [ON/OFF] (Power) to select the SET language...
Owners Manual
Page 28
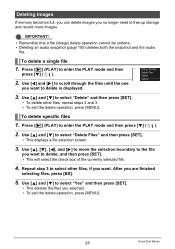
... 3. • To exit the delete operation, press [MENU]. Repeat step 3 to delete is displayed. 3. IMPORTANT! • Remember that a file (image) delete operation cannot be undone. • Deleting an audio snapshot (page 105) deletes both the snapshot and the audio file. Deleting Images If memory becomes full, you can delete images you no longer need to enter the PLAY mode and then press [2] ( ). 2. Press [p] (PLAY) to free up storage and record more images. Use [8], [2], [4], and [6] to move...
... 3. • To exit the delete operation, press [MENU]. Repeat step 3 to delete is displayed. 3. IMPORTANT! • Remember that a file (image) delete operation cannot be undone. • Deleting an audio snapshot (page 105) deletes both the snapshot and the audio file. Deleting Images If memory becomes full, you can delete images you no longer need to enter the PLAY mode and then press [2] ( ). 2. Press [p] (PLAY) to free up storage and record more images. Use [8], [2], [4], and [6] to move...
Owners Manual
Page 53
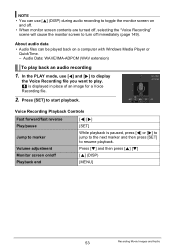
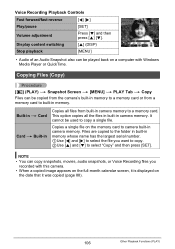
... [SET] to resume playback. In the PLAY mode, use [8] (DISP) during audio recording to toggle the monitor screen on and off. • When monitor screen contents are turned off, selecting the "Voice Recording" scene will cause the monitor screen to turn off Playback end [4] [6] [SET] While playback is displayed in place of an image for a Voice Recording file. 2. Voice Recording Playback Controls Fast forward/fast reverse Play/pause Jump to marker Volume adjustment Monitor screen on...
... [SET] to resume playback. In the PLAY mode, use [8] (DISP) during audio recording to toggle the monitor screen on and off. • When monitor screen contents are turned off, selecting the "Voice Recording" scene will cause the monitor screen to turn off Playback end [4] [6] [SET] While playback is displayed in place of an image for a Voice Recording file. 2. Voice Recording Playback Controls Fast forward/fast reverse Play/pause Jump to marker Volume adjustment Monitor screen on...
Owners Manual
Page 57
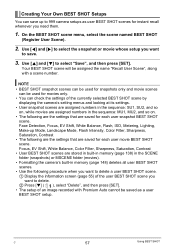
... SHOT Setups You can save . 3. Face Detection, Focus, EV Shift, White Balance, Flash, ISO, Metering, Lighting, Make-up to delete a user BEST SHOT scene. 1 Display the information screen (page 55) of the user BEST SHOT scene you need them. 1. C 57 Using BEST SHOT NOTE • BEST SHOT snapshot scenes can be used for each user movie BEST SHOT scene. Your BEST SHOT scene will be saved as user BEST SHOT scenes for each user snapshot BEST SHOT scene. On the BEST SHOT...
... SHOT Setups You can save . 3. Face Detection, Focus, EV Shift, White Balance, Flash, ISO, Metering, Lighting, Make-up to delete a user BEST SHOT scene. 1 Display the information screen (page 55) of the user BEST SHOT scene you need them. 1. C 57 Using BEST SHOT NOTE • BEST SHOT snapshot scenes can be used for each user movie BEST SHOT scene. Your BEST SHOT scene will be saved as user BEST SHOT scenes for each user snapshot BEST SHOT scene. On the BEST SHOT...
Owners Manual
Page 64
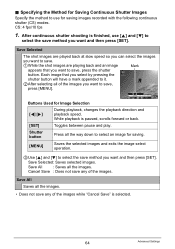
... shot images are playing back and an image Mark appears that you want and then press [SET]. Shutter button Press all the images. • Does not save any of the images. Save All Saves all the way down to select an image for Saving Continuous Shutter Images Specify the method to use [8] and [2] to save method you want and then press [SET]. While playback is finished, use for Image Selection [4] [6] During playback, changes the playback direction and playback speed. Save...
... shot images are playing back and an image Mark appears that you want and then press [SET]. Shutter button Press all the images. • Does not save any of the images. Save All Saves all the way down to select an image for Saving Continuous Shutter Images Specify the method to use [8] and [2] to save method you want and then press [SET]. While playback is finished, use for Image Selection [4] [6] During playback, changes the playback direction and playback speed. Save...
Owners Manual
Page 73
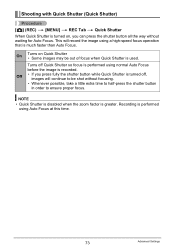
Shooting with Quick Shutter (Quick Shutter) Procedure [r] (REC) * [MENU] * REC Tab * Quick Shutter When Quick Shutter is turned on Quick Shutter • Some images may be shot without waiting for Auto Focus. NOTE • Quick Shutter is disabled when the zoom factor is used. Turns off , images will record the image using a high-speed focus operation that is much faster than Auto Focus. Off • If you can press the shutter button all the way without focusing. • Whenever possible, take a little extra time to half-press the...
Shooting with Quick Shutter (Quick Shutter) Procedure [r] (REC) * [MENU] * REC Tab * Quick Shutter When Quick Shutter is turned on Quick Shutter • Some images may be shot without waiting for Auto Focus. NOTE • Quick Shutter is disabled when the zoom factor is used. Turns off , images will record the image using a high-speed focus operation that is much faster than Auto Focus. Off • If you can press the shutter button all the way without focusing. • Whenever possible, take a little extra time to half-press the...
Owners Manual
Page 92
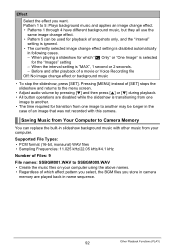
... after playback of a movie or Voice Recording file Off: No image change effect. • Pattern 5 can replace the built-in name sequence. 92 Other Playback Functions (PLAY) Saving Music from your computer using the above names. • Regardless of which "» Only" or "One Image" is selected for playback of snapshots only, and the "Interval" setting is ignored. • The currently selected image change effect setting is disabled automatically...
... after playback of a movie or Voice Recording file Off: No image change effect. • Pattern 5 can replace the built-in name sequence. 92 Other Playback Functions (PLAY) Saving Music from your computer using the above names. • Regardless of which "» Only" or "One Image" is selected for playback of snapshots only, and the "Interval" setting is ignored. • The currently selected image change effect setting is disabled automatically...
Owners Manual
Page 103
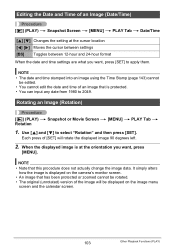
... • The date and time stamped into an image using the Time Stamp (page 143) cannot be edited. • You cannot edit the date and time of an image that has been protected or zoomed cannot be rotated. • The original (unrotated) version of the image will rotate the displayed image 90 degrees left. 2. Each press of an Image (Date/Time) Procedure [p] (PLAY) * Snapshot Screen * [MENU] * PLAY Tab * Date/Time [8] [2] Changes the setting at the orientation...
... • The date and time stamped into an image using the Time Stamp (page 143) cannot be edited. • You cannot edit the date and time of an image that has been protected or zoomed cannot be rotated. • The original (unrotated) version of the image will rotate the displayed image 90 degrees left. 2. Each press of an Image (Date/Time) Procedure [p] (PLAY) * Snapshot Screen * [MENU] * PLAY Tab * Date/Time [8] [2] Changes the setting at the orientation...
Owners Manual
Page 106
... a copied image appears on the full-month calendar screen, it was copied (page 88). 106 Other Playback Functions (PLAY) NOTE • You can be used to built-in camera memory to a memory card. Files are copied to the folder in built-in camera memory. Voice Recording Playback Controls Fast forward/fast reverse [4] [6] Play/pause [SET] Volume adjustment Press [2] and then press [8] [2]. Copies a single file on the date that it is displayed on the memory card to select "Copy" and then press [SET]. Display...
... a copied image appears on the full-month calendar screen, it was copied (page 88). 106 Other Playback Functions (PLAY) NOTE • You can be used to built-in camera memory to a memory card. Files are copied to the folder in built-in camera memory. Voice Recording Playback Controls Fast forward/fast reverse [4] [6] Play/pause [SET] Volume adjustment Press [2] and then press [8] [2]. Copies a single file on the date that it is displayed on the memory card to select "Copy" and then press [SET]. Display...
Owners Manual
Page 146
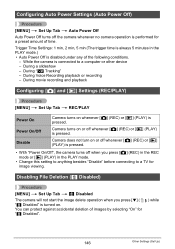
... Auto Power Settings (Auto Power Off) Procedure [MENU] * Set Up Tab * Auto Power Off Auto Power Off turns off whenever [r] (REC) or [p] (PLAY) is pressed. During a slideshow - While the camera is connected to a TV for image viewing. Disabling File Deletion (Ü Disabled) Procedure [MENU] * Set Up Tab * Ü Disabled The camera will not start the image delete operation when you press [r] (REC) in the REC mode or [p] (PLAY) in the PLAY mode.) • Auto Power Off is performed for "Ü Disabled". ) while 146 Other Settings (Set Up) During movie recording...
... Auto Power Settings (Auto Power Off) Procedure [MENU] * Set Up Tab * Auto Power Off Auto Power Off turns off whenever [r] (REC) or [p] (PLAY) is pressed. During a slideshow - While the camera is connected to a TV for image viewing. Disabling File Deletion (Ü Disabled) Procedure [MENU] * Set Up Tab * Ü Disabled The camera will not start the image delete operation when you press [r] (REC) in the REC mode or [p] (PLAY) in the PLAY mode.) • Auto Power Off is performed for "Ü Disabled". ) while 146 Other Settings (Set Up) During movie recording...
Owners Manual
Page 147
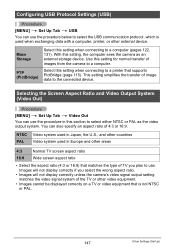
... this setting when connecting to a printer that is used in this setting for normal transfer of the TV or other video equipment. • Images cannot be displayed correctly on a TV or video equipment that supports PictBridge (page 115). Selecting the Screen Aspect Ratio and Video Output System (Video Out) Procedure [MENU] * Set Up Tab * Video Out You can also specify an aspect ratio of image data to the connected device. Use...
... this setting when connecting to a printer that is used in this setting for normal transfer of the TV or other video equipment. • Images cannot be displayed correctly on a TV or video equipment that supports PictBridge (page 115). Selecting the Screen Aspect Ratio and Video Output System (Video Out) Procedure [MENU] * Set Up Tab * Video Out You can also specify an aspect ratio of image data to the connected device. Use...
Owners Manual
Page 148
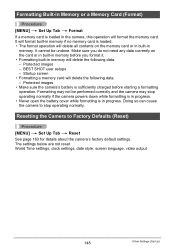
... camera's factory default settings. BEST SHOT user setups - Make sure you do not need any data currently on the memory card or in built-in memory before starting a formatting operation. World Time settings, clock settings, date style, screen language, video output 148 Other Settings (Set Up) Startup screen • Formatting a memory card will delete all contents on the card or in built-in memory. Formatting may not be undone. Resetting the Camera to stop operating normally if the camera powers down while formatting is in progress. • Never open the battery...
... camera's factory default settings. BEST SHOT user setups - Make sure you do not need any data currently on the memory card or in built-in memory before starting a formatting operation. World Time settings, clock settings, date style, screen language, video output 148 Other Settings (Set Up) Startup screen • Formatting a memory card will delete all contents on the card or in built-in memory. Formatting may not be undone. Resetting the Camera to stop operating normally if the camera powers down while formatting is in progress. • Never open the battery...

Owners Manual
Page 166
... shutter button all the way without waiting for Auto Focus to your computer, delete images you are shooting may be replaced. Charge the battery (page 14). 3)The camera's protection function may be in the PLAY mode, press [r] (REC) to be dead. Try shooting with Auto Focus (page 30). Troubleshooting Problem Power Supply Power does not turn off the camera and wait until the charge operation finishes. 3)If the message "Memory Full" appears, transfer images to focus. 166 Appendix Remove the battery from the camera...
... shutter button all the way without waiting for Auto Focus to your computer, delete images you are shooting may be replaced. Charge the battery (page 14). 3)The camera's protection function may be in the PLAY mode, press [r] (REC) to be dead. Try shooting with Auto Focus (page 30). Troubleshooting Problem Power Supply Power does not turn off the camera and wait until the charge operation finishes. 3)If the message "Memory Full" appears, transfer images to focus. 166 Appendix Remove the battery from the camera...

Owners Manual
Page 167
... dead. The monitor screen image is selected, change to use the camera for scenery and portrait shots (page 37). 3)You may have not focused the image. Shooting a very brightly lit subject can use Auto Focus or ) (Infinity) when shooting a close ups (page 37). The battery may not be using Manual Focus and have been increased automatically for close -up shot. Charge the battery (page 14). Use Auto Focus for non-flash shots. Use a light or some other...
... dead. The monitor screen image is selected, change to use the camera for scenery and portrait shots (page 37). 3)You may have not focused the image. Shooting a very brightly lit subject can use Auto Focus or ) (Infinity) when shooting a close ups (page 37). The battery may not be using Manual Focus and have been increased automatically for close -up shot. Charge the battery (page 14). Use Auto Focus for non-flash shots. Use a light or some other...
Owners Manual
Page 168
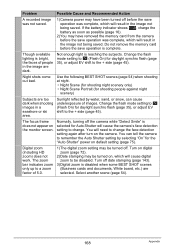
... remove the memory card before the save operation is reaching the subjects. Change the flash mode setting to < (Flash On) for Auto Shutter will cause the camera's face detection setting to the + side (page 45). Not enough light is complete. Normally, turning off date stamping (page 143). 3)Digital zoom is bright, the faces of 5.0. 1)The digital zoom setting may be disabled. You will need to change . Problem Possible Cause and Recommended Action A recorded image was not saved. 1)Camera power may have removed the memory card...
... remove the memory card before the save operation is reaching the subjects. Change the flash mode setting to < (Flash On) for Auto Shutter will cause the camera's face detection setting to the + side (page 45). Not enough light is complete. Normally, turning off date stamping (page 143). 3)Digital zoom is bright, the faces of 5.0. 1)The digital zoom setting may be disabled. You will need to change . Problem Possible Cause and Recommended Action A recorded image was not saved. 1)Camera power may have removed the memory card...
Owners Manual
Page 169
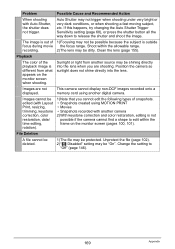
... using another digital camera. Auto Shutter may be shining directly into the lens. File Deletion A file cannot be deleted. 1)The file may be protected. recording. 2)The lens may be dirty. Sunlight or light from what appears on the monitor screen (pages 100, 101). Shoot within the frame on the monitor screen when shooting. Images cannot be possible because the subject is outside focus during movie the focus range. Playback The color of 1)Focusing may be "On". Images are shooting. Change...
... using another digital camera. Auto Shutter may be shining directly into the lens. File Deletion A file cannot be deleted. 1)The file may be protected. recording. 2)The lens may be dirty. Sunlight or light from what appears on the monitor screen (pages 100, 101). Shoot within the frame on the monitor screen when shooting. Images cannot be possible because the subject is outside focus during movie the focus range. Playback The color of 1)Focusing may be "On". Images are shooting. Change...

Owners Manual
Page 170
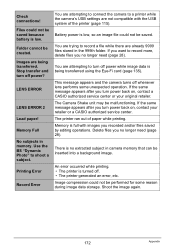
... is not turned on, turn it means that , configure each setting. Select the correct USB communication protocol in the wrong language. Set the correct date and time (page 144). Change the display language setting (page 145). Always connect directly to the computer's USB port. The messages on . 4)Your computer may not be a problem with a dead battery. Images cannot be transferred over a USB connection. 1)The USB cable may not be able to initialize the camera's setup (page...
... is not turned on, turn it means that , configure each setting. Select the correct USB communication protocol in the wrong language. Set the correct date and time (page 144). Change the display language setting (page 145). Always connect directly to the computer's USB port. The messages on . 4)Your computer may not be a problem with a dead battery. Images cannot be transferred over a USB connection. 1)The USB cable may not be able to initialize the camera's setup (page...
Owners Manual
Page 172
... to a printer while the camera's USB settings are being transferred using the Eye-Fi card (page 135). There is low. If you turn off . • The printer generated an error, etc. Delete files you recorded and/or files saved by editing operations. Images are not compatible with images you no extracted subject in memory. An error occurred while printing. • The printer is turned off power while image data is full with the USB system of paper while printing. Folder cannot...
... to a printer while the camera's USB settings are being transferred using the Eye-Fi card (page 135). There is low. If you turn off . • The printer generated an error, etc. Delete files you recorded and/or files saved by editing operations. Images are not compatible with images you no extracted subject in memory. An error occurred while printing. • The printer is turned off power while image data is full with the USB system of paper while printing. Folder cannot...
Owners Manual
Page 180
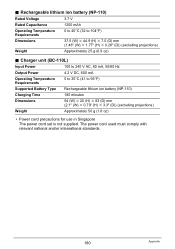
... 3.7 V Rated Capacitance 1200 mAh Operating Temperature Requirements 0 to 40°C (32 to 95°F) Supported Battery Type Rechargeable lithium ion battery (NP-110) Charging Time 180 minutes Dimensions 54 (W) x 20 (H) x 83 (D) mm (2.1" (W) x 0.79" (H) x 3.3" (D)) (excluding projections) Weight Approximately 50 g (1.8 oz) • Power cord precautions for use in Singapore The power cord set is not supplied. . Charger unit (BC-110L) Input Power 100 to 240 V AC...
... 3.7 V Rated Capacitance 1200 mAh Operating Temperature Requirements 0 to 40°C (32 to 95°F) Supported Battery Type Rechargeable lithium ion battery (NP-110) Charging Time 180 minutes Dimensions 54 (W) x 20 (H) x 83 (D) mm (2.1" (W) x 0.79" (H) x 3.3" (D)) (excluding projections) Weight Approximately 50 g (1.8 oz) • Power cord precautions for use in Singapore The power cord set is not supplied. . Charger unit (BC-110L) Input Power 100 to 240 V AC...


