
Owners Manual
Page 4
... ❚ To change Auto Shutter trigger sensitivity Sensitivity) . . . 32 Using Face Recognition Face Recognition) . . 34 ❚ To perform a face recognition recording operation Normal) . . . 34 ❚ Using the Family First Mode Family First) . . . 35 Using Continuous Shutter Continuous) . . 39 Specifying ISO Sensitivity ISO) . . 41 Correcting Image Brightness EV Shift) . . 42 Changing the Control Panel Date/Time Style 43 Shooting with Zoom 43 ❚ Optical Zoom and Digital Zoom Switch Point 44 Shooting with the Make-up Mode Make-up) . . 46...
... ❚ To change Auto Shutter trigger sensitivity Sensitivity) . . . 32 Using Face Recognition Face Recognition) . . 34 ❚ To perform a face recognition recording operation Normal) . . . 34 ❚ Using the Family First Mode Family First) . . . 35 Using Continuous Shutter Continuous) . . 39 Specifying ISO Sensitivity ISO) . . 41 Correcting Image Brightness EV Shift) . . 42 Changing the Control Panel Date/Time Style 43 Shooting with Zoom 43 ❚ Optical Zoom and Digital Zoom Switch Point 44 Shooting with the Make-up Mode Make-up) . . 46...

Owners Manual
Page 7
...; Playing a Movie 122 ❚ Viewing User Documentation PDF Files) . . 122 ❚ User Registration 122 Files and Folders 123 Memory Card Data 124 ❚❙ Other Settings (Set Up) 126 REC Mode Control Panel Display R Panel) . 126 Adjusting Monitor Screen Brightness Screen) . 127 Configuring Camera Sound Settings Sounds) . 128 Configuring a Startup Image Startup) . 128 Specifying the File Name Serial Number Generation Rule . . . . . (File No.) . 129 Configuring World Time Settings World Time) . 130 Time Stamping Snapshots Timestamp) . 131 Setting the Camera's Clock...
...; Playing a Movie 122 ❚ Viewing User Documentation PDF Files) . . 122 ❚ User Registration 122 Files and Folders 123 Memory Card Data 124 ❚❙ Other Settings (Set Up) 126 REC Mode Control Panel Display R Panel) . 126 Adjusting Monitor Screen Brightness Screen) . 127 Configuring Camera Sound Settings Sounds) . 128 Configuring a Startup Image Startup) . 128 Specifying the File Name Serial Number Generation Rule . . . . . (File No.) . 129 Configuring World Time Settings World Time) . 130 Time Stamping Snapshots Timestamp) . 131 Setting the Camera's Clock...

Owners Manual
Page 43
... Angle):Reduces the size of the image to enlarge it) for the date: Month/Day or Day/Month. • The time is turned on the image size (page 45). 1. The image deterioration point depends on . 43 Snapshot Tutorial Press the shutter button to select the date or time. In the REC mode, press [SET]. 2. Changing the Control Panel Date/Time Style 1. IMPORTANT! • Digital zoom is disabled while date stamping (page 131) is displayed using 24-hour format.
... Angle):Reduces the size of the image to enlarge it) for the date: Month/Day or Day/Month. • The time is turned on the image size (page 45). 1. The image deterioration point depends on . 43 Snapshot Tutorial Press the shutter button to select the date or time. In the REC mode, press [SET]. 2. Changing the Control Panel Date/Time Style 1. IMPORTANT! • Digital zoom is disabled while date stamping (page 131) is displayed using 24-hour format.

Owners Manual
Page 51
... (WAV extension) - About audio data • Audio files can use [4] and [6] to display the Voice Recording file you want to play back an audio recording 1. Press [SET] to start playback. Volume adjustment Press [2] and then press [8] [2] Monitor screen on a computer with Windows Media Player or QuickTime. - Audio File Size: Approximately 165KB (Approximately 30 seconds of an image for a Voice Recording file. 2. In the PLAY mode, use [8] (DISP) during audio recording to toggle the monitor...
... (WAV extension) - About audio data • Audio files can use [4] and [6] to display the Voice Recording file you want to play back an audio recording 1. Press [SET] to start playback. Volume adjustment Press [2] and then press [8] [2] Monitor screen on a computer with Windows Media Player or QuickTime. - Audio File Size: Approximately 165KB (Approximately 30 seconds of an image for a Voice Recording file. 2. In the PLAY mode, use [8] (DISP) during audio recording to toggle the monitor...

Owners Manual
Page 66
... Settings Using Continuous Shutter (Continuous) Procedure [r] (REC) * [MENU] * REC Tab * Continuous For details, see the Control Panel procedure on the image size and quality settings, whether or not a memory card is shot after the shutter button is pressed, and the next two images as soon as the camera is in the camera, and the flash charge condition. " X3 (Triple Self-timer) Shoots three images: one image 10 seconds after a fixed amount of time. „ 10 sec 10-second Self-timer...
... Settings Using Continuous Shutter (Continuous) Procedure [r] (REC) * [MENU] * REC Tab * Continuous For details, see the Control Panel procedure on the image size and quality settings, whether or not a memory card is shot after the shutter button is pressed, and the next two images as soon as the camera is in the camera, and the flash charge condition. " X3 (Triple Self-timer) Shoots three images: one image 10 seconds after a fixed amount of time. „ 10 sec 10-second Self-timer...

Owners Manual
Page 68
... normal and does not indicate malfunction. D Auto A Camera AS S Image AS F DEMO Off Minimizes the effects of image resolution. • Anti Shake may not be used during movie recording. • ISO sensitivity, aperture, and shutter speed do not appear on the monitor screen when you shoot a snapshot. • The ISO sensitivity setting (page 41) must be "AUTO" for "S Image AS" to work. • If the flash fires, the Anti Shake...
... normal and does not indicate malfunction. D Auto A Camera AS S Image AS F DEMO Off Minimizes the effects of image resolution. • Anti Shake may not be used during movie recording. • ISO sensitivity, aperture, and shutter speed do not appear on the monitor screen when you shoot a snapshot. • The ISO sensitivity setting (page 41) must be "AUTO" for "S Image AS" to work. • If the flash fires, the Anti Shake...

Owners Manual
Page 71
...used. Setting [4]/[6] key operation Metering Changes the Metering Mode (page 77) EV Shift Adjusts the EV shift value (page 42) White Balance Changes the white balance setting (page 76) ISO Changes the ISO Sensitivity setting (page 41) Self-timer Sets the self-timer time (page 66) Off Cancels [4] and [6] key assignments Shooting with Quick Shutter (Quick Shutter) Procedure [r] (REC) * [MENU] * REC Tab * Quick Shutter When Quick Shutter is turned on Quick Shutter • Some images may be shot without waiting for Auto Focus. Turns off , images will record the image using...
...used. Setting [4]/[6] key operation Metering Changes the Metering Mode (page 77) EV Shift Adjusts the EV shift value (page 42) White Balance Changes the white balance setting (page 76) ISO Changes the ISO Sensitivity setting (page 41) Self-timer Sets the self-timer time (page 66) Off Cancels [4] and [6] key assignments Shooting with Quick Shutter (Quick Shutter) Procedure [r] (REC) * [MENU] * REC Tab * Quick Shutter When Quick Shutter is turned on Quick Shutter • Some images may be shot without waiting for Auto Focus. Turns off , images will record the image using...

Owners Manual
Page 85
Playing a Slideshow on the Camera (Slideshow) Procedure [p] (PLAY) * [MENU] * PLAY Tab * Slideshow Start Images Time Interval Effect Starts the slideshow Specifies the type of images to be used for playback of snapshots only, and the "Interval" setting is ignored. • The currently selected image change effect setting is disabled automatically in the slideshow All images: Snapshots, movies, and audio recordings T Only: Snapshots and audio snapshots only » Only: Movies only One Image: One...
Playing a Slideshow on the Camera (Slideshow) Procedure [p] (PLAY) * [MENU] * PLAY Tab * Slideshow Start Images Time Interval Effect Starts the slideshow Specifies the type of images to be used for playback of snapshots only, and the "Interval" setting is ignored. • The currently selected image change effect setting is disabled automatically in the slideshow All images: Snapshots, movies, and audio recordings T Only: Snapshots and audio snapshots only » Only: Movies only One Image: One...

Owners Manual
Page 101
... is displayed on the memory card to camera built-in camera memory. NOTE • You can be used to built-in camera memory to select "Copy" and then press [SET]. Copying Files (Copy) Procedure [p] (PLAY) * Snapshot Screen * [MENU] * PLAY Tab * Copy Files can copy snapshots, movies, audio snapshots, or Voice Recording files you want to copy. 2Use [8] and [2] to a memory card. It cannot be copied from the camera's built-in memory to a memory card or from built-in memory. Files are copied to the folder in...
... is displayed on the memory card to camera built-in camera memory. NOTE • You can be used to built-in camera memory to select "Copy" and then press [SET]. Copying Files (Copy) Procedure [p] (PLAY) * Snapshot Screen * [MENU] * PLAY Tab * Copy Files can copy snapshots, movies, audio snapshots, or Voice Recording files you want to copy. 2Use [8] and [2] to a memory card. It cannot be copied from the camera's built-in memory to a memory card or from built-in memory. Files are copied to the folder in...
Owners Manual
Page 102
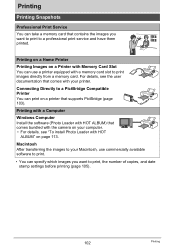
... "To install Photo Loader with your printer. Connecting Directly to print images directly from a memory card. Printing on a Home Printer Printing Images on a Printer with a memory card slot to a PictBridge Compatible Printer You can print on your Macintosh, use a printer equipped with Memory Card Slot You can use commercially available software to print. • You can specify which images you want to print, the number of copies, and date stamp settings before printing (page 105). 102 Printing Printing Printing Snapshots Professional Print Service You can take a memory card...
... "To install Photo Loader with your printer. Connecting Directly to print images directly from a memory card. Printing on a Home Printer Printing Images on a Printer with a memory card slot to a PictBridge Compatible Printer You can print on your Macintosh, use a printer equipped with Memory Card Slot You can use commercially available software to print. • You can specify which images you want to print, the number of copies, and date stamp settings before printing (page 105). 102 Printing Printing Printing Snapshots Professional Print Service You can take a memory card...

Owners Manual
Page 103
... USB power over the USB cable. Turn on the camera is aligned with the port. 103 Printing Make sure the camera's USB port battery is fully inserted, you still will be able to see the metal part of the USB cable connector, connect the cable to a printer 1. malfunction. • Note that even while the connector is sufficiently charged before connecting to the camera. Small connector • Make sure that supports PictBridge and print images...
... USB power over the USB cable. Turn on the camera is aligned with the port. 103 Printing Make sure the camera's USB port battery is fully inserted, you still will be able to see the metal part of the USB cable connector, connect the cable to a printer 1. malfunction. • Note that even while the connector is sufficiently charged before connecting to the camera. Small connector • Make sure that supports PictBridge and print images...

Owners Manual
Page 107
Configuring camera settings Configuring computer settings Professional print service Configure DPOF settings (page 105). Doing so can cause the two stamps to be deleted. • Do not turn date stamping on a printer that supports PRINT Image Matching III makes it , so the date is always included when you want. You can turn on a printer that supports Exif Print (Exif 2.2) uses information about models that includes a date stamped with the camera's Time Stamp function. PRINT Image Matching and PRINT Image Matching III are trademarks of...
Configuring camera settings Configuring computer settings Professional print service Configure DPOF settings (page 105). Doing so can cause the two stamps to be deleted. • Do not turn date stamping on a printer that supports PRINT Image Matching III makes it , so the date is always included when you want. You can turn on a printer that supports Exif Print (Exif 2.2) uses information about models that includes a date stamped with the camera's Time Stamp function. PRINT Image Matching and PRINT Image Matching III are trademarks of...

Owners Manual
Page 131
... BEST SHOT scenes (ID Photo, Business cards and documents, White board, etc.) Setting the Camera's Clock (Adjust) Procedure [MENU] * Set Up Tab * Adjust [8] [2] Change the setting at the cursor location [4] [6] Move the cursor between settings [BS] Toggles between 12-hour and 24-hour format When the date and time settings are what you do so later using the DPOF function or some printing application (page 107). • Digital zoom is disabled while date stamping is turned...
... BEST SHOT scenes (ID Photo, Business cards and documents, White board, etc.) Setting the Camera's Clock (Adjust) Procedure [MENU] * Set Up Tab * Adjust [8] [2] Change the setting at the cursor location [4] [6] Move the cursor between settings [BS] Toggles between 12-hour and 24-hour format When the date and time settings are what you do so later using the DPOF function or some printing application (page 107). • Digital zoom is disabled while date stamping is turned...

Owners Manual
Page 133
... button to a computer or other device - While the camera is performed for a preset amount of time. Configuring Auto Power Settings (Auto Power Off) Procedure [MENU] * Set Up Tab * Auto Power Off Auto Power Off turns off the monitor screen whenever no camera operation is connected to a computer or other device - During Auto Shutter standby - During a slideshow - During Voice Recording playback or recording - Trigger Time Settings: 1 min, 2 min, 5 min (The trigger time is always 5 minutes in the PLAY mode.) • Auto Power...
... button to a computer or other device - While the camera is performed for a preset amount of time. Configuring Auto Power Settings (Auto Power Off) Procedure [MENU] * Set Up Tab * Auto Power Off Auto Power Off turns off the monitor screen whenever no camera operation is connected to a computer or other device - During Auto Shutter standby - During a slideshow - During Voice Recording playback or recording - Trigger Time Settings: 1 min, 2 min, 5 min (The trigger time is always 5 minutes in the PLAY mode.) • Auto Power...

Owners Manual
Page 134
... this setting when connecting to a printer that supports PictBridge (page 103). Use this setting for image viewing. Select this setting when connecting to a computer (pages 110, 119). Configuring [r] and [p] Settings (REC/PLAY) Procedure [MENU] * Set Up Tab * REC/PLAY Power On Power On/Off Disable Camera turns on or off when you press [r] (REC) in the REC mode or [p] (PLAY) in the PLAY mode. • Change this setting to anything besides "Disable" before connecting to select the USB communication...
... this setting when connecting to a printer that supports PictBridge (page 103). Use this setting for image viewing. Select this setting when connecting to a computer (pages 110, 119). Configuring [r] and [p] Settings (REC/PLAY) Procedure [MENU] * Set Up Tab * REC/PLAY Power On Power On/Off Disable Camera turns on or off when you press [r] (REC) in the REC mode or [p] (PLAY) in the PLAY mode. • Change this setting to anything besides "Disable" before connecting to select the USB communication...

Owners Manual
Page 136
... Memory or a Memory Card (Format) Procedure [MENU] * Set Up Tab * Format If a memory card is loaded in the camera, this operation will delete the following data. - Pre-recorded face data for details about the camera's factory default settings. Startup screen • Formatting a memory card will format the memory card. Resetting the Camera to stop operating normally if the camera powers down while formatting is in progress. • Never open the battery cover while formatting is in progress. The settings below are not reset. Protected images • Make sure that the battery...
... Memory or a Memory Card (Format) Procedure [MENU] * Set Up Tab * Format If a memory card is loaded in the camera, this operation will delete the following data. - Pre-recorded face data for details about the camera's factory default settings. Startup screen • Formatting a memory card will format the memory card. Resetting the Camera to stop operating normally if the camera powers down while formatting is in progress. • Never open the battery cover while formatting is in progress. The settings below are not reset. Protected images • Make sure that the battery...
Owners Manual
Page 158
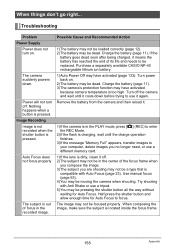
... the message "Memory Full" appears, transfer images to your computer, delete images you are shooting may have activated because camera temperature is too high. Use manual focus (page 63). 4)You may be dead. Troubleshooting Problem Power Supply Power does not turn off . 2)The subject may not be in the center of its life and needs to enter the REC Mode. 2)If the flash is charging, wait until it means the battery...
... the message "Memory Full" appears, transfer images to your computer, delete images you are shooting may have activated because camera temperature is too high. Use manual focus (page 63). 4)You may be dead. Troubleshooting Problem Power Supply Power does not turn off . 2)The subject may not be in the center of its life and needs to enter the REC Mode. 2)If the flash is charging, wait until it means the battery...

Owners Manual
Page 160
... a zoom factor of the playback image is disabled when some BEST SHOT scenes (Business cards and documents, White board, etc.) are not displayed. Auto Shutter may have been faulty. Position the camera so sunlight does not shine directly into the lens when you are too dark when shooting images in a seashore or ski area. Images are selected. Problem Possible Cause and Recommended Action Subjects are shooting. Change the flash mode setting to < (Flash...
... a zoom factor of the playback image is disabled when some BEST SHOT scenes (Business cards and documents, White board, etc.) are not displayed. Auto Shutter may have been faulty. Position the camera so sunlight does not shine directly into the lens when you are too dark when shooting images in a seashore or ski area. Images are selected. Problem Possible Cause and Recommended Action Subjects are shooting. Change the flash mode setting to < (Flash...

Owners Manual
Page 161
Images cannot be transferred over a USB connection. 1)The USB cable may be a problem with the camera's memory data. If the same message appears after purchasing the camera or the battery may not be able to edit within the frame on the monitor screen (pages 94, 95). Problem Possible Cause and Recommended Action Images cannot be edited (with Layout Print, resizing, trimming, keystone correction, color restoration, date/ time editing, rotation). 1)Note that...
Images cannot be transferred over a USB connection. 1)The USB cable may be a problem with the camera's memory data. If the same message appears after purchasing the camera or the battery may not be able to edit within the frame on the monitor screen (pages 94, 95). Problem Possible Cause and Recommended Action Images cannot be edited (with Layout Print, resizing, trimming, keystone correction, color restoration, date/ time editing, rotation). 1)Note that...
Owners Manual
Page 163
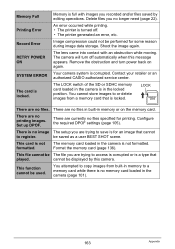
... an error, etc. LOCK There are no files specified for printing. Set up DPOF. An error occurred while printing. • The printer is not formatted. The camera will turn power back on the memory card. Contact your retailer or an authorized CASIO authorized service center. This file cannot be displayed by editing operations. Shoot the image again. There are no printing images. This function cannot be saved as a user BEST SHOT scene. Your camera system is no longer need...
... an error, etc. LOCK There are no files specified for printing. Set up DPOF. An error occurred while printing. • The printer is not formatted. The camera will turn power back on the memory card. Contact your retailer or an authorized CASIO authorized service center. This file cannot be displayed by editing operations. Shoot the image again. There are no printing images. This function cannot be saved as a user BEST SHOT scene. Your camera system is no longer need...


