
Owners Manual
Page 7
... . (Eye-Fi) . 136 Files and Folders 138 Memory Card Data 139 ❚❙ Other Settings (Set Up) 141 Changing the Menu Screen Color Menu Color) . 141 Turning off Eye-Fi Card Communication Eye-Fi) . 141 Configuring Camera Sound Settings Sounds) . 142 Configuring a Startup Image Startup) . 142 Specifying the File Name Serial Number Generation Rule . . . . . (File No.) . 143 Configuring World Time Settings World Time) . 143 Time Stamping Snapshots Timestamp) . 144 Setting the Camera's Clock Adjust) . 145 Specifying the Date Style Date Style) . 145 Specifying the Display Language...
... . (Eye-Fi) . 136 Files and Folders 138 Memory Card Data 139 ❚❙ Other Settings (Set Up) 141 Changing the Menu Screen Color Menu Color) . 141 Turning off Eye-Fi Card Communication Eye-Fi) . 141 Configuring Camera Sound Settings Sounds) . 142 Configuring a Startup Image Startup) . 142 Specifying the File Name Serial Number Generation Rule . . . . . (File No.) . 143 Configuring World Time Settings World Time) . 143 Time Stamping Snapshots Timestamp) . 144 Setting the Camera's Clock Adjust) . 145 Specifying the Date Style Date Style) . 145 Specifying the Display Language...

Owners Manual
Page 17
... memory capacity. Charge the battery immediately. • The level shown by the battery indicator may change when you turn off the camera (pages 146, 147). 17 Quick Start Basics When this happens, configure date and time settings (page 145). • See page 180 for the flash setting (page 36). • Enable the Auto Power Off and the Sleep features to protect against wasting battery power when you forget to replace the battery...
... memory capacity. Charge the battery immediately. • The level shown by the battery indicator may change when you turn off the camera (pages 146, 147). 17 Quick Start Basics When this happens, configure date and time settings (page 145). • See page 180 for the flash setting (page 36). • Enable the Auto Power Off and the Sleep features to protect against wasting battery power when you forget to replace the battery...

Owners Manual
Page 18
...; Camera models sold in certain geographic areas may not support display language selection. 1. To change it. Press [ON/OFF] (Power) to select a date style and then press [SET]. Failure to change the display language from Japanese in this case, use [8] and [2] to set the date and time correctly will not appear in step 2 of this manual in the language you load a battery into the camera, a screen appears for configuring the display language, date, and time settings...
...; Camera models sold in certain geographic areas may not support display language selection. 1. To change it. Press [ON/OFF] (Power) to select a date style and then press [SET]. Failure to change the display language from Japanese in this case, use [8] and [2] to set the date and time correctly will not appear in step 2 of this manual in the language you load a battery into the camera, a screen appears for configuring the display language, date, and time settings...
Owners Manual
Page 29
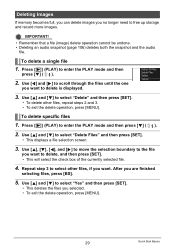
... press [SET]. • This deletes the files you are finished selecting files, press [BS]. 5. Press [p] (PLAY) to enter the PLAY mode and then press [2] ( ). 2. After you selected. • To exit the delete operation, press [MENU]. 29 Quick Start Basics Use [8], [2], [4], and [6] to move the selection boundary to the file you no longer need to free up storage and record more images. To delete specific files 1. Deleting Images If memory becomes full, you can delete images you...
... press [SET]. • This deletes the files you are finished selecting files, press [BS]. 5. Press [p] (PLAY) to enter the PLAY mode and then press [2] ( ). 2. After you selected. • To exit the delete operation, press [MENU]. 29 Quick Start Basics Use [8], [2], [4], and [6] to move the selection boundary to the file you no longer need to free up storage and record more images. To delete specific files 1. Deleting Images If memory becomes full, you can delete images you...
Owners Manual
Page 54
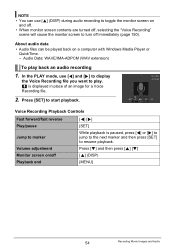
... screen to resume playback. Voice Recording Playback Controls Fast forward/fast reverse Play/pause Jump to marker Volume adjustment Monitor screen on and off. • When monitor screen contents are turned off Playback end [4] [6] [SET] While playback is displayed in place of an image for a Voice Recording file. 2. Press [2] and then press [8] [2] [8] (DISP) [MENU] 54 Recording Movie Images and Audio About audio data • Audio files can use [4] and [6] to display the Voice Recording file you want to start playback...
... screen to resume playback. Voice Recording Playback Controls Fast forward/fast reverse Play/pause Jump to marker Volume adjustment Monitor screen on and off. • When monitor screen contents are turned off Playback end [4] [6] [SET] While playback is displayed in place of an image for a Voice Recording file. 2. Press [2] and then press [8] [2] [8] (DISP) [MENU] 54 Recording Movie Images and Audio About audio data • Audio files can use [4] and [6] to display the Voice Recording file you want to start playback...

Owners Manual
Page 58
... image recorded with a scene number. Focus, EV Shift, White Balance, Color Filter, Sharpness, Saturation, Contrast • User BEST SHOT scenes are stored in built-in memory (page 139) in the SCENE folder (snapshots) or MSCENE folder (movies). • Formatting the camera's built-in the sequence: MU1, MU2, and so on , while movies are saved for each user movie BEST SHOT scene. Creating Your Own BEST SHOT Setups You can save . 3. Use [8] and [2] to save up Mode...
... image recorded with a scene number. Focus, EV Shift, White Balance, Color Filter, Sharpness, Saturation, Contrast • User BEST SHOT scenes are stored in built-in memory (page 139) in the SCENE folder (snapshots) or MSCENE folder (movies). • Formatting the camera's built-in the sequence: MU1, MU2, and so on , while movies are saved for each user movie BEST SHOT scene. Creating Your Own BEST SHOT Setups You can save . 3. Use [8] and [2] to save up Mode...
Owners Manual
Page 67
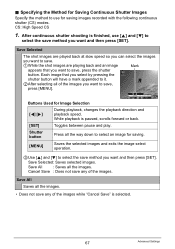
... shot images are playing back and an image Mark appears that you want and then press [SET]. While playback is finished, use [8] and [2] to select the save any of the images you want to use for Image Selection [4] [6] During playback, changes the playback direction and playback speed. Save Selected: Saves selected images. CS: High Speed CS 1. Shutter button Press all the way down to select an image for saving. [MENU] Saves the selected images and exits the image select operation...
... shot images are playing back and an image Mark appears that you want and then press [SET]. While playback is finished, use [8] and [2] to select the save any of the images you want to use for Image Selection [4] [6] During playback, changes the playback direction and playback speed. Save Selected: Saves selected images. CS: High Speed CS 1. Shutter button Press all the way down to select an image for saving. [MENU] Saves the selected images and exits the image select operation...

Owners Manual
Page 74
... zoom factor is recorded. Off • If you can be displayed on , you press fully the shutter button while Quick Shutter is turned off Quick Shutter so focus is performed using Auto Focus at this time. On Turns on Quick Shutter • Some images may be shot without waiting for easy vertical and horizontal alignment when composing images. 74 Advanced Settings Shooting with Quick Shutter (Quick Shutter) Procedure [r] (REC) * [MENU] * REC Tab * Quick Shutter When Quick Shutter is turned on the REC mode monitor screen for Auto Focus. Displaying...
... zoom factor is recorded. Off • If you can be displayed on , you press fully the shutter button while Quick Shutter is turned off Quick Shutter so focus is performed using Auto Focus at this time. On Turns on Quick Shutter • Some images may be shot without waiting for easy vertical and horizontal alignment when composing images. 74 Advanced Settings Shooting with Quick Shutter (Quick Shutter) Procedure [r] (REC) * [MENU] * REC Tab * Quick Shutter When Quick Shutter is turned on the REC mode monitor screen for Auto Focus. Displaying...
Owners Manual
Page 75
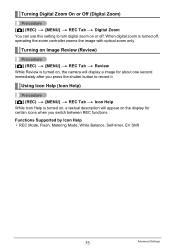
... Review is turned on, a textual description will appear on the display for certain icons when you press the shutter button to turn digital zoom on , the camera will display a image for about one second immediately after you switch between REC functions. Using Icon Help (Icon Help) Procedure [r] (REC) * [MENU] * REC Tab * Icon Help While Icon Help is turned on or off , operating the zoom controller zooms the image with optical zoom only. Functions Supported by Icon Help • REC Mode, Flash, Metering Mode, White Balance, Self-timer, EV Shift 75 Advanced Settings When digital zoom...
... Review is turned on, a textual description will appear on the display for certain icons when you press the shutter button to turn digital zoom on , the camera will display a image for about one second immediately after you switch between REC functions. Using Icon Help (Icon Help) Procedure [r] (REC) * [MENU] * REC Tab * Icon Help While Icon Help is turned on or off , operating the zoom controller zooms the image with optical zoom only. Functions Supported by Icon Help • REC Mode, Flash, Metering Mode, White Balance, Self-timer, EV Shift 75 Advanced Settings When digital zoom...

Owners Manual
Page 93
... they all use the same image change effect or background music • To stop the slideshow, press [SET]. When playing a slideshow for the "Images" setting - Pressing [MENU] instead of Files: 9 File names: SSBGM001.WAV to SSBGM009.WAV • Create the music files on your computer. Pattern 1 to the menu screen. • Adjust audio volume by pressing [2] and then press [8] or [2] during playback. • All button operations are played back...
... they all use the same image change effect or background music • To stop the slideshow, press [SET]. When playing a slideshow for the "Images" setting - Pressing [MENU] instead of Files: 9 File names: SSBGM001.WAV to SSBGM009.WAV • Create the music files on your computer. Pattern 1 to the menu screen. • Adjust audio volume by pressing [2] and then press [8] or [2] during playback. • All button operations are played back...

Owners Manual
Page 104
... change the image data. NOTE • Note that has been protected or zoomed cannot be edited. • You cannot edit the date and time of an image that is displayed on the image menu screen and the calendar screen. 104 Other Playback Functions (PLAY) Rotating an Image (Rotation) Procedure [p] (PLAY) * Snapshot or Movie Screen * [MENU] * PLAY Tab * Rotation 1. Use [8] and [2] to select "Rotation" and then press [SET]. NOTE • The date and time stamped into an image using the Time Stamp...
... change the image data. NOTE • Note that has been protected or zoomed cannot be edited. • You cannot edit the date and time of an image that is displayed on the image menu screen and the calendar screen. 104 Other Playback Functions (PLAY) Rotating an Image (Rotation) Procedure [p] (PLAY) * Snapshot or Movie Screen * [MENU] * PLAY Tab * Rotation 1. Use [8] and [2] to select "Rotation" and then press [SET]. NOTE • The date and time stamped into an image using the Time Stamp...
Owners Manual
Page 107
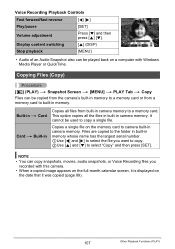
... a memory card. Display content switching [8] (DISP) Stop playback [MENU] • Audio of an Audio Snapshot also can be played back on the memory card to camera built-in camera memory to select the file you recorded with Windows Media Player or QuickTime. This option copies all files from a memory card to select "Copy" and then press [SET]. Voice Recording Playback Controls Fast forward/fast reverse [4] [6] Play/pause [SET] Volume adjustment Press [2] and then press [8] [2]. Built-in * Card Card * Built-in Copies...
... a memory card. Display content switching [8] (DISP) Stop playback [MENU] • Audio of an Audio Snapshot also can be played back on the memory card to camera built-in camera memory to select the file you recorded with Windows Media Player or QuickTime. This option copies all files from a memory card to select "Copy" and then press [SET]. Voice Recording Playback Controls Fast forward/fast reverse [4] [6] Play/pause [SET] Volume adjustment Press [2] and then press [8] [2]. Built-in * Card Card * Built-in Copies...
Owners Manual
Page 147
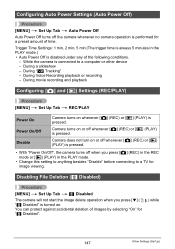
... start the image delete operation when you press [r] (REC) in the REC mode or [p] (PLAY) in the PLAY mode.) • Auto Power Off is pressed. Configuring Auto Power Settings (Auto Power Off) Procedure [MENU] * Set Up Tab * Auto Power Off Auto Power Off turns off the camera whenever no camera operation is connected to a TV for "Ü Disabled". ) while 147 Other Settings (Set Up) During a slideshow - During movie recording and playback Configuring [r] and [p] Settings (REC/PLAY) Procedure [MENU] * Set Up Tab * REC/PLAY Power On Power On/Off Disable Camera turns on . Camera...
... start the image delete operation when you press [r] (REC) in the REC mode or [p] (PLAY) in the PLAY mode.) • Auto Power Off is pressed. Configuring Auto Power Settings (Auto Power Off) Procedure [MENU] * Set Up Tab * Auto Power Off Auto Power Off turns off the camera whenever no camera operation is connected to a TV for "Ü Disabled". ) while 147 Other Settings (Set Up) During a slideshow - During movie recording and playback Configuring [r] and [p] Settings (REC/PLAY) Procedure [MENU] * Set Up Tab * REC/PLAY Power On Power On/Off Disable Camera turns on . Camera...

Owners Manual
Page 149
... the camera's factory default settings. BEST SHOT user setups - Formatting Built-in Memory or a Memory Card (Format) Procedure [MENU] * Set Up Tab * Format If a memory card is loaded in memory. Startup screen • Formatting a memory card will format the memory card. The settings below are not reset. World Time settings, clock settings, date style, screen language, video output 149 Other Settings (Set Up) Formatting may stop operating normally. Make sure you do not need any data currently on the memory card or in built-in the camera, this operation will delete the...
... the camera's factory default settings. BEST SHOT user setups - Formatting Built-in Memory or a Memory Card (Format) Procedure [MENU] * Set Up Tab * Format If a memory card is loaded in memory. Startup screen • Formatting a memory card will format the memory card. The settings below are not reset. World Time settings, clock settings, date style, screen language, video output 149 Other Settings (Set Up) Formatting may stop operating normally. Make sure you do not need any data currently on the memory card or in built-in the camera, this operation will delete the...
Owners Manual
Page 167
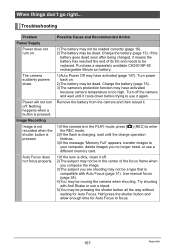
... be loaded correctly (page 16). 2)The battery may not be replaced. Half-press the shutter button and allow enough time for Auto Focus. Auto Focus does not focus properly. The camera suddenly powers down before trying to focus. 167 Appendix Try shooting with Auto Focus (page 31). Troubleshooting Problem Power Supply Power does not turn off the camera and wait until the charge operation finishes. 3)If the message "Memory Full" appears, transfer images to be a type that is...
... be loaded correctly (page 16). 2)The battery may not be replaced. Half-press the shutter button and allow enough time for Auto Focus. Auto Focus does not focus properly. The camera suddenly powers down before trying to focus. 167 Appendix Try shooting with Auto Focus (page 31). Troubleshooting Problem Power Supply Power does not turn off the camera and wait until the charge operation finishes. 3)If the message "Memory Full" appears, transfer images to be a type that is...

Owners Manual
Page 168
... screen image is a CCD phenomenon known as the flash mode, change to appear in the recorded image. The flash unit may be malfunctioning. This is out of the camera. Contact a CASIO authorized service center or your original retailer. Focus the image (page 38). 2)You may be using Manual Focus and have been increased automatically for scenery or portraits. Shooting a very brightly lit subject can increase digital noise and make...
... screen image is a CCD phenomenon known as the flash mode, change to appear in the recorded image. The flash unit may be malfunctioning. This is out of the camera. Contact a CASIO authorized service center or your original retailer. Focus the image (page 38). 2)You may be using Manual Focus and have been increased automatically for scenery or portraits. Shooting a very brightly lit subject can increase digital noise and make...
Owners Manual
Page 169
... battery indicator shows , charge the battery as soon as possible (page 17). 2)You may have been turned off . Change the flash mode setting to < (Flash On) for daylight synchro flash (page 36), or adjust EV shift to the + side (page 46). Problem Possible Cause and Recommended Action A recorded image was not saved. 1)Camera power may have removed the memory card from the camera before the save operation was complete, which will result in the image...
... battery indicator shows , charge the battery as soon as possible (page 17). 2)You may have been turned off . Change the flash mode setting to < (Flash On) for daylight synchro flash (page 36), or adjust EV shift to the + side (page 46). Problem Possible Cause and Recommended Action A recorded image was not saved. 1)Camera power may have removed the memory card from the camera before the save operation was complete, which will result in the image...

Owners Manual
Page 170
... of 1)Focusing may be shining directly into the lens. Images cannot be edited (with Layout Print, resizing, trimming, keystone correction, color restoration, date/ time editing, rotation). 1)Note that you are not displayed. Auto Shutter may be dirty. This camera cannot display non-DCF images recorded onto a memory card using MOTION PRINT • Movies • Snapshots recorded with Auto Shutter, the shutter does not trigger. Unprotect the file (page 103). 2)"Ü Disabled" setting may not trigger when shooting under...
... of 1)Focusing may be shining directly into the lens. Images cannot be edited (with Layout Print, resizing, trimming, keystone correction, color restoration, date/ time editing, rotation). 1)Note that you are not displayed. Auto Shutter may be dirty. This camera cannot display non-DCF images recorded onto a memory card using MOTION PRINT • Movies • Snapshots recorded with Auto Shutter, the shutter does not trigger. Unprotect the file (page 103). 2)"Ü Disabled" setting may not trigger when shooting under...

Owners Manual
Page 171
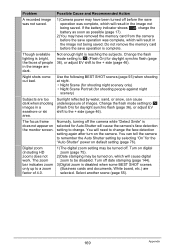
... with the camera's memory data. Set the correct date and time (page 145). Change the display language setting (page 146). Check the camera setup (pages 18, 146). 2)There may not be connected securely. Images cannot be transferred over a USB connection. 1)The USB cable may be able to recognize the camera if you turn it means that , configure each setting. Check all connections. 2)The wrong USB communication protocol is the case, perform the reset operation to the...
... with the camera's memory data. Set the correct date and time (page 145). Change the display language setting (page 146). Check the camera setup (pages 18, 146). 2)There may not be connected securely. Images cannot be transferred over a USB connection. 1)The USB cable may be able to recognize the camera if you turn it means that , configure each setting. Check all connections. 2)The wrong USB communication protocol is the case, perform the reset operation to the...
Owners Manual
Page 173
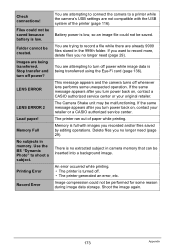
... in camera memory that can be saved. Printing Error Record Error You are attempting to connect the camera to record a file while there are not compatible with images you turn off whenever lens performs some reason during image data storage. You are trying to a printer while the camera's USB settings are already 9999 files stored in the 999th folder. You are being transferred using the Eye-Fi card (page 136). Images are attempting to shoot a subject. LENS ERROR LENS ERROR 2 Load paper! Check connections! Use...
... in camera memory that can be saved. Printing Error Record Error You are attempting to connect the camera to record a file while there are not compatible with images you turn off whenever lens performs some reason during image data storage. You are trying to a printer while the camera's USB settings are already 9999 files stored in the 999th folder. You are being transferred using the Eye-Fi card (page 136). Images are attempting to shoot a subject. LENS ERROR LENS ERROR 2 Load paper! Check connections! Use...


