Owners Manual
Page 3
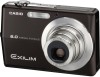
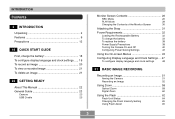
... QUICK START GUIDE First, charge the battery 18 To configure display language and clock settings ..... 19 To record an image 20 To view a recorded image 21 To delete an image 21 22 GETTING READY About This Manual 22 General Guide 23 Camera 23 USB Cradle 25 Monitor Screen Contents 26 REC Mode 26 PLAY Mode 28 Changing the Contents of the Monitor Screen 30 Attaching the Strap 31 Power Requirements 32 Loading the Rechargeable Battery 32 To charge...
... QUICK START GUIDE First, charge the battery 18 To configure display language and clock settings ..... 19 To record an image 20 To view a recorded image 21 To delete an image 21 22 GETTING READY About This Manual 22 General Guide 23 Camera 23 USB Cradle 25 Monitor Screen Contents 26 REC Mode 26 PLAY Mode 28 Changing the Contents of the Monitor Screen 30 Attaching the Strap 31 Power Requirements 32 Loading the Rechargeable Battery 32 To charge...
Owners Manual
Page 4
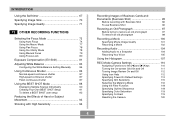
... Image Quality 71 73 OTHER RECORDING FUNCTIONS Selecting the Focus Mode 73 Using Auto Focus 74 Using the Macro Mode 77 Using Pan Focus 78 Using the Infinity Mode 78 Using Manual Focus 79 Using Focus Lock 80 Exposure Compensation (EV Shift 81 Adjusting White Balance 83 Configuring the White Balance Setting Manually 84 Using Continuous Shutter 86 Normal-speed continuous shutter 87 High-speed continuous shutter 87 Flash continuous shutter 87 Using the BEST SHOT Mode 88 Displaying Sample Scenes Individually 90 Creating Your Own BEST SHOT Setup 91 To delete...
... Image Quality 71 73 OTHER RECORDING FUNCTIONS Selecting the Focus Mode 73 Using Auto Focus 74 Using the Macro Mode 77 Using Pan Focus 78 Using the Infinity Mode 78 Using Manual Focus 79 Using Focus Lock 80 Exposure Compensation (EV Shift 81 Adjusting White Balance 83 Configuring the White Balance Setting Manually 84 Using Continuous Shutter 86 Normal-speed continuous shutter 87 High-speed continuous shutter 87 Flash continuous shutter 87 Using the BEST SHOT Mode 88 Displaying Sample Scenes Individually 90 Creating Your Own BEST SHOT Setup 91 To delete...
Owners Manual
Page 6
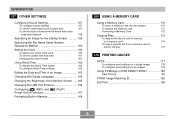
... Time settings 162 Editing the Date and Time of an Image 163 Changing the Display Language 164 Changing the Brightness of the Monitor Screen ..... 165 Changing the USB Port Protocol 166 Configuring [ ] (REC) and [ ] (PLAY) Power On/Off Functions 167 Formatting Built-in Memory 168 169 USING A MEMORY CARD Using a Memory Card 170 To insert a memory card into the camera 170 To replace the memory card 171 Formatting a Memory Card 172 Copying Files 173 To copy all the files in built-in memory to a memory card 174 To copy a specific file from a memory card...
... Time settings 162 Editing the Date and Time of an Image 163 Changing the Display Language 164 Changing the Brightness of the Monitor Screen ..... 165 Changing the USB Port Protocol 166 Configuring [ ] (REC) and [ ] (PLAY) Power On/Off Functions 167 Formatting Built-in Memory 168 169 USING A MEMORY CARD Using a Memory Card 170 To insert a memory card into the camera 170 To replace the memory card 171 Formatting a Memory Card 172 Copying Files 173 To copy all the files in built-in memory to a memory card 174 To copy a specific file from a memory card...

Owners Manual
Page 7
... 199 Memory Folder Structure 200 Image Files Supported by the Camera 201 218 APPENDIX Menu Reference 218 Indicator Lamp Reference 221 Troubleshooting Guide 224 If you have problems installing the USB driver... 229 Display Messages 230 Specifications 232 203 USING THE CAMERA WITH A COMPUTER Using the Camera with a Windows Computer ........ 203 Selecting the Software You Need 203 Computer System Requirements 205 Managing Images on a PC 206 Retouching, Reorienting, and Printing a Snapshot 209 Playing a Movie 211 Viewing User Documentation (PDF Files) 212 User...
... 199 Memory Folder Structure 200 Image Files Supported by the Camera 201 218 APPENDIX Menu Reference 218 Indicator Lamp Reference 221 Troubleshooting Guide 224 If you have problems installing the USB driver... 229 Display Messages 230 Specifications 232 203 USING THE CAMERA WITH A COMPUTER Using the Camera with a Windows Computer ........ 203 Selecting the Software You Need 203 Computer System Requirements 205 Managing Images on a PC 206 Retouching, Reorienting, and Printing a Snapshot 209 Playing a Movie 211 Viewing User Documentation (PDF Files) 212 User...

Owners Manual
Page 8
... or claims by deletion of data as stipulated above, all important data on other media to protect against its loss. • Note that the example screens and product illustrations shown in the United States and/or other related rights to these applications revert to CASIO COMPUTER CO., LTD. 8 Except as a result of malfunction, repairs, or battery replacement. assumes no responsibility...
... or claims by deletion of data as stipulated above, all important data on other media to protect against its loss. • Note that the example screens and product illustrations shown in the United States and/or other related rights to these applications revert to CASIO COMPUTER CO., LTD. 8 Except as a result of malfunction, repairs, or battery replacement. assumes no responsibility...
Owners Manual
Page 23
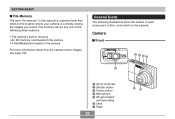
... camera's built-in memory • An SD memory card loaded in the camera • A MultiMediaCard loaded in this manual is a general term that refers to the location where your camera is currently storing the images you record. Camera I File Memory The term "file memory" in the camera For more information about how the camera stores images, see page 199. GETTING READY I Front 2 345 1 1 Zoom controller 2 Shutter button 3 Power button 4 Microphone 5 AF assist light/ self-timer lamp 6 Lens 7 Flash 23...
... camera's built-in memory • An SD memory card loaded in the camera • A MultiMediaCard loaded in this manual is a general term that refers to the location where your camera is currently storing the images you record. Camera I File Memory The term "file memory" in the camera For more information about how the camera stores images, see page 199. GETTING READY I Front 2 345 1 1 Zoom controller 2 Shutter button 3 Power button 4 Microphone 5 AF assist light/ self-timer lamp 6 Lens 7 Flash 23...
Owners Manual
Page 43
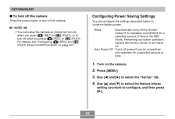
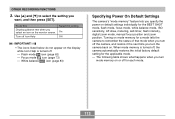
... time. 1. Use [̆] and [̄] to select the feature whose setting you do not perform any button operation causes the monitor screen to conserve battery power. Sleep : Automatically turns off the monitor screen if no operation is performed for a specified amount of time in the REC mode. Auto Power Off : Turns off power if you want to turn off the camera. For details, see "Configuring [ ] (REC) and [ ] (PLAY) Power On/Off Functions...
... time. 1. Use [̆] and [̄] to select the feature whose setting you do not perform any button operation causes the monitor screen to conserve battery power. Sleep : Automatically turns off the monitor screen if no operation is performed for a specified amount of time in the REC mode. Auto Power Off : Turns off power if you want to turn off the camera. For details, see "Configuring [ ] (REC) and [ ] (PLAY) Power On/Off Functions...
Owners Manual
Page 44
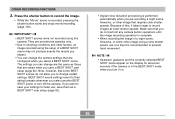
... operate in the PLAY mode. • Pressing any button while the camera is in the following cases. - While a movie is connected to use menus. While playing back a movie NOTE • You also can conserve battery power by selecting "0" for information about how to a computer or some other device through the USB cradle - While playing back a voice recording file - To configure this feature: Sleep Auto Power Off Select this setting...
... operate in the PLAY mode. • Pressing any button while the camera is in the following cases. - While a movie is connected to use menus. While playing back a movie NOTE • You also can conserve battery power by selecting "0" for information about how to a computer or some other device through the USB cradle - While playing back a voice recording file - To configure this feature: Sleep Auto Power Off Select this setting...
Owners Manual
Page 77
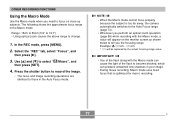
... the shutter button to record the image. • The focus and image recording operations are identical to select " Macro", and then press [SET]. 4. NOTE • When the Macro mode cannot focus properly because the subject is too far away, the camera automatically switches to the Auto Focus range (page 74). • Whenever you the focusing range. The following shows the approximate focus range in your image. • During movie recording, Macro mode uses fixed focus that is...
... the shutter button to record the image. • The focus and image recording operations are identical to select " Macro", and then press [SET]. 4. NOTE • When the Macro mode cannot focus properly because the subject is too far away, the camera automatically switches to the Auto Focus range (page 74). • Whenever you the focusing range. The following shows the approximate focus range in your image. • During movie recording, Macro mode uses fixed focus that is...
Owners Manual
Page 89
... turn it takes longer to save a BEST SHOT user setup (page 92). IMPORTANT! • BEST SHOT scenes were not recorded using the setup of this camera. BEST SHOT scene settings revert to their default presets whenever you expect. • You can change certain settings. NOTE • Operation guidance and the currently selected BEST SHOT scene appear on . 89 They are saved when you want to record images at lower shutter speeds. If you save your settings...
... turn it takes longer to save a BEST SHOT user setup (page 92). IMPORTANT! • BEST SHOT scenes were not recorded using the setup of this camera. BEST SHOT scene settings revert to their default presets whenever you expect. • You can change certain settings. NOTE • Operation guidance and the currently selected BEST SHOT scene appear on . 89 They are saved when you want to record images at lower shutter speeds. If you save your settings...
Owners Manual
Page 113
...for each mode. 113 Turning on mode memory for a mode tells the camera to select the setting you turn the camera back on the display while Icon Help is turned off Icon Help Select this : Display guidance text when you specify the power on the monitor screen. OTHER RECORDING FUNCTIONS 3. Turn off , the camera automatically restores the initial factory default setting for the BEST SHOT mode, flash mode, focus mode, white balance mode, ISO sensitivity, AF Area, metering, self-timer, flash intensity, digital zoom mode, manual focus position and zoom position. Focus mode icon (page 73...
...for each mode. 113 Turning on mode memory for a mode tells the camera to select the setting you turn the camera back on the display while Icon Help is turned off Icon Help Select this : Display guidance text when you specify the power on the monitor screen. OTHER RECORDING FUNCTIONS 3. Turn off , the camera automatically restores the initial factory default setting for the BEST SHOT mode, flash mode, focus mode, white balance mode, ISO sensitivity, AF Area, metering, self-timer, flash intensity, digital zoom mode, manual focus position and zoom position. Focus mode icon (page 73...
Owners Manual
Page 120
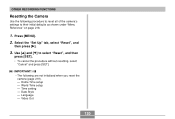
... the camera's settings to select "Reset", and then press [SET]. • To cancel the procedure without resetting, select "Cancel" and press [SET]. Press [MENU]. 2. Select the "Set Up" tab, select "Reset", and then press [̈]. 3. World Time setup - Video Out 120 Home Time setup - Date Style - Time setting - Language - OTHER RECORDING FUNCTIONS Resetting the Camera Use the following are not initialized when you reset the camera (page 219). - Use [̆] and [̄] to their initial defaults as...
... the camera's settings to select "Reset", and then press [SET]. • To cancel the procedure without resetting, select "Cancel" and press [SET]. Press [MENU]. 2. Select the "Set Up" tab, select "Reset", and then press [̈]. 3. World Time setup - Video Out 120 Home Time setup - Date Style - Time setting - Language - OTHER RECORDING FUNCTIONS Resetting the Camera Use the following are not initialized when you reset the camera (page 219). - Use [̆] and [̄] to their initial defaults as...
Owners Manual
Page 126
Move the zoom controller left , and right. 6. Movie images and the voice recording file icon - PLAYBACK 4. Press [SET] to be stored as separate files. • Note that appear when the image is displayed indicate when the image was originally recorded, not when the image was cropped. 126 Images recorded with MOTION PRINT - Use and [̈] to to scroll the part to extract the part of images. - Images created with another camera • The cropping operation cannot be...
Move the zoom controller left , and right. 6. Movie images and the voice recording file icon - PLAYBACK 4. Press [SET] to be stored as separate files. • Note that appear when the image is displayed indicate when the image was originally recorded, not when the image was cropped. 126 Images recorded with MOTION PRINT - Use and [̈] to to scroll the part to extract the part of images. - Images created with another camera • The cropping operation cannot be...
Owners Manual
Page 145
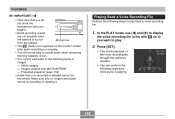
... PLAY mode, use [̇] and [̈] to display the voice recording file (a file with MOTION PRINT - Playing Back a Voice Recording File Perform the following steps to the following types of the voice recording file through the camera's speaker. • You can perform the following operations while audio is playing. 145 Press [SET]. • This starts playback of images. - Protected snapshot (page 152) • Audio that you no longer need audio before re-recording...
... PLAY mode, use [̇] and [̈] to display the voice recording file (a file with MOTION PRINT - Playing Back a Voice Recording File Perform the following steps to the following types of the voice recording file through the camera's speaker. • You can perform the following operations while audio is playing. 145 Press [SET]. • This starts playback of images. - Protected snapshot (page 152) • Audio that you no longer need audio before re-recording...
Owners Manual
Page 147
... cable. - Set the camera onto the USB cradle. 4. Turn off functions (page 167) when you can record movies by selecting " Only" for playback. The following explains how to the VIDEO IN and AUDIO IN terminals. - You can view recorded images on the size of a TV, you connect to a TV to the [AV OUT] (AV output port) - DVD recorder or video deck: Connect to use the camera's USB cradle to connect to compose images...
... cable. - Set the camera onto the USB cradle. 4. Turn off functions (page 167) when you can record movies by selecting " Only" for playback. The following explains how to the VIDEO IN and AUDIO IN terminals. - You can view recorded images on the size of a TV, you connect to a TV to the [AV OUT] (AV output port) - DVD recorder or video deck: Connect to use the camera's USB cradle to connect to compose images...
Owners Manual
Page 168
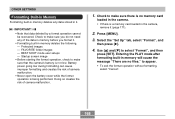
... the camera, remove it . Press [MENU]. 3. Entering the PLAY mode after formatting built-in memory will cause the message "There are no memory card loaded in the camera. • If there is not low. Protected images - Doing so creates the risk of camera malfunction. • Never open the battery cover while the format operation is no files." Check to make sure that data deleted by a format operation cannot be recovered. Startup screen image • Before starting the format operation...
... the camera, remove it . Press [MENU]. 3. Entering the PLAY mode after formatting built-in memory will cause the message "There are no memory card loaded in the camera. • If there is not low. Protected images - Doing so creates the risk of camera malfunction. • Never open the battery cover while the format operation is no files." Check to make sure that data deleted by a format operation cannot be recovered. Startup screen image • Before starting the format operation...
Owners Manual
Page 190
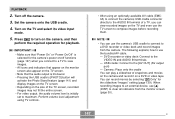
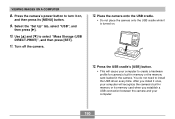
VIEWING IMAGES ON A COMPUTER 8. You do not need to select "Mass Storage (USB DIRECT-PRINT)", and then press [SET]. 11. After you install it on . 13. Use [̆] and [̄] to install the USB driver every time. Turn off the camera. 12. Place the camera onto the USB cradle. • Do not place the camera onto the USB cradle while it is turned on , and then press its memory card when you establish...
VIEWING IMAGES ON A COMPUTER 8. You do not need to select "Mass Storage (USB DIRECT-PRINT)", and then press [SET]. 11. After you install it on . 13. Use [̆] and [̄] to install the USB driver every time. Turn off the camera. 12. Place the camera onto the USB cradle. • Do not place the camera onto the USB cradle while it is turned on , and then press its memory card when you establish...

Owners Manual
Page 203
... of images transferred to a computer Photo Loader 2.3 * DirectX 9.0c Supported Windows Versions XP/2000/Me 98SE/98 XP/2000/Me/98SE/98 Required Operation Use the USB cradle to establish a connection between the camera and computer. Install the USB driver Type B (page 186). Note that allows you to perform depends on whether you are using it in combination with them. Selecting the Software You Need Install the software...
... of images transferred to a computer Photo Loader 2.3 * DirectX 9.0c Supported Windows Versions XP/2000/Me 98SE/98 XP/2000/Me/98SE/98 Required Operation Use the USB cradle to establish a connection between the camera and computer. Install the USB driver Type B (page 186). Note that allows you to perform depends on whether you are using it in combination with them. Selecting the Software You Need Install the software...
Owners Manual
Page 223
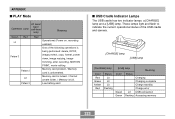
...format, power down, image resizing, image trimming, after recording, MOTION PRINT, movie editing Pattern 2 Memory card problem / Memory card is full. APPENDIX I USB Cradle Indicator Lamps The USB cradle has two indicator lamps: a [CHARGE] lamp and a [USB] lamp. Memory card is locked. / Cannot Lit create folder. / Memory is unformatted. Pattern 3 Low battery alert I PLAY Mode Operation Lamp AF assist light / self-timer lamp Meaning Green Red Red Operational (Power on, recording Lit enabled) One of the USB cradle and camera. [CHARGE] lamp [USB] lamp [CHARGE] lamp Color...
...format, power down, image resizing, image trimming, after recording, MOTION PRINT, movie editing Pattern 2 Memory card problem / Memory card is full. APPENDIX I USB Cradle Indicator Lamps The USB cradle has two indicator lamps: a [CHARGE] lamp and a [USB] lamp. Memory card is locked. / Cannot Lit create folder. / Memory is unformatted. Pattern 3 Low battery alert I PLAY Mode Operation Lamp AF assist light / self-timer lamp Meaning Green Red Red Operational (Power on, recording Lit enabled) One of the USB cradle and camera. [CHARGE] lamp [USB] lamp [CHARGE] lamp Color...
Owners Manual
Page 228
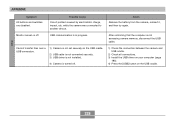
Cannot transfer files over a USB connection. 1) Camera is not set securely on the USB cradle. Other 228 Monitor screen is turned off . USB communication is not accessing camera memory, disconnect the USB cable. 1) Check the connection between the camera and USB cradle. 2) Check all connections. 3) Install the USB driver on your computer (page 186). 4) Press the [USB] button on the USB cradle. 2) USB cable is not connected securely. 3) USB driver is not installed. 4) Camera is off . APPENDIX Symptom All buttons and switches are disabled. Possible...
Cannot transfer files over a USB connection. 1) Camera is not set securely on the USB cradle. Other 228 Monitor screen is turned off . USB communication is not accessing camera memory, disconnect the USB cable. 1) Check the connection between the camera and USB cradle. 2) Check all connections. 3) Install the USB driver on your computer (page 186). 4) Press the [USB] button on the USB cradle. 2) USB cable is not connected securely. 3) USB driver is not installed. 4) Camera is off . APPENDIX Symptom All buttons and switches are disabled. Possible...


