Owners Manual
Page 2
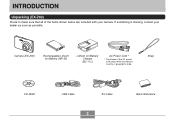
Strap CD-ROM USB Cable AV Cable 2 Basic Reference Camera (EX-Z60) Rechargeable Lithium Ion Battery (NP-20) Lithium Ion Battery Charger (BC-11L) AC Power Cord * * The shape of the items shown below are included with your dealer as soon as possible. INTRODUCTION INTRODUCTION Unpacking (EX-Z60) Check to make sure that all of the AC power cord plug varies according to country or geographic area. If something is missing, contact your camera.
Strap CD-ROM USB Cable AV Cable 2 Basic Reference Camera (EX-Z60) Rechargeable Lithium Ion Battery (NP-20) Lithium Ion Battery Charger (BC-11L) AC Power Cord * * The shape of the items shown below are included with your dealer as soon as possible. INTRODUCTION INTRODUCTION Unpacking (EX-Z60) Check to make sure that all of the AC power cord plug varies according to country or geographic area. If something is missing, contact your camera.

Owners Manual
Page 3
... the items shown below are included with your dealer as soon as possible. INTRODUCTION Unpacking (EX-Z60DX) Check to country or geographic area. Camera (EX-Z60) Rechargeable Lithium Ion Battery (NP-20) USB Cradle (CA-32) Strap CD-ROM USB Cable AV Cable Basic Reference • Note that all of the AC adaptor depends on the area...
... the items shown below are included with your dealer as soon as possible. INTRODUCTION Unpacking (EX-Z60DX) Check to country or geographic area. Camera (EX-Z60) Rechargeable Lithium Ion Battery (NP-20) USB Cradle (CA-32) Strap CD-ROM USB Cable AV Cable Basic Reference • Note that all of the AC adaptor depends on the area...
Owners Manual
Page 158
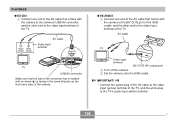
...) 2 Turn off the camera. 3 Set the camera onto the USB cradle. PLAYBACK G EX-Z60 1 Connect one end of the AV cable that is facing in the same direction as the front (lens side) of the TV. Yellow White (Video) (Audio) AV cable Video input terminal TV USB/AV connector Make sure that the side of the... connector that comes with the camera to the [AV OUT] port of the USB cradle, and the other end to the video input terminal of the TV. G EX-Z60DX 1 Connect one end of the AV cable that comes with an arrow (̆) is marked with the camera to the camera...
...) 2 Turn off the camera. 3 Set the camera onto the USB cradle. PLAYBACK G EX-Z60 1 Connect one end of the AV cable that is facing in the same direction as the front (lens side) of the TV. Yellow White (Video) (Audio) AV cable Video input terminal TV USB/AV connector Make sure that the side of the... connector that comes with the camera to the [AV OUT] port of the USB cradle, and the other end to the video input terminal of the TV. G EX-Z60DX 1 Connect one end of the AV cable that comes with an arrow (̆) is marked with the camera to the camera...
Owners Manual
Page 159
... for playback. • EX-Z60DX: Press [ ] or [ ] to maximum. Perform volume level adjustment using TV controls. • After using an optionally available AV cable (EMC3A) to connect the camera's USB/AV connector directly to the AUDIO IN terminal of a TV (without using the USB cable), you connect to a ... during recording may not fill the entire screen (EX-Z60). • Depending on the size of the following operations. • EX-Z60: Press [ ] to turn on the TV and even use the TV screen to compose images before recording them (EX-Z60DX). IMPORTANT! • Make sure that the...
... for playback. • EX-Z60DX: Press [ ] or [ ] to maximum. Perform volume level adjustment using TV controls. • After using an optionally available AV cable (EMC3A) to connect the camera's USB/AV connector directly to the AUDIO IN terminal of a TV (without using the USB cable), you connect to a ... during recording may not fill the entire screen (EX-Z60). • Depending on the size of the following operations. • EX-Z60: Press [ ] to turn on the TV and even use the TV screen to compose images before recording them (EX-Z60DX). IMPORTANT! • Make sure that the...
Owners Manual
Page 193
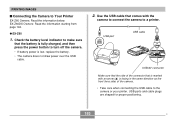
... connector Make sure that the side of the camera. • Take care when connecting the USB cable to turn off the camera. • If battery power is fully charged, and then press the power button to the camera or your printer. ...camera to Your Printer EX-Z60 Owners: Read the information below. PRINTING IMAGES I Connecting the Camera to a printer. EX-Z60DX Owners: Read the information starting from page 194. Use the USB cable that the battery is low, replace the battery. • The camera does not draw power over the USB cable. 2. G EX-Z60 1. USB ports and cable plugs are shaped ...
... connector Make sure that the side of the camera. • Take care when connecting the USB cable to turn off the camera. • If battery power is fully charged, and then press the power button to the camera or your printer. ...camera to Your Printer EX-Z60 Owners: Read the information below. PRINTING IMAGES I Connecting the Camera to a printer. EX-Z60DX Owners: Read the information starting from page 194. Use the USB cable that the battery is low, replace the battery. • The camera does not draw power over the USB cable. 2. G EX-Z60 1. USB ports and cable plugs are shaped ...

Owners Manual
Page 196
PRINTING IMAGES 6. Selecting this step to reappear. • The print menu will disappear after printing is complete. • EX-Z60: Turn off the camera and then disconnect the USB cable from the camera. • EX-Z60DX: Press the USB cradle's [USB] button and then turn off by pressing [BS]. On the camera's monitor screen, use [̇] and [̈...
PRINTING IMAGES 6. Selecting this step to reappear. • The print menu will disappear after printing is complete. • EX-Z60: Turn off the camera and then disconnect the USB cable from the camera. • EX-Z60DX: Press the USB cradle's [USB] button and then turn off by pressing [BS]. On the camera's monitor screen, use [̇] and [̈...
Owners Manual
Page 202
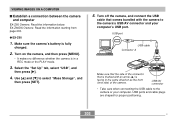
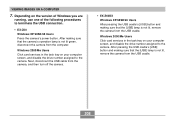
... and then press [SET]. 5. USB port USB cable Connector A Make sure that the side of the connector that comes bundled with an arrow (̆) is in the same direction as the front (lens side) of the camera. G EX-Z60 1. Select the "Set Up" tab, select "USB", and then press [̈]. 4.... Turn off the camera, and connect the USB cable that is fully charged. 2. VIEWING IMAGES ON A COMPUTER I Establish a connection between the camera...
... and then press [SET]. 5. USB port USB cable Connector A Make sure that the side of the connector that comes bundled with an arrow (̆) is in the same direction as the front (lens side) of the camera. G EX-Z60 1. Select the "Set Up" tab, select "USB", and then press [̈]. 4.... Turn off the camera, and connect the USB cable that is fully charged. 2. VIEWING IMAGES ON A COMPUTER I Establish a connection between the camera...
Owners Manual
Page 208
... number assigned to terminate the USB connection. • EX-Z60 Windows XP/98SE/98 Users Press the camera's power button. Next, disconnect the USB cable from the camera, and then turn off the camera. • EX-Z60DX Windows XP/98SE/98 Users After pressing the USB cradle's [USB] button and making sure that the [USB] lamp is not lit...
... number assigned to terminate the USB connection. • EX-Z60 Windows XP/98SE/98 Users Press the camera's power button. Next, disconnect the USB cable from the camera, and then turn off the camera. • EX-Z60DX Windows XP/98SE/98 Users After pressing the USB cradle's [USB] button and making sure that the [USB] lamp is not lit...

Owners Manual
Page 215
... Always copy images to your computer screen for a long time. After making sure that the cradle's USB lamp is in the number of the following operations to terminate the USB connection. • EX-Z60: On your computer to edit, delete, move , or rename operation. 4. Doing so can cause ...data to "burn in" on the camera or it may cause large error in progress. Next, disconnect the USB cable from the cradle. Perform either...
... Always copy images to your computer screen for a long time. After making sure that the cradle's USB lamp is in the number of the following operations to terminate the USB connection. • EX-Z60: On your computer to edit, delete, move , or rename operation. 4. Doing so can cause ...data to "burn in" on the camera or it may cause large error in progress. Next, disconnect the USB cable from the cradle. Perform either...

Owners Manual
Page 253
AC power cord; USB cable; USB cradle (CA-32); Special AC adaptor; AV Cable; AV Cable; USB cable; APPENDIX *1 Number of Shots (CIPA Standard) • Temperature: 23°C (73°F) • Monitor Screen: On • Zoom operation ...projections; 16.2mm (0.64˝) at thinnest part) Weight Approximately 118 g (4.2 oz) (excluding battery and accessories) Bundled Accessories EX-Z60 Rechargeable lithium ion battery (NP20); Basic Reference • EX-Z60DX Rechargeable lithium ion battery (NP20); AC power cord; Strap; CD-ROM; CD-ROM; power turned off and back on every...
AC power cord; USB cable; USB cradle (CA-32); Special AC adaptor; AV Cable; AV Cable; USB cable; APPENDIX *1 Number of Shots (CIPA Standard) • Temperature: 23°C (73°F) • Monitor Screen: On • Zoom operation ...projections; 16.2mm (0.64˝) at thinnest part) Weight Approximately 118 g (4.2 oz) (excluding battery and accessories) Bundled Accessories EX-Z60 Rechargeable lithium ion battery (NP20); Basic Reference • EX-Z60DX Rechargeable lithium ion battery (NP20); AC power cord; Strap; CD-ROM; CD-ROM; power turned off and back on every...


