Owners Manual
Page 3
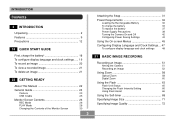
... replace the battery 37 Power Supply Precautions 38 Turning the Camera On and Off 42 Configuring Power Saving Settings 43 Using the On-screen Menus 45 Configuring Display Language and Clock Settings ... 47 To configure display language and clock settings 48 51 BASIC IMAGE RECORDING Recording an Image 51 Aiming the Camera 51 Recording an Image 52 Using Zoom 58 Optical Zoom 58 Digital Zoom 60 Using the Flash 63 Flash Unit Status 65 Changing the Flash Intensity Setting 66 Using Flash Assist 66 Using the Self-timer 68 Specifying Image Size...
... replace the battery 37 Power Supply Precautions 38 Turning the Camera On and Off 42 Configuring Power Saving Settings 43 Using the On-screen Menus 45 Configuring Display Language and Clock Settings ... 47 To configure display language and clock settings 48 51 BASIC IMAGE RECORDING Recording an Image 51 Aiming the Camera 51 Recording an Image 52 Using Zoom 58 Optical Zoom 58 Digital Zoom 60 Using the Flash 63 Flash Unit Status 65 Changing the Flash Intensity Setting 66 Using Flash Assist 66 Using the Self-timer 68 Specifying Image Size...
Owners Manual
Page 6
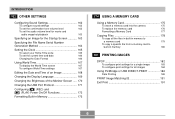
...and [ ] (PLAY) Power On/Off Functions 172 Formatting Built-in Memory 173 174 USING A MEMORY CARD Using a Memory Card 175 To insert a memory card into the camera 175 To replace the memory card 176 Formatting a Memory Card 177 Copying Files 178 To copy all the files in built-in memory to a memory card 179 To copy a specific file from a memory card to built-in memory 180 181 PRINTING IMAGES DPOF 182 To configure print settings for a single image 183 To configure print settings for all images 184 Using PictBridge or USB DIRECT-PRINT 186 Date Printing 189 PRINT Image...
...and [ ] (PLAY) Power On/Off Functions 172 Formatting Built-in Memory 173 174 USING A MEMORY CARD Using a Memory Card 175 To insert a memory card into the camera 175 To replace the memory card 176 Formatting a Memory Card 177 Copying Files 178 To copy all the files in built-in memory to a memory card 179 To copy a specific file from a memory card to built-in memory 180 181 PRINTING IMAGES DPOF 182 To configure print settings for a single image 183 To configure print settings for all images 184 Using PictBridge or USB DIRECT-PRINT 186 Date Printing 189 PRINT Image...

Owners Manual
Page 7
INTRODUCTION 192 VIEWING IMAGES ON A COMPUTER Using the Camera with a Windows Computer ........ 192 Using the Camera with a Macintosh Computer ....... 199 Using a Memory Card to Transfer Images to a Computer 203 Memory Data 204 DCF Protocol 204 Memory Folder Structure 205 Image Files Supported by the Camera 206 227 APPENDIX Menu Reference 227 Indicator Lamp Reference 230 Troubleshooting Guide 233 If you have problems installing the USB driver... 238 Display Messages 239 Specifications 241 208 USING THE CAMERA WITH A COMPUTER Using the Camera with a Windows Computer ...
INTRODUCTION 192 VIEWING IMAGES ON A COMPUTER Using the Camera with a Windows Computer ........ 192 Using the Camera with a Macintosh Computer ....... 199 Using a Memory Card to Transfer Images to a Computer 203 Memory Data 204 DCF Protocol 204 Memory Folder Structure 205 Image Files Supported by the Camera 206 227 APPENDIX Menu Reference 227 Indicator Lamp Reference 230 Troubleshooting Guide 233 If you have problems installing the USB driver... 238 Display Messages 239 Specifications 241 208 USING THE CAMERA WITH A COMPUTER Using the Camera with a Windows Computer ...
Owners Manual
Page 8
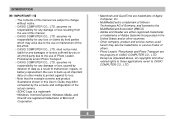
... and service names used herein may differ somewhat by deletion of data as a result of malfunction, repairs, or battery replacement. assumes no responsibility for any third party due to change without notice. • CASIO COMPUTER CO., LTD. assumes no responsibility for any damage or loss caused by the screens and configuration of the actual camera. • SDHC Logo is a trademark. • Windows...
... and service names used herein may differ somewhat by deletion of data as a result of malfunction, repairs, or battery replacement. assumes no responsibility for any third party due to change without notice. • CASIO COMPUTER CO., LTD. assumes no responsibility for any damage or loss caused by the screens and configuration of the actual camera. • SDHC Logo is a trademark. • Windows...
Owners Manual
Page 23
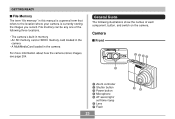
...; The camera's built-in memory • An SD memory card or SDHC memory card loaded in the camera • A MultiMediaCard loaded in this manual is a general term that refers to the location where your camera is currently storing the images you record. File memory can be any one of each component, button, and switch on the camera. GETTING READY I Front 2 345 1 1 Zoom controller 2 Shutter button 3 Power button 4 Microphone 5 AF assist light/ self-timer lamp 6 Lens 7 Flash 23 76...
...; The camera's built-in memory • An SD memory card or SDHC memory card loaded in the camera • A MultiMediaCard loaded in this manual is a general term that refers to the location where your camera is currently storing the images you record. File memory can be any one of each component, button, and switch on the camera. GETTING READY I Front 2 345 1 1 Zoom controller 2 Shutter button 3 Power button 4 Microphone 5 AF assist light/ self-timer lamp 6 Lens 7 Flash 23 76...
Owners Manual
Page 43
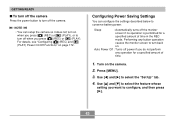
... turn off the camera Press the power button to turn back on. Performing any operation for a specified amount of time. 1. Use [̇] and [̈] to conserve battery power. Configuring Power Saving Settings You can setup the camera so it does not turn on when you press [ ] (REC) or [ ] (PLAY), or to turn off when you want to select the feature whose setting you press [ ] (REC) or [ ] (PLAY). Auto Power Off : Turns off power if...
... turn off the camera Press the power button to turn back on. Performing any operation for a specified amount of time. 1. Use [̇] and [̈] to conserve battery power. Configuring Power Saving Settings You can setup the camera so it does not turn on when you press [ ] (REC) or [ ] (PLAY), or to turn off when you want to select the feature whose setting you press [ ] (REC) or [ ] (PLAY). Auto Power Off : Turns off power if...
Owners Manual
Page 44
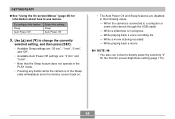
... monitor screen brightness setting (page 170). 44 While playing back a voice recording file - Use [̆] and [̄] to change the currently selected setting, and then press [SET]. • Available Sleep settings are: "30 sec", "1 min", "2 min", and "Off". • Available Auto Power Off settings are: "2 min" and "5 min". • Note that the Sleep feature does not operate in the PLAY mode. • Pressing any button while the camera...
... monitor screen brightness setting (page 170). 44 While playing back a voice recording file - Use [̆] and [̄] to change the currently selected setting, and then press [SET]. • Available Sleep settings are: "30 sec", "1 min", "2 min", and "Off". • Available Auto Power Off settings are: "2 min" and "5 min". • Note that the Sleep feature does not operate in the PLAY mode. • Pressing any button while the camera...
Owners Manual
Page 48
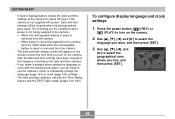
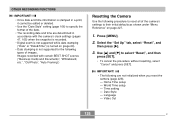
... power button, [ ] (REC) or [ ] (PLAY) to turn on the camera after the date and time settings have been cleared. Use and [̈] to select the language you will need to use the camera's menu to individually change the language (page 169) or clock (page 165) settings. • The time and date setting is used by the Time Stamp feature and the DPOF date stamp (pages 124, 182). GETTING READY • A built-in backup battery retains the date...
... power button, [ ] (REC) or [ ] (PLAY) to turn on the camera after the date and time settings have been cleared. Use and [̈] to select the language you will need to use the camera's menu to individually change the language (page 169) or clock (page 165) settings. • The time and date setting is used by the Time Stamp feature and the DPOF date stamp (pages 124, 182). GETTING READY • A built-in backup battery retains the date...
Owners Manual
Page 58
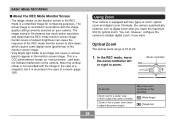
... screen in the REC mode is recorded in the case of a movie (page 105). Zoom controller ON/OFF To do this: Zoom out for a wider view (main subject becomes smaller) Zoom in accordance with two types of the camera. Using Zoom Your camera is a CCD phenomenon known as "vertical smear", and does not indicate malfunction of zoom: optical zoom and digital zoom. The actual image is 1X to zoom. Optical Zoom...
... screen in the REC mode is recorded in the case of a movie (page 105). Zoom controller ON/OFF To do this: Zoom out for a wider view (main subject becomes smaller) Zoom in accordance with two types of the camera. Using Zoom Your camera is a CCD phenomenon known as "vertical smear", and does not indicate malfunction of zoom: optical zoom and digital zoom. The actual image is 1X to zoom. Optical Zoom...
Owners Manual
Page 79
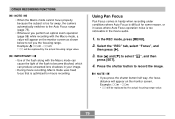
... Auto Focus operation noise is too noticeable in your image. • During movie recording, Macro mode uses fixed focus that is too far away, the camera automatically switches to the Auto Focus range (page 75). • Whenever you perform an optical zoom operation (page 58) while recording with the Macro mode can cause the light of the flash to tell you press the shutter button half way, the focus distance will be replaced by the actual focusing...
... Auto Focus operation noise is too noticeable in your image. • During movie recording, Macro mode uses fixed focus that is too far away, the camera automatically switches to the Auto Focus range (page 75). • Whenever you perform an optical zoom operation (page 58) while recording with the Macro mode can cause the light of the flash to tell you press the shutter button half way, the focus distance will be replaced by the actual focusing...
Owners Manual
Page 91
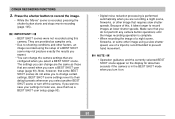
... movement. NOTE • Operation guidance and the currently selected BEST SHOT scene appear on the display for later use of this camera. OTHER RECORDING FUNCTIONS 3. Press the shutter button to record the image. • While the "Movie" scene is recommended to record images at lower shutter speeds. Make sure that are provided as a BEST SHOT user setup (page 93). • Digital noise reduction processing is in the BEST SHOT mode when you select...
... movement. NOTE • Operation guidance and the currently selected BEST SHOT scene appear on the display for later use of this camera. OTHER RECORDING FUNCTIONS 3. Press the shutter button to record the image. • While the "Movie" scene is recommended to record images at lower shutter speeds. Make sure that are provided as a BEST SHOT user setup (page 93). • Digital noise reduction processing is in the BEST SHOT mode when you select...
Owners Manual
Page 108
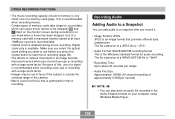
Make sure you select the optical zoom setting you want to use of a tripod is disabled during recording to start movie recording (page 58). • The effects of camera movement in memory is the Windows standard format for macro recording. Recording Audio Adding Audio to a Snapshot You can add audio to a snapshot after you record close ups or recording with a maximum transfer speed of memory cards take longer to record data, which can cause movie frames to...
Make sure you select the optical zoom setting you want to use of a tripod is disabled during recording to start movie recording (page 58). • The effects of camera movement in memory is the Windows standard format for macro recording. Recording Audio Adding Audio to a Snapshot You can add audio to a snapshot after you record close ups or recording with a maximum transfer speed of memory cards take longer to record data, which can cause movie frames to...
Owners Manual
Page 118
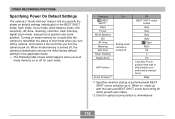
...mode memory for the BEST SHOT mode, flash mode, focus mode, white balance mode, ISO sensitivity, AF Area, metering, self-timer, flash intensity, digital zoom mode, manual focus position and zoom position. Function BEST SHOT*1 Flash Focus White Balance ISO AF Area Metering Self-timer Flash Intensity Digital Zoom On Setting when camera is turned off MF Position Zoom Position*2 Off BEST SHOT status cancel Auto Auto Auto Auto Spot Multi Off 0 On Last Auto Focus position that mode when you turn off the camera, and restore it the next time you turn mode memory on . When on default settings...
...mode memory for the BEST SHOT mode, flash mode, focus mode, white balance mode, ISO sensitivity, AF Area, metering, self-timer, flash intensity, digital zoom mode, manual focus position and zoom position. Function BEST SHOT*1 Flash Focus White Balance ISO AF Area Metering Self-timer Flash Intensity Digital Zoom On Setting when camera is turned off MF Position Zoom Position*2 Off BEST SHOT status cancel Auto Auto Auto Auto Spot Multi Off 0 On Last Auto Focus position that mode when you turn off the camera, and restore it the next time you turn mode memory on . When on default settings...
Owners Manual
Page 125
... SHOT scenes ("Business Cards and Documents", "Whiteboard, etc.", "Old Photo", "Auto Framing") Resetting the Camera Use the following types of images. Video Out 125 B OTHER RECORDING FUNCTIONS IMPORTANT! • Once date and time information is not supported for the following procedure to reset all of the camera's settings to their initial defaults as shown under "Menu Reference" on (page 60). • Date stamping is stamped in a print, it cannot be edited or deleted. • Use the "Date...
... SHOT scenes ("Business Cards and Documents", "Whiteboard, etc.", "Old Photo", "Auto Framing") Resetting the Camera Use the following types of images. Video Out 125 B OTHER RECORDING FUNCTIONS IMPORTANT! • Once date and time information is not supported for the following procedure to reset all of the camera's settings to their initial defaults as shown under "Menu Reference" on (page 60). • Date stamping is stamped in a print, it cannot be edited or deleted. • Use the "Date...
Owners Manual
Page 152
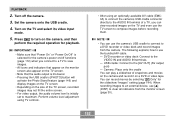
... mode. 5. When recording images to an external device, use the TV screen to maximum. Set the camera onto the USB cradle. 4. IMPORTANT! • Make sure that "Power On" or "Power On/Off" is selected for the camera's power on the camera, and then perform the required operation for the slideshow "Images" setting (page 144). Perform volume level adjustment using TV controls. • After using an optionally available AV cable (EMC3A) to connect the camera's USB cradle connector directly...
... mode. 5. When recording images to an external device, use the TV screen to maximum. Set the camera onto the USB cradle. 4. IMPORTANT! • Make sure that "Power On" or "Power On/Off" is selected for the camera's power on the camera, and then perform the required operation for the slideshow "Images" setting (page 144). Perform volume level adjustment using TV controls. • After using an optionally available AV cable (EMC3A) to connect the camera's USB cradle connector directly...
Owners Manual
Page 173
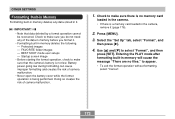
... screen image • Before starting the format operation, check to make sure that data deleted by a format operation cannot be recovered. BEST SHOT mode user setups - Entering the PLAY mode after formatting built-in memory will cause the message "There are no memory card loaded in the camera. • If there is no files." IMPORTANT! • Note that the camera's battery is being performed. Doing so creates the risk of camera malfunction. 1. Press [MENU]. 3. FAVORITE folder images - OTHER SETTINGS Formatting Built-in Memory Formatting...
... screen image • Before starting the format operation, check to make sure that data deleted by a format operation cannot be recovered. BEST SHOT mode user setups - Entering the PLAY mode after formatting built-in memory will cause the message "There are no memory card loaded in the camera. • If there is no files." IMPORTANT! • Note that the camera's battery is being performed. Doing so creates the risk of camera malfunction. 1. Press [MENU]. 3. FAVORITE folder images - OTHER SETTINGS Formatting Built-in Memory Formatting...
Owners Manual
Page 193
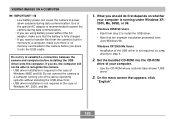
... the menu screen that the example installation presented here uses Windows 98. Use of the above operating systems without the AC adaptor, make sure that the battery is fully charged. • If you do first depends on whether your computer. • Use the CD-ROM whose contents label shows "USB driver". 3. If you want to transfer files from step 2 to establish a connection between the camera and computer...
... the menu screen that the example installation presented here uses Windows 98. Use of the above operating systems without the AC adaptor, make sure that the battery is fully charged. • If you do first depends on whether your computer. • Use the CD-ROM whose contents label shows "USB driver". 3. If you want to transfer files from step 2 to establish a connection between the camera and computer...

Owners Manual
Page 208
... a connection between the camera and computer. Install the applications you need to perform depends on whether you are using it in combination with useful applications for image transfer Software Name USB driver Type B Transfer of images from the Photo Loader 3.0 camera and management of * DirectX 9.0c images on the computer Supported Windows Versions XP/2000/Me 98SE/98 XP/2000/Me/98SE/98 Required Operation Use the USB cradle to establish a connection...
... a connection between the camera and computer. Install the applications you need to perform depends on whether you are using it in combination with useful applications for image transfer Software Name USB driver Type B Transfer of images from the Photo Loader 3.0 camera and management of * DirectX 9.0c images on the computer Supported Windows Versions XP/2000/Me 98SE/98 XP/2000/Me/98SE/98 Required Operation Use the USB cradle to establish a connection...
Owners Manual
Page 232
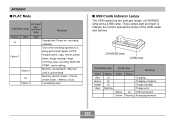
... Mode Operation Lamp AF assist light / self-timer lamp Meaning Green Red Red Operational (Power on, recording Lit enabled) One of the USB cradle and camera. [CHARGE] lamp [USB] lamp [CHARGE] lamp Color Red Green Amber Red Status Lit Lit Lit Flashing [USB] lamp Meaning Color Status Charging Charging complete Charge standby Charge error Green Lit USB connection Green Flashing Accessing memory 232 These lamps light and flash to indicate the current operational status of the following operations is being performed: delete, DPOF, Pattern 3 image protect, copy, format...
... Mode Operation Lamp AF assist light / self-timer lamp Meaning Green Red Red Operational (Power on, recording Lit enabled) One of the USB cradle and camera. [CHARGE] lamp [USB] lamp [CHARGE] lamp Color Red Green Amber Red Status Lit Lit Lit Flashing [USB] lamp Meaning Color Status Charging Charging complete Charge standby Charge error Green Lit USB connection Green Flashing Accessing memory 232 These lamps light and flash to indicate the current operational status of the following operations is being performed: delete, DPOF, Pattern 3 image protect, copy, format...

Owners Manual
Page 237
... the USB cradle. 2) USB cable is not connected securely. 3) USB driver is not installed. 4) Camera is off . Other 237 B while the camera was connected to initialize the camera's setup (page 125). Cannot transfer files over a USB connection. 1) Camera is not set securely on your retailer or a CASIO service center. If the language selection screen does not re-appear when you turn the camera on . 1) Camera's display language, Home city, date style, date and time, and other settings have not been configured. 2) A problem...
... the USB cradle. 2) USB cable is not connected securely. 3) USB driver is not installed. 4) Camera is off . Other 237 B while the camera was connected to initialize the camera's setup (page 125). Cannot transfer files over a USB connection. 1) Camera is not set securely on your retailer or a CASIO service center. If the language selection screen does not re-appear when you turn the camera on . 1) Camera's display language, Home city, date style, date and time, and other settings have not been configured. 2) A problem...


