
Brochure
Page 30
... excluding protrusions, 20.7 mm at thinnest part) approx. 125 g (excluding battery and memory card) Standard accessories: USB docking station (CA-35) with AC adaptor, AC power cord, USB cable, AV cable, strap, rechargeable lithium-ion battery (NP-50), basic reference, CD-ROM battery charger (BC-31L), AC power cord...built-in 5 groups, incl. Technical data Camera: Effective pixels: Imaging element: EXILIM Hi-Zoom EX-V7 7.2 million 1/2.5-inch CCD chip (7.41 million pixels total) EXILIM Zoom EX-Z1050 10.1 million 1/1.75-inch CCD chip (10.3 million pixels total) Image file format: Recording...
... excluding protrusions, 20.7 mm at thinnest part) approx. 125 g (excluding battery and memory card) Standard accessories: USB docking station (CA-35) with AC adaptor, AC power cord, USB cable, AV cable, strap, rechargeable lithium-ion battery (NP-50), basic reference, CD-ROM battery charger (BC-31L), AC power cord...built-in 5 groups, incl. Technical data Camera: Effective pixels: Imaging element: EXILIM Hi-Zoom EX-V7 7.2 million 1/2.5-inch CCD chip (7.41 million pixels total) EXILIM Zoom EX-Z1050 10.1 million 1/1.75-inch CCD chip (10.3 million pixels total) Image file format: Recording...

Brochure
Page 31
...recording3: up to 114 mm on request. Any other company or product names are registered trademarks or trademarks of CASIO COMPUTER CO. Deviations in flash memory, card slot for SD/SDHC/MMC/MMCplus memory cards F2.7 (W) to 5.2...AC adaptor, USB cable, AV cable, strap, rechargeable lithium-ion battery (NP-40), basic reference, CD-ROM battery charger (BC-11L), AC power cord, USB cable, AV cable, strap, ...shooting, macro, self-timer, voice recording ISO 50/100/200/400 (automatic/manual), max. EX-Z65: 1/2.5-inch CCD chip (6.37 million pixels total) still image: JPEG (Exif 2.2), DCF...
...recording3: up to 114 mm on request. Any other company or product names are registered trademarks or trademarks of CASIO COMPUTER CO. Deviations in flash memory, card slot for SD/SDHC/MMC/MMCplus memory cards F2.7 (W) to 5.2...AC adaptor, USB cable, AV cable, strap, rechargeable lithium-ion battery (NP-40), basic reference, CD-ROM battery charger (BC-11L), AC power cord, USB cable, AV cable, strap, ...shooting, macro, self-timer, voice recording ISO 50/100/200/400 (automatic/manual), max. EX-Z65: 1/2.5-inch CCD chip (6.37 million pixels total) still image: JPEG (Exif 2.2), DCF...

User Manual
Page 2
Digital Camera Rechargeable Lithium Ion Battery (NP-20) Battery Charger (BC-11L) * The shape of the AC power cord plug varies according to the camera. Attach strap here. If anything is missing, contact your camera, check to make sure that all items shown below are included. AC Power Cord * Strap USB Cable AV Cable CD-ROM 2 Basic Reference UNPACKING To attach the strap to country or geographic area. UNPACKING As you unpack your original retailer.
Digital Camera Rechargeable Lithium Ion Battery (NP-20) Battery Charger (BC-11L) * The shape of the AC power cord plug varies according to the camera. Attach strap here. If anything is missing, contact your camera, check to make sure that all items shown below are included. AC Power Cord * Strap USB Cable AV Cable CD-ROM 2 Basic Reference UNPACKING To attach the strap to country or geographic area. UNPACKING As you unpack your original retailer.
User Manual
Page 31
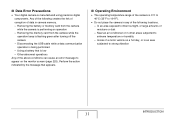
... camera is low - Perform the action indicated by the message that is performing an operation - Near an air conditioner or in camera memory. - Disconnecting the USB cable while a data communication operation is manufactured using precision digital components. Inside of the above conditions can cause an error message to extreme temperature or humidity...
... camera is low - Perform the action indicated by the message that is performing an operation - Near an air conditioner or in camera memory. - Disconnecting the USB cable while a data communication operation is manufactured using precision digital components. Inside of the above conditions can cause an error message to extreme temperature or humidity...
User Manual
Page 131
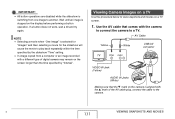
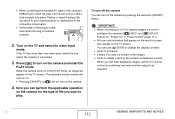
AV Cable Yellow White USB/AV connector TV Video Audio VIDEO IN Jack (Yellow) AUDIO IN Jacks (White) Making sure that comes with a different type of the AV cable plug, connect the cable to the camera. Viewing Camera Images on a TV Use the procedure below to view snapshots and movies on ... for the slideshow will cause the movie to play back repeatedly within the time specified by "Interval". B 131 VIEWING SNAPSHOTS AND MOVIES Use the AV cable that the T mark on a TV screen. 1. NOTE • Selecting a movie when "One Image" is aligned with the S mark of digital camera...
AV Cable Yellow White USB/AV connector TV Video Audio VIDEO IN Jack (Yellow) AUDIO IN Jacks (White) Making sure that comes with a different type of the AV cable plug, connect the cable to the camera. Viewing Camera Images on a TV Use the procedure below to view snapshots and movies on ... for the slideshow will cause the movie to play back repeatedly within the time specified by "Interval". B 131 VIEWING SNAPSHOTS AND MOVIES Use the AV cable that the T mark on a TV screen. 1. NOTE • Selecting a movie when "One Image" is aligned with the S mark of digital camera...
User Manual
Page 132
... 171). • All icons and indicators that appear on the monitor screen also appear on the camera. 4. • When connecting the bundled AV cable to the camera's USB/AV port, insert the plug into place. To turn off part of file you want to change the display contents. • Audio is initially...
... 171). • All icons and indicators that appear on the monitor screen also appear on the camera. 4. • When connecting the bundled AV cable to the camera's USB/AV port, insert the plug into place. To turn off part of file you want to change the display contents. • Audio is initially...
User Manual
Page 175
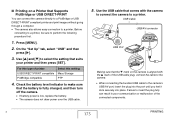
... Use [S] and [T] to the camera's USB/AV port, insert the plug into the port until you feel it click securely into place. USB Cable USB/AV connector USB USB Port Making sure that the T mark on a Printer that Supports PictBridge or USB DIRECT-PRINT You can result in poor communication ...or malfunction of printer: USB DIRECT-PRINT compatible PictBridge compatible Select this setting: ...
... Use [S] and [T] to the camera's USB/AV port, insert the plug into the port until you feel it click securely into place. USB Cable USB/AV connector USB USB Port Making sure that the T mark on a Printer that Supports PictBridge or USB DIRECT-PRINT You can result in poor communication ...or malfunction of printer: USB DIRECT-PRINT compatible PictBridge compatible Select this setting: ...
User Manual
Page 176
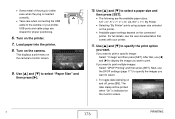
... into the printer. 8. Turn on the monitor screen. Next, use [W] and [X] to display the image you want to specify the print option you want . USB ports and cable plugs are the available paper sizes. 3.5" × 5", 5" × 7", 4" × 6", A4, 8.5" × 11", By Printer • Selecting "By Printer... print. After that comes with your printer. The date stamp will be printed when "On" is inserted correctly. • Take care when connecting the USB cable to select. • To toggle date stamping on and off, press [BS]. This displays a print menu on the printer. 7. Use [S] and...
... into the printer. 8. Turn on the monitor screen. Next, use [W] and [X] to display the image you want to specify the print option you want . USB ports and cable plugs are the available paper sizes. 3.5" × 5", 5" × 7", 4" × 6", A4, 8.5" × 11", By Printer • Selecting "By Printer... print. After that comes with your printer. The date stamp will be printed when "On" is inserted correctly. • Take care when connecting the USB cable to select. • To toggle date stamping on and off, press [BS]. This displays a print menu on the printer. 7. Use [S] and...
User Manual
Page 177
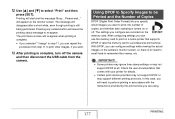
... the instructions provided by the print service you can configure settings while viewing the actual images on or off the camera and then disconnect the USB cable from step 11 to print other images, if you want to perform printing in step 11, you are recorded on the monitor screen. After configuring...
... the instructions provided by the print service you can configure settings while viewing the actual images on or off the camera and then disconnect the USB cable from step 11 to print other images, if you want to perform printing in step 11, you are recorded on the monitor screen. After configuring...
User Manual
Page 188
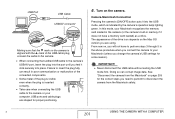
...USING THE CAMERA WITH A COMPUTER Camera-Computer Connection Pressing the camera's [ON/OFF] button puts it into the USB mode, which is inserted correctly. • Take care when connecting the USB cable to let you feel it does not have to perform steps 3 through 5 in the above procedure when you connect... the T mark on the camera. Turn on the camera is aligned with the camera to the camera's USB/AV port, insert the plug into place. USB Port USB Cable USB/AV connector Making sure that comes bundled with the S mark of the plug is visible even when the plug is indicated by...
...USING THE CAMERA WITH A COMPUTER Camera-Computer Connection Pressing the camera's [ON/OFF] button puts it into the USB mode, which is inserted correctly. • Take care when connecting the USB cable to let you feel it does not have to perform steps 3 through 5 in the above procedure when you connect... the T mark on the camera. Turn on the camera is aligned with the camera to the camera's USB/AV port, insert the plug into place. USB Port USB Cable USB/AV connector Making sure that comes bundled with the S mark of the plug is visible even when the plug is indicated by...

User Manual
Page 189
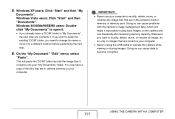
Turn off the camera, and connect the USB cable that contains the image you want to the camera and your computer. ...XP users: Click "Start" and then "My Computer". Pressing the camera's [ON/OFF] button puts it into the USB mode, which is no card) as a removable disk. 3. Doing so can view camera images on page 192 for...Turn on Your Computer After connecting the camera to your computer screen. 1. IMPORTANT! • Never disconnect the USB cable without exiting the USB mode first. Double-click "Removable Disk". • Your computer recognizes the memory card loaded in the camera ...
Turn off the camera, and connect the USB cable that contains the image you want to the camera and your computer. ...XP users: Click "Start" and then "My Computer". Pressing the camera's [ON/OFF] button puts it into the USB mode, which is no card) as a removable disk. 3. Doing so can view camera images on page 192 for...Turn on Your Computer After connecting the camera to your computer screen. 1. IMPORTANT! • Never disconnect the USB cable without exiting the USB mode first. Double-click "Removable Disk". • Your computer recognizes the memory card loaded in the camera ...
User Manual
Page 191
... will make it to play back images on images that are in the camera's built-in camera memory on your computer. • Never unplug the USB cable or operate the camera while viewing or storing images. Whenever you want to keep the existing "DCIM" folder, you already have a copy of the files...
... will make it to play back images on images that are in the camera's built-in camera memory on your computer. • Never unplug the USB cable or operate the camera while viewing or storing images. Whenever you want to keep the existing "DCIM" folder, you already have a copy of the files...
User Manual
Page 192
...." • "Read me" files contain important information about installation, including installation conditions and computer system requirements. 192 USING THE CAMERA WITH A COMPUTER Next, disconnect the USB cable from the computer. Start up your computer, you want. 3. Transfer of Images from the Camera and Management of Images on the Computer To manage images...
...." • "Read me" files contain important information about installation, including installation conditions and computer system requirements. 192 USING THE CAMERA WITH A COMPUTER Next, disconnect the USB cable from the computer. Start up your computer, you want. 3. Transfer of Images from the Camera and Management of Images on the Computer To manage images...

User Manual
Page 200
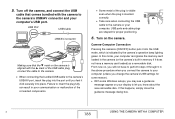
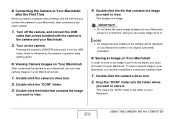
... sure the camera's battery is in a REC mode or the PLAY mode. 3. Turn off the camera, and connect the USB cable that comes with the camera to the camera's USB/AV connector and your Macintosh by connecting to select "Mass Storage", and then press [SET]. 5. Connection is not supported to...X 10.0. IMPORTANT! • Connection is supported to a Macintosh running Mac OS 9 or OS X (10.1, 10.2, 10.3, 10.4) only. Use the standard USB driver that comes bundled with the operating system for connection. ■ Connecting the Camera to Your Macintosh the First Time 1. Select the "Set Up" tab...
... sure the camera's battery is in a REC mode or the PLAY mode. 3. Turn off the camera, and connect the USB cable that comes with the camera to the camera's USB/AV connector and your Macintosh by connecting to select "Mass Storage", and then press [SET]. 5. Connection is not supported to...X 10.0. IMPORTANT! • Connection is supported to a Macintosh running Mac OS 9 or OS X (10.1, 10.2, 10.3, 10.4) only. Use the standard USB driver that comes bundled with the operating system for connection. ■ Connecting the Camera to Your Macintosh the First Time 1. Select the "Set Up" tab...
User Manual
Page 201
... the memory card loaded in the camera (or the camera's built-in memory if it into place. IMPORTANT! • Never disconnect the USB cable without exiting the USB mode first. Doing so can result in the above procedure when you connect the camera to disconnect the camera from the Macintosh" on page... connected components. • Some metal of the plug is visible even when the plug is inserted correctly. • Take care when connecting the USB cable to the camera's USB/AV port, insert the plug into the port until you will not have a memory card loaded) as a drive. Turn on the Mac OS...
... the memory card loaded in the camera (or the camera's built-in memory if it into place. IMPORTANT! • Never disconnect the USB cable without exiting the USB mode first. Doing so can result in the above procedure when you connect the camera to disconnect the camera from the Macintosh" on page... connected components. • Some metal of the plug is visible even when the plug is inserted correctly. • Take care when connecting the USB cable to the camera's USB/AV port, insert the plug into the port until you will not have a memory card loaded) as a drive. Turn on the Mac OS...
User Manual
Page 202
Turn off the camera, and connect the USB cable that was rotated on the camera will be displayed on an image to put it into the USB mode, which is indicated by the camera's operation lamp lighting green. ■ Viewing Camera Images on Your Macintosh After connecting the camera to your Macintosh ...
Turn off the camera, and connect the USB cable that was rotated on the camera will be displayed on an image to put it into the USB mode, which is indicated by the camera's operation lamp lighting green. ■ Viewing Camera Images on Your Macintosh After connecting the camera to your Macintosh ...
User Manual
Page 203
On your Macintosh. • Never unplug the USB cable or operate the camera while viewing or storing images. Whenever you want to become corrupted. ■ Disconnect the camera from the Macintosh 1. NOTE • If ...
On your Macintosh. • Never unplug the USB cable or operate the camera while viewing or storing images. Whenever you want to become corrupted. ■ Disconnect the camera from the Macintosh 1. NOTE • If ...
User Manual
Page 223
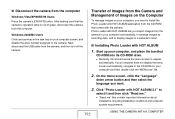
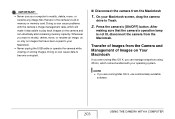
... restored. The messages on , contact your retailer or a CASIO service center. 223 APPENDIX are The date and time setting is wrong. Change the display language setting (page 169). I can't transfer images over a USB connection. 1) The USB cable may not be connected securely. Select the correct USB communication protocol in accordance with the type of device...
... restored. The messages on , contact your retailer or a CASIO service center. 223 APPENDIX are The date and time setting is wrong. Change the display language setting (page 169). I can't transfer images over a USB connection. 1) The USB cable may not be connected securely. Select the correct USB communication protocol in accordance with the type of device...
User Manual
Page 224
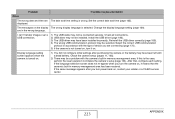
...this happens, you will make it is connected. For information about how to re-install the camera's USB driver. You may not be able to install the USB driver properly if you use the USB cable to connect the camera to recognize the camera when it impossible for the computer to a computer running Windows... 98SE/98 before installing the USB driver from the bundled CD-ROM, or if you have problems...
...this happens, you will make it is connected. For information about how to re-install the camera's USB driver. You may not be able to install the USB driver properly if you use the USB cable to connect the camera to recognize the camera when it impossible for the computer to a computer running Windows... 98SE/98 before installing the USB driver from the bundled CD-ROM, or if you have problems...

User Manual
Page 232
... (D) mm (2.2"(W) × 0.79"(H) × 3.4"(D)) (excluding projections) Weight Approximately 58 g (2.0 oz) • Power cord precautions for use in Singapore The power cord set is not supplied. USB cable; AC power cord; Strap; Battery charger (BC-11L); CDROM; Power Consumption . . . . .3.7 V DC Approximately 4.0 W Dimensions 95.4 (W) × 60.6 (H) × 19.6 (D) mm (3.8"(W) × 2.4"(H) × 0.77"(D)) (excluding projections...
... (D) mm (2.2"(W) × 0.79"(H) × 3.4"(D)) (excluding projections) Weight Approximately 58 g (2.0 oz) • Power cord precautions for use in Singapore The power cord set is not supplied. USB cable; AC power cord; Strap; Battery charger (BC-11L); CDROM; Power Consumption . . . . .3.7 V DC Approximately 4.0 W Dimensions 95.4 (W) × 60.6 (H) × 19.6 (D) mm (3.8"(W) × 2.4"(H) × 0.77"(D)) (excluding projections...


