
User Manual
Page 7
... World Time Settings 168 Changing the Display Language 169 Changing the USB Port Protocol 170 [ ] (REC) and [ ] (PLAY) Button Settings . . 171 Formatting Built-in Memory 172 PRINTING 173 Types of Printing 173 Using Professional Print Service 174 Using Your Printer to Print Images 174 Using DPOF to Specify Images to be Printed and the Number of Copies 177 ■ Date Stamping 180 Supported Protocols 181 USING THE CAMERA WITH A COMPUTER 182 What you can do 182 Using the Camera with a Windows Computer . . 183 ■ Viewing...
... World Time Settings 168 Changing the Display Language 169 Changing the USB Port Protocol 170 [ ] (REC) and [ ] (PLAY) Button Settings . . 171 Formatting Built-in Memory 172 PRINTING 173 Types of Printing 173 Using Professional Print Service 174 Using Your Printer to Print Images 174 Using DPOF to Specify Images to be Printed and the Number of Copies 177 ■ Date Stamping 180 Supported Protocols 181 USING THE CAMERA WITH A COMPUTER 182 What you can do 182 Using the Camera with a Windows Computer . . 183 ■ Viewing...

User Manual
Page 42
IMPORTANT! • Failure to set the date and time will cause the wrong date and time data to configure the settings correctly. GETTING READY 42 Use the procedure under "Configuring Display Language, Date, and Time Settings" (page 11) to be recorded with images. • If you make a mistake when configuring the language, date, and time settings, you press [ ] (REC) or [ ] (PLAY). Turning On Power for the First Time The first time you press [ ] (REC) or [ ] (PLAY) (page 171...
IMPORTANT! • Failure to set the date and time will cause the wrong date and time data to configure the settings correctly. GETTING READY 42 Use the procedure under "Configuring Display Language, Date, and Time Settings" (page 11) to be recorded with images. • If you make a mistake when configuring the language, date, and time settings, you press [ ] (REC) or [ ] (PLAY). Turning On Power for the First Time The first time you press [ ] (REC) or [ ] (PLAY) (page 171...

User Manual
Page 43
The Auto Power Off trigger time is a connection between the camera and computer or other device - Press [MENU]. 2. NOTE • When both sleep and Auto Power Off have the same time settings, Auto Power Off takes priority. • Sleep and Auto Power Off are disabled under the following conditions. - During movie recording and playback GETTING READY 43 Sleep does not function in the PLAY mode, regardless of their current PLAY mode settings. - Use [S] and [T] to select the...
The Auto Power Off trigger time is a connection between the camera and computer or other device - Press [MENU]. 2. NOTE • When both sleep and Auto Power Off have the same time settings, Auto Power Off takes priority. • Sleep and Auto Power Off are disabled under the following conditions. - During movie recording and playback GETTING READY 43 Sleep does not function in the PLAY mode, regardless of their current PLAY mode settings. - Use [S] and [T] to select the...

User Manual
Page 60
... setting automatically. • Shutter speed indicates the amount of the opening . This will remain on the monitor screen as seconds (1/1000 second, etc.) The camera adjusts this setting automatically. NOTE • The aperture value indicates the size of time that light is indicated on the monitor screen for a short while after you just shot. If the focus frame stays red and the operation lamp is flashing green, it . Checking a Snapshot A snapshot will display...
... setting automatically. • Shutter speed indicates the amount of the opening . This will remain on the monitor screen as seconds (1/1000 second, etc.) The camera adjusts this setting automatically. NOTE • The aperture value indicates the size of time that light is indicated on the monitor screen for a short while after you just shot. If the focus frame stays red and the operation lamp is flashing green, it . Checking a Snapshot A snapshot will display...

User Manual
Page 81
... 1. SHOOTING A MOVIE Movie Image Quality Before shooting a movie, you want and then press [SET]. In the REC mode, press [MENU]. 2. Use [S] and [T] to select the quality setting you should specify a movie image quality setting. Movie image quality is a standard that determines the detail, smoothness, and clarity of time you can be played back on a computer using the following shows the approximate movie file size for a oneminute movie. SHOOTING A MOVIE 81 Macintosh QuickTime Movie Size The following software. - Windows Media...
... 1. SHOOTING A MOVIE Movie Image Quality Before shooting a movie, you want and then press [SET]. In the REC mode, press [MENU]. 2. Use [S] and [T] to select the quality setting you should specify a movie image quality setting. Movie image quality is a standard that determines the detail, smoothness, and clarity of time you can be played back on a computer using the following shows the approximate movie file size for a oneminute movie. SHOOTING A MOVIE 81 Macintosh QuickTime Movie Size The following software. - Windows Media...
User Manual
Page 105
... shown below to adjust the focus setting. IMPORTANT! • While Manual Focus is within the boundary will return to step 1 if you press the keys during manual focus. 105 ADVANCED SETTINGS Use [W] and [X] to focus the image, as you view the results on the monitor screen as the focus mode, the [W] and [X] keys are used to tell you perform an optical zoom operation (page 67) while shooting with Key Customize...
... shown below to adjust the focus setting. IMPORTANT! • While Manual Focus is within the boundary will return to step 1 if you press the keys during manual focus. 105 ADVANCED SETTINGS Use [W] and [X] to focus the image, as you view the results on the monitor screen as the focus mode, the [W] and [X] keys are used to tell you perform an optical zoom operation (page 67) while shooting with Key Customize...
User Manual
Page 108
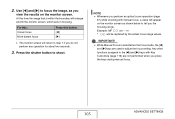
... Manually adjust white balance to suit a particular light source • For details, see "Configuring the White Balance Setting Manually" (page 109). White balance corrects for different types of trees, etc. Use [W] and [X] to select the fourth option from the bottom (White Balance). 3. Controlling White Balance Shooting on an overcast rainy day, in your images always look natural. 1. Overcast Shoot in the shadow of a building, in the shade of lighting so the colors...
... Manually adjust white balance to suit a particular light source • For details, see "Configuring the White Balance Setting Manually" (page 109). White balance corrects for different types of trees, etc. Use [W] and [X] to select the fourth option from the bottom (White Balance). 3. Controlling White Balance Shooting on an overcast rainy day, in your images always look natural. 1. Overcast Shoot in the shadow of a building, in the shade of lighting so the colors...

User Manual
Page 152
... extension) - Press [SET] to play back Voice Recording data on your computer using Windows Media Player or QuickTime. • Your camera supports the following audio data formats. - Toggle on-screen indicators on or off Press [T] and then use [W] and [X] to display the Voice Recording file you want to start playback. Pause or restart playback Press [SET]. Stop playback Press [MENU]. 152 USING AUDIO Hold down [X] or [W]. Adjust volume • You can also play . Approximate Audio File Size: 165 KB...
... extension) - Press [SET] to play back Voice Recording data on your computer using Windows Media Player or QuickTime. • Your camera supports the following audio data formats. - Toggle on-screen indicators on or off Press [T] and then use [W] and [X] to display the Voice Recording file you want to start playback. Pause or restart playback Press [SET]. Stop playback Press [MENU]. 152 USING AUDIO Hold down [X] or [W]. Adjust volume • You can also play . Approximate Audio File Size: 165 KB...

User Manual
Page 154
... the memory card being used for storage. In the PLAY mode, press [MENU]. 2. NOTE • You can protect an important file to ensure that even if a file is protected, it cannot be deleted if you want to scroll through images until the one you perform the format operation (pages 14, 48, 172). ■ Protecting a Specific File 1. On the "PLAY" tab, select "Protect" and then press [X]. 3. Protecting a File Against Deletion You can view folder and file names...
... the memory card being used for storage. In the PLAY mode, press [MENU]. 2. NOTE • You can protect an important file to ensure that even if a file is protected, it cannot be deleted if you want to scroll through images until the one you perform the format operation (pages 14, 48, 172). ■ Protecting a Specific File 1. On the "PLAY" tab, select "Protect" and then press [X]. 3. Protecting a File Against Deletion You can view folder and file names...

User Manual
Page 158
... FAVORITE folder. • When a copied file image appears on the full-month calendar screen, it is complete, the last file copied will be copied from the camera's built-in memory to a memory card, or from a memory card to select "Built-in Card" and then press [SET]. message disappears from the monitor screen before performing any operation on the camera. • After the copy operation is displayed on the camera, enter the PLAY mode and then press [MENU]. 3. Use...
... FAVORITE folder. • When a copied file image appears on the full-month calendar screen, it is complete, the last file copied will be copied from the camera's built-in memory to a memory card, or from a memory card to select "Built-in Card" and then press [SET]. message disappears from the monitor screen before performing any operation on the camera. • After the copy operation is displayed on the camera, enter the PLAY mode and then press [MENU]. 3. Use...

User Manual
Page 165
... all files are deleted or if a blank memory card is loaded. • If a memory card is greater than the largest sequential number remembered by the camera, numbering of the World Time (page 168) dates and times to be sure to change the current time setting only, if you want. Press [MENU]. 2. This displays the current World Time settings. If you already have the camera do this: Select this setting: Remember the numbers used...
... all files are deleted or if a blank memory card is loaded. • If a memory card is greater than the largest sequential number remembered by the camera, numbering of the World Time (page 168) dates and times to be sure to change the current time setting only, if you want. Press [MENU]. 2. This displays the current World Time settings. If you already have the camera do this: Select this setting: Remember the numbers used...
User Manual
Page 177
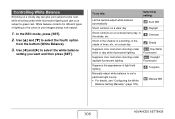
... the user documentation that supports DPOF or take the memory card to be Printed and the Number of Copies DPOF (Digital Print Order Format) lets you specify which images you are recorded on the monitor screen. Printing will re-appear when printing is turned on a home printer that comes with the instructions provided by the print service you want . 13. 12. The print menu screen will start and the message "Busy... Using DPOF to Specify Images to a professional print service...
... the user documentation that supports DPOF or take the memory card to be Printed and the Number of Copies DPOF (Digital Print Order Format) lets you specify which images you are recorded on the monitor screen. Printing will re-appear when printing is turned on a home printer that comes with the instructions provided by the print service you want . 13. 12. The print menu screen will start and the message "Busy... Using DPOF to Specify Images to a professional print service...
User Manual
Page 186
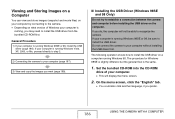
... camera. Do not connect the camera to establish a connection between the camera and computer before installing the USB driver on the computer. If you do, the computer will display the menu screen. 2. The procedure for Windows 98SE is slightly different, but the general flow is running Windows 98SE or 98, install the USB driver (page 186). Viewing and Storing Images on a Computer You can view and store images (snapshot and movie files...
... camera. Do not connect the camera to establish a connection between the camera and computer before installing the USB driver on the computer. If you do, the computer will display the menu screen. 2. The procedure for Windows 98SE is slightly different, but the general flow is running Windows 98SE or 98, install the USB driver (page 186). Viewing and Storing Images on a Computer You can view and store images (snapshot and movie files...

User Manual
Page 189
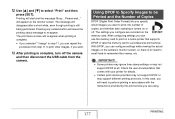
... after the First Time Since you need to install the USB driver and configure menu settings only the first time you want to your computer, you can corrupt image data. Double-click the "DCIM" folder. 4. IMPORTANT! • Never disconnect the USB cable without exiting the USB mode first. Pressing the camera's [ON/OFF] button puts it into the USB mode, which is no card) as a removable disk. 3. Windows 2000/Me/98SE/98 users: Doubleclick "My...
... after the First Time Since you need to install the USB driver and configure menu settings only the first time you want to your computer, you can corrupt image data. Double-click the "DCIM" folder. 4. IMPORTANT! • Never disconnect the USB cable without exiting the USB mode first. Pressing the camera's [ON/OFF] button puts it into the USB mode, which is no card) as a removable disk. 3. Windows 2000/Me/98SE/98 users: Doubleclick "My...

User Manual
Page 207
...; Movie File File of a BEST SHOT user setup • FAVORITE Folder Folder that contains files recorded with the camera. Depending on another camera, it . This file is created when you specify an image for use as the startup screen image. ■ Supported Image Files • Image files shot with this camera still may take a long time for auction site images. Extension is "AVI". • Audio File Audio recording file. Extension is "JPG". • Audio Snapshot Audio File Audio recording file of an image shot with...
...; Movie File File of a BEST SHOT user setup • FAVORITE Folder Folder that contains files recorded with the camera. Depending on another camera, it . This file is created when you specify an image for use as the startup screen image. ■ Supported Image Files • Image files shot with this camera still may take a long time for auction site images. Extension is "AVI". • Audio File Audio recording file. Extension is "JPG". • Audio Snapshot Audio File Audio recording file of an image shot with...

User Manual
Page 216
Set Up Tab Menu Panel Display On* / Off Wide* / 4:3 Sounds Startup* / Half Shutter / Shutter / Operation / Operation / Play Startup On (Selectable image) / Off* File No. Sleep 30 sec / 1 min* / 2 min / Off Auto Power Off 1 min* / 2 min / 5 min REC / PLAY Power On* / Power On/Off / Disable USB Mass Storage (USB DIRECT-PRINT)* / PTP (PictBridge) Video Out Format Reset NTSC 4:3* / NTSC 16:9 / PAL 4:3 / PAL 16:9 Format / Cancel* Reset / Cancel* B 216 APPENDIX Continue* / Reset World Time Home* / World Home Time setup (city, DST, etc.) World Time setup (city...
Set Up Tab Menu Panel Display On* / Off Wide* / 4:3 Sounds Startup* / Half Shutter / Shutter / Operation / Operation / Play Startup On (Selectable image) / Off* File No. Sleep 30 sec / 1 min* / 2 min / Off Auto Power Off 1 min* / 2 min / 5 min REC / PLAY Power On* / Power On/Off / Disable USB Mass Storage (USB DIRECT-PRINT)* / PTP (PictBridge) Video Out Format Reset NTSC 4:3* / NTSC 16:9 / PAL 4:3 / PAL 16:9 Format / Cancel* Reset / Cancel* B 216 APPENDIX Continue* / Reset World Time Home* / World Home Time setup (city, DST, etc.) World Time setup (city...

User Manual
Page 219
...Meaning Charging Battery charger or battery abnormality Charging complete or charge standby state (Ambient temperature is flashing green. Lit Memory card is locked / Cannot create folder. / Memory is unformatted. / Low battery alert. Battery Charger Lamp Reference The battery charger has a [CHARGE] lamp that lights or flashes in progress: Delete, DPOF, protect, copy, format, resize, trimming, adding audio to be lost. ■ PLAY mode Operation Lamp Color Status Meaning Lit Operational (Power on, recording enabled). IMPORTANT! • Never remove the memory card from the camera...
...Meaning Charging Battery charger or battery abnormality Charging complete or charge standby state (Ambient temperature is flashing green. Lit Memory card is locked / Cannot create folder. / Memory is unformatted. / Low battery alert. Battery Charger Lamp Reference The battery charger has a [CHARGE] lamp that lights or flashes in progress: Delete, DPOF, protect, copy, format, resize, trimming, adding audio to be lost. ■ PLAY mode Operation Lamp Color Status Meaning Lit Operational (Power on, recording enabled). IMPORTANT! • Never remove the memory card from the camera...

User Manual
Page 222
... dark. This camera cannot display non-DCF images recorded onto a memory card using another camera B 222 APPENDIX Change the flash mode setting to " synchro flash (page 71), or use adjust EV shift to a zoom factor of images. Position the camera so sunlight does not shine directly into the lens when you are not displayed. I can cause underexposure of 3.0. 1) The digital zoom setting may be dirty. Turn on digital zoom (page 70). 2) Time stamping may be disabled. The zoom bar indicates zoom only up...
... dark. This camera cannot display non-DCF images recorded onto a memory card using another camera B 222 APPENDIX Change the flash mode setting to " synchro flash (page 71), or use adjust EV shift to a zoom factor of images. Position the camera so sunlight does not shine directly into the lens when you are not displayed. I can cause underexposure of 3.0. 1) The digital zoom setting may be dirty. Turn on digital zoom (page 70). 2) Time stamping may be disabled. The zoom bar indicates zoom only up...
User Manual
Page 223
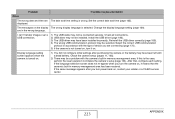
... the reset operation to initialize the camera's setup (page 124). Check all connections. 2) USB driver may have been installed incorrectly. If the same message appears after you are connecting (page 170). 5) If the camera is turned on. 1) You did not configure initial settings after purchasing the camera or the battery may not be a problem with a dead battery. Set the correct date and time (page 165). displayed. If the language selection screen does not...
... the reset operation to initialize the camera's setup (page 124). Check all connections. 2) USB driver may have been installed incorrectly. If the same message appears after you are connecting (page 170). 5) If the camera is turned on. 1) You did not configure initial settings after purchasing the camera or the battery may not be a problem with a dead battery. Set the correct date and time (page 165). displayed. If the language selection screen does not...

User Manual
Page 226
... the memory card. printing. Format the memory card (page 48). Contact your retailer or an authorized CASIO service center. There are trying to access is corrupted or is a type that cannot be played. Configure the required DPOF settings Set up DPOF. (page 177). formatted. The file you are no files in built-in the camera is locked. During printing, the printer is running low on power again. The LOCK switch of...
... the memory card. printing. Format the memory card (page 48). Contact your retailer or an authorized CASIO service center. There are trying to access is corrupted or is a type that cannot be played. Configure the required DPOF settings Set up DPOF. (page 177). formatted. The file you are no files in built-in the camera is locked. During printing, the printer is running low on power again. The LOCK switch of...


