
Owners Manual
Page 3
... 17 QUICK START GUIDE First, charge the battery 17 To configure display language and clock settings ..... 18 To record an image 19 To view a recorded image 20 To delete an image 20 21 GETTING READY About This Manual 21 General Guide 22 Camera 22 Lithium Ion Battery Charger 24 Monitor Screen Contents 25 REC Mode 25 PLAY Mode 27 Changing the Contents of the Monitor Screen 29 Attaching the Strap 30 Power Requirements 31 To charge the battery 31...
... 17 QUICK START GUIDE First, charge the battery 17 To configure display language and clock settings ..... 18 To record an image 19 To view a recorded image 20 To delete an image 20 21 GETTING READY About This Manual 21 General Guide 22 Camera 22 Lithium Ion Battery Charger 24 Monitor Screen Contents 25 REC Mode 25 PLAY Mode 27 Changing the Contents of the Monitor Screen 29 Attaching the Strap 30 Power Requirements 31 To charge the battery 31...

Owners Manual
Page 5
... Turning the On-screen Grid On and Off 113 Turning Image Review On and Off 114 Using Icon Help 114 Specifying Power On Default Settings 115 Specifying ISO Sensitivity 117 Selecting the Metering Mode 118 Using the Filter Function 120 Specifying Outline Sharpness 120 Specifying Color Saturation 121 Specifying Contrast 121 Date Stamping Snapshots 122 Resetting the Camera 123 Zooming the Display Image 126 Resizing an Image 127 Cropping an Image 128 Keystone Correction 130 Using Color...
... Turning the On-screen Grid On and Off 113 Turning Image Review On and Off 114 Using Icon Help 114 Specifying Power On Default Settings 115 Specifying ISO Sensitivity 117 Selecting the Metering Mode 118 Using the Filter Function 120 Specifying Outline Sharpness 120 Specifying Color Saturation 121 Specifying Contrast 121 Date Stamping Snapshots 122 Resetting the Camera 123 Zooming the Display Image 126 Resizing an Image 127 Cropping an Image 128 Keystone Correction 130 Using Color...

Owners Manual
Page 7
...Snapshot 211 Playing a Movie 213 Viewing User Documentation (PDF Files) 214 User Registration 214 Exiting the Menu Application 214 Using the Camera with a Macintosh Computer ....... 215 Selecting the Software You Need 215 Computer System Requirements 216 Managing Images on a Macintosh 217 Playing a Movie 218 Viewing User Documentation (PDF Files) 218 To register as a camera user 219 220 APPENDIX Menu Reference 220 Indicator Lamp Reference 223 Troubleshooting Guide 226 If you have problems installing the USB driver... 231 Display Messages 232 Specifications 234...
...Snapshot 211 Playing a Movie 213 Viewing User Documentation (PDF Files) 214 User Registration 214 Exiting the Menu Application 214 Using the Camera with a Macintosh Computer ....... 215 Selecting the Software You Need 215 Computer System Requirements 216 Managing Images on a Macintosh 217 Playing a Movie 218 Viewing User Documentation (PDF Files) 218 To register as a camera user 219 220 APPENDIX Menu Reference 220 Indicator Lamp Reference 223 Troubleshooting Guide 226 If you have problems installing the USB driver... 231 Display Messages 232 Specifications 234...

Owners Manual
Page 8
... loss resulting from the use of this manual are either registered trademarks or trademarks of Adobe Systems Incorporated in this User's Guide may differ somewhat by deletion of Photo Loader and/or Photohands. • CASIO COMPUTER CO., LTD. assumes no responsibility for any damage or loss caused by the screens and configuration of the actual camera. • The SD...
... loss resulting from the use of this manual are either registered trademarks or trademarks of Adobe Systems Incorporated in this User's Guide may differ somewhat by deletion of Photo Loader and/or Photohands. • CASIO COMPUTER CO., LTD. assumes no responsibility for any damage or loss caused by the screens and configuration of the actual camera. • The SD...

Owners Manual
Page 11
... old photograph to a PictBridge or USB DIRECT-PRINT compatible printer and you want using a DPOF compatible printer. DPOF can select from a movie and create still images that date, which helps to make searching for a particular file quicker and easier. • Connect the camera to a TV and use the TV screen for image recording and viewing (page 148) • World Time (page 165) A simple operation sets the current time for your images come out just the way...
... old photograph to a PictBridge or USB DIRECT-PRINT compatible printer and you want using a DPOF compatible printer. DPOF can select from a movie and create still images that date, which helps to make searching for a particular file quicker and easier. • Connect the camera to a TV and use the TV screen for image recording and viewing (page 148) • World Time (page 165) A simple operation sets the current time for your images come out just the way...

Owners Manual
Page 14
... and operating properly. Low battery power - INTRODUCTION I Data Error Precautions • Your digital camera is performing a record or memory access operation - I Test for proper operation before using the camera to record important images, make sure you turn off the camera - Disconnecting the USB cable while a data communication operation is still flashing green after you first record a number of data in file memory. - Follow the instructions provided by the message to appear on the monitor screen (page 232). Removing the battery, removing the memory card while...
... and operating properly. Low battery power - INTRODUCTION I Data Error Precautions • Your digital camera is performing a record or memory access operation - I Test for proper operation before using the camera to record important images, make sure you turn off the camera - Disconnecting the USB cable while a data communication operation is still flashing green after you first record a number of data in file memory. - Follow the instructions provided by the message to appear on the monitor screen (page 232). Removing the battery, removing the memory card while...

Owners Manual
Page 42
...) and [ ] (PLAY) Power On/Off Functions" on the camera. 2. Press [MENU]. 3. GETTING READY I To turn off the camera Press the power button to turn off when you press [ ] (REC) or [ ] (PLAY). Auto Power Off : Turns off power if you want to turn off the monitor screen if no operation is performed for a specified amount of time in the REC mode. Use [̆] and [̄] to select the feature whose setting you do...
...) and [ ] (PLAY) Power On/Off Functions" on the camera. 2. Press [MENU]. 3. GETTING READY I To turn off the camera Press the power button to turn off when you press [ ] (REC) or [ ] (PLAY). Auto Power Off : Turns off power if you want to turn off the monitor screen if no operation is performed for a specified amount of time in the REC mode. Use [̆] and [̄] to select the feature whose setting you do...

Owners Manual
Page 43
... 5. GETTING READY G See "Using the On-screen Menus" (page 44) for information about how to change the currently selected setting, and then press [SET]. • Available Sleep settings are: "30 sec", "1 min", "2 min", and "Off". • Available Auto Power Off settings are disabled in the PLAY mode. • Pressing any button while the camera is connected to a computer or some other device - While a movie is being recorded -
... 5. GETTING READY G See "Using the On-screen Menus" (page 44) for information about how to change the currently selected setting, and then press [SET]. • Available Sleep settings are: "30 sec", "1 min", "2 min", and "Off". • Available Auto Power Off settings are disabled in the PLAY mode. • Pressing any button while the camera is connected to a computer or some other device - While a movie is being recorded -

Owners Manual
Page 47
... time settings. • If you make a mistake when setting the language or clock with power. Date and time settings will need to use the camera's menu to turn on the camera. 2. When the rechargeable battery is dead or removed from the camera • The date and time setting screen will appear on the monitor screen the next time you turn on the camera after the date and time settings have been cleared. Press the power button, [ ] (REC) or [ ] (PLAY) to individually change the language...
... time settings. • If you make a mistake when setting the language or clock with power. Date and time settings will need to use the camera's menu to turn on the camera. 2. When the rechargeable battery is dead or removed from the camera • The date and time setting screen will appear on the monitor screen the next time you turn on the camera after the date and time settings have been cleared. Press the power button, [ ] (REC) or [ ] (PLAY) to individually change the language...

Owners Manual
Page 78
... the shutter button to record the image. • The focus and image recording operations are identical to those in the Auto Focus mode. OTHER RECORDING FUNCTIONS Using the Macro Mode Use the Macro mode when you need to focus on the monitor screen as shown below to tell you perform an optical zoom operation (page 59) while recording with the Macro mode can cause the light of the flash along with the Macro mode, a value will be replaced by the actual focusing range...
... the shutter button to record the image. • The focus and image recording operations are identical to those in the Auto Focus mode. OTHER RECORDING FUNCTIONS Using the Macro Mode Use the Macro mode when you need to focus on the monitor screen as shown below to tell you perform an optical zoom operation (page 59) while recording with the Macro mode can cause the light of the flash along with the Macro mode, a value will be replaced by the actual focusing range...

Owners Manual
Page 90
... the shutter button starts and stops movie recording (page 104). Make sure that are configured when you want to save your settings for later use, save a BEST SHOT user setup (page 93). They are recording a night scene, fireworks, or other factors, an image recorded using this , it is complete. 90 B Press the shutter button to their default presets whenever you do not allow you want , and then press [SET]. • Pressing [MENU...
... the shutter button starts and stops movie recording (page 104). Make sure that are configured when you want to save your settings for later use, save a BEST SHOT user setup (page 93). They are recording a night scene, fireworks, or other factors, an image recorded using this , it is complete. 90 B Press the shutter button to their default presets whenever you do not allow you want , and then press [SET]. • Pressing [MENU...

Owners Manual
Page 115
... the display while Icon Help is turned off the camera, and restore it the next time you want, and then press [SET]. Flash mode icon (page 63) - Focus mode icon (page 74) - When mode memory is turned off for the BEST SHOT mode, flash mode, focus mode, white balance mode, ISO sensitivity, AF Area, metering, self-timer, flash intensity, digital zoom mode, manual focus position and zoom position. To do not appear on the monitor screen. White balance AWB icon (page 84) Specifying Power On Default Settings The camera's "mode memory" feature lets you turn the camera...
... the display while Icon Help is turned off the camera, and restore it the next time you want, and then press [SET]. Flash mode icon (page 63) - Focus mode icon (page 74) - When mode memory is turned off for the BEST SHOT mode, flash mode, focus mode, white balance mode, ISO sensitivity, AF Area, metering, self-timer, flash intensity, digital zoom mode, manual focus position and zoom position. To do not appear on the monitor screen. White balance AWB icon (page 84) Specifying Power On Default Settings The camera's "mode memory" feature lets you turn the camera...

Owners Manual
Page 123
... [SET]. • To cancel the procedure without resetting, select "Cancel" and press [SET]. Date Style - Select the "Set Up" tab, select "Reset", and then press [̈]. 3. Time setting - Video Out 123 Use [̆] and [̄] to their initial defaults as shown under "Menu Reference" on page 220. 1. World Time setup - Home Time setup - OTHER RECORDING FUNCTIONS Resetting the Camera Use the following are not initialized when you reset the camera (page 221). - Press [MENU]. 2. Language...
... [SET]. • To cancel the procedure without resetting, select "Cancel" and press [SET]. Date Style - Select the "Set Up" tab, select "Reset", and then press [̈]. 3. Time setting - Video Out 123 Use [̆] and [̄] to their initial defaults as shown under "Menu Reference" on page 220. 1. World Time setup - Home Time setup - OTHER RECORDING FUNCTIONS Resetting the Camera Use the following are not initialized when you reset the camera (page 221). - Press [MENU]. 2. Language...

Owners Manual
Page 152
...; Deleting an audio snapshot deletes both the image file and the audio file attached to it is gone. Make sure you really do not need a file anymore before proceeding. • A protected file cannot be deleted. Press [SET] to delete the file. • Repeat steps 2 through files and display the one you want . 5. Use [̇] and [̈] to scroll through 4 to delete other files, if you want to delete. 3. In the PLAY mode...
...; Deleting an audio snapshot deletes both the image file and the audio file attached to it is gone. Make sure you really do not need a file anymore before proceeding. • A protected file cannot be deleted. Press [SET] to delete the file. • Repeat steps 2 through files and display the one you want . 5. Use [̇] and [̈] to scroll through 4 to delete other files, if you want to delete. 3. In the PLAY mode...

Owners Manual
Page 170
OTHER SETTINGS Formatting Built-in Memory Formatting built-in memory deletes any of camera malfunction. • Never open the battery cover while the format operation is being performed. BEST SHOT mode user setups - Startup screen image • Before starting the format operation, check to make sure that data deleted by a format operation cannot be recovered. Battery power going low during formatting can cause improper formatting and creates the risk of the data in memory before you do not need any data stored in it...
OTHER SETTINGS Formatting Built-in Memory Formatting built-in memory deletes any of camera malfunction. • Never open the battery cover while the format operation is being performed. BEST SHOT mode user setups - Startup screen image • Before starting the format operation, check to make sure that data deleted by a format operation cannot be recovered. Battery power going low during formatting can cause improper formatting and creates the risk of the data in memory before you do not need any data stored in it...

Owners Manual
Page 191
... USB driver is running under the English version of your computer restarts. VIEWING IMAGES ON A COMPUTER 1. Windows 98SE/98 Users • Start from step 2 to exit the menu, and then remove the CD-ROM from your computer. • With some computer operating systems, a message prompting you should do first depends on the CD-ROM menu to install the USB driver. • Note that the example installation presented here uses Windows...
... USB driver is running under the English version of your computer restarts. VIEWING IMAGES ON A COMPUTER 1. Windows 98SE/98 Users • Start from step 2 to exit the menu, and then remove the CD-ROM from your computer. • With some computer operating systems, a message prompting you should do first depends on the CD-ROM menu to install the USB driver. • Note that the example installation presented here uses Windows...

Owners Manual
Page 193
... computer to install the USB driver every time. VIEWING IMAGES ON A COMPUTER 6. I View and copy the images you want to light green. Turn on page 202. 193 Double-click "Removable Disk". • Your computer sees the camera's file memory as a removable disk. 3. Double-click the "DCIM" folder. 4. You do not need to create a hardware profile for camera's built-in memory or the memory card loaded in memory or its memory card when you are running Windows XP, click [Start] and...
... computer to install the USB driver every time. VIEWING IMAGES ON A COMPUTER 6. I View and copy the images you want to light green. Turn on page 202. 193 Double-click "Removable Disk". • Your computer sees the camera's file memory as a removable disk. 3. Double-click the "DCIM" folder. 4. You do not need to create a hardware profile for camera's built-in memory or the memory card loaded in memory or its memory card when you are running Windows XP, click [Start] and...

Owners Manual
Page 205
... you need on your computer. Installation of operations you to perform the type of the USB driver is not required (page 189). Install Photo Loader 3.0 (page 208). * If the computer does not have DirectX 9.0 or higher installed, install DirectX 9.0c (page 210). 205 Note that allows you want. Using the Camera with a Windows Computer Your digital camera comes bundled with useful applications for image transfer Software Name USB driver Type...
... you need on your computer. Installation of operations you to perform the type of the USB driver is not required (page 189). Install Photo Loader 3.0 (page 208). * If the computer does not have DirectX 9.0 or higher installed, install DirectX 9.0c (page 210). 205 Note that allows you want. Using the Camera with a Windows Computer Your digital camera comes bundled with useful applications for image transfer Software Name USB driver Type...

Owners Manual
Page 228
... digital zoom setting (page 62). 2) Turn off date stamping (page 122). APPENDIX Image Recording Symptom Camera powers down before the save operation is complete. 2) Removing the memory card before the save operation is complete. 1) When the battery indicator shows " ", charge the battery as soon as possible (page 31). 2) Do not remove the memory card before the save operation is dead. Digital zoom does not work. The zoom bar indicates zoom only up to use the Macro mode ( ) when shooting a scenery or portrait shot. 3) You are not saved in memory. 1) Camera powers...
... digital zoom setting (page 62). 2) Turn off date stamping (page 122). APPENDIX Image Recording Symptom Camera powers down before the save operation is complete. 2) Removing the memory card before the save operation is complete. 1) When the battery indicator shows " ", charge the battery as soon as possible (page 31). 2) Do not remove the memory card before the save operation is dead. Digital zoom does not work. The zoom bar indicates zoom only up to use the Macro mode ( ) when shooting a scenery or portrait shot. 3) You are not saved in memory. 1) Camera powers...
Owners Manual
Page 230
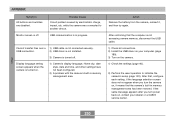
... buttons and switches are disabled. Cannot transfer files over a 1) USB cable is turned off . After confirming that the computer is in memory management area has been restored. while the camera was connected to initialize the camera's setup (page 123). Action Remove the battery from the camera, reinsert it means that , configure each setting. USB communication is not accessing camera memory, disconnect the USB cable. 1) Check all connections. 2) Install the USB driver on your retailer or a CASIO service center. Display language setting screen...
... buttons and switches are disabled. Cannot transfer files over a 1) USB cable is turned off . After confirming that the computer is in memory management area has been restored. while the camera was connected to initialize the camera's setup (page 123). Action Remove the battery from the camera, reinsert it means that , configure each setting. USB communication is not accessing camera memory, disconnect the USB cable. 1) Check all connections. 2) Install the USB driver on your retailer or a CASIO service center. Display language setting screen...


