User Guide
Page 4
...delete specific files 32 ❚ To delete all files 32 Snapshot Shooting Precautions 33 ❚ Auto Focus Restrictions 33 ❚❙ Snapshot Tutorial 34 Using the Control Panel 34 Changing the Image Size Size) . . 35 Using Flash Flash) . . 39 Using the Self-timer Self-timer) . . 41 Using Face Detection Face Detection) . . 42 Optimizing Image Brightness Lighting) . . 43 Using the easy Mode easy Mode) . . 43 Shooting with Zoom 45 ❚ Optical Zoom and Digital Zoom Switch Point 46 ❚❙ Recording Movie Images and Audio 48 To record a movie 48 Shooting...
...delete specific files 32 ❚ To delete all files 32 Snapshot Shooting Precautions 33 ❚ Auto Focus Restrictions 33 ❚❙ Snapshot Tutorial 34 Using the Control Panel 34 Changing the Image Size Size) . . 35 Using Flash Flash) . . 39 Using the Self-timer Self-timer) . . 41 Using Face Detection Face Detection) . . 42 Optimizing Image Brightness Lighting) . . 43 Using the easy Mode easy Mode) . . 43 Shooting with Zoom 45 ❚ Optical Zoom and Digital Zoom Switch Point 46 ❚❙ Recording Movie Images and Audio 48 To record a movie 48 Shooting...

User Guide
Page 5
... Sensitivity ISO) . . . 66 ❚ Using Built-in Color Filters Color Filter) . . . 66 ❚❙ Viewing Snapshots and Movies 67 Viewing Snapshots 67 Viewing a Movie 67 Zooming an On-screen Image 68 Displaying the Image Menu 68 Viewing Snapshots and Movies on a TV Screen 69 ❚❙ Other Playback Functions (PLAY) 71 Using the PLAY Panel 71 Playing a Slideshow on the Camera Slideshow) . . 73 Rotating an Image Rotation) . . 74 Using Red Eye Correction Red Eye) . . 74 Selecting Images for Printing DPOF Printing) . . 75 Protecting a File Against Deletion Protect...
... Sensitivity ISO) . . . 66 ❚ Using Built-in Color Filters Color Filter) . . . 66 ❚❙ Viewing Snapshots and Movies 67 Viewing Snapshots 67 Viewing a Movie 67 Zooming an On-screen Image 68 Displaying the Image Menu 68 Viewing Snapshots and Movies on a TV Screen 69 ❚❙ Other Playback Functions (PLAY) 71 Using the PLAY Panel 71 Playing a Slideshow on the Camera Slideshow) . . 73 Rotating an Image Rotation) . . 74 Using Red Eye Correction Red Eye) . . 74 Selecting Images for Printing DPOF Printing) . . 75 Protecting a File Against Deletion Protect...
User Guide
Page 6
.... 108 Time Stamping Snapshots Timestamp) . 109 Setting the Camera's Clock Adjust) . 109 Specifying the Date Style Date Style) . 110 Specifying the Display Language Language) . 110 Configuring Sleep State Settings Sleep) . .111 Configuring Auto Power Settings Auto Power Off) . .111 Configuring [r] and [p] Settings REC/PLAY) . 112 Disabling File Deletion Disabled) . 112 Configuring USB Protocol Settings USB) . 113 Selecting the Screen Aspect Ratio and Video Output System Video Out) . 113 Formatting Built-in Memory or a Memory Card Format) . 114 Resetting the Camera to Factory Defaults...
.... 108 Time Stamping Snapshots Timestamp) . 109 Setting the Camera's Clock Adjust) . 109 Specifying the Date Style Date Style) . 110 Specifying the Display Language Language) . 110 Configuring Sleep State Settings Sleep) . .111 Configuring Auto Power Settings Auto Power Off) . .111 Configuring [r] and [p] Settings REC/PLAY) . 112 Disabling File Deletion Disabled) . 112 Configuring USB Protocol Settings USB) . 113 Selecting the Screen Aspect Ratio and Video Output System Video Out) . 113 Formatting Built-in Memory or a Memory Card Format) . 114 Resetting the Camera to Factory Defaults...

User Guide
Page 22
...; Camera models sold in the language you purchased a camera intended for configuring the display language, date, and time settings. Example: July, 10, 2012 YY/MM/DD * 12/7/10 DD/MM/YY * 10/7/12 MM/DD/YY * 7/10/12 4. To switch between 12-hour and 24-hour format, press [0] (Movie). 5. To change it. Press [ON/OFF] (Power) to select a date style and then press [SET]. Use [8] and [2] to turn...
...; Camera models sold in the language you purchased a camera intended for configuring the display language, date, and time settings. Example: July, 10, 2012 YY/MM/DD * 12/7/10 DD/MM/YY * 10/7/12 MM/DD/YY * 7/10/12 4. To switch between 12-hour and 24-hour format, press [0] (Movie). 5. To change it. Press [ON/OFF] (Power) to select a date style and then press [SET]. Use [8] and [2] to turn...
User Guide
Page 45
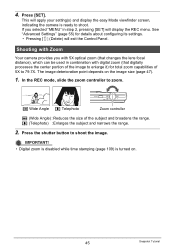
... narrows the range. 2. IMPORTANT! • Digital zoom is disabled while time stamping (page 109) is ready to shoot. w Wide Angle z Telephoto Zoom controller w (Wide Angle) : Reduces the size of 5X to enlarge it) for details about configuring its settings. • Pressing [ ] (Delete) will apply your setting(s) and display the easy Mode viewfinder screen, indicating the camera is turned on the image size (page 47). 1. If you with digital zoom (that changes the lens focal distance), which...
... narrows the range. 2. IMPORTANT! • Digital zoom is disabled while time stamping (page 109) is ready to shoot. w Wide Angle z Telephoto Zoom controller w (Wide Angle) : Reduces the size of 5X to enlarge it) for details about configuring its settings. • Pressing [ ] (Delete) will apply your setting(s) and display the easy Mode viewfinder screen, indicating the camera is turned on the image size (page 47). 1. If you with digital zoom (that changes the lens focal distance), which...
User Guide
Page 51
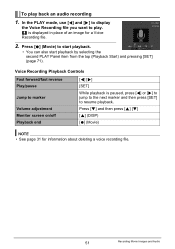
Voice Recording Playback Controls Fast forward/fast reverse Play/pause [4] [6] [SET] Jump to marker Volume adjustment Monitor screen on/off Playback end While playback is displayed in place of an image for information about deleting a voice recording file. 51 Recording Movie Images and Audio Press [0] (Movie) to play back an audio recording 1. To play . ` is paused, press [4] or [6] to jump to the next marker and then press [SET] to resume playback. Press [2] and then press...
Voice Recording Playback Controls Fast forward/fast reverse Play/pause [4] [6] [SET] Jump to marker Volume adjustment Monitor screen on/off Playback end While playback is displayed in place of an image for information about deleting a voice recording file. 51 Recording Movie Images and Audio Press [0] (Movie) to play back an audio recording 1. To play . ` is paused, press [4] or [6] to jump to the next marker and then press [SET] to resume playback. Press [2] and then press...

User Guide
Page 60
Some BEST SHOT scenes - Reducing the Effects of free space available for storage. Releasing the shutter button stops shooting. easy Mode - Auto Off Minimizes the effects of the following. - NOTE • With continuous shutter, exposure and focus for the first image are continually recorded until all recording is finished. • The continuous shutter rate depends on the current image size and image quality settings. • The speed of Continuous Shutter depends on the type of memory card loaded...
Some BEST SHOT scenes - Reducing the Effects of free space available for storage. Releasing the shutter button stops shooting. easy Mode - Auto Off Minimizes the effects of the following. - NOTE • With continuous shutter, exposure and focus for the first image are continually recorded until all recording is finished. • The continuous shutter rate depends on the current image size and image quality settings. • The speed of Continuous Shutter depends on the type of memory card loaded...

User Guide
Page 62
..., Flash, Metering Mode, White Balance, Self-timer, EV Shift 62 Advanced Settings Assigning Functions to the [4] and [6] keys. Using Icon Help (Icon Help) Procedure [r] (REC) * [SET] * MENU * REC Tab * Icon Help While Icon Help is turned on, a textual description will appear on the REC mode monitor screen for certain icons when you switch between REC functions. Setting EV Shift White Balance ISO Self-timer Off [4]/[6] key operation Adjusts the EV shift value (page 64) Changes the white balance setting (page 65) Changes the ISO Sensitivity setting (page 66) Sets the self-timer time...
..., Flash, Metering Mode, White Balance, Self-timer, EV Shift 62 Advanced Settings Assigning Functions to the [4] and [6] keys. Using Icon Help (Icon Help) Procedure [r] (REC) * [SET] * MENU * REC Tab * Icon Help While Icon Help is turned on, a textual description will appear on the REC mode monitor screen for certain icons when you switch between REC functions. Setting EV Shift White Balance ISO Self-timer Off [4]/[6] key operation Adjusts the EV shift value (page 64) Changes the white balance setting (page 65) Changes the ISO Sensitivity setting (page 66) Sets the self-timer time...
User Guide
Page 74
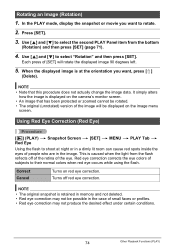
...) 1. Using Red Eye Correction (Red Eye) Procedure [p] (PLAY) * Snapshot Screen * [SET] * MENU * PLAY Tab * Red Eye Using the flash to shoot at the orientation you want , press [ ] (Delete). Correct Cancel Turns on the image menu screen. Use [8] and [2] to their normal colors when red eye occurs while using the flash. This is retained in memory and not deleted. • Red eye correction may not produce the desired effect under certain conditions. 74 Other Playback Functions (PLAY) Each press of the image will rotate the displayed image...
...) 1. Using Red Eye Correction (Red Eye) Procedure [p] (PLAY) * Snapshot Screen * [SET] * MENU * PLAY Tab * Red Eye Using the flash to shoot at the orientation you want , press [ ] (Delete). Correct Cancel Turns on the image menu screen. Use [8] and [2] to their normal colors when red eye occurs while using the flash. This is retained in memory and not deleted. • Red eye correction may not produce the desired effect under certain conditions. 74 Other Playback Functions (PLAY) Each press of the image will rotate the displayed image...
User Guide
Page 78
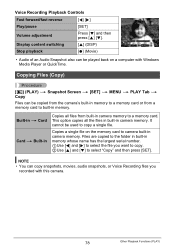
... camera memory. Copies a single file on a computer with this camera. 78 Other Playback Functions (PLAY) Voice Recording Playback Controls Fast forward/fast reverse [4] [6] Play/pause [SET] Volume adjustment Press [2] and then press [8] [2]. It cannot be played back on the memory card to built-in memory. NOTE • You can be copied from the camera's built-in memory to a memory card or from built-in memory whose name has the largest serial number. 1Use [4] and [6] to copy a single file. Display...
... camera memory. Copies a single file on a computer with this camera. 78 Other Playback Functions (PLAY) Voice Recording Playback Controls Fast forward/fast reverse [4] [6] Play/pause [SET] Volume adjustment Press [2] and then press [8] [2]. It cannot be played back on the memory card to built-in memory. NOTE • You can be copied from the camera's built-in memory to a memory card or from built-in memory whose name has the largest serial number. 1Use [4] and [6] to copy a single file. Display...

User Guide
Page 96
... Using the Camera with CASIO brand EXILIM Series digital cameras only. Start up your computer screen to a different file name when saving a snapshot that appear on your Web browser and accesses the user registration website. If your computer does not display the menu screen automatically, navigate to view the contents of course, you want. 3. Viewing User Documentation (PDF Files) 1. IMPORTANT! • Virtual Painter 5 LE for CASIO supports transformation of JPEG images shot with...
... Using the Camera with CASIO brand EXILIM Series digital cameras only. Start up your computer screen to a different file name when saving a snapshot that appear on your Web browser and accesses the user registration website. If your computer does not display the menu screen automatically, navigate to view the contents of course, you want. 3. Viewing User Documentation (PDF Files) 1. IMPORTANT! • Virtual Painter 5 LE for CASIO supports transformation of JPEG images shot with...
User Guide
Page 109
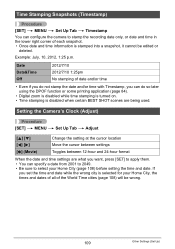
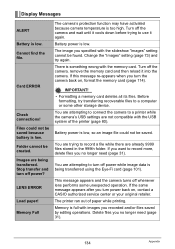
... stamping of date and/or time • Even if you do so later using the DPOF function or some printing application (page 84). • Digital zoom is disabled while time stamping is turned on. • Time stamping is disabled when certain BEST SHOT scenes are what you can do not stamp the date and/or time with Timestamp, you want, press [SET] to apply them. • You can configure the camera...
... stamping of date and/or time • Even if you do so later using the DPOF function or some printing application (page 84). • Digital zoom is disabled while time stamping is turned on. • Time stamping is disabled when certain BEST SHOT scenes are what you can do not stamp the date and/or time with Timestamp, you want, press [SET] to apply them. • You can configure the camera...
User Guide
Page 112
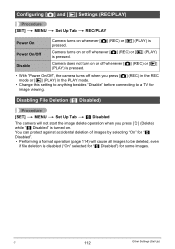
...; Disabled". • Performing a format operation (page 114) will not start the image delete operation when you press [r] (REC) in the REC mode or [p] (PLAY) in the PLAY mode. • Change this setting to anything besides "Disable" before connecting to be deleted, even if file deletion is pressed. Configuring [r] and [p] Settings (REC/PLAY) Procedure [SET] * MENU * Set Up Tab * REC/PLAY Power On Power On/Off Disable Camera turns on whenever [r] (REC) or [p] (PLAY) is turned on. Disabling File Deletion (Ü Disabled) Procedure [SET] * MENU * Set Up Tab * Ü Disabled...
...; Disabled". • Performing a format operation (page 114) will not start the image delete operation when you press [r] (REC) in the REC mode or [p] (PLAY) in the PLAY mode. • Change this setting to anything besides "Disable" before connecting to be deleted, even if file deletion is pressed. Configuring [r] and [p] Settings (REC/PLAY) Procedure [SET] * MENU * Set Up Tab * REC/PLAY Power On Power On/Off Disable Camera turns on whenever [r] (REC) or [p] (PLAY) is turned on. Disabling File Deletion (Ü Disabled) Procedure [SET] * MENU * Set Up Tab * Ü Disabled...

User Guide
Page 114
...factory default settings. Make sure you format it. • Formatting built-in memory. Startup screen • Formatting a memory card will cause all contents on the card or in built-in memory before starting a formatting operation. Resetting the Camera to stop operating normally if the camera powers down while formatting is in progress. • Never open the battery cover while formatting is in the camera, this operation will delete the following data. - World Time settings, clock settings, date style, screen language, video output C 114 Other Settings (Set Up) Formatting...
...factory default settings. Make sure you format it. • Formatting built-in memory. Startup screen • Formatting a memory card will cause all contents on the card or in built-in memory before starting a formatting operation. Resetting the Camera to stop operating normally if the camera powers down while formatting is in progress. • Never open the battery cover while formatting is in the camera, this operation will delete the following data. - World Time settings, clock settings, date style, screen language, video output C 114 Other Settings (Set Up) Formatting...
User Guide
Page 129
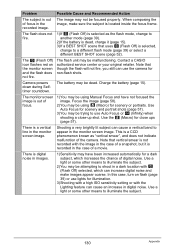
...... Image Recording Image is not recorded when the shutter button is pressed. Auto Focus does not focus properly. Use manual focus (page 57). 4)You may be dead. Half-press the shutter button and allow enough time for Auto Focus. Purchase a separately available CASIO NP-120 rechargeable lithium ion battery. 1)Auto Power Off may have activated because camera temperature is compatible with Anti Shake or use a different memory card. 1)If the lens is charging, wait until it off . Turn power back...
...... Image Recording Image is not recorded when the shutter button is pressed. Auto Focus does not focus properly. Use manual focus (page 57). 4)You may be dead. Half-press the shutter button and allow enough time for Auto Focus. Purchase a separately available CASIO NP-120 rechargeable lithium ion battery. 1)Auto Power Off may have activated because camera temperature is compatible with Anti Shake or use a different memory card. 1)If the lens is charging, wait until it off . Turn power back...
User Guide
Page 130
... case, turn on the monitor screen and the flash does not fire. Note that uses ? (Flash Off) is a CCD phenomenon known as the flash mode, change to another mode (page 39). 2)If the battery is dead, charge it is recorded in digital noise. There is a vertical line in the recorded image. When composing the image, make images appear coarse. Use Auto Focus for illumination. 3)Shooting with a high ISO sensitivity setting or with ? (Flash Off) selected...
... case, turn on the monitor screen and the flash does not fire. Note that uses ? (Flash Off) is a CCD phenomenon known as the flash mode, change to another mode (page 39). 2)If the battery is dead, charge it is recorded in digital noise. There is a vertical line in the recorded image. When composing the image, make images appear coarse. Use Auto Focus for illumination. 3)Shooting with a high ISO sensitivity setting or with ? (Flash Off) selected...

User Guide
Page 132
... in the wrong language. Change the display language setting (page 110). 1)The USB cable may not be "On". Images are shooting. This camera cannot display non-DCF images recorded onto a memory card using another camera 1)The file may be able to recognize the camera if you are not displayed. Set the correct date and time (page 109). Check all connections. 2)The wrong USB communication protocol is not turned on, turn it on. 4)Your computer may not be protected.
... in the wrong language. Change the display language setting (page 110). 1)The USB cable may not be "On". Images are shooting. This camera cannot display non-DCF images recorded onto a memory card using another camera 1)The file may be able to recognize the camera if you are not displayed. Set the correct date and time (page 109). Check all connections. 2)The wrong USB communication protocol is not turned on, turn it on. 4)Your computer may not be protected.
User Guide
Page 134
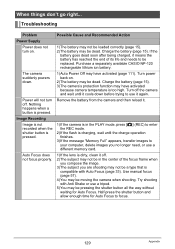
... no longer need (page 31). 134 Appendix Card ERROR Check connections! Delete files you want to a computer or some unexpected operation. This message appears and the camera turns off the camera and wait until it again. Display Messages ALERT Battery is low. Files could not be found. Folder cannot be saved because battery is being transferred. Before formatting, try again. Images are not compatible with images you recorded and/or files saved by editing operations. The printer ran...
... no longer need (page 31). 134 Appendix Card ERROR Check connections! Delete files you want to a computer or some unexpected operation. This message appears and the camera turns off the camera and wait until it again. Display Messages ALERT Battery is low. Files could not be found. Folder cannot be saved because battery is being transferred. Before formatting, try again. Images are not compatible with images you recorded and/or files saved by editing operations. The printer ran...
User Guide
Page 140
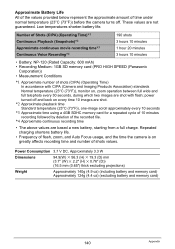
...;C (73°F)) before the camera turns off and back on every time 10 images are shot. *2 Approximate playback time Standard temperature (23°C (73°F)), one-image scroll approximately every 10 seconds *3 Approximate time using a 4GB SDHC memory card for a repeated cycle of 10 minutes recording followed by deletion of the recorded file. *4 Approximate continuous recording time • The above values are based a new battery, starting from a full charge. Power Consumption 3.7 V DC, Approximately...
...;C (73°F)) before the camera turns off and back on every time 10 images are shot. *2 Approximate playback time Standard temperature (23°C (73°F)), one-image scroll approximately every 10 seconds *3 Approximate time using a 4GB SDHC memory card for a repeated cycle of 10 minutes recording followed by deletion of the recorded file. *4 Approximate continuous recording time • The above values are based a new battery, starting from a full charge. Power Consumption 3.7 V DC, Approximately...

User Guide
Page 141
... lithium ion battery (NP-120) Rated Voltage 3.7 V Rated Capacitance 600 mAh Operating Temperature 0 to 40°C (32 to 95°F) Requirements Dimensions 53 (W) x 21 (H) x 45 (D) mm (2.1" (W) x 0.83" (H) x1.8" (D)) (excluding projections) Weight Approximately 37 g (1.3 oz) • Power cord precautions for use in Singapore The power cord set is not supplied. The power cord used must comply with relevant national and/or international standards. .
... lithium ion battery (NP-120) Rated Voltage 3.7 V Rated Capacitance 600 mAh Operating Temperature 0 to 40°C (32 to 95°F) Requirements Dimensions 53 (W) x 21 (H) x 45 (D) mm (2.1" (W) x 0.83" (H) x1.8" (D)) (excluding projections) Weight Approximately 37 g (1.3 oz) • Power cord precautions for use in Singapore The power cord set is not supplied. The power cord used must comply with relevant national and/or international standards. .


