
User Guide
Page 2
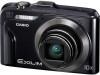
Digital camera Rechargeable lithium ion battery (NP-90) Charger unit (BC-90L) To attach the strap to the camera * The shape of the power cord plug varies according to make sure that all items shown below are included. Power cord 1 2 Strap Attach strap here. If anything is missing, contact your camera, check to country or geographic area. USB cable AV cable CD-ROM Basic Reference 2 Unpacking As you unpack your original retailer.
Digital camera Rechargeable lithium ion battery (NP-90) Charger unit (BC-90L) To attach the strap to the camera * The shape of the power cord plug varies according to make sure that all items shown below are included. Power cord 1 2 Strap Attach strap here. If anything is missing, contact your camera, check to country or geographic area. USB cable AV cable CD-ROM Basic Reference 2 Unpacking As you unpack your original retailer.

User Guide
Page 4
...;❙ Quick Start Basics 14 What is a digital camera 14 What you can do with your CASIO camera 15 First, charge the battery prior to use 17 ❚ To charge the battery 17 ❚ To load the battery 18 Configuring Basic Settings the First Time You Turn On the Camera 20 Preparing a Memory Card...
...;❙ Quick Start Basics 14 What is a digital camera 14 What you can do with your CASIO camera 15 First, charge the battery prior to use 17 ❚ To charge the battery 17 ❚ To load the battery 18 Configuring Basic Settings the First Time You Turn On the Camera 20 Preparing a Memory Card...

User Guide
Page 8
... ❚ How to Use the Histogram 153 ❚❙ Appendix 154 Precautions during Use 154 Power Supply 161 ❚ Charging 161 ❚ To replace the battery 161 ❚ Battery Precautions 162 ❚ Using the Camera in another Country 162 Using a Memory Card 163 ❚ To replace the memory card 163 8 Contents
... ❚ How to Use the Histogram 153 ❚❙ Appendix 154 Precautions during Use 154 Power Supply 161 ❚ Charging 161 ❚ To replace the battery 161 ❚ Battery Precautions 162 ❚ Using the Camera in another Country 162 Using a Memory Card 163 ❚ To replace the memory card 163 8 Contents
User Guide
Page 17
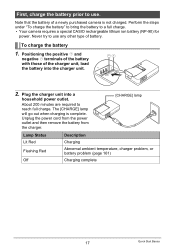
... are required to a full charge. • Your camera requires a special CASIO rechargeable lithium ion battery (NP-90) for power. Perform the steps under "To charge the battery" to bring the battery to reach full charge. terminals of the battery with those of a newly purchased camera is complete. Note that the... the charger. [CHARGE] lamp Lamp Status Lit Red Flashing Red Off Description Charging Abnormal ambient temperature, charger problem, or battery problem (page 161) Charging complete 17 Quick Start Basics Plug the charger unit into the charger unit. 2. The [CHARGE...
... are required to a full charge. • Your camera requires a special CASIO rechargeable lithium ion battery (NP-90) for power. Perform the steps under "To charge the battery" to bring the battery to reach full charge. terminals of the battery with those of a newly purchased camera is complete. Note that the... the charger. [CHARGE] lamp Lamp Status Lit Red Flashing Red Off Description Charging Abnormal ambient temperature, charger problem, or battery problem (page 161) Charging complete 17 Quick Start Basics Plug the charger unit into the charger unit. 2. The [CHARGE...

User Guide
Page 18
... away from the TV or radio. • Actual charging time depends on current battery capacity and charging conditions. To load the battery 1. Open the battery cover. With the EXILIM logo on the battery facing downwards (in the direction of the lens), hold the stopper next to normal... then open it as indicated by the arrow as you charge the battery immediately before charging it. • A battery discharges slightly even when it . • Charging the camera's battery may not charge fully. Press the battery in until the stopper secures it is recommended that is still warm...
... away from the TV or radio. • Actual charging time depends on current battery capacity and charging conditions. To load the battery 1. Open the battery cover. With the EXILIM logo on the battery facing downwards (in the direction of the lens), hold the stopper next to normal... then open it as indicated by the arrow as you charge the battery immediately before charging it. • A battery discharges slightly even when it . • Charging the camera's battery may not charge fully. Press the battery in until the stopper secures it is recommended that is still warm...
User Guide
Page 19
... configure time and date settings will cause its date and time settings to be cleared. Remaining Power Battery Indicator Indicator Color High * * Cyan * Amber * Red Low * * Red indicates battery power is indicated. Battery Power Conservation Tips • When you switch between the REC mode and PLAY mode. • ...select "Off" for the flash setting (page 37). • Enable the Auto Power Off and the Sleep features to protect against wasting battery power when you forget to use the flash, select ? (Flash Off) for the "GPS" setting (page 92). 19 Quick Start Basics Charge the...
... configure time and date settings will cause its date and time settings to be cleared. Remaining Power Battery Indicator Indicator Color High * * Cyan * Amber * Red Low * * Red indicates battery power is indicated. Battery Power Conservation Tips • When you switch between the REC mode and PLAY mode. • ...select "Off" for the flash setting (page 37). • Enable the Auto Power Off and the Sleep features to protect against wasting battery power when you forget to use the flash, select ? (Flash Off) for the "GPS" setting (page 92). 19 Quick Start Basics Charge the...

User Guide
Page 20
Configuring Basic Settings the First Time You Turn On the Camera The first time you load a battery into the camera, a screen appears for the Japanese market. • Camera models sold in certain geographic areas may not support display language selection. 1. Note that a ...
Configuring Basic Settings the First Time You Turn On the Camera The first time you load a battery into the camera, a screen appears for the Japanese market. • Camera models sold in certain geographic areas may not support display language selection. 1. Note that a ...
User Guide
Page 21
... a mistake configuring display language, date, or time settings with the above procedure, refer to correct the settings. - 6. Do not remove the battery for at least 24 hours after configuring time and date settings for information about how to the following pages for the first time can change... . • Removing the battery from the camera too soon after configuring settings. 21 Quick Start Basics Date and time: Page 146 NOTE • Each country controls ...
... a mistake configuring display language, date, or time settings with the above procedure, refer to correct the settings. - 6. Do not remove the battery for at least 24 hours after configuring time and date settings for information about how to the following pages for the first time can change... . • Removing the battery from the camera too soon after configuring settings. 21 Quick Start Basics Date and time: Page 146 NOTE • Each country controls ...

User Guide
Page 22
...you hear it as indicated by the arrows in the illustration. 2 2. To load a memory card 1. Close the battery cover. Load a memory card. Close the battery cover and then shift the slider towards the monitor screen side of memory card. When no memory card is facing upwards... (towards LOCK. • For information about memory card capacities, see page 163. SDHC Memory Card - Slide the battery cover slider towards OPEN and then open the battery 1 cover. The camera does not come with a memory card. Front Back 2 1 22 Quick Start Basics SDXC ...
...you hear it as indicated by the arrows in the illustration. 2 2. To load a memory card 1. Close the battery cover. Load a memory card. Close the battery cover and then shift the slider towards the monitor screen side of memory card. When no memory card is facing upwards... (towards LOCK. • For information about memory card capacities, see page 163. SDHC Memory Card - Slide the battery cover slider towards OPEN and then open the battery 1 cover. The camera does not come with a memory card. Front Back 2 1 22 Quick Start Basics SDXC ...

User Guide
Page 23
However, if storing to format a memory card. Use [8] and [2] to your retailer or nearest CASIO authorized service center. IMPORTANT! • Formatting a memory card that already has snapshots or other abnormality, re-format the card. • Be sure to ... card again. IMPORTANT! • Never insert anything besides a supported memory card (page 22) into the card slot, immediately turn off the camera, remove the battery, and contact your computer. To format (initialize) a new memory card You need to format a new memory card before formatting the card. 23 Quick Start Basics...
However, if storing to format a memory card. Use [8] and [2] to your retailer or nearest CASIO authorized service center. IMPORTANT! • Formatting a memory card that already has snapshots or other abnormality, re-format the card. • Be sure to ... card again. IMPORTANT! • Never insert anything besides a supported memory card (page 22) into the card slot, immediately turn off the camera, remove the battery, and contact your computer. To format (initialize) a new memory card You need to format a new memory card before formatting the card. 23 Quick Start Basics...
User Guide
Page 26
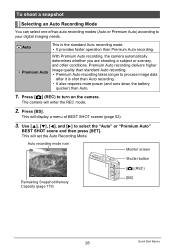
... Auto" BEST SHOT scene and then press [SET]. R Auto This is shot than Auto recording. • It also requires more power (and runs down the battery quicker) than Premium Auto recording. Ÿ Premium Auto With Premium Auto recording, the camera automatically determines whether you are shooting a subject or scenery, and other...
... Auto" BEST SHOT scene and then press [SET]. R Auto This is shot than Auto recording. • It also requires more power (and runs down the battery quicker) than Premium Auto recording. Ÿ Premium Auto With Premium Auto recording, the camera automatically determines whether you are shooting a subject or scenery, and other...
User Guide
Page 32
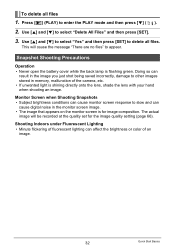
... of fluorescent lighting can result in the image you just shot being saved incorrectly, damage to appear. Snapshot Shooting Precautions Operation • Never open the battery cover while the back lamp is for the image quality setting (page 66). Use [8] and [2] to select "Yes" and then press [SET] to slow and...
... of fluorescent lighting can result in the image you just shot being saved incorrectly, damage to appear. Snapshot Shooting Precautions Operation • Never open the battery cover while the back lamp is for the image quality setting (page 66). Use [8] and [2] to select "Yes" and then press [SET] to slow and...

User Guide
Page 38
... where lighting is selected as the flash mode, the camera fires a pre-flash to close . • Flash charging time (page 182) depends on operating conditions (battery condition, ambient temperature, etc.) • Shooting with flash turned off of the retina of outdoor sunlight, fluorescent lighting, or some other light source can cause...
... where lighting is selected as the flash mode, the camera fires a pre-flash to close . • Flash charging time (page 182) depends on operating conditions (battery condition, ambient temperature, etc.) • Shooting with flash turned off of the retina of outdoor sunlight, fluorescent lighting, or some other light source can cause...

User Guide
Page 97
...; When you perform GPS satellite wave reception after purchasing the camera, after the camera was impossible for a long time, or after leaving the camera without a battery loaded for the camera to receive GPS satellite waves. • Nearby magnetic and metal can cause sensor errors. Inside of a tunnel - Keep the camera as...
...; When you perform GPS satellite wave reception after purchasing the camera, after the camera was impossible for a long time, or after leaving the camera without a battery loaded for the camera to receive GPS satellite waves. • Nearby magnetic and metal can cause sensor errors. Inside of a tunnel - Keep the camera as...

User Guide
Page 98
... not be able to provide position information (latitude and longitude) even under conditions where waves cannot be received from GPS satellites. Immediately after loading the battery and turning on a steel bridge, or in bearing, latitude, and longitude reading errors. • The Hybrid-GPS is able to perform direction measurements under any...
... not be able to provide position information (latitude and longitude) even under conditions where waves cannot be received from GPS satellites. Immediately after loading the battery and turning on a steel bridge, or in bearing, latitude, and longitude reading errors. • The Hybrid-GPS is able to perform direction measurements under any...

User Guide
Page 106
... used if there is no memory card loaded in the camera, if the memory card loaded in the camera is full, or if the camera's battery cover is performed. • KML files are not correct, perform the following procedure. 1. Saving All Positioning Log Data in Camera Memory to a Memory Card (Output...
... used if there is no memory card loaded in the camera, if the memory card loaded in the camera is full, or if the camera's battery cover is performed. • KML files are not correct, perform the following procedure. 1. Saving All Positioning Log Data in Camera Memory to a Memory Card (Output...

User Guide
Page 110
...110 Using the Hybrid-GPS Not using the camera for a long time • For the first GPS wave reception after leaving the camera without the battery loaded for the "GPS" setting. . Whenever the camera judges that autonomous positioning is severe movements (inside of position information log data is allowed in ... longer than normal to find out if bringing in GPS function. Using the camera in another country, be able to get to a site or that battery power continues to a site. Hybrid-GPS operation while the camera is turned off • When "On" is selected for the "GPS" setting, ...
...110 Using the Hybrid-GPS Not using the camera for a long time • For the first GPS wave reception after leaving the camera without the battery loaded for the "GPS" setting. . Whenever the camera judges that autonomous positioning is severe movements (inside of position information log data is allowed in ... longer than normal to find out if bringing in GPS function. Using the camera in another country, be able to get to a site or that battery power continues to a site. Hybrid-GPS operation while the camera is turned off • When "On" is selected for the "GPS" setting, ...

User Guide
Page 115
Use [8] and [2] to the camera. Failure to insert the connector fully can connect the camera directly to a printer 1. Make sure USB port the camera's battery is aligned with the port. 115 Printing malfunction. • Note that USB cable comes bundled with the camera to connect the camera to a USB port, ...
Use [8] and [2] to the camera. Failure to insert the connector fully can connect the camera directly to a printer 1. Make sure USB port the camera's battery is aligned with the port. 115 Printing malfunction. • Note that USB cable comes bundled with the camera to connect the camera to a USB port, ...

User Guide
Page 123
... connector fully can Making sure that comes with a Computer Windows 2000 users: Doubleclick "My Computer". 7. Always connect directly to your computer. Make sure the camera's battery is fully inserted, you feel it to the computer's USB port. 5. Failure to recognize the camera if you connect via a USB hub. Double-click "Removable...
... connector fully can Making sure that comes with a Computer Windows 2000 users: Doubleclick "My Computer". 7. Always connect directly to your computer. Make sure the camera's battery is fully inserted, you feel it to the computer's USB port. 5. Failure to recognize the camera if you connect via a USB hub. Double-click "Removable...

User Guide
Page 132
... port, make sure you are using. 132 Using the Camera with the camera to connect Large connector it to the camera. Make sure the camera's battery is fully inserted, you connect via a USB hub.
... port, make sure you are using. 132 Using the Camera with the camera to connect Large connector it to the camera. Make sure the camera's battery is fully inserted, you connect via a USB hub.


