
User Guide
Page 4
... Control Panel 28 Changing the Image Size Size) . . 29 Using Flash Flash) . . 31 Specifying ISO Sensitivity ISO) . . 34 Adjusting White Balance White Balance) . . 34 Correcting Image Brightness EV Shift) . . 36 Specifying the Metering Mode Metering) . . 37 Specifying the Auto Focus Area AF Area) . . 37 Shooting with the REC Light REC Light) . . 39 Changing the Control Panel Date/Time Style 39 Shooting with Zoom 40 ❚ Optical Zoom/Digital Zoom Switch Point 41 Selecting a Focus Mode Focus) . . 43 Correcting for Back Lighting 45 Locking the Auto Exposure and Auto Focus Setting...
... Control Panel 28 Changing the Image Size Size) . . 29 Using Flash Flash) . . 31 Specifying ISO Sensitivity ISO) . . 34 Adjusting White Balance White Balance) . . 34 Correcting Image Brightness EV Shift) . . 36 Specifying the Metering Mode Metering) . . 37 Specifying the Auto Focus Area AF Area) . . 37 Shooting with the REC Light REC Light) . . 39 Changing the Control Panel Date/Time Style 39 Shooting with Zoom 40 ❚ Optical Zoom/Digital Zoom Switch Point 41 Selecting a Focus Mode Focus) . . 43 Correcting for Back Lighting 45 Locking the Auto Exposure and Auto Focus Setting...
User Guide
Page 5
... REC Mode Settings REC) . . 79 ❚ Using the Self-timer Self-timer) . . . 79 ❚ Using the Auto Focus Assist Light AF Assist Light) . . . 80 ❚ Reducing the Effects of Camera and Subject Movement . . . . (Anti Shake) . . . 81 ❚ Shooting with Face Detection Face Detection) . . . 82 ❚ Shooting with Continuous Auto Focus Continuous AF) . . . 83 ❚ Specifying the [AE-L/AF-L] button Operation AE/AF Lock) . . . 83 ❚ Shooting with AE Bracketing AE Bracketing) . . . 83 ❚ Shooting with White Balance Bracketing...
... REC Mode Settings REC) . . 79 ❚ Using the Self-timer Self-timer) . . . 79 ❚ Using the Auto Focus Assist Light AF Assist Light) . . . 80 ❚ Reducing the Effects of Camera and Subject Movement . . . . (Anti Shake) . . . 81 ❚ Shooting with Face Detection Face Detection) . . . 82 ❚ Shooting with Continuous Auto Focus Continuous AF) . . . 83 ❚ Specifying the [AE-L/AF-L] button Operation AE/AF Lock) . . . 83 ❚ Shooting with AE Bracketing AE Bracketing) . . . 83 ❚ Shooting with White Balance Bracketing...
User Guide
Page 6
...; Controlling Color Saturation Saturation) . . . 90 ❚ Adjusting Image Contrast Contrast) . . . 90 Using the Remote Shutter Release 91 Using an External Flash 92 Installing the Lens Hood or a Lens Filter 94 ❚ Installing the Lens Hood 94 ❚ Installing a Filter 95 ❚❙ Viewing Snapshots and Movies 96 Viewing Snapshots 96 Viewing a Movie 96 Viewing Continuous Shutter Images 97 ❚ Deleting Continuous Shutter Images 99 ❚ Dividing Up a CS Group 99 ❚ Copying a CS Group Image 100 Zooming an On-screen Image 101 Displaying 12 Images...
...; Controlling Color Saturation Saturation) . . . 90 ❚ Adjusting Image Contrast Contrast) . . . 90 Using the Remote Shutter Release 91 Using an External Flash 92 Installing the Lens Hood or a Lens Filter 94 ❚ Installing the Lens Hood 94 ❚ Installing a Filter 95 ❚❙ Viewing Snapshots and Movies 96 Viewing Snapshots 96 Viewing a Movie 96 Viewing Continuous Shutter Images 97 ❚ Deleting Continuous Shutter Images 99 ❚ Dividing Up a CS Group 99 ❚ Copying a CS Group Image 100 Zooming an On-screen Image 101 Displaying 12 Images...
User Guide
Page 7
... the File Name Serial Number Generation Rule . . . . . (File No.) . 138 Configuring World Time Settings World Time) . 139 Time Stamping Snapshots Timestamp) . 140 Setting the Camera's Clock Adjust) . 140 Specifying the Date Style Date Style) . 141 Specifying the Display Language Language) . 141 Configuring Sleep State Settings Sleep) . 142 Configuring Auto Power Settings Auto Power Off) . 142 Configuring [r] and [p] Settings REC/PLAY) . 143 Controlling Monitor Screen Priority LCD Priority) . 143 Configuring USB Protocol Settings USB) . 144 Selecting the Screen Aspect Ratio and Video...
... the File Name Serial Number Generation Rule . . . . . (File No.) . 138 Configuring World Time Settings World Time) . 139 Time Stamping Snapshots Timestamp) . 140 Setting the Camera's Clock Adjust) . 140 Specifying the Date Style Date Style) . 141 Specifying the Display Language Language) . 141 Configuring Sleep State Settings Sleep) . 142 Configuring Auto Power Settings Auto Power Off) . 142 Configuring [r] and [p] Settings REC/PLAY) . 143 Controlling Monitor Screen Priority LCD Priority) . 143 Configuring USB Protocol Settings USB) . 144 Selecting the Screen Aspect Ratio and Video...

User Guide
Page 15
... camera and then press [SET]. Configuring the Display Language the First Time You Turn On the Camera The first time you can change the settings later (pages 140, 141). Use [8], [2], [4], and [6] to select a date style and then press [SET]. Use [8] and [2] to change. 15 Quick Start Basics Press [SET]. • If you make a mistake, you load a battery into the camera, a screen appears for configuring the display language, date, and time settings. The selected area is highlighted in red...
... camera and then press [SET]. Configuring the Display Language the First Time You Turn On the Camera The first time you can change the settings later (pages 140, 141). Use [8], [2], [4], and [6] to select a date style and then press [SET]. Use [8] and [2] to change. 15 Quick Start Basics Press [SET]. • If you make a mistake, you load a battery into the camera, a screen appears for configuring the display language, date, and time settings. The selected area is highlighted in red...
User Guide
Page 18
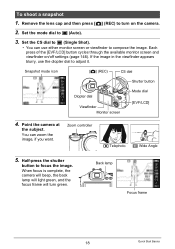
... adjust it. Half-press the shutter button to t (Auto). 3. To shoot a snapshot 1. You can use the diopter dial to t (Single Shot). • You can zoom the image, if you want. Remove the lens cap and then press [r] (REC) to compose the image. If the image in the viewfinder appears blurry, use either monitor screen or viewfinder to turn green. Zoom controller z Telephoto w Wide Angle 5. Point the camera at the subject. Set...
... adjust it. Half-press the shutter button to t (Auto). 3. To shoot a snapshot 1. You can use the diopter dial to t (Single Shot). • You can zoom the image, if you want. Remove the lens cap and then press [r] (REC) to compose the image. If the image in the viewfinder appears blurry, use either monitor screen or viewfinder to turn green. Zoom controller z Telephoto w Wide Angle 5. Point the camera at the subject. Set...
User Guide
Page 22
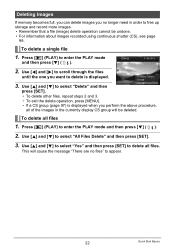
... Quick Start Basics Use [8] and [2] to enter the PLAY mode and then press [2] ( ). 2. To delete all of the images in order to enter the PLAY mode and then press [2] ( ). 2. Press [p] (PLAY) to select "Delete" and then press [SET]. • To delete other files, repeat steps 2 and 3. • To exit the delete operation, press [MENU]. • If a CS group (page 97) is displayed. 3. Press [p] (PLAY) to free up storage and record more images...
... Quick Start Basics Use [8] and [2] to enter the PLAY mode and then press [2] ( ). 2. To delete all of the images in order to enter the PLAY mode and then press [2] ( ). 2. Press [p] (PLAY) to select "Delete" and then press [SET]. • To delete other files, repeat steps 2 and 3. • To exit the delete operation, press [MENU]. • If a CS group (page 97) is displayed. 3. Press [p] (PLAY) to free up storage and record more images...
User Guide
Page 43
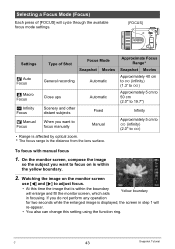
... step 1 will cycle through the available focus mode settings. [FOCUS] Settings Q Auto Focus ´ Macro Focus ) Infinity Focus W Manual Focus Type of [FOCUS] will re-appear. • You also can change this setting using the function ring. C 43 Snapshot Tutorial If you do not perform any operation for two seconds while the enlarged image is displayed, the screen in focusing. Selecting a Focus Mode (Focus) Each press of Shot Focus Mode Snapshot Movies General recording Automatic Close ups Scenery and other distant...
... step 1 will cycle through the available focus mode settings. [FOCUS] Settings Q Auto Focus ´ Macro Focus ) Infinity Focus W Manual Focus Type of [FOCUS] will re-appear. • You also can change this setting using the function ring. C 43 Snapshot Tutorial If you do not perform any operation for two seconds while the enlarged image is displayed, the screen in focusing. Selecting a Focus Mode (Focus) Each press of Shot Focus Mode Snapshot Movies General recording Automatic Close ups Scenery and other distant...
User Guide
Page 53
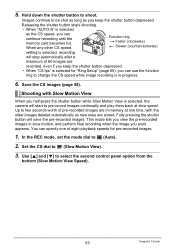
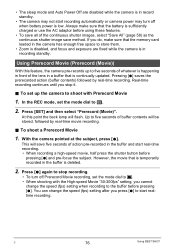
... play them back at one of eight playback speeds for "Ring Setup" (page 85), you can continue recording until the memory card becomes full. Shooting with the older images deleted automatically as you can use the function ring to be shot as long as new ones are recorded, even if you want appears. You can specify one time, with Slow Motion View When you half-press the shutter button...
... play them back at one of eight playback speeds for "Ring Setup" (page 85), you can continue recording until the memory card becomes full. Shooting with the older images deleted automatically as you can use the function ring to be shot as long as new ones are recorded, even if you want appears. You can specify one time, with Slow Motion View When you half-press the shutter button...
User Guide
Page 60
... able to record the number of images for a particular CS mode. • The Flash CS mode switches between the flash and the LED light manually. High-speed CS speed setting not "AUTO-N" Prerecord (Still image) Flash CS with flash Flash CS with Bracketing CS. • When the High-speed CS speed setting is shot. C 60 Snapshot Tutorial Save All : Saves all the images. Make sure your memory card has sufficient remaining capacity before shooting with using a continuous shutter mode, keep the camera still until shooting is...
... able to record the number of images for a particular CS mode. • The Flash CS mode switches between the flash and the LED light manually. High-speed CS speed setting not "AUTO-N" Prerecord (Still image) Flash CS with flash Flash CS with Bracketing CS. • When the High-speed CS speed setting is shot. C 60 Snapshot Tutorial Save All : Saves all the images. Make sure your memory card has sufficient remaining capacity before shooting with using a continuous shutter mode, keep the camera still until shooting is...
User Guide
Page 76
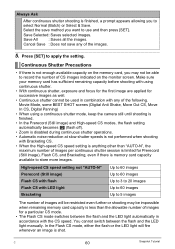
... cannot change the speed (fps) setting after you press [0] to t. • When shooting with Prerecord Movie 1. Real-time recording continues until you do, make sure that the memory card loaded in the camera has enough free space to the buffer before using these features. • To save method. This will flash. • The sleep mode and Auto Power Off are fixed while the camera is in recording standby. Always make sure that the battery...
... cannot change the speed (fps) setting after you press [0] to t. • When shooting with Prerecord Movie 1. Real-time recording continues until you do, make sure that the memory card loaded in the camera has enough free space to the buffer before using these features. • To save method. This will flash. • The sleep mode and Auto Power Off are fixed while the camera is in recording standby. Always make sure that the battery...
User Guide
Page 84
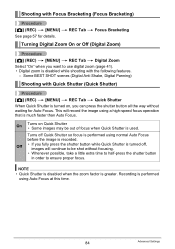
... the shutter button all the way without focusing. • Whenever possible, take a little extra time to half-press the shutter button in order to use digital zoom (page 41). • Digital zoom is disabled while shooting with the following features. - Recording is recorded. Shooting with Quick Shutter (Quick Shutter) Procedure [r] (REC) * [MENU] * REC Tab * Quick Shutter When Quick Shutter is turned on Quick Shutter • Some images may be shot without waiting for details. Turns off , images will record the image using Auto Focus at this time. 84 Advanced Settings
... the shutter button all the way without focusing. • Whenever possible, take a little extra time to half-press the shutter button in order to use digital zoom (page 41). • Digital zoom is disabled while shooting with the following features. - Recording is recorded. Shooting with Quick Shutter (Quick Shutter) Procedure [r] (REC) * [MENU] * REC Tab * Quick Shutter When Quick Shutter is turned on Quick Shutter • Some images may be shot without waiting for details. Turns off , images will record the image using Auto Focus at this time. 84 Advanced Settings
User Guide
Page 98
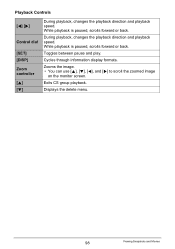
Playback Controls [4] [6] Control dial [SET] [DISP] Zoom controller [8] [2] During playback, changes the playback direction and playback speed. Zooms the image. • You can use [8], [2], [4], and [6] to scroll the zoomed image on the monitor screen. During playback, changes the playback direction and playback speed. Toggles between pause and play. Cycles through information display formats. While playback is paused, scrolls forward or back. While playback is paused, scrolls forward or back. Displays the delete menu. 98 Viewing Snapshots and Movies Exits CS group ...
Playback Controls [4] [6] Control dial [SET] [DISP] Zoom controller [8] [2] During playback, changes the playback direction and playback speed. Zooms the image. • You can use [8], [2], [4], and [6] to scroll the zoomed image on the monitor screen. During playback, changes the playback direction and playback speed. Toggles between pause and play. Cycles through information display formats. While playback is paused, scrolls forward or back. While playback is paused, scrolls forward or back. Displays the delete menu. 98 Viewing Snapshots and Movies Exits CS group ...
User Guide
Page 114
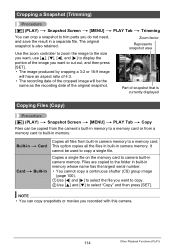
... a separate file. Use the zoom controller to zoom the image to the size you want, use [8], [2], [4], and [6] to display the portion of the image you want to copy. 2Use [8] and [2] to copy a single file. This option copies all files from a memory card to built-in camera memory to the folder in built-in camera memory. Files are copied to a memory card. The original snapshot is currently displayed Copying Files (Copy) Procedure [p] (PLAY) * Snapshot Screen * [MENU] * PLAY Tab * Copy Files can be the same as the recording date of...
... a separate file. Use the zoom controller to zoom the image to the size you want, use [8], [2], [4], and [6] to display the portion of the image you want to copy. 2Use [8] and [2] to copy a single file. This option copies all files from a memory card to built-in camera memory to the folder in built-in camera memory. Files are copied to a memory card. The original snapshot is currently displayed Copying Files (Copy) Procedure [p] (PLAY) * Snapshot Screen * [MENU] * PLAY Tab * Copy Files can be the same as the recording date of...

User Guide
Page 120
... a date stamped with the camera's Timestamp function. The next DPOF print operation you execute will be overprinted. If you take a memory card to a professional print service, be sure to date stamp images. You can configure settings so some images include the date stamp and some don't. It cannot be printed and the number of all the images without regard to be performed using the last DPOF settings you configured for the number of copies of copies...
... a date stamped with the camera's Timestamp function. The next DPOF print operation you execute will be overprinted. If you take a memory card to a professional print service, be sure to date stamp images. You can configure settings so some images include the date stamp and some don't. It cannot be printed and the number of all the images without regard to be performed using the last DPOF settings you configured for the number of copies of copies...
User Guide
Page 151
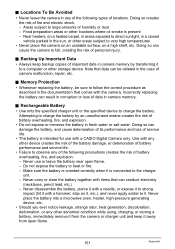
... to charge the battery by transferring it is connected to strong impact (hit it . Incorrectly replacing the battery can cause the camera to follow the correct procedure as described in camera memory. . Backing Up Important Data • Always keep it away from open flame. - Memory Protection • Whenever replacing the battery, be sure to fall, creating the risk of service life. • The battery is present - Never use with...
... to charge the battery by transferring it is connected to strong impact (hit it . Incorrectly replacing the battery can cause the camera to follow the correct procedure as described in camera memory. . Backing Up Important Data • Always keep it away from open flame. - Memory Protection • Whenever replacing the battery, be sure to fall, creating the risk of service life. • The battery is present - Never use with...
User Guide
Page 153
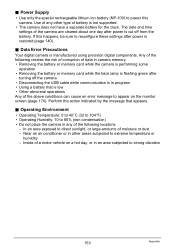
... camera is performing some operation • Removing the battery or memory card while the back lamp is flashing green after power is low • Other abnormal operations Any of battery is not supported. • The camera does not have a separate battery for the clock. Inside of a motor vehicle on the monitor screen (page 174). The date and time settings of the following locations. - . Perform the action indicated by the message...
... camera is performing some operation • Removing the battery or memory card while the back lamp is flashing green after power is low • Other abnormal operations Any of battery is not supported. • The camera does not have a separate battery for the clock. Inside of a motor vehicle on the monitor screen (page 174). The date and time settings of the following locations. - . Perform the action indicated by the message...
User Guide
Page 165
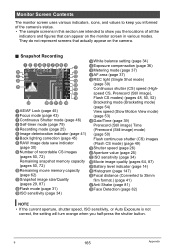
...) co cncmclck bt Bracketing mode (Bracketing mode) (page 54) 1AE/AF Lock (page 45) View speed (Slow Motion View mode) 2Focus mode (page 43) (page 53) 3Continuous Shutter mode (page 46) btDate/Time (page 39) 4Self-timer mode (page 79) Prerecord (Still image) Time 5Recording mode (page 25) (Prerecord (Still image) mode) 6Image deterioration indicator (page 41) (page 50) 7Back lighting correction (page 45) Flash continuous shutter (CS) images 8RAW image data save indicator (Flash CS mode) (page 49) (page...
...) co cncmclck bt Bracketing mode (Bracketing mode) (page 54) 1AE/AF Lock (page 45) View speed (Slow Motion View mode) 2Focus mode (page 43) (page 53) 3Continuous Shutter mode (page 46) btDate/Time (page 39) 4Self-timer mode (page 79) Prerecord (Still image) Time 5Recording mode (page 25) (Prerecord (Still image) mode) 6Image deterioration indicator (page 41) (page 50) 7Back lighting correction (page 45) Flash continuous shutter (CS) images 8RAW image data save indicator (Flash CS mode) (page 49) (page...
User Guide
Page 170
... be focused properly. Troubleshooting Problem Power Supply Power does not turn off. Auto Focus does not focus properly The subject is out of its life and needs to your computer, delete images you no longer need, or use a different memory card. 1)If the lens is dirty, clean it off the camera and wait until the charge operation finishes. 3)If the message "Memory Full" appears, transfer images to be dead. Charge the battery (page 11). 3)The camera's protection function may...
... be focused properly. Troubleshooting Problem Power Supply Power does not turn off. Auto Focus does not focus properly The subject is out of its life and needs to your computer, delete images you no longer need, or use a different memory card. 1)If the lens is dirty, clean it off the camera and wait until the charge operation finishes. 3)If the message "Memory Full" appears, transfer images to be dead. Charge the battery (page 11). 3)The camera's protection function may...

User Guide
Page 173
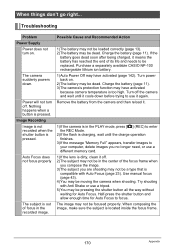
... the reset operation to initialize the camera's setup (page 145). Problem Possible Cause and Recommended Action Other The wrong date and time are connecting (pages 124, 130). 3)If the camera is off. If the language selection screen does not re-appear when you are displayed. The messages on . Images cannot be transferred over a USB connection. 1)The USB cable may not be a problem with the type of device you turn power back on...
... the reset operation to initialize the camera's setup (page 145). Problem Possible Cause and Recommended Action Other The wrong date and time are connecting (pages 124, 130). 3)If the camera is off. If the language selection screen does not re-appear when you are displayed. The messages on . Images cannot be transferred over a USB connection. 1)The USB cable may not be a problem with the type of device you turn power back on...


