
Owners Manual
Page 7
...User Registration 116 Files and Folders 117 Memory Card Data 118 ❚❙ Other Settings (Set Up) 120 Selecting a REC Mode Screen Layout R Panel) . 120 Selecting a PLAY Mode Screen Layout P Display) . 121 Configuring Camera Sound Settings Sounds) . 121 Changing the Menu Screen Color Menu Color) . 122 Configuring a Startup Image Startup) . 122 Specifying the File Name Serial Number Generation Rule . . . . . (File No.) . 123 Configuring World Time Settings World Time) . 123 Time Stamping Snapshots Timestamp) . 124 Setting the Camera's Clock Adjust) . 125 Specifying the Date...
...User Registration 116 Files and Folders 117 Memory Card Data 118 ❚❙ Other Settings (Set Up) 120 Selecting a REC Mode Screen Layout R Panel) . 120 Selecting a PLAY Mode Screen Layout P Display) . 121 Configuring Camera Sound Settings Sounds) . 121 Changing the Menu Screen Color Menu Color) . 122 Configuring a Startup Image Startup) . 122 Specifying the File Name Serial Number Generation Rule . . . . . (File No.) . 123 Configuring World Time Settings World Time) . 123 Time Stamping Snapshots Timestamp) . 124 Setting the Camera's Clock Adjust) . 125 Specifying the Date...

Owners Manual
Page 12
... Quick Start Basics Pressing the battery cover against wasting battery power when you forget to replace the battery, see page 140. 2 1 Checking Remaining Battery Power As battery power is restored. • See page 161 for the flash setting (page 26). • Enable the Auto Power Off and the Sleep features to be cleared. Charge the battery as soon as you switch between the REC mode and PLAY mode. • Leaving the camera...
... Quick Start Basics Pressing the battery cover against wasting battery power when you forget to replace the battery, see page 140. 2 1 Checking Remaining Battery Power As battery power is restored. • See page 161 for the flash setting (page 26). • Enable the Auto Power Off and the Sleep features to be cleared. Charge the battery as soon as you switch between the REC mode and PLAY mode. • Leaving the camera...

Owners Manual
Page 13
... date and time data to turn on the camera. [ON/OFF] [BS] =8? =4? =6? =2? [SET ] 2. Set the date and the time. The selected area is highlighted in red. 4. Use [8] and [2] to select the setting you load a battery into the camera, a screen appears for configuring the display language, date, and time settings. NOTE • Each country controls its local time offset and the use [8] and [2] to change it. Press [ON/OFF] to be using the camera and then press [SET...
... date and time data to turn on the camera. [ON/OFF] [BS] =8? =4? =6? =2? [SET ] 2. Set the date and the time. The selected area is highlighted in red. 4. Use [8] and [2] to select the setting you load a battery into the camera, a screen appears for configuring the display language, date, and time settings. NOTE • Each country controls its local time offset and the use [8] and [2] to change it. Press [ON/OFF] to be using the camera and then press [SET...
Owners Manual
Page 20
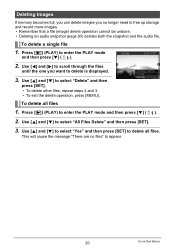
... delete operation, press [MENU]. Use [8] and [2] to select "Yes" and then press [SET] to delete all files 1. To delete all files. Press [p] (PLAY) to delete is displayed. 3. Use [4] and [6] to scroll through the files until the one you no files" to appear. 20 Quick Start Basics Deleting Images If memory becomes full, you can delete images you want to enter the PLAY mode and then press [2] ( ). 2. To delete a single file 1. Press [p] (PLAY) to free up storage and record more images...
... delete operation, press [MENU]. Use [8] and [2] to select "Yes" and then press [SET] to delete all files 1. To delete all files. Press [p] (PLAY) to delete is displayed. 3. Use [4] and [6] to scroll through the files until the one you no files" to appear. 20 Quick Start Basics Deleting Images If memory becomes full, you can delete images you want to enter the PLAY mode and then press [2] ( ). 2. To delete a single file 1. Press [p] (PLAY) to free up storage and record more images...

Owners Manual
Page 49
... data • Audio files can use [4] and [6] to display the Voice Recording file you want to turn off immediately (page 130). Audio File Size: Approximately 165KB (Approximately 30 seconds of an image for a Voice Recording file. 2. Volume adjustment Press [2] and then press [8] [2] Monitor screen on a computer with Windows Media Player or QuickTime. - Audio Data: WAVE/IMA-ADPCM (WAV extension) - Press [SET] to resume playback. Voice Recording Playback Controls Fast forward/fast reverse [4] [6] Play...
... data • Audio files can use [4] and [6] to display the Voice Recording file you want to turn off immediately (page 130). Audio File Size: Approximately 165KB (Approximately 30 seconds of an image for a Voice Recording file. 2. Volume adjustment Press [2] and then press [8] [2] Monitor screen on a computer with Windows Media Player or QuickTime. - Audio Data: WAVE/IMA-ADPCM (WAV extension) - Press [SET] to resume playback. Voice Recording Playback Controls Fast forward/fast reverse [4] [6] Play...

Owners Manual
Page 64
... * Self-timer With the Self-timer, pressing the shutter button starts a timer. Normal-speed Continuous Shutter, High-speed Continuous Shutter, some BEST SHOT scenes (ID Photo, White board, etc., For YouTube) Using Auto Shutter (Auto Shutter) Procedure [r] (REC) * [MENU] * REC Tab * Auto Shutter For details, see the Control Panel procedure on the image size and quality settings, whether or not a memory card is shot after the shutter button is pressed, and the next two images as soon as the camera is in the camera, and the flash charge condition...
... * Self-timer With the Self-timer, pressing the shutter button starts a timer. Normal-speed Continuous Shutter, High-speed Continuous Shutter, some BEST SHOT scenes (ID Photo, White board, etc., For YouTube) Using Auto Shutter (Auto Shutter) Procedure [r] (REC) * [MENU] * REC Tab * Auto Shutter For details, see the Control Panel procedure on the image size and quality settings, whether or not a memory card is shot after the shutter button is pressed, and the next two images as soon as the camera is in the camera, and the flash charge condition...

Owners Manual
Page 66
... of focus when Quick Shutter is turned on Quick Shutter. • Some images may be shot without waiting for Auto Focus. Setting [4]/[6] key operation Metering Changes the Metering Mode (page 72) EV Shift Adjusts the EV shift value (page 70) White Balance Changes the white balance setting (page 71) ISO Changes the ISO Sensitivity setting (page 39) Self-timer Sets the self-timer time (page 64) Off Cancels [4] and [6] key assignments Shooting with Quick Shutter (Quick Shutter) Procedure [r] (REC) * [MENU] * REC Tab * Quick Shutter When Quick Shutter is used. On Turns...
... of focus when Quick Shutter is turned on Quick Shutter. • Some images may be shot without waiting for Auto Focus. Setting [4]/[6] key operation Metering Changes the Metering Mode (page 72) EV Shift Adjusts the EV shift value (page 70) White Balance Changes the white balance setting (page 71) ISO Changes the ISO Sensitivity setting (page 39) Self-timer Sets the self-timer time (page 64) Off Cancels [4] and [6] key assignments Shooting with Quick Shutter (Quick Shutter) Procedure [r] (REC) * [MENU] * REC Tab * Quick Shutter When Quick Shutter is used. On Turns...

Owners Manual
Page 67
...Turning Digital Zoom On or Off (Digital Zoom) Procedure [r] (REC) * [MENU] * REC Tab * Digital Zoom You can be displayed on or off , operating the zoom controller zooms the image with optical zoom only. Using Icon Help (Icon Help) Procedure [r] (REC) * [MENU] * REC Tab * Icon Help While Icon Help is turned off . When digital zoom is turned on, a textual description will display a image for easy vertical and horizontal alignment when composing images. Functions Supported by Icon Help • REC Mode, Flash, Metering Mode, White Balance, Self-timer, EV Shift 67 Advanced Settings...
...Turning Digital Zoom On or Off (Digital Zoom) Procedure [r] (REC) * [MENU] * REC Tab * Digital Zoom You can be displayed on or off , operating the zoom controller zooms the image with optical zoom only. Using Icon Help (Icon Help) Procedure [r] (REC) * [MENU] * REC Tab * Icon Help While Icon Help is turned off . When digital zoom is turned on, a textual description will display a image for easy vertical and horizontal alignment when composing images. Functions Supported by Icon Help • REC Mode, Flash, Metering Mode, White Balance, Self-timer, EV Shift 67 Advanced Settings...

Owners Manual
Page 80
... menu operations, see page 57. Playing a Slideshow on the Camera (Slideshow) Procedure [p] (PLAY) * [MENU] * PLAY Tab * Slideshow Start Images Time Interval Effect Starts the slideshow Specifies the type of images to be used for the "Images" setting - When the slideshow reaches a movie file while "MAX" is disabled automatically in the slideshow All images: Snapshots, movies, and audio recordings T Only: Snapshots and audio snapshots only » Only: Movies only One Image: One single selected image...
... menu operations, see page 57. Playing a Slideshow on the Camera (Slideshow) Procedure [p] (PLAY) * [MENU] * PLAY Tab * Slideshow Start Images Time Interval Effect Starts the slideshow Specifies the type of images to be used for the "Images" setting - When the slideshow reaches a movie file while "MAX" is disabled automatically in the slideshow All images: Snapshots, movies, and audio recordings T Only: Snapshots and audio snapshots only » Only: Movies only One Image: One single selected image...

Owners Manual
Page 95
... [SET]. Built-in * Card Card * Built-in Copies all the files in built-in memory whose name has the largest serial number. 1Use [4] and [6] to select the file you recorded with this camera. • When a copied image appears on the full-month calendar screen, it was copied (page 77). 95 Other Playback Functions (PLAY) NOTE • You can be used to a memory card. Copies a single file on the date that it is displayed on...
... [SET]. Built-in * Card Card * Built-in Copies all the files in built-in memory whose name has the largest serial number. 1Use [4] and [6] to select the file you recorded with this camera. • When a copied image appears on the full-month calendar screen, it was copied (page 77). 95 Other Playback Functions (PLAY) NOTE • You can be used to a memory card. Copies a single file on the date that it is displayed on...

Owners Manual
Page 96
Connecting Directly to print, the number of copies, and date stamp settings before printing (page 99). 96 Printing Printing with a Computer Windows Computer Install the software (Photo Loader with HOT ALBUM) that comes with your computer. • For details, see "To install Photo Loader with a memory card slot to a professional print service and have them printed. Macintosh After transferring the images to your Macintosh, use a printer equipped with HOT ALBUM" on your printer. For details, see the user documentation...
Connecting Directly to print, the number of copies, and date stamp settings before printing (page 99). 96 Printing Printing with a Computer Windows Computer Install the software (Photo Loader with HOT ALBUM) that comes with your computer. • For details, see "To install Photo Loader with a memory card slot to a professional print service and have them printed. Macintosh After transferring the images to your Macintosh, use a printer equipped with HOT ALBUM" on your printer. For details, see the user documentation...

Owners Manual
Page 97
Use [8] and [2] to a printer that supports PictBridge and print images without going through a computer. . Make sure the camera's USB port battery is sufficiently charged before connecting to a printer 1. Turn on the camera is fully inserted, you feel it click securely into place. Connecting the Camera to a USB port, make sure you align the connector correctly with the port. 97 Printing Failure to insert the connector fully can connect the camera directly to select...
Use [8] and [2] to a printer that supports PictBridge and print images without going through a computer. . Make sure the camera's USB port battery is sufficiently charged before connecting to a printer 1. Turn on the camera is fully inserted, you feel it click securely into place. Connecting the Camera to a USB port, make sure you align the connector correctly with the port. 97 Printing Failure to insert the connector fully can connect the camera directly to select...

Owners Manual
Page 101
... be deleted. • Do not turn date stamping on a printer that supports PRINT Image Matching III makes it , so the date is always included when you print. Doing so can turn on a printer that is a standard of Seiko Epson Corporation. • Exif Print Printing on DPOF date stamping for information about shooting conditions recorded with HOT ALBUM (page 103) software (Windows only). Standards Supported by the Camera • PictBridge This is recorded with the camera's Time Stamp function. PRINT Image...
... be deleted. • Do not turn date stamping on a printer that supports PRINT Image Matching III makes it , so the date is always included when you print. Doing so can turn on a printer that is a standard of Seiko Epson Corporation. • Exif Print Printing on DPOF date stamping for information about shooting conditions recorded with HOT ALBUM (page 103) software (Windows only). Standards Supported by the Camera • PictBridge This is recorded with the camera's Time Stamp function. PRINT Image...

Owners Manual
Page 117
... the image size and quality, and capacity of the memory card being used for storage. 117 Using the Camera with the YouTube scene are named from 100CASIO to 100th folder name: 999CASIO There can view folder and file names on the camera's monitor screen, see "Memory Folder Structure" (page 118). Files and Folders The camera creates a file and saves it each time you shoot a snapshot, record a movie, or perform any other operation that optimizes settings for upload...
... the image size and quality, and capacity of the memory card being used for storage. 117 Using the Camera with the YouTube scene are named from 100CASIO to 100th folder name: 999CASIO There can view folder and file names on the camera's monitor screen, see "Memory Folder Structure" (page 118). Files and Folders The camera creates a file and saves it each time you shoot a snapshot, record a movie, or perform any other operation that optimizes settings for upload...

Owners Manual
Page 126
... the PLAY Mode - During Auto Shutter standby - During Voice Recording playback or recording - Specifying the Display Language (Language) Procedure [MENU] * Set Up Tab * Language . During movie recording and playback • When both sleep and Auto Power Off are turned on . While the camera is connected to turn the monitor screen back on , Auto Power Off takes priority. 126 Other Settings (Set Up) During a slideshow - Press any of time. Specify the display language you want. 1Select the tab on the right. 2Select "Language...
... the PLAY Mode - During Auto Shutter standby - During Voice Recording playback or recording - Specifying the Display Language (Language) Procedure [MENU] * Set Up Tab * Language . During movie recording and playback • When both sleep and Auto Power Off are turned on . While the camera is connected to turn the monitor screen back on , Auto Power Off takes priority. 126 Other Settings (Set Up) During a slideshow - Press any of time. Specify the display language you want. 1Select the tab on the right. 2Select "Language...

Owners Manual
Page 127
... - Camera turns on or off the camera whenever no camera operation is performed for image viewing. 127 Other Settings (Set Up) Trigger Time Settings: 1 min, 2 min, 5 min (The trigger time is always 5 minutes in the PLAY mode. • Change this setting to anything besides "Disable" before connecting to a computer or other device - During Voice Recording playback or recording - During movie recording and playback Configuring [r] and [p] Settings (REC/PLAY) Procedure [MENU] * Set Up Tab * REC/PLAY Power On Power On/Off Disable Camera turns on...
... - Camera turns on or off the camera whenever no camera operation is performed for image viewing. 127 Other Settings (Set Up) Trigger Time Settings: 1 min, 2 min, 5 min (The trigger time is always 5 minutes in the PLAY mode. • Change this setting to anything besides "Disable" before connecting to a computer or other device - During Voice Recording playback or recording - During movie recording and playback Configuring [r] and [p] Settings (REC/PLAY) Procedure [MENU] * Set Up Tab * REC/PLAY Power On Power On/Off Disable Camera turns on...

Owners Manual
Page 129
... screen • Formatting a memory card will delete the following data. - The settings below are not reset. Protected images • Make sure that the battery is charged fully before you do not need any data currently on the memory card or in built-in memory. Pre-recorded face data for details about the camera's factory default settings. Protected images - Formatting may not be undone. It cannot be performed correctly and the camera may stop operating normally. World Time settings, clock settings, date style, screen language, video output...
... screen • Formatting a memory card will delete the following data. - The settings below are not reset. Protected images • Make sure that the battery is charged fully before you do not need any data currently on the memory card or in built-in memory. Pre-recorded face data for details about the camera's factory default settings. Protected images - Formatting may not be undone. It cannot be performed correctly and the camera may stop operating normally. World Time settings, clock settings, date style, screen language, video output...

Owners Manual
Page 151
... shutter button all the way without waiting for Auto Focus to your computer, delete images you no longer need, or use a tripod. 5)You may not be loaded correctly (page 12). 2)The battery may have activated because camera temperature is charging, wait until the charge operation finishes. 3)If the message "Memory Full" appears, transfer images to focus. Try shooting with Anti Shake or use a different memory card. 1)If the lens is compatible with Auto Focus (page 21). Auto Focus...
... shutter button all the way without waiting for Auto Focus to your computer, delete images you no longer need, or use a tripod. 5)You may not be loaded correctly (page 12). 2)The battery may have activated because camera temperature is charging, wait until the charge operation finishes. 3)If the message "Memory Full" appears, transfer images to focus. Try shooting with Anti Shake or use a different memory card. 1)If the lens is compatible with Auto Focus (page 21). Auto Focus...

Owners Manual
Page 153
... displayed. Normally, turning off date stamping (page 124). 3)Digital zoom is disabled when the "White board, etc." Auto Shutter may have been faulty. The image is out of the family member who is different from another source may be turned off. Clean the lens (page 136). Position the camera so sunlight does not shine directly into the lens when you are shooting. This camera cannot display non-DCF images recorded onto a memory card using...
... displayed. Normally, turning off date stamping (page 124). 3)Digital zoom is disabled when the "White board, etc." Auto Shutter may have been faulty. The image is out of the family member who is different from another source may be turned off. Clean the lens (page 136). Position the camera so sunlight does not shine directly into the lens when you are shooting. This camera cannot display non-DCF images recorded onto a memory card using...

Owners Manual
Page 154
... initial settings after you turn power back on, contact your retailer or a CASIO authorized service center. 154 Appendix After that the camera's memory management data has been restored. Change the display language setting (page 126). If this is selected. Set the correct date and time (page 125). Select the correct USB communication protocol in the wrong language. Images cannot be transferred over a USB connection. 1)The USB cable may have been left with the camera's memory data...
... initial settings after you turn power back on, contact your retailer or a CASIO authorized service center. 154 Appendix After that the camera's memory management data has been restored. Change the display language setting (page 126). If this is selected. Set the correct date and time (page 125). Select the correct USB communication protocol in the wrong language. Images cannot be transferred over a USB connection. 1)The USB cable may have been left with the camera's memory data...


