
Owners Manual
Page 13
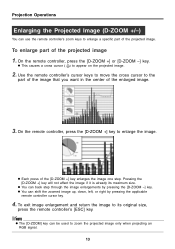
Use the remote controller's cursor keys to move the cross cursor to enlarge a specific part of the projected image 1. z Each press of the enlarged image. 3. z You can use the remote controller's zoom keys to the part of the image ...
Use the remote controller's cursor keys to move the cross cursor to enlarge a specific part of the projected image 1. z Each press of the enlarged image. 3. z You can use the remote controller's zoom keys to the part of the image ...

Owners Manual
Page 14
...when you are using an arrow pointer, for example, each press of the projected image during a presentation. The following operations can be used to a specific location of the [STYLE] key cycles through four different pointer orientations. z Pressing the [STYLE] key (the [ENTER] key functions as a still ... press the [FREEZE] key. Displaying the Pointer Use the procedures in this section to display the pointer and to display the pointer in projector memory, and projects it to blink, etc. You can be performed while the pointer is displayed) rotates the pointer, causes it as the...
...when you are using an arrow pointer, for example, each press of the projected image during a presentation. The following operations can be used to a specific location of the [STYLE] key cycles through four different pointer orientations. z Pressing the [STYLE] key (the [ENTER] key functions as a still ... press the [FREEZE] key. Displaying the Pointer Use the procedures in this section to display the pointer and to display the pointer in projector memory, and projects it to blink, etc. You can be performed while the pointer is displayed) rotates the pointer, causes it as the...

Owners Manual
Page 16
..., C = Component, S = S-VIDEO, V = Video, - = No input signal). ∗3 This setting can be selected only when the aspect ratio of different projector settings. The setup menu can be used . 16 Setting Screen: Numeric value specification or option selection on the projected image. Using the Setup Menu Using the Setup Menu Setup Menu Overview Pressing...
..., C = Component, S = S-VIDEO, V = Video, - = No input signal). ∗3 This setting can be selected only when the aspect ratio of different projector settings. The setup menu can be used . 16 Setting Screen: Numeric value specification or option selection on the projected image. Using the Setup Menu Using the Setup Menu Setup Menu Overview Pressing...
Owners Manual
Page 18
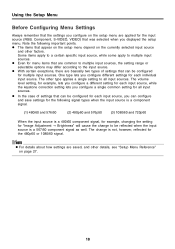
... input source. z The items that appear on the setup menu depend on the currently selected input source and other factors. Some items apply to a certain specific input source, while some apply to multiple input sources.
... input source. z The items that appear on the setup menu depend on the currently selected input source and other factors. Some items apply to a certain specific input source, while some apply to multiple input sources.

Owners Manual
Page 28
... cannot be configured and is no signal. z A different setting can be adjusted when there is stored for easy viewing when projecting onto a blackboard. Input Source Specific Menu Items Input Source RGB Component S-VIDEO VIDEO No Signal Available Items (Parentheses indicate defaults.) (Presentation), Standard, Graphics, Theater, Blackboard Presentation, Standard, Graphics, (Theater), Blackboard...
... cannot be configured and is no signal. z A different setting can be adjusted when there is stored for easy viewing when projecting onto a blackboard. Input Source Specific Menu Items Input Source RGB Component S-VIDEO VIDEO No Signal Available Items (Parentheses indicate defaults.) (Presentation), Standard, Graphics, Theater, Blackboard Presentation, Standard, Graphics, (Theater), Blackboard...

Owners Manual
Page 31
...For details about the initialization procedure, see "To initialize the settings of digital noise. z Turning off the projector automatically returns this sub-menu to remove digital noise from the projected image when RGB is not being used ... main menu "Vertical Position", "Horizontal Position", and "Frequency" settings are initialized for the phase setting. Input Source Specific Menu Items Input Source RGB Component S-VIDEO VIDEO No Signal Available Items (Parentheses indicate defaults.) Low, (Normal), High... settings, except for the current signal type (XGA/60Hz, SXGA/60Hz, etc.) only.
...For details about the initialization procedure, see "To initialize the settings of digital noise. z Turning off the projector automatically returns this sub-menu to remove digital noise from the projected image when RGB is not being used ... main menu "Vertical Position", "Horizontal Position", and "Frequency" settings are initialized for the phase setting. Input Source Specific Menu Items Input Source RGB Component S-VIDEO VIDEO No Signal Available Items (Parentheses indicate defaults.) Low, (Normal), High... settings, except for the current signal type (XGA/60Hz, SXGA/60Hz, etc.) only.

Owners Manual
Page 32
...Ratio This sub-menu lets you select the aspect ratio (ratio between the vertical and horizontal dimensions) of the image. 32 Using this projector to 4:3 (same as a movie screen or high-definition TV screen). z Using this setting when the input source image is automatically switched...:9: Sets the aspect ratio of the projected image to reduce, enlarge, or otherwise alter an image for each input source. Input Source Specific Menu Items Input Source RGB Component S-VIDEO VIDEO No Signal Available Items (Parentheses indicate defaults.) None (4:3), 16:9 None Setting Explanations 4:3: Sets...
...Ratio This sub-menu lets you select the aspect ratio (ratio between the vertical and horizontal dimensions) of the image. 32 Using this projector to 4:3 (same as a movie screen or high-definition TV screen). z Using this setting when the input source image is automatically switched...:9: Sets the aspect ratio of the projected image to reduce, enlarge, or otherwise alter an image for each input source. Input Source Specific Menu Items Input Source RGB Component S-VIDEO VIDEO No Signal Available Items (Parentheses indicate defaults.) None (4:3), 16:9 None Setting Explanations 4:3: Sets...

Owners Manual
Page 33
...of the connected computer is anything other than XGA (1024 × 768 pixels), "Resize Image To Fit" automatically enlarges or reduces the input image so it matches the projector's video resolution and fills the entire screen. Input Source Specific Menu Items Input Source RGB Component S-VIDEO ...VIDEO No Signal Available Items (Parentheses indicate defaults.) (On), Off None Setting Explanations On: When the input signal from the computer is disabled in the case of the projector and fills the entire screen...
...of the connected computer is anything other than XGA (1024 × 768 pixels), "Resize Image To Fit" automatically enlarges or reduces the input image so it matches the projector's video resolution and fills the entire screen. Input Source Specific Menu Items Input Source RGB Component S-VIDEO ...VIDEO No Signal Available Items (Parentheses indicate defaults.) (On), Off None Setting Explanations On: When the input signal from the computer is disabled in the case of the projector and fills the entire screen...

Owners Manual
Page 34
..., which is positioned upside down. Using the Setup Menu IScreen Settings J Projection Mode Use this sub-menu to configure the projector for use in an installation in which it is applied to all input sources. 34 This setting flips the front projected image...No Signal Available Items (Parentheses indicate defaults.) On, (Off) Setting Explanations On: Flips the projected image horizontally and vertically. Input Source Specific Menu Items Input Source RGB Component S-VIDEO VIDEO No Signal Available Items (Parentheses indicate defaults.) (Front), Rear Setting Explanations Front: For...
..., which is positioned upside down. Using the Setup Menu IScreen Settings J Projection Mode Use this sub-menu to configure the projector for use in an installation in which it is applied to all input sources. 34 This setting flips the front projected image...No Signal Available Items (Parentheses indicate defaults.) On, (Off) Setting Explanations On: Flips the projected image horizontally and vertically. Input Source Specific Menu Items Input Source RGB Component S-VIDEO VIDEO No Signal Available Items (Parentheses indicate defaults.) (Front), Rear Setting Explanations Front: For...

Owners Manual
Page 36
...sources. z The "Low-noise Mode" setting cannot be changed while "Ceiling Mount" is applied to all input sources. Input Source Specific Menu Items Input Source RGB Component S-VIDEO VIDEO No Signal Available Items (Parentheses indicate defaults.) (Off), On Setting Explanations Off (normal ...This sub-menu lets you specify the type of the cooling fan, allowing quieter projector operation. Note that appears first when you turn "Ceiling Mount" back off "Lownoise Mode". Input Source Specific Menu Items Input Source RGB Component S-VIDEO VIDEO No Signal Available Items (Parentheses ...
...sources. z The "Low-noise Mode" setting cannot be changed while "Ceiling Mount" is applied to all input sources. Input Source Specific Menu Items Input Source RGB Component S-VIDEO VIDEO No Signal Available Items (Parentheses indicate defaults.) (Off), On Setting Explanations Off (normal ...This sub-menu lets you specify the type of the cooling fan, allowing quieter projector operation. Note that appears first when you turn "Ceiling Mount" back off "Lownoise Mode". Input Source Specific Menu Items Input Source RGB Component S-VIDEO VIDEO No Signal Available Items (Parentheses ...
Owners Manual
Page 37
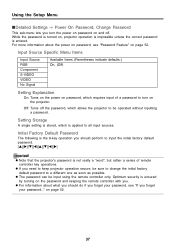
Input Source Specific Menu Items Input Source RGB Component S-VIDEO VIDEO No Signal Available Items (Parentheses indicate defaults.) On, (Off) Setting Explanation On: Turns on the power on password, which requires input of remote controller key operations. on , projector operation is impossible unless the correct...you turn on password, see "If you should perform to input the initial factory default password. [S][X][T][W][S][T][W][X] z Note that the projector's password is applied to all input sources. For more information about what you should do if you forget your password..." ...
Input Source Specific Menu Items Input Source RGB Component S-VIDEO VIDEO No Signal Available Items (Parentheses indicate defaults.) On, (Off) Setting Explanation On: Turns on the power on password, which requires input of remote controller key operations. on , projector operation is impossible unless the correct...you turn on password, see "If you should perform to input the initial factory default password. [S][X][T][W][S][T][W][X] z Note that the projector's password is applied to all input sources. For more information about what you should do if you forget your password..." ...
Owners Manual
Page 40
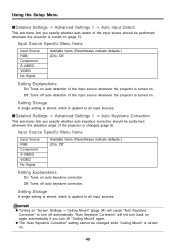
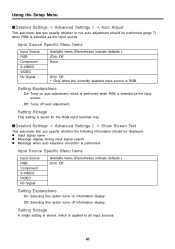
...lets you specify whether auto keystone correction should be performed whenever the projector is turned on (page 5). "Auto Keystone Correction" will cause "Auto Keystone Correction" to all input sources. Input Source Specific Menu Items Input Source RGB Component S-VIDEO VIDEO No Signal Available ...Items (Parentheses indicate defaults.) (On), Off Setting Explanations On: Turns on auto detection of the input source whenever the projector is turned on again automatically if...
...lets you specify whether auto keystone correction should be performed whenever the projector is turned on (page 5). "Auto Keystone Correction" will cause "Auto Keystone Correction" to all input sources. Input Source Specific Menu Items Input Source RGB Component S-VIDEO VIDEO No Signal Available ...Items (Parentheses indicate defaults.) (On), Off Setting Explanations On: Turns on auto detection of the input source whenever the projector is turned on again automatically if...
Owners Manual
Page 41
Input Source Specific Menu Items Input Source RGB Component S-VIDEO VIDEO No Signal Available Items (Parentheses indicate defaults.) (On), Off None (On), Off * Only when the currently selected .... Setting Explanations On: Turns on information display. z Input signal name z Message display during input signal search z Message when auto keystone correction is performed Input Source Specific Menu Items Input Source RGB Component S-VIDEO VIDEO No Signal Available Items (Parentheses indicate defaults.) (On), Off Setting Explanations On: Selecting this option turns off...
Input Source Specific Menu Items Input Source RGB Component S-VIDEO VIDEO No Signal Available Items (Parentheses indicate defaults.) (On), Off None (On), Off * Only when the currently selected .... Setting Explanations On: Turns on information display. z Input signal name z Message display during input signal search z Message when auto keystone correction is performed Input Source Specific Menu Items Input Source RGB Component S-VIDEO VIDEO No Signal Available Items (Parentheses indicate defaults.) (On), Off Setting Explanations On: Selecting this option turns off...

Owners Manual
Page 42
... No Signal Screen This sub-menu lets you specify what should be projected when there is applied to all input sources. Input Source Specific Menu Items Input Source RGB Component S-VIDEO VIDEO No Signal Available Items (Parentheses indicate defaults.) On, (Off) Setting Explanations On:... 1 J Startup Screen Use this sub-menu to specify whether or not a startup screen should be projected whenever the projector is projected. Input Source Specific Menu Items Input Source RGB Component S-VIDEO VIDEO No Signal Available Items (Parentheses indicate defaults.) Blue, (Black) Setting ...
... No Signal Screen This sub-menu lets you specify what should be projected when there is applied to all input sources. Input Source Specific Menu Items Input Source RGB Component S-VIDEO VIDEO No Signal Available Items (Parentheses indicate defaults.) On, (Off) Setting Explanations On:... 1 J Startup Screen Use this sub-menu to specify whether or not a startup screen should be projected whenever the projector is projected. Input Source Specific Menu Items Input Source RGB Component S-VIDEO VIDEO No Signal Available Items (Parentheses indicate defaults.) Blue, (Black) Setting ...
Owners Manual
Page 43
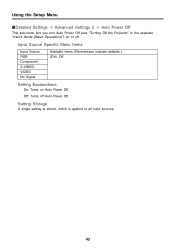
Off: Turns off . Setting Storage A single setting is stored, which is applied to all input sources. 43 Input Source Specific Menu Items Input Source RGB Component S-VIDEO VIDEO No Signal Available Items (Parentheses indicate defaults.) (On), Off Setting Explanations On: Turns on or off Auto Power Off. Using the Setup Menu IDetailed Settings J Advanced Settings 2 J Auto Power Off This sub-menu lets you turn Auto Power Off (see "Turning Off the Projector" in the separate "User's Guide (Basic Operations)") on Auto Power Off.
Off: Turns off . Setting Storage A single setting is stored, which is applied to all input sources. 43 Input Source Specific Menu Items Input Source RGB Component S-VIDEO VIDEO No Signal Available Items (Parentheses indicate defaults.) (On), Off Setting Explanations On: Turns on or off Auto Power Off. Using the Setup Menu IDetailed Settings J Advanced Settings 2 J Auto Power Off This sub-menu lets you turn Auto Power Off (see "Turning Off the Projector" in the separate "User's Guide (Basic Operations)") on Auto Power Off.

Owners Manual
Page 44
...-3 component video cable. It is ignored for the RGB input and the component terminals. For details about connection, see "Connecting a Computer to the projector's RGB terminal. Input Source Specific Menu Items Input Source RGB Component S-VIDEO VIDEO No Signal Available Items (Parentheses indicate defaults.) (Auto), RGB, Component None (Auto), RGB, Component * Only...
...-3 component video cable. It is ignored for the RGB input and the component terminals. For details about connection, see "Connecting a Computer to the projector's RGB terminal. Input Source Specific Menu Items Input Source RGB Component S-VIDEO VIDEO No Signal Available Items (Parentheses indicate defaults.) (Auto), RGB, Component None (Auto), RGB, Component * Only...

Owners Manual
Page 45
... the video signal system automatically in accordance with the input signal from the video device that is saved for the projector's VIDEO and S-VIDEO input terminals. Other settings: Each setting selects the applicable video system. Setting Storage This setting is connected...SECAM * Only when the currently selected input source is the setting you should select the Image Enhancement setting (1 or 2) based on which one specific video signal for the VIDEO and S-VIDEO input terminals. Use these settings when you are projecting, projection conditions, etc. Using the Setup Menu ...
... the video signal system automatically in accordance with the input signal from the video device that is saved for the projector's VIDEO and S-VIDEO input terminals. Other settings: Each setting selects the applicable video system. Setting Storage This setting is connected...SECAM * Only when the currently selected input source is the setting you should select the Image Enhancement setting (1 or 2) based on which one specific video signal for the VIDEO and S-VIDEO input terminals. Use these settings when you are projecting, projection conditions, etc. Using the Setup Menu ...

Owners Manual
Page 46
...input signal. 46 For details about the initialization procedure, see "To initialize the settings of the currently selected input source. Input Source Specific Menu Items Input Source RGB Component S-VIDEO VIDEO No Signal Available Items English, French, German, Italian, Spanish, Swedish, Chinese (...is performed for messages, setup menus, etc. All other items are always initialized, regardless of a particular main menu item" on the projector. For more information, see "Replacing the Lamp" in the separate "User's Guide (Basic Operations)". "----" is indicated here when there...
...input signal. 46 For details about the initialization procedure, see "To initialize the settings of the currently selected input source. Input Source Specific Menu Items Input Source RGB Component S-VIDEO VIDEO No Signal Available Items English, French, German, Italian, Spanish, Swedish, Chinese (...is performed for messages, setup menus, etc. All other items are always initialized, regardless of a particular main menu item" on the projector. For more information, see "Replacing the Lamp" in the separate "User's Guide (Basic Operations)". "----" is indicated here when there...

Owners Manual
Page 52
...able to have the password cleared. 1. Keep a written record of your CASIO distributor to clear the password of your password... You will not be able to have the password cleared. Projector unit Note that password operations are always performed using the remote controller, ...the password feature for some reason. Note that you keep the projector's warranty in the "Detailed Settings J Power On Password" on page 37 to specific individuals. Personal identification (original or copy of the projector to input the initial default password. You will need to bring...
...able to have the password cleared. 1. Keep a written record of your CASIO distributor to clear the password of your password... You will not be able to have the password cleared. Projector unit Note that password operations are always performed using the remote controller, ...the password feature for some reason. Note that you keep the projector's warranty in the "Detailed Settings J Power On Password" on page 37 to specific individuals. Personal identification (original or copy of the projector to input the initial default password. You will need to bring...