

User Manual
Page 1
z Be sure to read the precautions in the Quick Start Guide that comes with the Data Projector. z To obtain the latest version of this manual visit the website at the URL below. http://world.casio.com/manual/projector/ E DATA PROJECTOR XJ-H2600/XJ-H2650* * USB Port Models User's Guide z Be sure to keep all user documentation handy for future reference.
z Be sure to read the precautions in the Quick Start Guide that comes with the Data Projector. z To obtain the latest version of this manual visit the website at the URL below. http://world.casio.com/manual/projector/ E DATA PROJECTOR XJ-H2600/XJ-H2650* * USB Port Models User's Guide z Be sure to keep all user documentation handy for future reference.
User Manual
Page 2
...Japan, the United States of America and other countries and areas. z Copying of this User's Guide are allowed to use this manual. z CASIO COMPUTER CO., LTD. shall not be registered product names or trademarks of the United States. z AMX is forbidden. z The contents of the...the United States and other use . shall not be exactly the same as the screens actually produced by the product. z Portions of this manual show the XJ-H2650. z HDMI, the HDMI Logo and High-Definition Multimedia Interface are registered trademarks or trademarks of the United States. B 2 z Microsoft, ...
...Japan, the United States of America and other countries and areas. z Copying of this User's Guide are allowed to use this manual. z CASIO COMPUTER CO., LTD. shall not be registered product names or trademarks of the United States. z AMX is forbidden. z The contents of the...the United States and other use . shall not be exactly the same as the screens actually produced by the product. z Portions of this manual show the XJ-H2650. z HDMI, the HDMI Logo and High-Definition Multimedia Interface are registered trademarks or trademarks of the United States. B 2 z Microsoft, ...

User Manual
Page 3
Contents About this manual 5 Projector Overview 6 Projector Features and Main Functions 6 Remote Controller and Projector Keys 8 Back Terminals 9 Loading Remote Controller Batteries 10 Setting Up the Projector 10 Setup ... Resolution ...16 3D Input Mode ...17 Horizontal Flipping in the 3D Input Mode 18 Image Operations During Projection 19 Adjusting Image Brightness 19 To use manual keystone correction 19 Selecting the Color Mode 20 Zooming an Image ...20 Momentarily Blanking the Image and Muting the Audio 21 Freezing an Image...21...
Contents About this manual 5 Projector Overview 6 Projector Features and Main Functions 6 Remote Controller and Projector Keys 8 Back Terminals 9 Loading Remote Controller Batteries 10 Setting Up the Projector 10 Setup ... Resolution ...16 3D Input Mode ...17 Horizontal Flipping in the 3D Input Mode 18 Image Operations During Projection 19 Adjusting Image Brightness 19 To use manual keystone correction 19 Selecting the Color Mode 20 Zooming an Image ...20 Momentarily Blanking the Image and Muting the Audio 21 Freezing an Image...21...
User Manual
Page 5
... Supported Signals 62 Using Wired LAN to Control the Projector (XJ-H1650, XJ-H1750, XJ-H2650, XJ-ST145, XJ-ST155 65 Supported External Devices 65 Controlling the Projector from a Computer 65 Projector RS-232C Control 70 Connecting the Projector to a Computer 70 Specifications 73 About this manual are explained using the remote controller that comes with the...
... Supported Signals 62 Using Wired LAN to Control the Projector (XJ-H1650, XJ-H1750, XJ-H2650, XJ-ST145, XJ-ST155 65 Supported External Devices 65 Controlling the Projector from a Computer 65 Projector RS-232C Control 70 Connecting the Projector to a Computer 70 Specifications 73 About this manual are explained using the remote controller that comes with the...
User Manual
Page 8
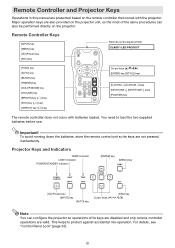
... pressed inadvertently. Major operation keys are presented based on the remote controller that comes with batteries loaded. Remote Controller and Projector Keys Operations in this manual are also provided on the projector unit, so the most of the same procedures can configure the projector so operations of its keys are valid...
... pressed inadvertently. Major operation keys are presented based on the remote controller that comes with batteries loaded. Remote Controller and Projector Keys Operations in this manual are also provided on the projector unit, so the most of the same procedures can configure the projector so operations of its keys are valid...

User Manual
Page 19
...[KEYSTONE +] and [KEYSTONE -] keys to the screen and performs keystone correction automatically. Press the [BRIGHT] key. z Image brightness adjustment z Manual keystone correction z Color mode selection z Image zooming z Momentarily blanking the image and muting the audio z Image freeze z Pointer display in the...detects when it is an external device connected to adjust image brightness. 3. Image Operations During Projection You can use manual keystone correction The projector has a keystone correction feature that prevents distortion of the projected image when projecting from an ...
...[KEYSTONE +] and [KEYSTONE -] keys to the screen and performs keystone correction automatically. Press the [BRIGHT] key. z Image brightness adjustment z Manual keystone correction z Color mode selection z Image zooming z Momentarily blanking the image and muting the audio z Image freeze z Pointer display in the...detects when it is an external device connected to adjust image brightness. 3. Image Operations During Projection You can use manual keystone correction The projector has a keystone correction feature that prevents distortion of the projected image when projecting from an ...

User Manual
Page 25
... [ESC] key. Because of low-power, quiet operation and projection brightness. Use the [W] and [X] keys to projection brightness. On (Manual): Enables manual adjustment to balance the needs of this the Eco Mode setting cannot be given to low-power, low-noise operation or to select the ... setting, the Eco Mode setting will automatically change to step 3. If the "Projection Mode" setting is changed . If you select "On (Manual)" here, go to "On (Manual)". 25 z The "On (Auto)" setting cannot be selected for the Eco Mode while "Rear" is selected for "Screen Settings J Projection...
... [ESC] key. Because of low-power, quiet operation and projection brightness. Use the [W] and [X] keys to projection brightness. On (Manual): Enables manual adjustment to balance the needs of this the Eco Mode setting cannot be given to low-power, low-noise operation or to select the ... setting, the Eco Mode setting will automatically change to step 3. If the "Projection Mode" setting is changed . If you select "On (Manual)" here, go to "On (Manual)". 25 z The "On (Auto)" setting cannot be selected for the Eco Mode while "Rear" is selected for "Screen Settings J Projection...

User Manual
Page 40
... 2 main menu to their initial default settings. When this happens, use this setting to adjust the frequency manually. When this happens, use this setting to adjust the phase manually. z Changing this sub-menu to adjust the horizontal position of the input source image within the projection area.... Signal Specific Use this setting when there is performed, and not for some reason, your manual frequency settings cause the image input from the computer to disappear from the projection, you can press the [AUTO] key to perform ...
... 2 main menu to their initial default settings. When this happens, use this setting to adjust the frequency manually. When this happens, use this setting to adjust the phase manually. z Changing this sub-menu to adjust the horizontal position of the input source image within the projection area.... Signal Specific Use this setting when there is performed, and not for some reason, your manual frequency settings cause the image input from the computer to disappear from the projection, you can press the [AUTO] key to perform ...

User Manual
Page 43
Input Settings Main Menu Setting Name Input Setting Unit Description COMPUTER1 R C Terminal/ COMPUTER2 Terminal N Single Use this sub-menu to specify manually the type of signal being input from the video device that the "Keystone Correction", "Projection Mode", "Ceiling Mount", "Startup Screen",... / NTSC4.43 / PAL / PAL-M / PAL-N / PAL60 / SECAM: Each setting selects the applicable video system. Use this sub-menu to specify manually the type of a Computer to the Projector" (page 12). RGB: Select this sub-menu to return all of a video device using a commercially available ...
Input Settings Main Menu Setting Name Input Setting Unit Description COMPUTER1 R C Terminal/ COMPUTER2 Terminal N Single Use this sub-menu to specify manually the type of signal being input from the video device that the "Keystone Correction", "Projection Mode", "Ceiling Mount", "Startup Screen",... / NTSC4.43 / PAL / PAL-M / PAL-N / PAL60 / SECAM: Each setting selects the applicable video system. Use this sub-menu to specify manually the type of a Computer to the Projector" (page 12). RGB: Select this sub-menu to return all of a video device using a commercially available ...
User Manual
Page 51
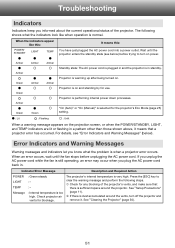
... the warning message and perform the following shows what the problem is too high. Projector is performing internal power down processes. "On (Auto)" or "On (Manual)" is selected for use. For details, see below ). If you unplug the AC power cord while the fan is still operating, an error may occur...
... the warning message and perform the following shows what the problem is too high. Projector is performing internal power down processes. "On (Auto)" or "On (Manual)" is selected for use. For details, see below ). If you unplug the AC power cord while the fan is still operating, an error may occur...

User Manual
Page 66
.... Under initial default settings, the projector is connected to select "Wired LAN info" and then press the [ENTER] key. 3. Refer to assign a projector's IP address manually. In the Web browser address bar, input the projector's IP address and then press the [Enter] key. Important! Depending on the network environment being connected...
.... Under initial default settings, the projector is connected to select "Wired LAN info" and then press the [ENTER] key. 3. Refer to assign a projector's IP address manually. In the Web browser address bar, input the projector's IP address and then press the [Enter] key. Important! Depending on the network environment being connected...

User Manual
Page 73
...B 73 makes no guarantees concerning the operation or suitability of Pixels: WXGA (1280 × 800) Projection Lens 1.2X manual optical zoom, manual focus Light Source Laser and LED Terminals COMPUTER IN: RGB 15-pin mini D-Sub × 2 (Also used as... Norwegian, Polish, Display Languages Finnish, Czech, Turkish, Russian, Chinese (Simplified), Chinese (Traditional), Korean, Japanese * XJ-H2650 only z CASIO COMPUTER CO., LTD. Specifications Model Name XJ-H2600 XJ-H2650 Brightness (ANSI Lumens) 3500 Projection System DLP DLP chip Size: 0.65 inch, Number of any USB device that ...
...B 73 makes no guarantees concerning the operation or suitability of Pixels: WXGA (1280 × 800) Projection Lens 1.2X manual optical zoom, manual focus Light Source Laser and LED Terminals COMPUTER IN: RGB 15-pin mini D-Sub × 2 (Also used as... Norwegian, Polish, Display Languages Finnish, Czech, Turkish, Russian, Chinese (Simplified), Chinese (Traditional), Korean, Japanese * XJ-H2650 only z CASIO COMPUTER CO., LTD. Specifications Model Name XJ-H2600 XJ-H2650 Brightness (ANSI Lumens) 3500 Projection System DLP DLP chip Size: 0.65 inch, Number of any USB device that ...
Brochure
Page 2
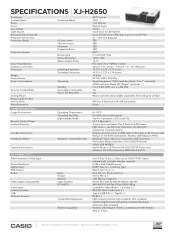
SPECIFICATIONS | XJ-H2650 Brightness 3500 lumens Contrast Ratio Telephoto Mode 1400 : 1 Zoom 1.2X Manual Focus Manual Focus Lens Offset 100% Light Source Casio Laser & Led Hybrid Estimated Operating Life Up to 20,000 Hours (Warranty 3 years or ...10 Color Reproduction Full Color (16.77 Million Colors) Keystone Correction Vertical +30° (Auto) Vertical + or - 30° (Manual) Dimension Including Projections 15.75 x 12.72 x 4.17 Inches Excluding Projections 15.75 x 12.72 x 3.78 Inches Weight 15.6 ...
SPECIFICATIONS | XJ-H2650 Brightness 3500 lumens Contrast Ratio Telephoto Mode 1400 : 1 Zoom 1.2X Manual Focus Manual Focus Lens Offset 100% Light Source Casio Laser & Led Hybrid Estimated Operating Life Up to 20,000 Hours (Warranty 3 years or ...10 Color Reproduction Full Color (16.77 Million Colors) Keystone Correction Vertical +30° (Auto) Vertical + or - 30° (Manual) Dimension Including Projections 15.75 x 12.72 x 4.17 Inches Excluding Projections 15.75 x 12.72 x 3.78 Inches Weight 15.6 ...