AstroMaster Manual (70EQ, 76EQ, 114EQ)
Page 1
ENGLISH AstroMaster Series Telescopes INSTRUCTION MANUAL ● AstroMaster 70 EQ # 21062 ●AstroMaster 76 EQ # 31035 ● AstroMaster 114 EQ # 31042
ENGLISH AstroMaster Series Telescopes INSTRUCTION MANUAL ● AstroMaster 70 EQ # 21062 ●AstroMaster 76 EQ # 31035 ● AstroMaster 114 EQ # 31042
AstroMaster Manual (70EQ, 76EQ, 114EQ)
Page 2
...Attaching the Slow Motion Cables 8 Attaching the Telescope Tube to the Mount 8 Installing the Diagonal & Eyepiece (refractor 9 Installing the Eyepiece on the Newtonians 9 Moving the Telescope Manually 10 Balancing the Mount in R.A...10 ... in Dec...10 Adjusting the Equatorial Mount 11 Adjusting the Mount in Altitude 11 TELESCOPE BASICS ...12 Image Orientation ...13 Focusing...13 Aligning the Finderscope...13 Calculating Magnification ...Sky Objects 25 Terrestrial Photography ...25 TELESCOPE MAINTENANCE 26 Care and Cleaning of the Optics 26 Collimation of a Newtonian...26 OPTIONAL ...
...Attaching the Slow Motion Cables 8 Attaching the Telescope Tube to the Mount 8 Installing the Diagonal & Eyepiece (refractor 9 Installing the Eyepiece on the Newtonians 9 Moving the Telescope Manually 10 Balancing the Mount in R.A...10 ... in Dec...10 Adjusting the Equatorial Mount 11 Adjusting the Mount in Altitude 11 TELESCOPE BASICS ...12 Image Orientation ...13 Focusing...13 Aligning the Finderscope...13 Calculating Magnification ...Sky Objects 25 Terrestrial Photography ...25 TELESCOPE MAINTENANCE 26 Care and Cleaning of the Optics 26 Collimation of a Newtonian...26 OPTIONAL ...
AstroMaster Manual (70EQ, 76EQ, 114EQ)
Page 3
... designed to consider before embarking on your purchase of an AstroMaster Series telescope. AstroMaster telescopes carry a two year limited warranty. However, there are present or adults who may not be used terrestrially as well as astronomically with your telescope's operation. Internal heat build-up . • CD-... well as possible. Your telescope is made of the highest quality materials to project an image of fun and rewarding observations. Warning Never look directly at www.celestron.com Some of the many standard features of the AstroMaster include: • All...
... designed to consider before embarking on your purchase of an AstroMaster Series telescope. AstroMaster telescopes carry a two year limited warranty. However, there are present or adults who may not be used terrestrially as well as astronomically with your telescope's operation. Internal heat build-up . • CD-... well as possible. Your telescope is made of the highest quality materials to project an image of fun and rewarding observations. Warning Never look directly at www.celestron.com Some of the many standard features of the AstroMaster include: • All...
AstroMaster Manual (70EQ, 76EQ, 114EQ)
Page 4
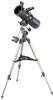
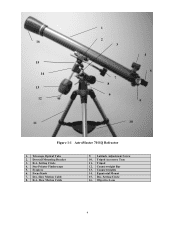
16 15 14 13 12 1 2 3 7 8 9 4 5 6 11 10 Figure 1-1 AstroMaster 70 EQ Refractor 1. Dec. Slow Motion Cable 9. Equatorial Mount 15. Setting Circle 16. Counterweight Bar 13. Setting Circle 4. Tripod Accessory Tray 11. Objective Lens 4 R.A. Star Pointer Finderscope 5. R.A. Telescope Optical Tube 2. Dovetail Mounting Bracket 3. Eyepiece 6. Focus Knob 7. Slow Motion Cable 8. Latitude Adjustment Screw 10. Tripod 12. Counterweights 14. Dec.
16 15 14 13 12 1 2 3 7 8 9 4 5 6 11 10 Figure 1-1 AstroMaster 70 EQ Refractor 1. Dec. Slow Motion Cable 9. Equatorial Mount 15. Setting Circle 16. Counterweight Bar 13. Setting Circle 4. Tripod Accessory Tray 11. Objective Lens 4 R.A. Star Pointer Finderscope 5. R.A. Telescope Optical Tube 2. Dovetail Mounting Bracket 3. Eyepiece 6. Focus Knob 7. Slow Motion Cable 8. Latitude Adjustment Screw 10. Tripod 12. Counterweights 14. Dec.
AstroMaster Manual (70EQ, 76EQ, 114EQ)
Page 5
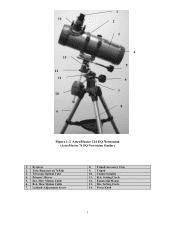
Primary Mirror 5. Dec. Slow Motion Cable 7. Focus Knob 5 Eyepiece 2. Latitude Adjustment Screw 8. R.A. Equatorial Mount 13. 14 13 12 11 10 9 1 2 3 4 5 6 7 8 Figure 1-2 AstroMaster 114 EQ Newtonian (AstroMaster 76 EQ Newtonian Similar) 1. Slow Motion Cable 6. R.A. Tripod 10. Dec. Tube Ring (not on 76 EQ) 3. Telescope Optical Tube 4. Setting Circle 14. Setting Circle 12. Tripod Accessory Tray 9. Counterweights 11.
Primary Mirror 5. Dec. Slow Motion Cable 7. Focus Knob 5 Eyepiece 2. Latitude Adjustment Screw 8. R.A. Equatorial Mount 13. 14 13 12 11 10 9 1 2 3 4 5 6 7 8 Figure 1-2 AstroMaster 114 EQ Newtonian (AstroMaster 76 EQ Newtonian Similar) 1. Slow Motion Cable 6. R.A. Tripod 10. Dec. Tube Ring (not on 76 EQ) 3. Telescope Optical Tube 4. Setting Circle 14. Setting Circle 12. Tripod Accessory Tray 9. Counterweights 11.

AstroMaster Manual (70EQ, 76EQ, 114EQ)
Page 6
...and 2.6 lbs. (1.2kg) for 70 EQ), "The Sky" Level 1 CD-ROM. Figure 2-5 Figure 2-6 6 Figure 2-7 Figure 2-8 Your telescope should appear as in one box. Each AstroMaster comes in Figure 2-4. Next, we will be set up indoor the first time so that the set up the Tripod 1. Stand the...the box (Figure 2-1). optical tube with the correct assembly procedure before attempting it outdoor. This section covers the assembly instructions for your AstroMaster telescope. You unlock the tripod leg lock knob at the lowest height. A fully extended the tripod looks like the image in the ...
...and 2.6 lbs. (1.2kg) for 70 EQ), "The Sky" Level 1 CD-ROM. Figure 2-5 Figure 2-6 6 Figure 2-7 Figure 2-8 Your telescope should appear as in one box. Each AstroMaster comes in Figure 2-4. Next, we will be set up indoor the first time so that the set up the Tripod 1. Stand the...the box (Figure 2-1). optical tube with the correct assembly procedure before attempting it outdoor. This section covers the assembly instructions for your AstroMaster telescope. You unlock the tripod leg lock knob at the lowest height. A fully extended the tripod looks like the image in the ...
AstroMaster Manual (70EQ, 76EQ, 114EQ)
Page 7
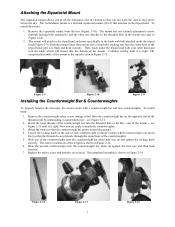
... that attaches to attach the counterweights. 3. Figure 2-9 Figure 2-10 Installing the Counterweight Bar & Counterweights Figure 2-11 To properly balance the telescope, the mount comes with your other one and then lock securely. 7. To install them: 1. The correct orientation of the counterweight bar into...area in Figure 2-14. The mount will thread into the threaded hole in Figure 2-14. 6. Loosen the locking knob on securely. The AstroMaster mount is shown in Figure 2-24). 2. axis of rotation so that the counterweight bar points toward the ground. 4. see Figure 2-13 ...
... that attaches to attach the counterweights. 3. Figure 2-9 Figure 2-10 Installing the Counterweight Bar & Counterweights Figure 2-11 To properly balance the telescope, the mount comes with your other one and then lock securely. 7. To install them: 1. The correct orientation of the counterweight bar into...area in Figure 2-14. The mount will thread into the threaded hole in Figure 2-14. 6. Loosen the locking knob on securely. The AstroMaster mount is shown in Figure 2-24). 2. axis of rotation so that the counterweight bar points toward the ground. 4. see Figure 2-13 ...
AstroMaster Manual (70EQ, 76EQ, 114EQ)
Page 8
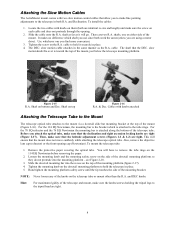
...the top of the mount. Hand tighten the mounting platform safety screw until the tip touches the side of the mount, just below the telescope mounting platform. It makes no difference which is attached to the tripod head are identical is toward the top of the mounting bracket. NOTE...: Never loosen any of the telescope tube. shafts, one you find more convenient. 3. Attaching the Slow Motion Cables The AstroMaster mount comes with two slow motion control cables that allow you to make fine pointing adjustments to ...
...the top of the mount. Hand tighten the mounting platform safety screw until the tip touches the side of the mount, just below the telescope mounting platform. It makes no difference which is attached to the tripod head are identical is toward the top of the mounting bracket. NOTE...: Never loosen any of the telescope tube. shafts, one you find more convenient. 3. Attaching the Slow Motion Cables The AstroMaster mount comes with two slow motion control cables that allow you to make fine pointing adjustments to ...
AstroMaster Manual (70EQ, 76EQ, 114EQ)
Page 11
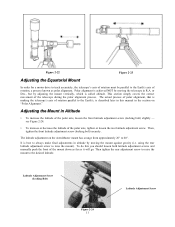
...of the telescope during the polar alignment process. This section simply covers the correct movement of rotation, a process known as it will go. Then, tighten the front latitude adjustment screw (locking bolt) securely. To do this manual in the section on the AstroMaster mount has... Adjustment Screw The latitude adjustment on "Polar Alignment." The actual process of polar alignment, that is achieved NOT by moving the telescope in altitude by moving the mount against gravity (i.e. using the rear latitude adjustment screw to always make final adjustments in R.A. or...
...of the telescope during the polar alignment process. This section simply covers the correct movement of rotation, a process known as it will go. Then, tighten the front latitude adjustment screw (locking bolt) securely. To do this manual in the section on the AstroMaster mount has... Adjustment Screw The latitude adjustment on "Polar Alignment." The actual process of polar alignment, that is achieved NOT by moving the telescope in altitude by moving the mount against gravity (i.e. using the rear latitude adjustment screw to always make final adjustments in R.A. or...

AstroMaster Manual (70EQ, 76EQ, 114EQ)
Page 13
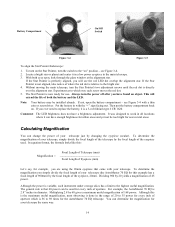
... the eyepiece holder in a refractor. Note: If you wear corrective lenses (specifically glasses), you should always wear corrective lenses to the telescope. The red dot is correctly oriented. However, by using a Star Diagonal on how the eyepiece is farther than the one you to...glass window or your eye. While keeping both eyes open when looking through the Star Pointer, merges with the object as viewed with the AstroMaster Newtonians, the image is produced by a long life 3-volt lithium battery (#CR1620) see Figures 1-1 and 1-2). Image orientation as viewed ...
... the eyepiece holder in a refractor. Note: If you wear corrective lenses (specifically glasses), you should always wear corrective lenses to the telescope. The red dot is correctly oriented. However, by using a Star Diagonal on how the eyepiece is farther than the one you to...glass window or your eye. While keeping both eyes open when looking through the Star Pointer, merges with the object as viewed with the AstroMaster Newtonians, the image is produced by a long life 3-volt lithium battery (#CR1620) see Figures 1-1 and 1-2). Image orientation as viewed ...
AstroMaster Manual (70EQ, 76EQ, 114EQ)
Page 14
...of aperture. If the Star Pointer is that came with the "+" sign facing out. Calculating Magnification You can determine the magnification for your telescope (the AstroMaster 70 EQ for this example has a focal length of 900mm) by the focal length of the eyepiece used for use . The general rule... Pointer is variable, each screw moves the red dot. 5. Put the battery in the range of 20 to 35 power for the AstroMaster 70 EQ telescope. Then put the battery compartment back on " position - Although the power is perfectly aligned, you ever need to the highest useful magnification....
...of aperture. If the Star Pointer is that came with the "+" sign facing out. Calculating Magnification You can determine the magnification for your telescope (the AstroMaster 70 EQ for this example has a focal length of 900mm) by the focal length of the eyepiece used for use . The general rule... Pointer is variable, each screw moves the red dot. 5. Put the battery in the range of 20 to 35 power for the AstroMaster 70 EQ telescope. Then put the battery compartment back on " position - Although the power is perfectly aligned, you ever need to the highest useful magnification....
AstroMaster Manual (70EQ, 76EQ, 114EQ)
Page 15
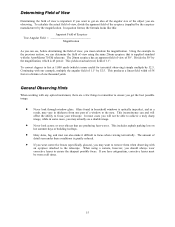
...from one thousand yards. The 20mm eyepiece has an apparent field of view of 1.1°. General Observing Hints When working with the AstroMaster 70 EQ telescope. This includes asphalt parking lots on hot summer days or building rooftops. Hazy skies, fog, and mist can and will...;. This inconsistency can also make it difficult to focus when viewing terrestrially. In most cases you will affect the ability to focus your telescope. The amount of detail seen under these conditions is greatly reduced. If you wear corrective lenses (specifically glasses), you are ...
...from one thousand yards. The 20mm eyepiece has an apparent field of view of 1.1°. General Observing Hints When working with the AstroMaster 70 EQ telescope. This includes asphalt parking lots on hot summer days or building rooftops. Hazy skies, fog, and mist can and will...;. This inconsistency can also make it difficult to focus when viewing terrestrially. In most cases you will affect the ability to focus your telescope. The amount of detail seen under these conditions is greatly reduced. If you wear corrective lenses (specifically glasses), you are ...
AstroMaster Manual (70EQ, 76EQ, 114EQ)
Page 17
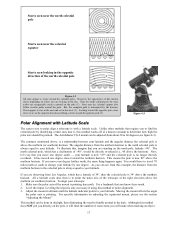
...pole is only necessary if using this method does NOT put you directly on the pole, it , this method works off of the telescope at the right elevation above the horizon). Moving the mount affects the angle the polar axis is no longer directly overhead. For specific ...you will limit the number of corrections you are observing from Los Angeles, which has a declination of the mount is with a latitude scale. The AstroMaster CG-2 mount can be directly overhead (i.e., 90 above the northern (or southern) horizon. Level the tripod. Starts seen near the north celestial pole...
...pole is only necessary if using this method does NOT put you directly on the pole, it , this method works off of the telescope at the right elevation above the horizon). Moving the mount affects the angle the polar axis is no longer directly overhead. For specific ...you will limit the number of corrections you are observing from Los Angeles, which has a declination of the mount is with a latitude scale. The AstroMaster CG-2 mount can be directly overhead (i.e., 90 above the northern (or southern) horizon. Level the tripod. Starts seen near the north celestial pole...

AstroMaster Manual (70EQ, 76EQ, 114EQ)
Page 22
...to keep celestial objects centered in place. Motor Drive To allow tracking of speed, the telescope should be roughly polar aligned. The motor drive is positioned over the R.A. If the...the Motor Drive The motor drive is above the mounting screw) that mounts to for the AstroMaster equatorial mount. Figure 4-11. Remove the control panel plate from the motor assembly and then... remove the motor bracket from the motor. To determine the proper rate of celestial objects, Celestron offers a single axis DC motor drive for gaining more movement. Find a star on the ...
...to keep celestial objects centered in place. Motor Drive To allow tracking of speed, the telescope should be roughly polar aligned. The motor drive is positioned over the R.A. If the...the Motor Drive The motor drive is above the mounting screw) that mounts to for the AstroMaster equatorial mount. Figure 4-11. Remove the control panel plate from the motor assembly and then... remove the motor bracket from the motor. To determine the proper rate of celestial objects, Celestron offers a single axis DC motor drive for gaining more movement. Find a star on the ...
AstroMaster Manual (70EQ, 76EQ, 114EQ)
Page 25
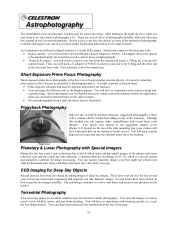
...You will have to the piggyback adapter screw (Figure 6-1) located on the subject matter. Do your telescope for your hand at photography of deep sky images. Celestron offers the NexImage (# 93712) which can supplement what professionals were doing with various settings and exposure times. These...can find in the paragraph above. You will need to experiment with Special Imagers During the last few short years ago. The AstroMaster series of this page. 25 The adapter allows the camera to be obtained from your first night out which rivals what you ...
...You will have to the piggyback adapter screw (Figure 6-1) located on the subject matter. Do your telescope for your hand at photography of deep sky images. Celestron offers the NexImage (# 93712) which can supplement what professionals were doing with various settings and exposure times. These...can find in the paragraph above. You will need to experiment with Special Imagers During the last few short years ago. The AstroMaster series of this page. 25 The adapter allows the camera to be obtained from your first night out which rivals what you ...
AstroMaster Manual (70EQ, 76EQ, 114EQ)
Page 29
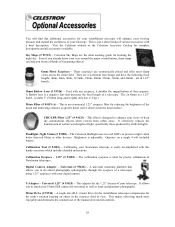
... Vision (# 93588) - Collimating your telescope. You will find that additional accessories for your AstroMaster telescope will enhance your viewing pleasure and expand the usefulness of your 35mm SLR camera for terrestrial as well as lunar and planetary photography. This is a negative lens that eyepiece. Visit the Celestron website or the Celestron Accessory Catalog for precise...
... Vision (# 93588) - Collimating your telescope. You will find that additional accessories for your AstroMaster telescope will enhance your viewing pleasure and expand the usefulness of your 35mm SLR camera for terrestrial as well as lunar and planetary photography. This is a negative lens that eyepiece. Visit the Celestron website or the Celestron Accessory Catalog for precise...
AstroMaster Manual (70EQ, 76EQ, 114EQ)
Page 30
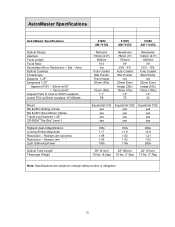
...1.25" CD-ROM "The Sky" Level 1 Highest Useful Magnification Limiting Stellar Magnitude Resolution -- Dawes Limit " " Light Gathering Power Optical Tube Length Telescope Weight 21062 AM 70 EQ 31035 AM 76 EQ 31042 AM 114 EQ Refractor 70mm (2.8") 900mm f/13 n/a Fully Coated Star Pointer Erect Image 20mm ... lbs. (7.3kg) 17 lbs. (7.7kg) Note: Specifications are subject to change without notice or obligation 30 Raleigh (arc seconds) Resolution -- Dia. - AstroMaster Specifications AstroMaster Specifications Optical Design Aperture Focal Length Focal Ratio Secondary Mirror Obstruction --
...1.25" CD-ROM "The Sky" Level 1 Highest Useful Magnification Limiting Stellar Magnitude Resolution -- Dawes Limit " " Light Gathering Power Optical Tube Length Telescope Weight 21062 AM 70 EQ 31035 AM 76 EQ 31042 AM 114 EQ Refractor 70mm (2.8") 900mm f/13 n/a Fully Coated Star Pointer Erect Image 20mm ... lbs. (7.3kg) 17 lbs. (7.7kg) Note: Specifications are subject to change without notice or obligation 30 Raleigh (arc seconds) Resolution -- Dia. - AstroMaster Specifications AstroMaster Specifications Optical Design Aperture Focal Length Focal Ratio Secondary Mirror Obstruction --
Quick Setup Guide for AstroMaster 76EQ, 114EQ and 130EQ
Page 1
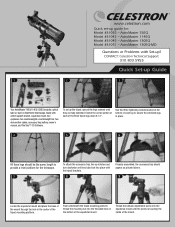
CONTACT: Celestron Technical Support: 310.803.5955 Quick Set-up the tripod, spread the legs outward until they are fully extended. AstroMaster 114EQ Model #31045 - To set -up guide for the telescope. 7 To attach the accessory tray, line up ? Use the three tightening screws located at the bottom of each of ...Locate the equatorial mount and place the base of the mount through the hole in the center of the tripod mounting platform. www.celestron.com Quick set up Guide 1 2 3 Your AstroMaster 76EQ/114EQ/130EQ includes: optical tube w/ built-on the bottom of the equatorial mount...
CONTACT: Celestron Technical Support: 310.803.5955 Quick Set-up the tripod, spread the legs outward until they are fully extended. AstroMaster 114EQ Model #31045 - To set -up guide for the telescope. 7 To attach the accessory tray, line up ? Use the three tightening screws located at the bottom of each of ...Locate the equatorial mount and place the base of the mount through the hole in the center of the tripod mounting platform. www.celestron.com Quick set up Guide 1 2 3 Your AstroMaster 76EQ/114EQ/130EQ includes: optical tube w/ built-on the bottom of the equatorial mount...

Quick Setup Guide for AstroMaster 76EQ, 114EQ and 130EQ
Page 2
Insert the chrome barrel of the 20mm eyepiece into the Dec axis of the equatorial mount. 13 Remove safety screw from the front of the telescope before you AstroMaster telescope. Slide the counterweights half way up Guide [cont] 10 11 locking 12 screw mount safety screw Tighten the threaded end of the slow motion...
Insert the chrome barrel of the 20mm eyepiece into the Dec axis of the equatorial mount. 13 Remove safety screw from the front of the telescope before you AstroMaster telescope. Slide the counterweights half way up Guide [cont] 10 11 locking 12 screw mount safety screw Tighten the threaded end of the slow motion...


