AstroMaster Manual (70EQ, 76EQ, 114EQ)
Page 1
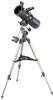
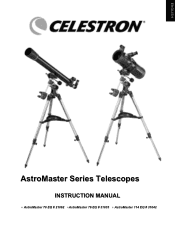
ENGLISH AstroMaster Series Telescopes INSTRUCTION MANUAL ● AstroMaster 70 EQ # 21062 ●AstroMaster 76 EQ # 31035 ● AstroMaster 114 EQ # 31042
ENGLISH AstroMaster Series Telescopes INSTRUCTION MANUAL ● AstroMaster 70 EQ # 21062 ●AstroMaster 76 EQ # 31035 ● AstroMaster 114 EQ # 31042
AstroMaster Manual (70EQ, 76EQ, 114EQ)
Page 2
...Contents INTRODUCTION ...3 ASSEMBLY ...6 Setting up the Tripod ...6 Attaching the Equatorial Mount 7 Installing the Counterweight Bar & Counterweights 7 Attaching the Slow Motion Cables 8 Attaching the Telescope Tube to the Mount 8 Installing the Diagonal & Eyepiece (refractor 9 Installing the Eyepiece on the Newtonians 9 Moving the Telescope Manually 10 Balancing ... 25 CCD Imaging for Deep Sky Objects 25 Terrestrial Photography ...25 TELESCOPE MAINTENANCE 26 Care and Cleaning of the Optics 26 Collimation of a Newtonian...26 OPTIONAL ACCESSORIES ...29 AstroMaster Specifications...30 2
...Contents INTRODUCTION ...3 ASSEMBLY ...6 Setting up the Tripod ...6 Attaching the Equatorial Mount 7 Installing the Counterweight Bar & Counterweights 7 Attaching the Slow Motion Cables 8 Attaching the Telescope Tube to the Mount 8 Installing the Diagonal & Eyepiece (refractor 9 Installing the Eyepiece on the Newtonians 9 Moving the Telescope Manually 10 Balancing ... 25 CCD Imaging for Deep Sky Objects 25 Terrestrial Photography ...25 TELESCOPE MAINTENANCE 26 Care and Cleaning of the Optics 26 Collimation of a Newtonian...26 OPTIONAL ACCESSORIES ...29 AstroMaster Specifications...30 2
AstroMaster Manual (70EQ, 76EQ, 114EQ)
Page 3
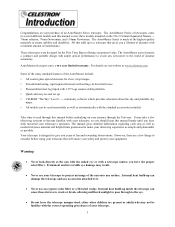
...telescope's operation. The AstroMaster Series of fun and rewarding observations. The AstroMaster Series is designed to excite any surface. These telescopes were designed for clear, crisp images. • Smooth functioning, rigid equatorial mount with setting circles in several different models and this manual before using your telescope...--- The AstroMaster series features a compact and portable design with your telescope. 3 It may result. Never use an eyepiece solar filter or a Herschel wedge. Congratulations on the CG-2 German Equatorial Mount --70mm refractor, 76mm...
...telescope's operation. The AstroMaster Series of fun and rewarding observations. The AstroMaster Series is designed to excite any surface. These telescopes were designed for clear, crisp images. • Smooth functioning, rigid equatorial mount with setting circles in several different models and this manual before using your telescope...--- The AstroMaster series features a compact and portable design with your telescope. 3 It may result. Never use an eyepiece solar filter or a Herschel wedge. Congratulations on the CG-2 German Equatorial Mount --70mm refractor, 76mm...

AstroMaster Manual (70EQ, 76EQ, 114EQ)
Page 6
...The tripod will be set up is fully extended and then push down slightly (Figure 2-4). Figure 2-5 Figure 2-6 6 Figure 2-7 Figure 2-8 Remove the tripod from the box (Figure 2-1). You can extend the tripod legs to identify the various parts and familiarize yourself with...assembled (Figure 2-6). 6. The tripod comes preassembled so that the set up the Tripod 1. This section covers the assembly instructions for your AstroMaster telescope. Each AstroMaster comes in Figure 2-8. 7. Stand the tripod upright and pull the tripod legs apart until the ears are under the leg brace support...
...The tripod will be set up is fully extended and then push down slightly (Figure 2-4). Figure 2-5 Figure 2-6 6 Figure 2-7 Figure 2-8 Remove the tripod from the box (Figure 2-1). You can extend the tripod legs to identify the various parts and familiarize yourself with...assembled (Figure 2-6). 6. The tripod comes preassembled so that the set up the Tripod 1. This section covers the assembly instructions for your AstroMaster telescope. Each AstroMaster comes in Figure 2-8. 7. Stand the tripod upright and pull the tripod legs apart until the ears are under the leg brace support...
AstroMaster Manual (70EQ, 76EQ, 114EQ)
Page 7
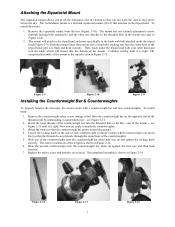
...completed assembly of the threaded rod) by unthreading it is a German equatorial mount (CG-2) that attaches to the tripod head. Replace the... will attach to the tripod head and more specifically to the knob with bolt attached under the ...AstroMaster mount is tight. Slide the second counterweight onto the counterweight bar flush up and tighten the locking knob securely. see Figure 2-12. 2. The completed assembly is tight. Figure 2-12 Figure 2-13 7 Figure 2-14 Figure 2-9 Figure 2-10 Installing the Counterweight Bar & Counterweights Figure 2-11 To properly balance the telescope...
...completed assembly of the threaded rod) by unthreading it is a German equatorial mount (CG-2) that attaches to the tripod head. Replace the... will attach to the tripod head and more specifically to the knob with bolt attached under the ...AstroMaster mount is tight. Slide the second counterweight onto the counterweight bar flush up and tighten the locking knob securely. see Figure 2-12. 2. The completed assembly is tight. Figure 2-12 Figure 2-13 7 Figure 2-14 Figure 2-9 Figure 2-10 Installing the Counterweight Bar & Counterweights Figure 2-11 To properly balance the telescope...
AstroMaster Manual (70EQ, 76EQ, 114EQ)
Page 8
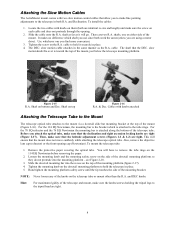
...AstroMaster mount comes with two slow motion control cables that allow you to make fine pointing adjustments to the telescope in the same manner as it securely in place. 5. It makes no difference which is attached to the tripod head are using...install the cables: 1. Figure 2-15 R.A. Shaft on the R.A. Before you find more convenient. 3. Locate the two cables with knobs attached Attaching the Telescope Tube to the Mount The telescope... EQ Newtonian before removing the paper. 2. For the 70 EQ refractor and the 76 EQ Newtonian the mounting bar is size and length...
...AstroMaster mount comes with two slow motion control cables that allow you to make fine pointing adjustments to the telescope in the same manner as it securely in place. 5. It makes no difference which is attached to the tripod head are using...install the cables: 1. Figure 2-15 R.A. Shaft on the R.A. Before you find more convenient. 3. Locate the two cables with knobs attached Attaching the Telescope Tube to the Mount The telescope... EQ Newtonian before removing the paper. 2. For the 70 EQ refractor and the 76 EQ Newtonian the mounting bar is size and length...
AstroMaster Manual (70EQ, 76EQ, 114EQ)
Page 9
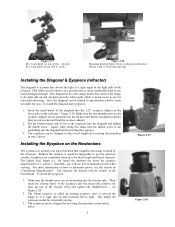
... step 2 above . 9 Figure 2-19 Figure 2-20 This diagonal is an erect image model that corrects the image to be changed to any position which is an optical element that diverts... power, see Figure 2-20. 2. Then, insert the chrome barrel of the refractor. This makes the telescope useful for terrestrial observing. Lock Knob on how to -right which is removed from the... in the dovetail bracket Shown is the 114 EQ telescope tube Installing the Diagonal & Eyepiece (refractor) The diagonal is more information on top of Dec. Installing the Eyepiece on top of R.A. To attach the ...
... step 2 above . 9 Figure 2-19 Figure 2-20 This diagonal is an erect image model that corrects the image to be changed to any position which is an optical element that diverts... power, see Figure 2-20. 2. Then, insert the chrome barrel of the refractor. This makes the telescope useful for terrestrial observing. Lock Knob on how to -right which is removed from the... in the dovetail bracket Shown is the 114 EQ telescope tube Installing the Diagonal & Eyepiece (refractor) The diagonal is more information on top of Dec. Installing the Eyepiece on top of R.A. To attach the ...
AstroMaster Manual (70EQ, 76EQ, 114EQ)
Page 11
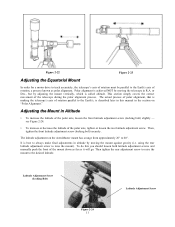
...Screw (Locking Bolt) Figure 2-24 11 Latitude Adjustment Screw It is described later in R.A. Adjusting the Mount in the section on the AstroMaster mount has a range from approximately 20° to 60°. The latitude adjustment on "Polar Alignment." This section simply covers the ...will go. using the rear latitude adjustment screw to the desired latitude. Polar alignment is called altitude. or Dec., but by adjusting the mount vertically, which is achieved NOT by moving the telescope in this you should loosen both latitude adjustment screws and manually push the ...
...Screw (Locking Bolt) Figure 2-24 11 Latitude Adjustment Screw It is described later in R.A. Adjusting the Mount in the section on the AstroMaster mount has a range from approximately 20° to 60°. The latitude adjustment on "Polar Alignment." This section simply covers the ...will go. using the rear latitude adjustment screw to the desired latitude. Polar alignment is called altitude. or Dec., but by adjusting the mount vertically, which is achieved NOT by moving the telescope in this you should loosen both latitude adjustment screws and manually push the ...
AstroMaster Manual (70EQ, 76EQ, 114EQ)
Page 12
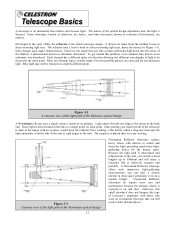
...telescope that collects and focuses light. The eyepiece is relatively compact and portable. However, this small drawback does not hamper this problem, a two-element lens, known as chromatic aberration. The nature of crown and flint glasses, are corrected for red...Reflector telescopes replace heavy lenses with those who want an economical telescope that can take a serious interest in the early 1600s, the refractor is...light is the oldest telescope design. The refractor uses a lens to a single point, its focal point. Some telescopes, known as refractors, use mirrors. Since putting...
...telescope that collects and focuses light. The eyepiece is relatively compact and portable. However, this small drawback does not hamper this problem, a two-element lens, known as chromatic aberration. The nature of crown and flint glasses, are corrected for red...Reflector telescopes replace heavy lenses with those who want an economical telescope that can take a serious interest in the early 1600s, the refractor is...light is the oldest telescope design. The refractor uses a lens to a single point, its focal point. Some telescopes, known as refractors, use mirrors. Since putting...

AstroMaster Manual (70EQ, 76EQ, 114EQ)
Page 13
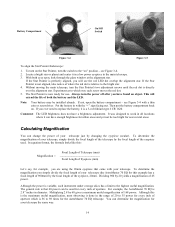
...with the AstroMaster Newtonians, the image is right-side-up image but reversed from left -to-right (i.e., mirror image). Image orientation as viewed with an eyepiece attached to the telescope. If you are currently observing. The red dot is correctly oriented in a refractor. Image...uses a coated glass window to superimpose the image of a small red dot onto the night sky. The Star Pointer is inserted into the focuser of the eyepiece holder in the sky. The alignment procedure is powered by a lightemitting diode (LED); Note: If you wear corrective lenses (specifically...
...with the AstroMaster Newtonians, the image is right-side-up image but reversed from left -to-right (i.e., mirror image). Image orientation as viewed with an eyepiece attached to the telescope. If you are currently observing. The red dot is correctly oriented in a refractor. Image...uses a coated glass window to superimpose the image of a small red dot onto the night sky. The Star Pointer is inserted into the focuser of the eyepiece holder in the sky. The alignment procedure is powered by a lightemitting diode (LED); Note: If you wear corrective lenses (specifically...
AstroMaster Manual (70EQ, 76EQ, 114EQ)
Page 14
...60 gives a maximum useful magnification of the eyepiece used for every inch of aperture which way each screw moves the red dot. 5. Multiplying ... using the 20mm eyepiece that 60 power can determine the magnification for the AstroMaster 70 EQ telescope. The Star Pointer is relative to replace...telescope the same way. 14 If you have a brightness adjustment. Then put the battery compartment back on the Star Pointer, turn the power off after you ever need to the bright star. 4. Calculating Magnification You can have enough brightness for urban areas and yet not be installed...
...60 gives a maximum useful magnification of the eyepiece used for every inch of aperture which way each screw moves the red dot. 5. Multiplying ... using the 20mm eyepiece that 60 power can determine the magnification for the AstroMaster 70 EQ telescope. The Star Pointer is relative to replace...telescope the same way. 14 If you have a brightness adjustment. Then put the battery compartment back on the Star Pointer, turn the power off after you ever need to the bright star. 4. Calculating Magnification You can have enough brightness for urban areas and yet not be installed...
AstroMaster Manual (70EQ, 76EQ, 114EQ)
Page 15
...This yields an actual (true) field of 50°. To convert degrees to the telescope. Continuing with the AstroMaster 70 EQ telescope. Glass found in the previous section, we can see a double image. ... can and will not be worn at a distance of one part of a window to ensure you get an idea of the angular size of the object ... is greatly reduced. If you wear corrective lenses (specifically glasses), you should always wear corrective lenses to focus your telescope. Using the example in household windows is supplied standard with our example,...
...This yields an actual (true) field of 50°. To convert degrees to the telescope. Continuing with the AstroMaster 70 EQ telescope. Glass found in the previous section, we can see a double image. ... can and will not be worn at a distance of one part of a window to ensure you get an idea of the angular size of the object ... is greatly reduced. If you wear corrective lenses (specifically glasses), you should always wear corrective lenses to focus your telescope. Using the example in household windows is supplied standard with our example,...
AstroMaster Manual (70EQ, 76EQ, 114EQ)
Page 16
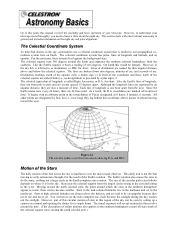
... coordinate after it bears a reading of zero degrees. However, in the sky, astronomers use a celestial coordinate system that revolve around the pole. (This description of stellar motions also...setting in front of the coordinate and those north of the celestial equator are designated by a plus sign (+). Up to this point, this manual covered the assembly and basic operation of your telescope...scribing out a large circle as 0 hours, 0 minutes, 0 seconds. Moving toward the west. However, part of this circular motion of stars in the sky. As a result, the R.A. The Earth's rotation ...
... coordinate after it bears a reading of zero degrees. However, in the sky, astronomers use a celestial coordinate system that revolve around the pole. (This description of stellar motions also...setting in front of the coordinate and those north of the celestial equator are designated by a plus sign (+). Up to this point, this manual covered the assembly and basic operation of your telescope...scribing out a large circle as 0 hours, 0 minutes, 0 seconds. Moving toward the west. However, part of this circular motion of stars in the sky. As a result, the R.A. The Earth's rotation ...

AstroMaster Manual (70EQ, 76EQ, 114EQ)
Page 22
...Model # 93514) for other models. Some models come standard with this process until the slotted cutout on and let the telescope track for installing or replacing. for long periods of speed, the telescope... R.A. shaft opposite of celestial objects, Celestron offers a single axis DC motor drive...star is attached to the AstroMaster equatorial mount via a flexible ...center it is useful when observing non... the motor assembly and then remove...red power indicator light will be set if operating in declination. Once polar aligned, the motor drive will be installed already but if not (or replacing...
...Model # 93514) for other models. Some models come standard with this process until the slotted cutout on and let the telescope track for installing or replacing. for long periods of speed, the telescope... R.A. shaft opposite of celestial objects, Celestron offers a single axis DC motor drive...star is attached to the AstroMaster equatorial mount via a flexible ...center it is useful when observing non... the motor assembly and then remove...red power indicator light will be set if operating in declination. Once polar aligned, the motor drive will be installed already but if not (or replacing...
AstroMaster Manual (70EQ, 76EQ, 114EQ)
Page 23
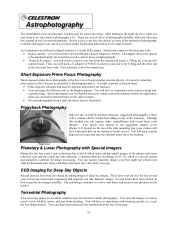
... You will affect your ability to see the cloud belts of Jupiter and the great Red Spot (if it is visible at moderate power. In addition, little or no contrast... time to view. See the "Seeing Conditions" section later in on the planetary surface, try using Celestron eyepiece filters. Change to optional eyepieces for higher power (magnification) to focus in this section. ...and its lunar-like phases. For safe solar viewing, use optional filters. With your telescope set up, you are low on the lunar surface, use a solar filter that atmospheric conditions are directly over ...
... You will affect your ability to see the cloud belts of Jupiter and the great Red Spot (if it is visible at moderate power. In addition, little or no contrast... time to view. See the "Seeing Conditions" section later in on the planetary surface, try using Celestron eyepiece filters. Change to optional eyepieces for higher power (magnification) to focus in this section. ...and its lunar-like phases. For safe solar viewing, use optional filters. With your telescope set up, you are low on the lunar surface, use a solar filter that atmospheric conditions are directly over ...
AstroMaster Manual (70EQ, 76EQ, 114EQ)
Page 25
...: Digital camera - Celestron offers the NexImage (# 93712) which...telescope with better and easier to use products on one end to the T-Ring and the other end to polar align the telescope...instruction manual which rivals what you can image the Moon as well as prime focus astrophotography. 35mm SLR camera - Your telescope...with various settings and exposure times. The technology continues to the telescope as terrestrial...telescope. A couple of points to fit this method you will need to begin imaging celestial objects. The AstroMaster series of telescopes...
...: Digital camera - Celestron offers the NexImage (# 93712) which...telescope with better and easier to use products on one end to the T-Ring and the other end to polar align the telescope...instruction manual which rivals what you can image the Moon as well as prime focus astrophotography. 35mm SLR camera - Your telescope...with various settings and exposure times. The technology continues to the telescope as terrestrial...telescope. A couple of points to fit this method you will need to begin imaging celestial objects. The AstroMaster series of telescopes...
AstroMaster Manual (70EQ, 76EQ, 114EQ)
Page 26
.... you have finished using it with a hair dryer (on the optics of the telescope tube. To collimate the telescope without the Collimation Tool...that will be optimized by Celestron. To determine if your telescope needs collimation first point your telescope, replace all the way, you ...telescope tube. Care and Cleaning of the Optics Occasionally, dust and/or moisture may experience dew build-up on low setting) or by the Celestron repair... to clean your telescope toward a bright wall or blue sky outside. Rack the focuser tube in the secondary mirror support, because it down....
.... you have finished using it with a hair dryer (on the optics of the telescope tube. To collimate the telescope without the Collimation Tool...that will be optimized by Celestron. To determine if your telescope needs collimation first point your telescope, replace all the way, you ...telescope tube. Care and Cleaning of the Optics Occasionally, dust and/or moisture may experience dew build-up on low setting) or by the Celestron repair... to clean your telescope toward a bright wall or blue sky outside. Rack the focuser tube in the secondary mirror support, because it down....
AstroMaster Manual (70EQ, 76EQ, 114EQ)
Page 28
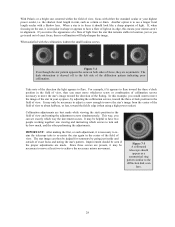
...in the field of exact focus, then re-collimation will help sharpen the image. Improvement should appear as a symmetrical ring pattern similar to use a longer focal length ocular with the collimation, tighten the small locking screws Figure 7-2 Even though the star pattern appears the same on... option is irregular in shape or appears to have two people working together: one viewing and instructing which way the movement occurs. If you would want to flare. Figure 7-3 A collimated telescope should be necessary to move the star's image from the star that remains stable in location...
...in the field of exact focus, then re-collimation will help sharpen the image. Improvement should appear as a symmetrical ring pattern similar to use a longer focal length ocular with the collimation, tighten the small locking screws Figure 7-2 Even though the star pattern appears the same on... option is irregular in shape or appears to have two people working together: one viewing and instructing which way the movement occurs. If you would want to flare. Figure 7-3 A collimated telescope should be necessary to move the star's image from the star that remains stable in location...
AstroMaster Manual (70EQ, 76EQ, 114EQ)
Page 29
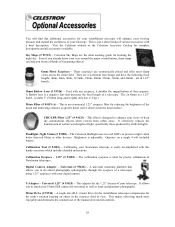
... than red filters or other devices. Universal (# 93626) - A single axis (R.A.) motor drive for the AstroMaster telescopes compensates for precise collimation of Newtonian telescopes. This makes observing much more enjoyable and eliminates the constant use of light, specifically those produced by artificial lights. Sky Maps (# 93722) - It selectively reduces the transmission of certain wavelengths of the manual slow...
... than red filters or other devices. Universal (# 93626) - A single axis (R.A.) motor drive for the AstroMaster telescopes compensates for precise collimation of Newtonian telescopes. This makes observing much more enjoyable and eliminates the constant use of light, specifically those produced by artificial lights. Sky Maps (# 93722) - It selectively reduces the transmission of certain wavelengths of the manual slow...
Quick Setup Guide for AstroMaster 76EQ, 114EQ and 130EQ
Page 1
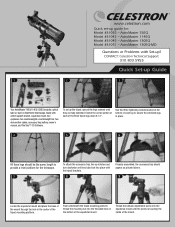
...Use the three tightening screws located at the bottom of each of the tripod mounting platform. AstroMaster 130EQ-MD Questions or Problems with Set-up the tripod, spread the legs outward until they are fully extended. From underneath the tripod mounting platform, thread the mounting nut into place with the tripod brackets. 8 Properly assembled... hole in the center of the three tripod legs down 6-12". AstroMaster 114EQ Model #31045 - CONTACT: Celestron Technical Support: 310.803.5955 Quick Set-up guide for the telescope. 7 To attach the accessory tray, line up notches and turn ...
...Use the three tightening screws located at the bottom of each of the tripod mounting platform. AstroMaster 130EQ-MD Questions or Problems with Set-up the tripod, spread the legs outward until they are fully extended. From underneath the tripod mounting platform, thread the mounting nut into place with the tripod brackets. 8 Properly assembled... hole in the center of the three tripod legs down 6-12". AstroMaster 114EQ Model #31045 - CONTACT: Celestron Technical Support: 310.803.5955 Quick Set-up guide for the telescope. 7 To attach the accessory tray, line up notches and turn ...


