8810CB FOR BELT DRIVE OPERATORS
Page 1
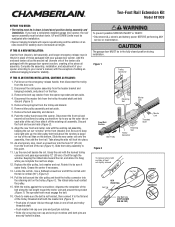
... of the rail (Figure 1). Remove idler pulley assembly and set aside. 4. With the trolley against the screwdriver, dispense the remainder of an extra bracket for stability. The garage door MUST be in down on the floor. 3. UP and DOWN Limits must be in the fully closed door) position during installation. Disconnect the master link from the opener sprocket and set aside. 7. Push the trolley back toward the motor unit and around...
... of the rail (Figure 1). Remove idler pulley assembly and set aside. 4. With the trolley against the screwdriver, dispense the remainder of an extra bracket for stability. The garage door MUST be in down on the floor. 3. UP and DOWN Limits must be in the fully closed door) position during installation. Disconnect the master link from the opener sprocket and set aside. 7. Push the trolley back toward the motor unit and around...

8810CB FOR BELT DRIVE OPERATORS
Page 2
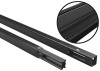
... brace to the owner's manual. Insert the trolley threaded shaft through the hole in the trolley. Replace the old emergency release rope with an adjustable wrench or a 7/16" open end wrench about a quarter turn until finger tight against the trolley. 21. Description Qty 183C158-14 Header Rail Extension 1 183C157-10 Center Rail Extension 1 41A5250-2 10' Belt Assembly 1 41A3021 Rope 1 4A1008 Master Link Kit 1 Finished Ceiling Hanging Bracket (Cross Brace) Lock Washer 5/16" Nut...
... brace to the owner's manual. Insert the trolley threaded shaft through the hole in the trolley. Replace the old emergency release rope with an adjustable wrench or a 7/16" open end wrench about a quarter turn until finger tight against the trolley. 21. Description Qty 183C158-14 Header Rail Extension 1 183C157-10 Center Rail Extension 1 41A5250-2 10' Belt Assembly 1 41A3021 Rope 1 4A1008 Master Link Kit 1 Finished Ceiling Hanging Bracket (Cross Brace) Lock Washer 5/16" Nut...


