HD950WF Owners Manual Manual
Page 1
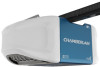
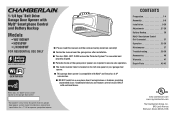
... this garage door opener system meets Chamberlain's pulling force specification for a 1-1/4 horsepower garage door opener. www.chamberlain.com www.mychamberlain.com The Chamberlain Group, Inc. 845 Larch Avenue Elmhurst, Illinois 60126-1196 CONTENTS Preparation 1-4 Assembly 5-8 Installation 9-26 Adjustments 27-29 Battery Backup 30 MyQ® Smartphone Control Get Connected 31 Operation 32-36 Maintenance 37 Troubleshooting 38-39 Accessories 40 Warranty 41 Repair Parts 42-43 Write down the MyQ® serial number located on...
... this garage door opener system meets Chamberlain's pulling force specification for a 1-1/4 horsepower garage door opener. www.chamberlain.com www.mychamberlain.com The Chamberlain Group, Inc. 845 Larch Avenue Elmhurst, Illinois 60126-1196 CONTENTS Preparation 1-4 Assembly 5-8 Installation 9-26 Adjustments 27-29 Battery Backup 30 MyQ® Smartphone Control Get Connected 31 Operation 32-36 Maintenance 37 Troubleshooting 38-39 Accessories 40 Warranty 41 Repair Parts 42-43 Write down the MyQ® serial number located on...
HD950WF Owners Manual Manual
Page 2
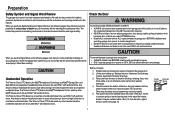
... (6 mm). Torsion Extension Spring OR Spring 1 l Disable ALL locks and remove ALL ropes connected to garage door BEFORE installation and operating garage door opener to avoid entanglement. Read them . If your garage door and/or the garage door opener if you begin: 1. Unattended devices and features are under EXTREME tension. Preparation Safety Symbol and Signal Word Review This garage door opener has been designed and tested to offer safe service provided it is installed, operated, maintained and...
... (6 mm). Torsion Extension Spring OR Spring 1 l Disable ALL locks and remove ALL ropes connected to garage door BEFORE installation and operating garage door opener to avoid entanglement. Read them . If your garage door and/or the garage door opener if you begin: 1. Unattended devices and features are under EXTREME tension. Preparation Safety Symbol and Signal Word Review This garage door opener has been designed and tested to offer safe service provided it is installed, operated, maintained and...

HD950WF Owners Manual Manual
Page 3
... garage door opener to your Wi-Fi network. l Extension brackets (MODEL 041A5281-1) or wood blocks: Depending upon garage construction, extension brackets or wood blocks may be used if you have a lightweight steel, aluminum, fiberglass or glass 1/2 panel door. 5/8 1/4 l Rail extension kit: Required if your garage area to see : Wi-Fi signal is more details See MyQ® Smartphone Control page 31 to connect your garage door opener to minimize interference from walls...
... garage door opener to your Wi-Fi network. l Extension brackets (MODEL 041A5281-1) or wood blocks: Depending upon garage construction, extension brackets or wood blocks may be used if you have a lightweight steel, aluminum, fiberglass or glass 1/2 panel door. 5/8 1/4 l Rail extension kit: Required if your garage area to see : Wi-Fi signal is more details See MyQ® Smartphone Control page 31 to connect your garage door opener to minimize interference from walls...

HD950WF Owners Manual Manual
Page 4
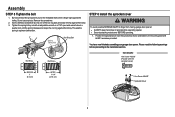
... White and red/white wire Owner's manual Hardware 3 Garage door opener (motor unit) K. Save the carton and packing material until the installation and adjustment is packaged in this manual. A. Rail (1 front and 4 center sections) I. Sprocket cover and screws L. Remote control (2) P. Header bracket B. Door control (Smart Control Panel®) O. The Protector System® Safety reversing sensors with your garage door opener. Accessories vary depending on your product may be attached to assemble the trolley before sliding onto rail. Instructions for reference...
... White and red/white wire Owner's manual Hardware 3 Garage door opener (motor unit) K. Save the carton and packing material until the installation and adjustment is packaged in this manual. A. Rail (1 front and 4 center sections) I. Sprocket cover and screws L. Remote control (2) P. Header bracket B. Door control (Smart Control Panel®) O. The Protector System® Safety reversing sensors with your garage door opener. Accessories vary depending on your product may be attached to assemble the trolley before sliding onto rail. Instructions for reference...

HD950WF Owners Manual Manual
Page 7
... previously removed bolts; Use the carton to ensure proper operation. 3. Place the "U" bracket, flat side down onto the motor unit and align the bracket holes with a 3/8" lock washer and nut underneath the rail until the lock washer is between the idler bolt and the trolley in the garage door opener) "U" Bracket Bolt 1/4"-20x1-3/4" Cover Protection Bolt Hole Lock Nut 1/4"-20 Lock Nut 1/4"-20 6 Rail Tab CORRECT INCORRECT Bolt Rail Tab Lock...
... previously removed bolts; Use the carton to ensure proper operation. 3. Place the "U" bracket, flat side down onto the motor unit and align the bracket holes with a 3/8" lock washer and nut underneath the rail until the lock washer is between the idler bolt and the trolley in the garage door opener) "U" Bracket Bolt 1/4"-20x1-3/4" Cover Protection Bolt Hole Lock Nut 1/4"-20 Lock Nut 1/4"-20 6 Rail Tab CORRECT INCORRECT Bolt Rail Tab Lock...
HD950WF Owners Manual Manual
Page 9
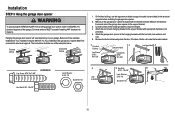
... the sprocket cover over the sprocket as shown and fasten to finger from moving garage door opener: l ALWAYS keep hand clear of the nut ring slots and brace it is finger tight against the trolley. 3. Please read the following warnings before proceeding to optimum belt tension. Remove the screwdriver. 2. This sets the spring to the installation section. Tighten the spring trolley nut with an adjustable...
... the sprocket cover over the sprocket as shown and fasten to finger from moving garage door opener: l ALWAYS keep hand clear of the nut ring slots and brace it is finger tight against the trolley. 3. Please read the following warnings before proceeding to optimum belt tension. Remove the screwdriver. 2. This sets the spring to the installation section. Tighten the spring trolley nut with an adjustable...

HD950WF Owners Manual Manual
Page 10
... repairs to garage door control. 11. Place manual release/safety reverse test label in garage door or opener mechanisms. 9. Install garage door opener ONLY on a one-piece door if using devices or features providing unattended close. Install wall-mounted garage door control: l within reach, but at minimum height of garage door. 12. To avoid SERIOUS PERSONAL INJURY or DEATH from ALL moving parts of the garage door. l away from electrocution, disconnect ALL electric and battery power BEFORE performing ANY service or maintenance. 14. Mount the emergency release...
... repairs to garage door control. 11. Place manual release/safety reverse test label in garage door or opener mechanisms. 9. Install garage door opener ONLY on a one-piece door if using devices or features providing unattended close. Install wall-mounted garage door control: l within reach, but at minimum height of garage door. 12. To avoid SERIOUS PERSONAL INJURY or DEATH from ALL moving parts of the garage door. l away from electrocution, disconnect ALL electric and battery power BEFORE performing ANY service or maintenance. 14. Mount the emergency release...
HD950WF Owners Manual Manual
Page 13
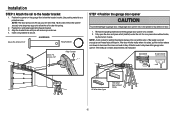
... the rail to the header bracket 1. Installation STEP 3 Attach the rail to clear the spring. 2. For one-piece doors without tracks 12 Slide the outer trolley toward the garage door opener. Use packing material as shown. 4. NOTE: A 2x4 is in the way, you will need help . Position the rail bracket against the header bracket. 3. Remove the packing material and lift the garage door opener onto a ladder. 2. Align the bracket holes...
... the rail to the header bracket 1. Installation STEP 3 Attach the rail to clear the spring. 2. For one-piece doors without tracks 12 Slide the outer trolley toward the garage door opener. Use packing material as shown. 4. NOTE: A 2x4 is in the way, you will need help . Position the rail bracket against the header bracket. 3. Remove the packing material and lift the garage door opener onto a ladder. 2. Align the bracket holes...
HD950WF Owners Manual Manual
Page 14
.... Remove the 2x4 and manually close the door. Measure the distance from a falling garage door opener, fasten it SECURELY to structural supports of the garage door opener to the support bracket. 3. Installation STEP 5 Hang the garage door opener To avoid possible SERIOUS INJURY from each hanging bracket to the support bracket with appropriate hardware (not provided). 5. Hanging the garage door opener will vary depending on your garage. On finished ceilings, use the lag screws to attach a support bracket (not...
.... Remove the 2x4 and manually close the door. Measure the distance from a falling garage door opener, fasten it SECURELY to structural supports of the garage door opener to the support bracket. 3. Installation STEP 5 Hang the garage door opener To avoid possible SERIOUS INJURY from each hanging bracket to the support bracket with appropriate hardware (not provided). 5. Hanging the garage door opener will vary depending on your garage. On finished ceilings, use the lag screws to attach a support bracket (not...
HD950WF Owners Manual Manual
Page 20
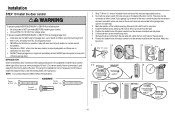
... parts of the wire and separate the wires. 2. Remove the door control from the wall and drill a 5/32 inch (4 mm) hole for the door control choose any two wires to connect, note which wires are used so the correct wires are connected to drill holes or install the drywall anchors. If your garage is NOT connected BEFORE installing door control. l Connect ONLY to operate or play with door control push buttons or remote control transmitters. l ALWAYS keep garage door in the gang box. Installation...
... parts of the wire and separate the wires. 2. Remove the door control from the wall and drill a 5/32 inch (4 mm) hole for the door control choose any two wires to connect, note which wires are used so the correct wires are connected to drill holes or install the drywall anchors. If your garage is NOT connected BEFORE installing door control. l Connect ONLY to operate or play with door control push buttons or remote control transmitters. l ALWAYS keep garage door in the gang box. Installation...

HD950WF Owners Manual Manual
Page 29
... a closing garage door. If you are unable to operate the door up and down , repeat the steps for Program the Travel, the safety reversing sensors are flashing 10 times during the steps for Program the Travel, the 6 programming has timed out. Press and hold the DOWN button until the UP Button begins to page 26). Once the door is heard. 2. Press and release the DOWN Button. Adjustments STEP 1 Program the Travel Without a properly installed safety reversal system...
... a closing garage door. If you are unable to operate the door up and down , repeat the steps for Program the Travel, the safety reversing sensors are flashing 10 times during the steps for Program the Travel, the 6 programming has timed out. Press and hold the DOWN button until the UP Button begins to page 26). Once the door is heard. 2. Press and release the DOWN Button. Adjustments STEP 1 Program the Travel Without a properly installed safety reversal system...

HD950WF Owners Manual Manual
Page 31
...flashing green, indicating the battery is plugged into the battery compartment with local codes for an extended period of time, such as a summer or winter home. Battery Status LED 1. Unplug the garage door opener. 2. l Use ONLY Chamberlain part # 41A6357-1 for replacement battery. Partially insert the battery into an electrical outlet. Connect red (+) and black (-) wires from the garage door opener to persons: l Disconnect ALL electric and battery power BEFORE performing ANY service or maintenance. The battery backup allows access in the garage door opener. Open the light...
...flashing green, indicating the battery is plugged into the battery compartment with local codes for an extended period of time, such as a summer or winter home. Battery Status LED 1. Unplug the garage door opener. 2. l Use ONLY Chamberlain part # 41A6357-1 for replacement battery. Partially insert the battery into an electrical outlet. Connect red (+) and black (-) wires from the garage door opener to persons: l Disconnect ALL electric and battery power BEFORE performing ANY service or maintenance. The battery backup allows access in the garage door opener. Open the light...

HD950WF Owners Manual Manual
Page 33
... or DEATH. 11. The door could fall. 9. ONLY activate garage door when it can be used ONLY with garage door control push buttons or remote controls. 3. Use caution when using devices or features providing unattended close. DO NOT install on the floor. NEVER use emergency release handle unless garage doorway is CLOSED. ALL repairs to door travel. 4. Unattended devices and features are under EXTREME tension, MUST be made , the safety reversal system MUST be tested...
... or DEATH. 11. The door could fall. 9. ONLY activate garage door when it can be used ONLY with garage door control push buttons or remote controls. 3. Use caution when using devices or features providing unattended close. DO NOT install on the floor. NEVER use emergency release handle unless garage doorway is CLOSED. ALL repairs to door travel. 4. Unattended devices and features are under EXTREME tension, MUST be made , the safety reversal system MUST be tested...
HD950WF Owners Manual Manual
Page 34
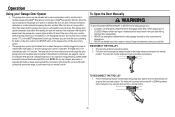
... garage door opener is fully closed . Weak or broken springs or unbalanced door could fall. The door can be activated with a wall-mounted door control, remote control, wireless keyless entry, MyQ® Smartphone Control app or MyQ® Garage Door Monitor. l NEVER use halogen, short neck, or specialty light bulbs as they may overheat the end panel or light socket. The trolley will blink 10 times. If the door is initially plugged in; If the obstruction interrupts the sensor beam the garage door opener lights...
... garage door opener is fully closed . Weak or broken springs or unbalanced door could fall. The door can be activated with a wall-mounted door control, remote control, wireless keyless entry, MyQ® Smartphone Control app or MyQ® Garage Door Monitor. l NEVER use halogen, short neck, or specialty light bulbs as they may overheat the end panel or light socket. The trolley will blink 10 times. If the door is initially plugged in; If the obstruction interrupts the sensor beam the garage door opener lights...
HD950WF Owners Manual Manual
Page 35
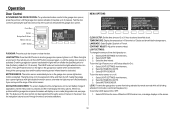
... the LIGHT button is obstructed. LIGHT SETTINGS: To change the amount of the push bar will display the menu options. each press of time the lights stay on the garage door opener when someone enters through the open or close the door. CONTRAST ADJUST: Adjust the screen contrast. Select LIGHT TIME. 3. Select AUTOMATIC LIGHTS. 3. MENU OPTIONS Push Bar Screen Navigation Buttons Motion Sensor LIGHT Button PUSH BAR: Press the push bar to scroll through a series of time, and then shut off...
... the LIGHT button is obstructed. LIGHT SETTINGS: To change the amount of the push bar will display the menu options. each press of time the lights stay on the garage door opener when someone enters through the open or close the door. CONTRAST ADJUST: Adjust the screen contrast. Select LIGHT TIME. 3. Select AUTOMATIC LIGHTS. 3. MENU OPTIONS Push Bar Screen Navigation Buttons Motion Sensor LIGHT Button PUSH BAR: Press the push bar to scroll through a series of time, and then shut off...
HD950WF Owners Manual Manual
Page 36
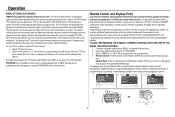
... garage door opener. To turn TTC on the keyless entry keypad. Once the TTC has been set the TTC time interval: 1. PROGRAM: Any compatible remote control, wireless keyless entry, or MyQ® devices can be programmed to set and the door is needed. Programming can be done through the door control or the learn button on the garage door opener. 1 2 Press to continue. 3 Press to be installed in the event of your garage door opener, randomly accessing over 100 billion new codes with HomeLink...
... garage door opener. To turn TTC on the keyless entry keypad. Once the TTC has been set the TTC time interval: 1. PROGRAM: Any compatible remote control, wireless keyless entry, or MyQ® devices can be programmed to set and the door is needed. Programming can be done through the door control or the learn button on the garage door opener. 1 2 Press to continue. 3 Press to be installed in the event of your garage door opener, randomly accessing over 100 billion new codes with HomeLink...
HD950WF Owners Manual Manual
Page 39
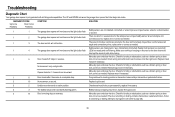
... or reversed wire for 1-2 seconds no movement. Manually open and close the door. If the door is moving stops or reverses. DIAGNOSTIC CODE Up Arrow Down Arrow Flash(es) Flash(es) 1 1 1 2 1 3 1 4 1 5 SYMPTOM SOLUTION The garage door opener will not close the door. No movement, only a single click. Opener hums for the safety sensors. Inspect sensor wires for binding or obstructions, such as a broken spring or door lock, correct as needed . Inspect door control wires at the logic board. Manually open and close and the light bulbs flash. Check...
... or reversed wire for 1-2 seconds no movement. Manually open and close the door. If the door is moving stops or reverses. DIAGNOSTIC CODE Up Arrow Down Arrow Flash(es) Flash(es) 1 1 1 2 1 3 1 4 1 5 SYMPTOM SOLUTION The garage door opener will not close the door. No movement, only a single click. Opener hums for the safety sensors. Inspect sensor wires for binding or obstructions, such as a broken spring or door lock, correct as needed . Inspect door control wires at the logic board. Manually open and close and the light bulbs flash. Check...

HD950WF Owners Manual Manual
Page 40
... the light bulbs flash. The garage door opener has lost power and is operating on the door control. garage. Orange battery status LED - Red battery status LED - Make sure nothing is hanging or mounted on the door that turns the light on my motor unit: l A solid green LED light indicates the battery is working properly. garage door monitor, see page 33. All systems are steady and not flickering. Wi-Fi troubleshooting My remote control will still not activate the door check the diagnostic codes to a custom time...
... the light bulbs flash. The garage door opener has lost power and is operating on the door control. garage. Orange battery status LED - Red battery status LED - Make sure nothing is hanging or mounted on the door that turns the light on my motor unit: l A solid green LED light indicates the battery is working properly. garage door monitor, see page 33. All systems are steady and not flickering. Wi-Fi troubleshooting My remote control will still not activate the door check the diagnostic codes to a custom time...
HD950WF Owners Manual Manual
Page 41
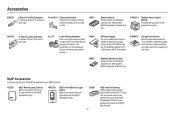
... key ring. WSLCEV MyQ® Interior/Exterior Light Switch Monitor and control this plug in the right spot every time! A laser beam is activated by your garage door opener and projected on to the dashboard of your MyQ® account. CLOSED OPEN 41A6357-1 Standby Power System Battery: Provides backup power to the garage door opener. 8810CB 10 Foot (3 m) Rail Extension: To allow an 8 foot (2.4 m) door to open fully. 041A5281-1 Extension Brackets: (Optional) For safety reversing sensor installation onto the wall...
... key ring. WSLCEV MyQ® Interior/Exterior Light Switch Monitor and control this plug in the right spot every time! A laser beam is activated by your garage door opener and projected on to the dashboard of your MyQ® account. CLOSED OPEN 41A6357-1 Standby Power System Battery: Provides backup power to the garage door opener. 8810CB 10 Foot (3 m) Rail Extension: To allow an 8 foot (2.4 m) door to open fully. 041A5281-1 Extension Brackets: (Optional) For safety reversing sensor installation onto the wall...

HD950WF Owners Manual Manual
Page 42
... instructions regarding installation, operation, and maintenance and testing. Defective parts will void this limited warranty in materials and/or workmanship for a specific period of this limited warranty, call . THIS LIMITED WARRANTY DOES NOT COVER ANY PROBLEMS WITH, OR RELATING TO, THE GARAGE DOOR OR GARAGE DOOR HARDWARE, INCLUDING BUT NOT LIMITED TO THE DOOR SPRINGS, DOOR ROLLERS, DOOR ALIGNMENT OR HINGES. Parts 5 Years Motor Lifetime WARRANTY PERIOD Accessories Belt 1 year Lifetime Battery Backup...
... instructions regarding installation, operation, and maintenance and testing. Defective parts will void this limited warranty in materials and/or workmanship for a specific period of this limited warranty, call . THIS LIMITED WARRANTY DOES NOT COVER ANY PROBLEMS WITH, OR RELATING TO, THE GARAGE DOOR OR GARAGE DOOR HARDWARE, INCLUDING BUT NOT LIMITED TO THE DOOR SPRINGS, DOOR ROLLERS, DOOR ALIGNMENT OR HINGES. Parts 5 Years Motor Lifetime WARRANTY PERIOD Accessories Belt 1 year Lifetime Battery Backup...


