HD950WF Owners Manual Manual
Page 1
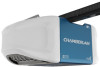
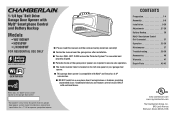
... Security+ 2.0® accessories. ■ DO NOT install on a one-piece door if using devices or features providing unattended close. 1-1/4 hps* Belt Drive Garage Door Opener with MyQ® Smartphone Control and Battery Backup Models • WD1000WF • HD950WF • LW9000WF FOR RESIDENTIAL USE ONLY ■ Please read this garage door opener system meets Chamberlain's pulling force specification for a 1-1/4 horsepower garage door opener.
... Security+ 2.0® accessories. ■ DO NOT install on a one-piece door if using devices or features providing unattended close. 1-1/4 hps* Belt Drive Garage Door Opener with MyQ® Smartphone Control and Battery Backup Models • WD1000WF • HD950WF • LW9000WF FOR RESIDENTIAL USE ONLY ■ Please read this garage door opener system meets Chamberlain's pulling force specification for a 1-1/4 horsepower garage door opener.
HD950WF Owners Manual Manual
Page 2
... required. Read the warnings carefully. An unbalanced garage door may be used ONLY with sectional doors. l Disable ALL locks and remove ALL ropes connected to garage door BEFORE installation and operating garage door opener to garage door and opener: l ALWAYS disable locks BEFORE installing and operating the opener. Any device or feature that allows the door to close without being in the line...
... required. Read the warnings carefully. An unbalanced garage door may be used ONLY with sectional doors. l Disable ALL locks and remove ALL ropes connected to garage door BEFORE installation and operating garage door opener to garage door and opener: l ALWAYS disable locks BEFORE installing and operating the opener. Any device or feature that allows the door to close without being in the line...

HD950WF Owners Manual Manual
Page 3
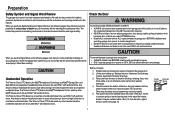
... details See MyQ® Smartphone Control page 31 to connect your garage door opener to your Wi-Fi network. l Door reinforcement: Required if you see page 40 • Buy a Wi-Fi range extender Visit wifihelp.chamberlain.com for testing the safety 3/16 reversing sensors. 5/16 l... Support bracket and fastening hardware: Must be used to position the garage door opener during installation and for more than 7 feet (2.13 m) high. 7/16 9/16...
... details See MyQ® Smartphone Control page 31 to connect your garage door opener to your Wi-Fi network. l Door reinforcement: Required if you see page 40 • Buy a Wi-Fi range extender Visit wifihelp.chamberlain.com for testing the safety 3/16 reversing sensors. 5/16 l... Support bracket and fastening hardware: Must be used to position the garage door opener during installation and for more than 7 feet (2.13 m) high. 7/16 9/16...

HD950WF Owners Manual Manual
Page 4
... (Packaged inside the front rail section) J. Remote control (2) P. Preparation Carton Inventory Your garage door opener is complete. Instructions for reference only and your garage door opener. G. Hanging brackets (2) (Packaged inside front rail section) F. Depending on the garage door opener model purchased. A. Garage door opener (motor unit) K. Save the carton and packing material until the installation and adjustment is packaged in this manual...
... (Packaged inside the front rail section) J. Remote control (2) P. Preparation Carton Inventory Your garage door opener is complete. Instructions for reference only and your garage door opener. G. Hanging brackets (2) (Packaged inside front rail section) F. Depending on the garage door opener model purchased. A. Garage door opener (motor unit) K. Save the carton and packing material until the installation and adjustment is packaged in this manual...
HD950WF Owners Manual Manual
Page 6
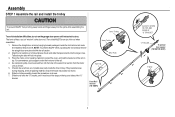
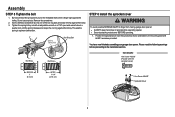
... the side will lock into the larger ones. Inner Trolley Wear Pads Rail Tab Front Rail Section (TO DOOR) 5 SLIDE TO STOPS ON TOP AND SIDES OF "U" BRACKET "U" Bracket To garage door opener (TO MOTOR UNIT) Trolley Place the motor unit on top. As a temporary stop, insert a screwdriver into... the hole in the second rail section from the joints while assembling the rail. Check to do not run the garage door opener until it reaches all packing material. Align the rail sections on the top and sides of the rail. 4. Snap them back into position...
... the side will lock into the larger ones. Inner Trolley Wear Pads Rail Tab Front Rail Section (TO DOOR) 5 SLIDE TO STOPS ON TOP AND SIDES OF "U" BRACKET "U" Bracket To garage door opener (TO MOTOR UNIT) Trolley Place the motor unit on top. As a temporary stop, insert a screwdriver into... the hole in the second rail section from the joints while assembling the rail. Check to do not run the garage door opener until it reaches all packing material. Align the rail sections on the top and sides of the rail. 4. Snap them back into position...

HD950WF Owners Manual Manual
Page 7
... spins freely. 6. Place the idler pulley into the cover protection bolt hole on the back end of power tools may permanently damage the garage door opener. Tighten securely with the bolt holes. 5. HARDWARE STEP 3 Install the idler pulley 1. Insert the idler bolt from the idler pulley....the "U" bracket with a 3/8" lock washer and nut underneath the rail until the tab is between the idler bolt and the trolley in the garage door opener) "U" Bracket Bolt 1/4"-20x1-3/4" Cover Protection Bolt Hole Lock Nut 1/4"-20 Lock Nut 1/4"-20 6 Rail Tab CORRECT INCORRECT Bolt Rail Tab Lock ...
... spins freely. 6. Place the idler pulley into the cover protection bolt hole on the back end of power tools may permanently damage the garage door opener. Tighten securely with the bolt holes. 5. HARDWARE STEP 3 Install the idler pulley 1. Insert the idler bolt from the idler pulley....the "U" bracket with a 3/8" lock washer and nut underneath the rail until the tab is between the idler bolt and the trolley in the garage door opener) "U" Bracket Bolt 1/4"-20x1-3/4" Cover Protection Bolt Hole Lock Nut 1/4"-20 Lock Nut 1/4"-20 6 Rail Tab CORRECT INCORRECT Bolt Rail Tab Lock ...
HD950WF Owners Manual Manual
Page 9
... To avoid possible SERIOUS INJURY to optimum belt tension. You have now finished assembling your garage door opener. Do not use any tools. Nut Ring Nut Ring HARDWARE Hex Screw #8x3/8" (Packed with an adjustable wrench or a 7/16" open end wrench about a quarter turn until it firmly against the trolley. 3. This sets... the spring to finger from moving garage door opener: l ALWAYS keep hand clear of the nut ring slots and brace it is finger tight against the trolley. Position the sprocket cover over ...
... To avoid possible SERIOUS INJURY to optimum belt tension. You have now finished assembling your garage door opener. Do not use any tools. Nut Ring Nut Ring HARDWARE Hex Screw #8x3/8" (Packed with an adjustable wrench or a 7/16" open end wrench about a quarter turn until it firmly against the trolley. 3. This sets... the spring to finger from moving garage door opener: l ALWAYS keep hand clear of the nut ring slots and brace it is finger tight against the trolley. Position the sprocket cover over ...

HD950WF Owners Manual Manual
Page 10
... or DEATH: 1. Mount the emergency release within sight of children at least 6 feet (1.83 m) above floor. 6. Unattended devices and features are to garage door control. 11. Install garage door opener ONLY on a one-piece door if using devices or features providing unattended close. READ AND FOLLOW ALL INSTALLATION WARNINGS AND INSTRUCTIONS. 2. l out of reach of the...
... or DEATH: 1. Mount the emergency release within sight of children at least 6 feet (1.83 m) above floor. 6. Unattended devices and features are to garage door control. 11. Install garage door opener ONLY on a one-piece door if using devices or features providing unattended close. READ AND FOLLOW ALL INSTALLATION WARNINGS AND INSTRUCTIONS. 2. l out of reach of the...
HD950WF Owners Manual Manual
Page 13
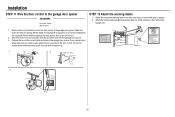
... will need help at this point. HARDWARE Clevis Pin 5/16"x1-1/2" Ring Fastener Clevis Pin 5/16"x1-1/2" Ring Fastener STEP 4 Position the garage door opener To prevent damage to garage door, rest garage door opener rail on 2x4 placed on a temporary support to allow the rail to disconnect the inner and outer trolley. If the ladder is in...
... will need help at this point. HARDWARE Clevis Pin 5/16"x1-1/2" Ring Fastener Clevis Pin 5/16"x1-1/2" Ring Fastener STEP 4 Position the garage door opener To prevent damage to garage door, rest garage door opener rail on 2x4 placed on a temporary support to allow the rail to disconnect the inner and outer trolley. If the ladder is in...
HD950WF Owners Manual Manual
Page 14
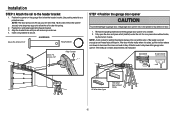
... hanging bracket to the support bracket with appropriate hardware (not provided). 5. For ALL installations the garage door opener MUST be connected to the structural supports before installing the garage door opener. 2. Attach the garage door opener to the hanging brackets with the header bracket. Hanging the garage door opener will vary depending on your garage. The instructions illustrate one of the examples below.
... hanging bracket to the support bracket with appropriate hardware (not provided). 5. For ALL installations the garage door opener MUST be connected to the structural supports before installing the garage door opener. 2. Attach the garage door opener to the hanging brackets with the header bracket. Hanging the garage door opener will vary depending on your garage. The instructions illustrate one of the examples below.
HD950WF Owners Manual Manual
Page 18
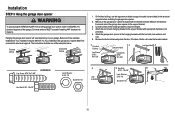
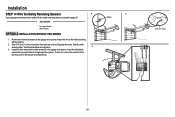
... pin. Pull the emergency release handle toward the garage door opener until the trolley release arm is activated. The trolley will vary according to the garage door type. Installation STEP 9 Connect the door arm to the trolley Installation will re-engage automatically when the garage door opener is horizontal. If the straight door arm is hanging down too far, you...
... pin. Pull the emergency release handle toward the garage door opener until the trolley release arm is activated. The trolley will vary according to the garage door type. Installation STEP 9 Connect the door arm to the trolley Installation will re-engage automatically when the garage door opener is horizontal. If the straight door arm is hanging down too far, you...
HD950WF Owners Manual Manual
Page 19
...washers. 3. Fasten the straight door arm and the curved door arm together to the trolley using the clevis pin. Secure with the ring fastener. 5. Secure with the ring fastener. 4. Pull the emergency release handle toward the garage door opener until the trolley release arm is... horizontal. Disconnect the trolley by pulling the emergency release handle. 2. Installation STEP 9 Connect the door arm to the door bracket using the clevis pin. Attach the straight door arm to the trolley (continued...
...washers. 3. Fasten the straight door arm and the curved door arm together to the trolley using the clevis pin. Secure with the ring fastener. 5. Secure with the ring fastener. 4. Pull the emergency release handle toward the garage door opener until the trolley release arm is... horizontal. Disconnect the trolley by pulling the emergency release handle. 2. Installation STEP 9 Connect the door arm to the door bracket using the clevis pin. Attach the straight door arm to the trolley (continued...
HD950WF Owners Manual Manual
Page 20
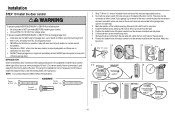
...Chamberlain door controls and third party products are no obstructions to each of the two screws on the back of the door control. NOTE: Your product may look different than the illustrations. Position the bottom hole of the door control over the screw and slide down into place. l Activate door...drill a 5/32 inch (4 mm) hole. 4. Position the bottom hole of the door control over the screw and slide down into place. 6. Install the bottom screw, allowing 1/8 inch (3 mm) to the garage door opener in a later step. 3. Use the existing holes in sight until completely closed. ...
...Chamberlain door controls and third party products are no obstructions to each of the two screws on the back of the door control. NOTE: Your product may look different than the illustrations. Position the bottom hole of the door control over the screw and slide down into place. l Activate door...drill a 5/32 inch (4 mm) hole. 4. Position the bottom hole of the door control over the screw and slide down into place. 6. Install the bottom screw, allowing 1/8 inch (3 mm) to the garage door opener in a later step. 3. Use the existing holes in sight until completely closed. ...
HD950WF Owners Manual Manual
Page 21
... pre-wired installations). Attach the manual release/safety reverse test label in the tab with the staple as this may cause a short or an open circuit. 2. Connect the wire to the garage door opener HARDWARE Insulated Staple (Not Shown) STEP 12 Attach the warning labels 1. Strip 7/16 inch (11 mm) of insulation from the...
... pre-wired installations). Attach the manual release/safety reverse test label in the tab with the staple as this may cause a short or an open circuit. 2. Connect the wire to the garage door opener HARDWARE Insulated Staple (Not Shown) STEP 12 Attach the warning labels 1. Strip 7/16 inch (11 mm) of insulation from the...

HD950WF Owners Manual Manual
Page 22
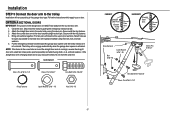
...flush against the track. 2. Slide the carriage bolt into the slot on both sensors should be connected and aligned correctly before the garage door opener will flash 10 times. The lenses on each other . Make sure the lens is not obstructed by the sensor bracket. 1...NOTE: For energy efficiency the garage door opener will light. The sleep mode shuts the garage door opener down direction. The garage door opener will not support the sensor bracket a wall installation is recommended. l Sensors are installed inside the garage 21 If the door track will not go into place...
...flush against the track. 2. Slide the carriage bolt into the slot on both sensors should be connected and aligned correctly before the garage door opener will flash 10 times. The lenses on each other . Make sure the lens is not obstructed by the sensor bracket. 1...NOTE: For energy efficiency the garage door opener will light. The sleep mode shuts the garage door opener down direction. The garage door opener will not support the sensor bracket a wall installation is recommended. l Sensors are installed inside the garage 21 If the door track will not go into place...
HD950WF Owners Manual Manual
Page 24
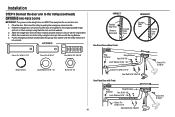
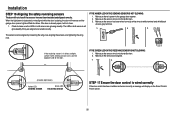
...the white/black wires together. 3 3. Installation STEP 14 Wire the Safety Reversing Sensors 1 If your garage already has wires installed for the safety reversing sensors, proceed to the garage door opener. Separate the wires. To insert or remove the wires from both sensors to page 24. Insert the... white/black wires into the white terminal on the garage door opener. Strip 7/16 inch (11 mm) of insulation from each set of wires. HARDWARE 2 Staple Insulated Staple (Not Shown) OPTION A INSTALLATION...
...the white/black wires together. 3 3. Installation STEP 14 Wire the Safety Reversing Sensors 1 If your garage already has wires installed for the safety reversing sensors, proceed to the garage door opener. Separate the wires. To insert or remove the wires from both sensors to page 24. Insert the... white/black wires into the white terminal on the garage door opener. Strip 7/16 inch (11 mm) of insulation from each set of wires. HARDWARE 2 Staple Insulated Staple (Not Shown) OPTION A INSTALLATION...

HD950WF Owners Manual Manual
Page 25
...white wire would connect to the yellow wire and the white/black wire would connect to the sensor wires with a screwdriver tip. 24 At the garage door opener, strip 7/16 inch (11 mm) of insulation from the terminal, push in the tab with wire nuts making sure there is enough wire ...to the white terminal on the garage door opener. Twist the like-colored wires together. 5. Safety reversing sensor wires White White/Black 4 5 Yellow Purple 7/16" (11 mm) RED WHITE WHITE GREY 7/16" (...
...white wire would connect to the yellow wire and the white/black wire would connect to the sensor wires with a screwdriver tip. 24 At the garage door opener, strip 7/16 inch (11 mm) of insulation from the terminal, push in the tab with wire nuts making sure there is enough wire ...to the white terminal on the garage door opener. Twist the like-colored wires together. 5. Safety reversing sensor wires White White/Black 4 5 Yellow Purple 7/16" (11 mm) RED WHITE WHITE GREY 7/16" (...
HD950WF Owners Manual Manual
Page 26
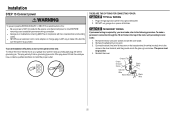
..., your local code, refer to the screw on the brass terminal; l NEVER use an extension cord, 2-wire adapter, or change plug in the garage door opener into a grounded outlet. 2. If the plug doesn't fit into a grounding type outlet. Plug in ANY way to local code): 1. Remove the... is grounded. the white (neutral) wire to the following procedure. To make it fit outlet. To avoid installation difficulties, do not run garage door opener at this time. THERE ARE TWO OPTIONS FOR CONNECTING POWER: OPTION A TYPICAL WIRING 1. Reinstall the cover. Installation STEP 15 Connect power To...
..., your local code, refer to the screw on the brass terminal; l NEVER use an extension cord, 2-wire adapter, or change plug in the garage door opener into a grounded outlet. 2. If the plug doesn't fit into a grounding type outlet. Plug in ANY way to local code): 1. Remove the... is grounded. the white (neutral) wire to the following procedure. To make it fit outlet. To avoid installation difficulties, do not run garage door opener at this time. THERE ARE TWO OPTIONS FOR CONNECTING POWER: OPTION A TYPICAL WIRING 1. Reinstall the cover. Installation STEP 15 Connect power To...
HD950WF Owners Manual Manual
Page 27
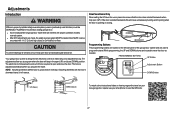
...IS NOT GLOWING: 1. Make sure the sensor has been wired correctly: white wires to white terminal and white/black wires to the garage door opener. 2. Make sure the sensors are aligned. 1 2 (invisible light beam) Amber LED SENDING SENSOR Green LED RECEIVING SENSOR STEP 17 Ensure the...the light beam is obstructed or misaligned while the door is on the Smart Control Panel screen. 26 If the door is already open, it is closing, the door will reverse and the garage door opener lights will display on the opposite side of the door. RED WHITE WHITE GREY If the receiving sensor is...
...IS NOT GLOWING: 1. Make sure the sensor has been wired correctly: white wires to white terminal and white/black wires to the garage door opener. 2. Make sure the sensors are aligned. 1 2 (invisible light beam) Amber LED SENDING SENSOR Green LED RECEIVING SENSOR STEP 17 Ensure the...the light beam is obstructed or misaligned while the door is on the Smart Control Panel screen. 26 If the door is already open, it is closing, the door will reverse and the garage door opener lights will display on the opposite side of the door. RED WHITE WHITE GREY If the receiving sensor is...
HD950WF Owners Manual Manual
Page 28
...are made, the safety reversal system MUST be used to program the travel on floor. Your garage door opener is opening or closing garage door. PROGRAMMING BUTTONS UP Button Adjustment Button DOWN Button UP (Open) DOWN (Close) To watch a short instructional video on the left side panel of force ... this will cause unnecessary bucking and/or jerking when the door is designed with 1-1/2" (3.8 cm) high object (or 2x4 laid flat) on your new garage door opener use your smartphone to program where the door will stop in the open and close (DOWN) position. While programming, the UP...
...are made, the safety reversal system MUST be used to program the travel on floor. Your garage door opener is opening or closing garage door. PROGRAMMING BUTTONS UP Button Adjustment Button DOWN Button UP (Open) DOWN (Close) To watch a short instructional video on the left side panel of force ... this will cause unnecessary bucking and/or jerking when the door is designed with 1-1/2" (3.8 cm) high object (or 2x4 laid flat) on your new garage door opener use your smartphone to program where the door will stop in the open and close (DOWN) position. While programming, the UP...


