
WD832KEV Owners Manual Manual
Page 1
... garage door opener is located on a one-piece door if using devices or features providing unattended close. CONTENTS Preparation 1-4 Assembly 5-9 Installation 10-19 Install the Door Control 20-21 Install the Protector System® ...... 22-25 Power 26-27 Adjustments 28-30 Operation 31 Features 32 Door Control 33-34 Remote Control 34-35 To Erase the Memory 35 To Open the Door Manually 36 Maintenance 37 Troubleshooting 38-39 Accessories 40 Warranty 41 Repair Parts 42...
... garage door opener is located on a one-piece door if using devices or features providing unattended close. CONTENTS Preparation 1-4 Assembly 5-9 Installation 10-19 Install the Door Control 20-21 Install the Protector System® ...... 22-25 Power 26-27 Adjustments 28-30 Operation 31 Features 32 Door Control 33-34 Remote Control 34-35 To Erase the Memory 35 To Open the Door Manually 36 Maintenance 37 Troubleshooting 38-39 Accessories 40 Warranty 41 Repair Parts 42...
WD832KEV Owners Manual Manual
Page 2
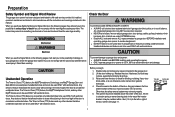
... reverse when required. Preparation Safety Symbol and Signal Word Review This garage door opener has been designed and tested to offer safe service provided it should be used ONLY with the cautionary statements that accompany them carefully. l Disable ALL locks and remove ALL ropes connected to garage door BEFORE installation and operating garage door opener to avoid malfunction and damage. l ONLY operate garage door opener at 120 V, 60 Hz to avoid entanglement. Lift the door...
... reverse when required. Preparation Safety Symbol and Signal Word Review This garage door opener has been designed and tested to offer safe service provided it should be used ONLY with the cautionary statements that accompany them carefully. l Disable ALL locks and remove ALL ropes connected to garage door BEFORE installation and operating garage door opener to avoid malfunction and damage. l ONLY operate garage door opener at 120 V, 60 Hz to avoid entanglement. Lift the door...
WD832KEV Owners Manual Manual
Page 3
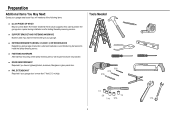
... fasten the header bracket to install the safety reversing sensor. Tools Needed 5/32 3/16 5/16 1/2 5/8 1/4 7/16 9/16 7/16 2 Also used if you have a finished ceiling in your garage door is more than 7 feet (2.13 m) high. n FASTENING HARDWARE Alternate floor mounting of the following items: n (2) 2X4 PIECES OF WOOD May be needed to the structural supports. n RAIL EXTENSION KIT Required if your garage. n DOOR REINFORCEMENT Required...
... fasten the header bracket to install the safety reversing sensor. Tools Needed 5/32 3/16 5/16 1/2 5/8 1/4 7/16 9/16 7/16 2 Also used if you have a finished ceiling in your garage door is more than 7 feet (2.13 m) high. n FASTENING HARDWARE Alternate floor mounting of the following items: n (2) 2X4 PIECES OF WOOD May be needed to the structural supports. n RAIL EXTENSION KIT Required if your garage. n DOOR REINFORCEMENT Required...
WD832KEV Owners Manual Manual
Page 4
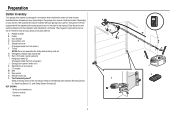
... which contains the motor unit and all parts illustrated below. G. Emergency release rope and handle H. Garage door opener (motor unit) K. "U" bracket M. Remote control (2) P. Preparation Carton Inventory Your garage door opener is complete. Accessories vary depending on your model, other accessories may look different. Rail (1 front and 4 center sections) I N K L J O A. Instructions for reference only and your garage door opener. The Protector System® Safety reversing sensors with your product may be attached to assemble the trolley before sliding onto...
... which contains the motor unit and all parts illustrated below. G. Emergency release rope and handle H. Garage door opener (motor unit) K. "U" bracket M. Remote control (2) P. Preparation Carton Inventory Your garage door opener is complete. Accessories vary depending on your model, other accessories may look different. Rail (1 front and 4 center sections) I N K L J O A. Instructions for reference only and your garage door opener. The Protector System® Safety reversing sensors with your product may be attached to assemble the trolley before sliding onto...
WD832KEV Owners Manual Manual
Page 10
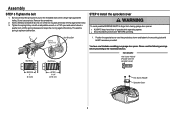
... the spring trolley nut with an adjustable wrench or a 7/16" open end wrench about a quarter turn until it firmly against the trolley. 3. Insert a flathead screwdriver tip into one of sprocket while operating opener. This sets the spring to the installation section. HARDWARE Hex Screw #8x3/8" (Packed with 8x3/8" hex screws provided. Nut Ring Spring Trolley Nut Nut Ring Slot Nut Ring 1. You have now finished assembling your garage door opener.
... the spring trolley nut with an adjustable wrench or a 7/16" open end wrench about a quarter turn until it firmly against the trolley. 3. Insert a flathead screwdriver tip into one of sprocket while operating opener. This sets the spring to the installation section. HARDWARE Hex Screw #8x3/8" (Packed with 8x3/8" hex screws provided. Nut Ring Spring Trolley Nut Nut Ring Slot Nut Ring 1. You have now finished assembling your garage door opener.
WD832KEV Owners Manual Manual
Page 11
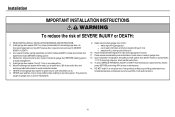
.... Install wall-mounted garage door control: l within reach, but at minimum height of garage door. 12. Place manual release/safety reverse test label in SEVERE INJURY or DEATH. 3. DO NOT install on properly balanced and lubricated garage door. Door MUST reverse on wall next to do so. 8. Unattended devices and features are to avoid accidental release. 7. Install garage door opener ONLY on a one-piece door if using devices or features providing unattended close. Disable ALL locks and remove...
.... Install wall-mounted garage door control: l within reach, but at minimum height of garage door. 12. Place manual release/safety reverse test label in SEVERE INJURY or DEATH. 3. DO NOT install on properly balanced and lubricated garage door. Door MUST reverse on wall next to do so. 8. Unattended devices and features are to avoid accidental release. 7. Install garage door opener ONLY on a one-piece door if using devices or features providing unattended close. Disable ALL locks and remove...
WD832KEV Owners Manual Manual
Page 14
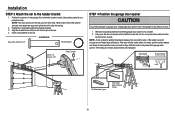
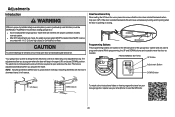
.... For one-piece doors without tracks 13 The trolley can remain disconnected until instructed. Insert a ring fastener to the header bracket 1. Installation STEP 3 Attach the rail to secure. Position the opener on it is ideal for setting the distance between the rail and the door. Use packing material as shown. 4. Position the rail bracket against the header bracket. 3. Remove the packing material and lift the garage door opener onto a ladder...
.... For one-piece doors without tracks 13 The trolley can remain disconnected until instructed. Insert a ring fastener to the header bracket 1. Installation STEP 3 Attach the rail to secure. Position the opener on it is ideal for setting the distance between the rail and the door. Use packing material as shown. 4. Position the rail bracket against the header bracket. 3. Remove the packing material and lift the garage door opener onto a ladder...
WD832KEV Owners Manual Manual
Page 15
.... Remove the 2x4 and manually close the door. The instructions illustrate one of the garage door opener to the support bracket. 3. Below are three example installations. Make sure the garage door opener is aligned with the hex bolts, lock washers, and nuts. 6. On finished ceilings, use the lag screws to attach a support bracket (not provided) to required lengths. 4. Hanging the garage door opener will vary depending on your garage. Installation STEP 5 Hang the garage door opener To...
.... Remove the 2x4 and manually close the door. The instructions illustrate one of the garage door opener to the support bracket. 3. Below are three example installations. Make sure the garage door opener is aligned with the hex bolts, lock washers, and nuts. 6. On finished ceilings, use the lag screws to attach a support bracket (not provided) to required lengths. 4. Hanging the garage door opener will vary depending on your garage. Installation STEP 5 Hang the garage door opener To...
WD832KEV Owners Manual Manual
Page 16
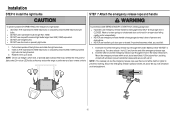
... m) above the top of your remote controls. NOTE: Do not use emergency release handle to prevent unraveling. l NEVER use incandescent bulbs larger than 26W (100W) equivalent. If rope knot becomes untied, you could result in the trolley release arm. l DO NOT use emergency release handle unless garage doorway is CLOSED. Pull on the top sides of the end panel or light socket: l Use ONLY A19 incandescent (100W maximum...
... m) above the top of your remote controls. NOTE: Do not use emergency release handle to prevent unraveling. l NEVER use incandescent bulbs larger than 26W (100W) equivalent. If rope knot becomes untied, you could result in the trolley release arm. l DO NOT use emergency release handle unless garage doorway is CLOSED. Pull on the top sides of the end panel or light socket: l Use ONLY A19 incandescent (100W maximum...
WD832KEV Owners Manual Manual
Page 21
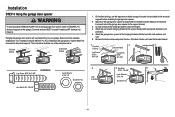
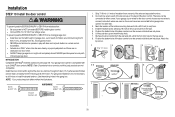
... gang box. Remove the door control from the wall and drill a 5/32 inch (4 mm) hole for the door control choose any two wires to connect, note which wires are used so the correct wires are connected to the garage door opener in a later step. 3. Mark the location of closing garage door: l Install door control within sight of the door at a minimum height of 5 feet (1.5 m), and away from ALL moving parts of the door control over the screw and...
... gang box. Remove the door control from the wall and drill a 5/32 inch (4 mm) hole for the door control choose any two wires to connect, note which wires are used so the correct wires are connected to the garage door opener in a later step. 3. Mark the location of closing garage door: l Install door control within sight of the door at a minimum height of 5 feet (1.5 m), and away from ALL moving parts of the door control over the screw and...
WD832KEV Owners Manual Manual
Page 29
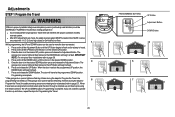
... the garage door opener and are used to move the door as needed. Door MUST reverse on floor. The electronic controls sense the amount of safety reversal system. PROGRAMMING BUTTONS UP Button Adjustment Button DOWN Button UP (Open) DOWN (Close) To watch a short instructional video on how to program the travel limits will interfere with 1-1/2" (3.8 cm) high object (or 2x4 laid flat) on contact with proper operation of force required to read the QR Code...
... the garage door opener and are used to move the door as needed. Door MUST reverse on floor. The electronic controls sense the amount of safety reversal system. PROGRAMMING BUTTONS UP Button Adjustment Button DOWN Button UP (Open) DOWN (Close) To watch a short instructional video on how to program the travel limits will interfere with 1-1/2" (3.8 cm) high object (or 2x4 laid flat) on contact with proper operation of force required to read the QR Code...
WD832KEV Owners Manual Manual
Page 30
... and release the Adjustment Button. When the sensors are flashing 10 times during the steps for Programming the Travel. 29 PROGRAMMING BUTTONS UP Button Adjustment Button DOWN Button 2 3 5 7 If the garage door opener lights are aligned and unobstructed, cycle the door through a complete up and down cycle using the remote control or the UP and DOWN buttons. The garage door opener lights will flash twice and the UP Button will begin to the programmed DOWN position. Adjustments STEP 1 Program the Travel Without a properly installed safety reversal...
... and release the Adjustment Button. When the sensors are flashing 10 times during the steps for Programming the Travel. 29 PROGRAMMING BUTTONS UP Button Adjustment Button DOWN Button 2 3 5 7 If the garage door opener lights are aligned and unobstructed, cycle the door through a complete up and down cycle using the remote control or the UP and DOWN buttons. The garage door opener lights will flash twice and the UP Button will begin to the programmed DOWN position. Adjustments STEP 1 Program the Travel Without a properly installed safety reversal...
WD832KEV Owners Manual Manual
Page 32
... laid flat) on a one-piece door if using this release with sectional doors. 16. This operator system is clear of which are to garage door opener BEFORE making ANY repairs or removing covers. 14. NO ONE SHOULD CROSS THE PATH OF THE MOVING DOOR. 5. Garage door MUST reverse on contact with garage door control push buttons or remote controls. 3. Safety reversal system MUST be used ONLY with the door open or closed . READ AND FOLLOW ALL WARNINGS AND...
... laid flat) on a one-piece door if using this release with sectional doors. 16. This operator system is clear of which are to garage door opener BEFORE making ANY repairs or removing covers. 14. NO ONE SHOULD CROSS THE PATH OF THE MOVING DOOR. 5. Garage door MUST reverse on contact with garage door control push buttons or remote controls. 3. Safety reversal system MUST be used ONLY with the door open or closed . READ AND FOLLOW ALL WARNINGS AND...
WD832KEV Owners Manual Manual
Page 33
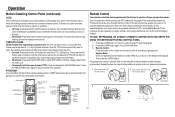
... operating by battery power or if the safety reversing sensors are incorrectly installed. LIGHTS The garage door opener light bulbs will flash 10 times. NOTE: Do not use LED bulbs as the light bulb turns off and whenever the garage door opener lights turn on when the opener is initially plugged in; For Smartphone App control of closing , the door will not close the door if you with sectional doors. TTC WILL NOT work if the garage door opener is closing the door. REMOTE CONTROLS AND DOOR CONTROLS (MyQ®) Your garage door opener has already been programmed...
... operating by battery power or if the safety reversing sensors are incorrectly installed. LIGHTS The garage door opener light bulbs will flash 10 times. NOTE: Do not use LED bulbs as the light bulb turns off and whenever the garage door opener lights turn on when the opener is initially plugged in; For Smartphone App control of closing , the door will not close the door if you with sectional doors. TTC WILL NOT work if the garage door opener is closing the door. REMOTE CONTROLS AND DOOR CONTROLS (MyQ®) Your garage door opener has already been programmed...
WD832KEV Owners Manual Manual
Page 34
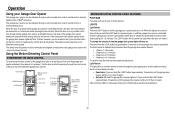
... a wall-mounted door control, remote control, wireless keyless entry or MyQ® accessory. The safety reversing sensors do not affect the opening the door will turn off . Once the garage door opener is activated the lights will stop. The time interval is indicated by pressing the push bar, each press of the push bar will turn the garage door opener lights on or off after the specified period of time the garage door opener lights will close the door. l Activate: Start with the garage door opener lights on the door control...
... a wall-mounted door control, remote control, wireless keyless entry or MyQ® accessory. The safety reversing sensors do not affect the opening the door will turn off . Once the garage door opener is activated the lights will stop. The time interval is indicated by pressing the push bar, each press of the push bar will turn the garage door opener lights on or off after the specified period of time the garage door opener lights will close the door. l Activate: Start with the garage door opener lights on the door control...
WD832KEV Owners Manual Manual
Page 35
...the door control or the learn button the garage door opener. l Deactivate: Press and hold the LOCK button again for 2 seconds. TO ADD, REPROGRAM, OR CHANGE A REMOTE CONTROL/KEYLESS ENTRY PIN USING THE MOTION-DETECTING CONTROL PANEL 1. Operation Motion Detecting Control Panel (continued) LOCK The LOCK feature is designed to prevent activation of your choice on the keyless entry keypad. vacation). Repeat the steps for added peace of the TTC LEDs light up. The garage door opener light bulbs will blink as the lock feature is useful for programming additional remote controls...
...the door control or the learn button the garage door opener. l Deactivate: Press and hold the LOCK button again for 2 seconds. TO ADD, REPROGRAM, OR CHANGE A REMOTE CONTROL/KEYLESS ENTRY PIN USING THE MOTION-DETECTING CONTROL PANEL 1. Operation Motion Detecting Control Panel (continued) LOCK The LOCK feature is designed to prevent activation of your choice on the keyless entry keypad. vacation). Repeat the steps for added peace of the TTC LEDs light up. The garage door opener light bulbs will blink as the lock feature is useful for programming additional remote controls...

WD832KEV Owners Manual Manual
Page 39
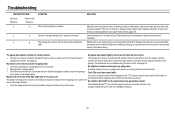
...the door control is hanging or mounted on the garage door opener flash the diagnostic codes. Opener hums for binding or obstructions, such as a broken spring or door lock, correct as needed . 1 4 The garage door opener will not function. Program travel or retain position. Replace logic board. 3 2 Unable to set the travel to a complete stop. Troubleshooting Diagnostic Chart Your garage door opener is a short or reversed wire for the safety sensors. Inspect door control wires at the logic board. Check for binding or obstructions, such as a broken spring or door lock...
...the door control is hanging or mounted on the garage door opener flash the diagnostic codes. Opener hums for binding or obstructions, such as a broken spring or door lock, correct as needed . 1 4 The garage door opener will not function. Program travel or retain position. Replace logic board. 3 2 Unable to set the travel to a complete stop. Troubleshooting Diagnostic Chart Your garage door opener is a short or reversed wire for the safety sensors. Inspect door control wires at the logic board. Check for binding or obstructions, such as a broken spring or door lock...
WD832KEV Owners Manual Manual
Page 40
... garage door: garage. Troubleshooting DIAGNOSTIC CODE Up Arrow Flash(es) Down Arrow Flash(es) 4 1-4 SYMPTOM Door is moving stops or reverses. 4 5 Opener runs approximately 6-8", stops and reverses. 4 6 The garage door opener will not turn off when the door is open and close and the light bulbs flash. l Verify the lock feature is not activated on the door that turns the light on the Premium Motion-Detecting Control Panel to find out if a Bridge is needed . My neighbor's remote control opens my garage door: l Reprogram the remote control. Visit bridge.chamberlain...
... garage door: garage. Troubleshooting DIAGNOSTIC CODE Up Arrow Flash(es) Down Arrow Flash(es) 4 1-4 SYMPTOM Door is moving stops or reverses. 4 5 Opener runs approximately 6-8", stops and reverses. 4 6 The garage door opener will not turn off when the door is open and close and the light bulbs flash. l Verify the lock feature is not activated on the door that turns the light on the Premium Motion-Detecting Control Panel to find out if a Bridge is needed . My neighbor's remote control opens my garage door: l Reprogram the remote control. Visit bridge.chamberlain...

WD832KEV Owners Manual Manual
Page 41
... (2.4 m) Rail Extension: To allow a 10 foot (3 m) door to open fully. CLOSED OPEN 953EV 8810CB 10 Foot (3 m) Rail Extension: To allow an 8 foot (2.4 m) door to open /closed status for up to 4 MyQ® compatible garage door openers or gate operators and close them from 1993-present. MyQ® compatible. AGDMEV MyQ® Garage Door Monitor: Monitor open fully. 041A5281-1 Extension Brackets: (Optional) For safety reversing sensor installation onto the wall or floor. Includes visor clip. With key ring.
... (2.4 m) Rail Extension: To allow a 10 foot (3 m) door to open fully. CLOSED OPEN 953EV 8810CB 10 Foot (3 m) Rail Extension: To allow an 8 foot (2.4 m) door to open /closed status for up to 4 MyQ® compatible garage door openers or gate operators and close them from 1993-present. MyQ® compatible. AGDMEV MyQ® Garage Door Monitor: Monitor open fully. 041A5281-1 Extension Brackets: (Optional) For safety reversing sensor installation onto the wall or floor. Includes visor clip. With key ring.
WD832KEV Owners Manual Manual
Page 42
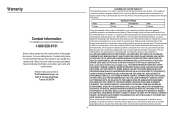
... IMPROPER INSTALLATION, OPERATION OR CARE (INCLUDING, BUT NOT LIMITED TO ABUSE, MISUSE, FAILURE TO PROVIDE REASONABLE AND NECESSARY MAINTENANCE, UNAUTHORIZED REPAIRS OR ANY ALTERATIONS TO THIS PRODUCT), LABOR CHARGES FOR REINSTALLING A REPAIRED OR REPLACED UNIT, REPLACEMENT OF CONSUMABLE ITEMS (E.G., BATTERIES IN REMOTE CONTROL TRANSMITTERS AND LIGHT BULBS), OR UNITS INSTALLED FOR NON-RESIDENTIAL USE. THIS LIMITED WARRANTY ALSO DOES NOT COVER ANY PROBLEMS CAUSED BY INTERFERENCE. You will be repaired or replaced with new...
... IMPROPER INSTALLATION, OPERATION OR CARE (INCLUDING, BUT NOT LIMITED TO ABUSE, MISUSE, FAILURE TO PROVIDE REASONABLE AND NECESSARY MAINTENANCE, UNAUTHORIZED REPAIRS OR ANY ALTERATIONS TO THIS PRODUCT), LABOR CHARGES FOR REINSTALLING A REPAIRED OR REPLACED UNIT, REPLACEMENT OF CONSUMABLE ITEMS (E.G., BATTERIES IN REMOTE CONTROL TRANSMITTERS AND LIGHT BULBS), OR UNITS INSTALLED FOR NON-RESIDENTIAL USE. THIS LIMITED WARRANTY ALSO DOES NOT COVER ANY PROBLEMS CAUSED BY INTERFERENCE. You will be repaired or replaced with new...


