
Hardware Installation Guide
Page 39
...height. Carefully review the following figures to become familiar with Option 43 configured is designed to the Controller Filter List" section on page 2-10). • Enable automatic configuration of access points on page 2-10). Chapter 2 Mounting Instructions Cisco Confidential - ...power tap installation (Figure 2-3) OL-9977-05 Cisco Aironet 1500 Series Outdoor Mesh Access Point Hardware Installation Guide 2-7 As a general rule, range increases in proportion to switch trunk ports. • Ensure that your switch is configured with untagged access ports for additional ...
...height. Carefully review the following figures to become familiar with Option 43 configured is designed to the Controller Filter List" section on page 2-10). • Enable automatic configuration of access points on page 2-10). Chapter 2 Mounting Instructions Cisco Confidential - ...power tap installation (Figure 2-3) OL-9977-05 Cisco Aironet 1500 Series Outdoor Mesh Access Point Hardware Installation Guide 2-7 As a general rule, range increases in proportion to switch trunk ports. • Ensure that your switch is configured with untagged access ports for additional ...
Hardware Installation Guide
Page 48
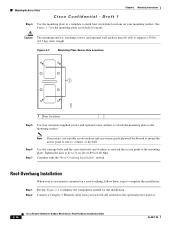
...necessary, use suitable screw anchors and an exterior-grade plywood backboard to mount the access point to the optional power injector. 2-16 Cisco Aironet 1500 Series Outdoor Mesh Access Point Hardware Installation Guide OL-9977-05 Continue with the "Roof-Overhang Installation" section. Step 2... the mounting plate as a template to mark four screw hole locations on a roof overhang, follow these steps to complete the installation: Step 1 Review Figure 2-1 to 8.02 Nm). Figure 2-7 Mounting Plate Screw Hole Locations 1 142684 1 Four locations Step 5 Use four customer-supplied screws and ...
...necessary, use suitable screw anchors and an exterior-grade plywood backboard to mount the access point to the optional power injector. 2-16 Cisco Aironet 1500 Series Outdoor Mesh Access Point Hardware Installation Guide OL-9977-05 Continue with the "Roof-Overhang Installation" section. Step 2... the mounting plate as a template to mark four screw hole locations on a roof overhang, follow these steps to complete the installation: Step 1 Review Figure 2-1 to 8.02 Nm). Figure 2-7 Mounting Plate Screw Hole Locations 1 142684 1 Four locations Step 5 Use four customer-supplied screws and ...