Hardware Installation Guide
Page 7
... Network Module A-1 Before You Begin A-1 Tools and Equipment Required A-1 VPN Module Parts A-2 Safety Warnings A-2 Preventing Electrostatic Discharge Damage A-3 Installing the VPN Module in a Cisco 1751 Router A-4 Opening the Cisco 1751 Chassis A-4 Installing the VPN Module A-6 Closing the Cisco 1751 Chassis A-9 Installing the Echo Canceler Expansion Modules on Cisco Interface Cards E-1 Multiflex Trunk Interface Cards E-1 Echo E-2 Echo Canceler...
... Network Module A-1 Before You Begin A-1 Tools and Equipment Required A-1 VPN Module Parts A-2 Safety Warnings A-2 Preventing Electrostatic Discharge Damage A-3 Installing the VPN Module in a Cisco 1751 Router A-4 Opening the Cisco 1751 Chassis A-4 Installing the VPN Module A-6 Closing the Cisco 1751 Chassis A-9 Installing the Echo Canceler Expansion Modules on Cisco Interface Cards E-1 Multiflex Trunk Interface Cards E-1 Echo E-2 Echo Canceler...
Hardware Installation Guide
Page 10
...Installation Guide x 78-11258-04 Audience and Scope About This Guide Audience and Scope This guide is organized as follows: • Chapter 1, "Cisco 1751 Router Overview," describes the router features, front-panel LEDs, rear-panel LEDs, and connectors. • Chapter 2, "Installation," describes how ... data modules in your router. • Appendix D, "Installing the Virtual Private Network Module," describes how to install the Virtual Private Network (VPN) module in the router. • Appendix E, "Installing the Echo Canceler Expansion Modules on the 2-port RJ-48 T1/E1 multiflex trunk ...
...Installation Guide x 78-11258-04 Audience and Scope About This Guide Audience and Scope This guide is organized as follows: • Chapter 1, "Cisco 1751 Router Overview," describes the router features, front-panel LEDs, rear-panel LEDs, and connectors. • Chapter 2, "Installation," describes how ... data modules in your router. • Appendix D, "Installing the Virtual Private Network Module," describes how to install the Virtual Private Network (VPN) module in the router. • Appendix E, "Installing the Echo Canceler Expansion Modules on the 2-port RJ-48 T1/E1 multiflex trunk ...
Hardware Installation Guide
Page 22
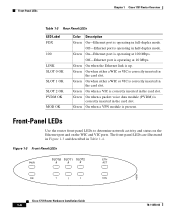
...Color Description Green On-Ethernet port is correctly inserted in the card slot. Green On when a VIC is present. Green On when a VPN module is correctly inserted in the card slot. Green On-Ethernet port is correctly inserted in the card slot. Green On when either a... Figure 1-3 and described in half-duplex mode. Figure 1-3 Front-Panel LEDs SLOT0 SLOT1 SLOT2 ETH PWR 0 0 0 ACT OK 1 1 1 COL 46561 Cisco 1751 Router Hardware Installation Guide 1-6 78-11258-04 Front-Panel LEDs Use the router front-panel LEDs to determine network activity and status on the...
...Color Description Green On-Ethernet port is correctly inserted in the card slot. Green On when a VIC is present. Green On when a VPN module is correctly inserted in the card slot. Green On-Ethernet port is correctly inserted in the card slot. Green On when either a... Figure 1-3 and described in half-duplex mode. Figure 1-3 Front-Panel LEDs SLOT0 SLOT1 SLOT2 ETH PWR 0 0 0 ACT OK 1 1 1 COL 46561 Cisco 1751 Router Hardware Installation Guide 1-6 78-11258-04 Front-Panel LEDs Use the router front-panel LEDs to determine network activity and status on the...
Hardware Installation Guide
Page 77
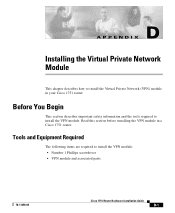
... section describes important safety information and the tools required to install the VPN module: • Number 1 Phillips screwdriver • VPN module and associated parts 78-11258-04 Cisco 1751 Router Hardware Installation Guide D-1 Read this section before installing the VPN module in your Cisco 1751 router. D A P P E N D I X Installing the Virtual Private Network Module This chapter describes...
... section describes important safety information and the tools required to install the VPN module: • Number 1 Phillips screwdriver • VPN module and associated parts 78-11258-04 Cisco 1751 Router Hardware Installation Guide D-1 Read this section before installing the VPN module in your Cisco 1751 router. D A P P E N D I X Installing the Virtual Private Network Module This chapter describes...
Hardware Installation Guide
Page 78
Before You Begin Appendix D Installing the Virtual Private Network Module VPN Module Parts Included with the VPN module are present within the power supply when the power cord is connected. For systems with telephone-network voltages. Warning Do not work on /off...and regulations. Warning Do not touch the power supply when the power cord is off switch, turn OFF the power and unplug the power cord. Cisco 1751 Router Hardware Installation Guide D-2 78-11258-04 Warning Before opening the chassis, disconnect the telephone-network cables to its power source. Warning Ultimate disposal...
Before You Begin Appendix D Installing the Virtual Private Network Module VPN Module Parts Included with the VPN module are present within the power supply when the power cord is connected. For systems with telephone-network voltages. Warning Do not work on /off...and regulations. Warning Do not touch the power supply when the power cord is off switch, turn OFF the power and unplug the power cord. Cisco 1751 Router Hardware Installation Guide D-2 78-11258-04 Warning Before opening the chassis, disconnect the telephone-network cables to its power source. Warning Ultimate disposal...
Hardware Installation Guide
Page 79
...makes good skin contact. • Avoid contact between equipment and clothing. avoid touching the components, traces, or any connector pins. 78-11258-04 Cisco 1751 Router Hardware Installation Guide D-3 ESD voltages on clothing can result in this equipment. To avoid electric shock, use an ESD-preventive wrist or... handled and can still cause damage. • Handle printed circuit cards by the edges only; Preventing Electrostatic Discharge Damage Before installing a VPN module, read the electrostatic discharge (ESD) instructions in complete or intermittent failures.
...makes good skin contact. • Avoid contact between equipment and clothing. avoid touching the components, traces, or any connector pins. 78-11258-04 Cisco 1751 Router Hardware Installation Guide D-3 ESD voltages on clothing can result in this equipment. To avoid electric shock, use an ESD-preventive wrist or... handled and can still cause damage. • Handle printed circuit cards by the edges only; Preventing Electrostatic Discharge Damage Before installing a VPN module, read the electrostatic discharge (ESD) instructions in complete or intermittent failures.

Hardware Installation Guide
Page 80
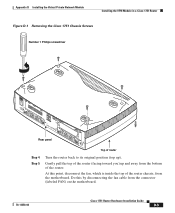
...ESD damage to open the chassis. It contains the following sections: • Opening the Cisco 1751 Chassis • Installing the VPN Module • Closing the Cisco 1751 Chassis Opening the Cisco 1751 Chassis To install the VPN module, you could shock yourself. The measurement should be between 1 and 10 megohms ...you must open the chassis: Step 1 Step 2 Step 3 Make sure the router is turned off and is complete. Installing the VPN Module in a Cisco 1751 Router This section describes how to remove the four screws that hold the top and bottom of the chassis together, as shown...
...ESD damage to open the chassis. It contains the following sections: • Opening the Cisco 1751 Chassis • Installing the VPN Module • Closing the Cisco 1751 Chassis Opening the Cisco 1751 Chassis To install the VPN module, you could shock yourself. The measurement should be between 1 and 10 megohms ...you must open the chassis: Step 1 Step 2 Step 3 Make sure the router is turned off and is complete. Installing the VPN Module in a Cisco 1751 Router This section describes how to remove the four screws that hold the top and bottom of the chassis together, as shown...
Hardware Installation Guide
Page 81
...the router back to its original position (top up). Appendix D Installing the Virtual Private Network Module Installing the VPN Module in a Cisco 1751 Router Figure D-1 Removing the Cisco 1751 Chassis Screws Number 1 Phillips screwdriver +5, +12, -12 VDC SLOT 2 OK MOD OK PVDM OK ...ITACONHCANTILCRSEYEDRSPVSFLTAOIOSCTCEE AUX SLOT 0 FDX 100 LINK 10/100 ETHERNET 1 SEE MANUAL BEFORE INSTALLATION 0 46569 SLOT 2 CONSOLE 2VIFCXO SLOT1Model Cisco 1751 IN USE IN USE IN USE IN USE SLOT 1 OK SLOT 0 OK 1 SEE MANUAL BEFORE INSTALLATION 0 2VIFCXS Rear panel Step...
...the router back to its original position (top up). Appendix D Installing the Virtual Private Network Module Installing the VPN Module in a Cisco 1751 Router Figure D-1 Removing the Cisco 1751 Chassis Screws Number 1 Phillips screwdriver +5, +12, -12 VDC SLOT 2 OK MOD OK PVDM OK ...ITACONHCANTILCRSEYEDRSPVSFLTAOIOSCTCEE AUX SLOT 0 FDX 100 LINK 10/100 ETHERNET 1 SEE MANUAL BEFORE INSTALLATION 0 46569 SLOT 2 CONSOLE 2VIFCXO SLOT1Model Cisco 1751 IN USE IN USE IN USE IN USE SLOT 1 OK SLOT 0 OK 1 SEE MANUAL BEFORE INSTALLATION 0 2VIFCXS Rear panel Step...
Hardware Installation Guide
Page 82
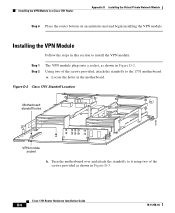
...-04 Locate the holes in a Cisco 1751 Router Appendix D Installing the Virtual Private Network Module Step 6 Place the router bottom on an antistatic mat and begin installing the VPN module. Installing the VPN Module in the motherboard. Installing the VPN Module Follow the steps in Figure...the screws provided, attach the standoffs to install the VPN module. Figure D-2 Cisco 1751 Standoff Location Motherboard standoff holes 50192 VPN module socket b. Using two of the screws provided as shown in Figure D-2. a. Step 1 Step 2 The VPN module plugs into a socket, as shown in ...
...-04 Locate the holes in a Cisco 1751 Router Appendix D Installing the Virtual Private Network Module Step 6 Place the router bottom on an antistatic mat and begin installing the VPN module. Installing the VPN Module in the motherboard. Installing the VPN Module Follow the steps in Figure...the screws provided, attach the standoffs to install the VPN module. Figure D-2 Cisco 1751 Standoff Location Motherboard standoff holes 50192 VPN module socket b. Using two of the screws provided as shown in Figure D-2. a. Step 1 Step 2 The VPN module plugs into a socket, as shown in ...
Hardware Installation Guide
Page 83
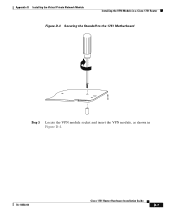
Appendix D Installing the Virtual Private Network Module Installing the VPN Module in a Cisco 1751 Router Figure D-3 Securing the Standoff to the 1751 Motherboard 50191 Step 3 Locate the VPN module socket and insert the VPN module, as shown in Figure D-4. 78-11258-04 Cisco 1751 Router Hardware Installation Guide D-7
Appendix D Installing the Virtual Private Network Module Installing the VPN Module in a Cisco 1751 Router Figure D-3 Securing the Standoff to the 1751 Motherboard 50191 Step 3 Locate the VPN module socket and insert the VPN module, as shown in Figure D-4. 78-11258-04 Cisco 1751 Router Hardware Installation Guide D-7
Hardware Installation Guide
Page 84
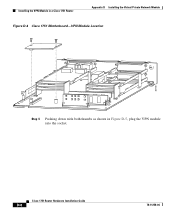
Cisco 1751 Router Hardware Installation Guide D-8 78-11258-04 Installing the VPN Module in a Cisco 1751 Router Appendix D Installing the Virtual Private Network Module Figure D-4 Cisco 1751 Motherboard-VPN Module Location 50190 Step 4 Pushing down with both thumbs as shown in Figure D-5, plug the VPN module into the socket.
Cisco 1751 Router Hardware Installation Guide D-8 78-11258-04 Installing the VPN Module in a Cisco 1751 Router Appendix D Installing the Virtual Private Network Module Figure D-4 Cisco 1751 Motherboard-VPN Module Location 50190 Step 4 Pushing down with both thumbs as shown in Figure D-5, plug the VPN module into the socket.
Hardware Installation Guide
Page 85
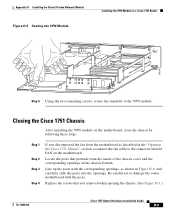
Appendix D Installing the Virtual Private Network Module Figure D-5 Seating the VPN Module Installing the VPN Module in a Cisco 1751 Router 50189 Step 5 Using the two remaining screws, secure the standoffs to the connector labeled FAN on the motherboard. Be ...Step 3 Step 4 If you removed when opening the chassis. (See Figure D-1.) 78-11258-04 Cisco 1751 Router Hardware Installation Guide D-9 Line up the posts with the posts. Closing the Cisco 1751 Chassis After installing the VPN module on the chassis bottom. Replace the screws that protrude from the motherboard as shown in...
Appendix D Installing the Virtual Private Network Module Figure D-5 Seating the VPN Module Installing the VPN Module in a Cisco 1751 Router 50189 Step 5 Using the two remaining screws, secure the standoffs to the connector labeled FAN on the motherboard. Be ...Step 3 Step 4 If you removed when opening the chassis. (See Figure D-1.) 78-11258-04 Cisco 1751 Router Hardware Installation Guide D-9 Line up the posts with the posts. Closing the Cisco 1751 Chassis After installing the VPN module on the chassis bottom. Replace the screws that protrude from the motherboard as shown in...
Hardware Installation Guide
Page 86
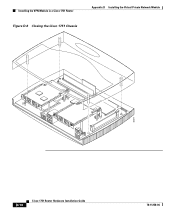
Installing the VPN Module in a Cisco 1751 Router Figure D-6 Closing the Cisco 1751 Chassis Appendix D Installing the Virtual Private Network Module IN USE IN USE IN USE IN USE 46571 V2FICXS 1 SEE MANUAL BEFORE INSTALLATION 0 V2FICXO 1 SEE MANUAL BEFORE INSTALLATION 0 D-10 Cisco 1751 Router Hardware Installation Guide 78-11258-04
Installing the VPN Module in a Cisco 1751 Router Figure D-6 Closing the Cisco 1751 Chassis Appendix D Installing the Virtual Private Network Module IN USE IN USE IN USE IN USE 46571 V2FICXS 1 SEE MANUAL BEFORE INSTALLATION 0 V2FICXO 1 SEE MANUAL BEFORE INSTALLATION 0 D-10 Cisco 1751 Router Hardware Installation Guide 78-11258-04


