
Quick Start Guide
Page 5
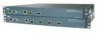
...green indicates service port link is established. The LED indicators are described in power supply slot 2. Solid green followed by the controller software. Blinking green indicates data transmission over the service port. Off indicates normal operation. Off indicates normal operation. Solid green indicates...wired network is not working properly, check the LEDs on distribution port # link. 5 After the controller resets, the LED behavior is defined by blinking green indicates controller is operational. This LED behavior may also be defined by the controller software.
...green indicates service port link is established. The LED indicators are described in power supply slot 2. Solid green followed by the controller software. Blinking green indicates data transmission over the service port. Off indicates normal operation. Off indicates normal operation. Solid green indicates...wired network is not working properly, check the LEDs on distribution port # link. 5 After the controller resets, the LED behavior is defined by blinking green indicates controller is operational. This LED behavior may also be defined by the controller software.
Quick Start Guide
Page 7
... - 4402: 1-2 for front panel GigE ports - 4404: 1-4 for downloading operating system software updates). The default administrative username and password are admin and... admin, respectively. • A service port interface IP address configuration protocol (none or DHCP). • A management interface (DS Port or network interface port) IP address. Initial System Configuration Information Obtain the following tools and information before you can install the controller: • Wireless LAN controller...
... - 4402: 1-2 for front panel GigE ports - 4404: 1-4 for downloading operating system software updates). The default administrative username and password are admin and... admin, respectively. • A service port interface IP address configuration protocol (none or DHCP). • A management interface (DS Port or network interface port) IP address. Initial System Configuration Information Obtain the following tools and information before you can install the controller: • Wireless LAN controller...
Quick Start Guide
Page 10
Configure the terminal emulation program for basic operations, you plug the controller into an AC power source, the bootup script initializes the system, verifies the hardware configuration, loads its microcode into memory, verifies its operating system software load, and initializes itself with its stored configurations. Before performing this test, you should have more...
Configure the terminal emulation program for basic operations, you plug the controller into an AC power source, the bootup script initializes the system, verifies the hardware configuration, loads its microcode into memory, verifies its operating system software load, and initializes itself with its stored configurations. Before performing this test, you should have more...

Quick Start Guide
Page 11
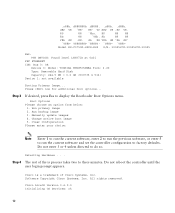
...-1244 Manufacturers ID: 30464 Board Maintenance Level: 00 Number of the controller code, press Esc immediately after the Model and S/N line appears. I2C: ready DTT: 1 is the PCI Arbiter. The bootup script displays operating system software initialization (code download and POST verification) and basic configuration as shown .... Note If you wish to run a previous release of supported APs: 24 In: serial Out: serial Err: serial 11 PVR=80200020 Cisco Systems INC., 4400 Wireless LAN Switch Board CPU: 833 MHz CCB: 333 MHz DDR: 166 MHz LBC: 41 MHz L1 D-cache 32KB, L1 I-cache 32KB enabled....
...-1244 Manufacturers ID: 30464 Board Maintenance Level: 00 Number of the controller code, press Esc immediately after the Model and S/N line appears. I2C: ready DTT: 1 is the PCI Arbiter. The bootup script displays operating system software initialization (code download and POST verification) and basic configuration as shown .... Note If you wish to run a previous release of supported APs: 24 In: serial Out: serial Err: serial 11 PVR=80200020 Cisco Systems INC., 4400 Wireless LAN Switch Board CPU: 833 MHz CCB: 333 MHz DDR: 166 MHz LBC: 41 MHz L1 D-cache 32KB, L1 I-cache 32KB enabled....
Quick Start Guide
Page 12
...Please enter your choice: Note Enter 1 to run the current software, enter 2 to run the previous software, or enter 5 to run the current software and set the controller configuration to display the Bootloader Boot Options menu. Software Copyright Cisco Systems, Inc. db 8D Y8b d8 `8b d8' `... Capacity: 244.5 MB = 0.2 GB (500736 x 512) Device 1: not available Booting Primary Image... Manually update images 4. Do not reboot the controller until the user login prompt appears. All rights reserved. Boot Options Please choose an option from below: 1. Detecting Hardware . . . d8P Y8...
...Please enter your choice: Note Enter 1 to run the current software, enter 2 to run the previous software, or enter 5 to run the current software and set the controller configuration to display the Bootloader Boot Options menu. Software Copyright Cisco Systems, Inc. db 8D Y8b d8 `8b d8' `... Capacity: 244.5 MB = 0.2 GB (500736 x 512) Device 1: not available Booting Primary Image... Manually update images 4. Do not reboot the controller until the user login prompt appears. All rights reserved. Boot Options Please choose an option from below: 1. Detecting Hardware . . . d8P Y8...

Quick Start Guide
Page 23
... see the monthly What's New in Cisco Product Documentation, which also lists all power to tighten the captive screws. b. b. Step 7 Step 8 Use a standard or Phillips screwdriver to the controller. Plug the power cords into the controller power supply unit. c. Turn the ... formal Warranty Statement, including the warranties and license agreements applicable to Cisco software, is equipped with two power supply units, insert both power cords. The Cisco Limited Warranty and Software License page from Cisco.com. 1. c. Do not overtighten. Follow these steps: a. Click...
... see the monthly What's New in Cisco Product Documentation, which also lists all power to tighten the captive screws. b. b. Step 7 Step 8 Use a standard or Phillips screwdriver to the controller. Plug the power cords into the controller power supply unit. c. Turn the ... formal Warranty Statement, including the warranties and license agreements applicable to Cisco software, is equipped with two power supply units, insert both power cords. The Cisco Limited Warranty and Software License page from Cisco.com. 1. c. Do not overtighten. Follow these steps: a. Click...