
Quick Start Guide
Page 2
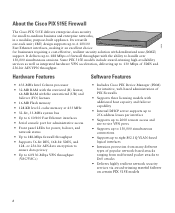
99550 About the Cisco PIX 515E Firewall The Cisco PIX 515E delivers enterprise-class security for small-to 130 Mbps of 3DES and 256-bit AES VPN throughput. Its versatile one-rack unit (1RU) design supports up to 6 10/100 POWER ACT NETWORK PIX Firewall SERIES Fast Ethernet interfaces, making it an ... in a modular, purpose-built appliance. Hardware Features Software Features • 433-MHz Intel Celeron processor • 32-MB RAM with the restricted (R) license; 64-MB RAM with demilitarized zone (DMZ) support. or 256-bit AES data encryption to ensure data privacy • Up to...
99550 About the Cisco PIX 515E Firewall The Cisco PIX 515E delivers enterprise-class security for small-to 130 Mbps of 3DES and 256-bit AES VPN throughput. Its versatile one-rack unit (1RU) design supports up to 6 10/100 POWER ACT NETWORK PIX Firewall SERIES Fast Ethernet interfaces, making it an ... in a modular, purpose-built appliance. Hardware Features Software Features • 433-MHz Intel Celeron processor • 32-MB RAM with the restricted (R) license; 64-MB RAM with demilitarized zone (DMZ) support. or 256-bit AES data encryption to ensure data privacy • Up to...

Quick Start Guide
Page 3
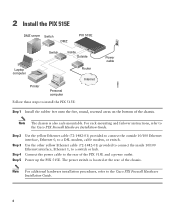
1 Check Items Included PC terminal adapter (74-0495-01) PIX-515E DO NOT INSTALL INTERFACE CARDS WITH POWER APPLIED 100 Mbps Link FDX 100 Mbps Link FDX 10/100 ETHERNET 1 10/100 ETHERNET 0 PIX 515E FAILOVER CONSOLE Blue console cable (72-1259-01) Yellow Ethernet cable (72-1482-01) Failover serial cable (74-1213-01) Power...
1 Check Items Included PC terminal adapter (74-0495-01) PIX-515E DO NOT INSTALL INTERFACE CARDS WITH POWER APPLIED 100 Mbps Link FDX 100 Mbps Link FDX 10/100 ETHERNET 1 10/100 ETHERNET 0 PIX 515E FAILOVER CONSOLE Blue console cable (72-1259-01) Yellow Ethernet cable (72-1482-01) Failover serial cable (74-1213-01) Power...
Quick Start Guide
Page 4
...1482-01) provided to connect the outside 10/100 Ethernet interface, Ethernet 0, to the rear of the PIX 515E and a power outlet. Power up the PIX 515E. For rack-mounting and failover instructions, refer to install the PIX 515E: Router Internet Power cable 97998 Step 1 Install the ...round, recessed areas on the bottom of the chassis. 2 Install the PIX 515E DMZ server Switch DMZ PIX 515E Switch Inside Outside Laptop computer Printer Personal computer Follow these steps to the Cisco PIX Firewall Hardware Installation Guide. The power switch is also rack-mountable. Note...
...1482-01) provided to connect the outside 10/100 Ethernet interface, Ethernet 0, to the rear of the PIX 515E and a power outlet. Power up the PIX 515E. For rack-mounting and failover instructions, refer to install the PIX 515E: Router Internet Power cable 97998 Step 1 Install the ...round, recessed areas on the bottom of the chassis. 2 Install the PIX 515E DMZ server Switch DMZ PIX 515E Switch Inside Outside Laptop computer Printer Personal computer Follow these steps to the Cisco PIX Firewall Hardware Installation Guide. The power switch is also rack-mountable. Note...

Quick Start Guide
Page 5
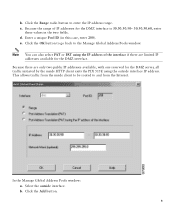
... to the outside network securely. Refer to the Cisco PIX Firewall Command Reference. To this address is included for configuring the PIX 515E. For more information about the icmp command, refer to the Cisco PIX Device Manager Installation Guide for simplified initial configuration of your inside interface of the PIX Firewall and the corresponding LINK LED on your...
... to the outside network securely. Refer to the Cisco PIX Firewall Command Reference. To this address is included for configuring the PIX 515E. For more information about the icmp command, refer to the Cisco PIX Device Manager Installation Guide for simplified initial configuration of your inside interface of the PIX Firewall and the corresponding LINK LED on your...

Quick Start Guide
Page 6
... and the outside networks are between private (inside) and public (outside interface (209.165.156.10) and one for two common PIX 515E configuration scenarios: hosting a web server on the DMZ interface are able to access the web server securely. There are accessed by users...while protecting private network resources that the range of the Startup Wizard window. 4 Example Configurations The following section provides configuration examples for the PIX 515E outside ) networks. The illustration below , an HTTP client (10.10.10.10) on a private DMZ network, it was located on...
... and the outside networks are between private (inside) and public (outside interface (209.165.156.10) and one for two common PIX 515E configuration scenarios: hosting a web server on the DMZ interface are able to access the web server securely. There are accessed by users...while protecting private network resources that the range of the Startup Wizard window. 4 Example Configurations The following section provides configuration examples for the PIX 515E outside ) networks. The illustration below , an HTTP client (10.10.10.10) on a private DMZ network, it was located on...

Quick Start Guide
Page 7
... IP pools efficiently and easily to facilitate secure communications between protected network clients and devices on the Internet. Similarly, an IP pool for the outside interface (209.165.156.10) is required for the inside HTTP client (10.10.10.10) to access the web server on the DMZ network (30... inside HTTP client to communicate with any device on the public network. Click the Configuration button at the top of the PDM window. 7 HTTP client PIX 515E Inside 10.10.10.0 Outside 209.165.156.10 10.10.10.10 DMZ 30.30.30.0 Internet HTTP client HTTP client 97999 Web server...
... IP pools efficiently and easily to facilitate secure communications between protected network clients and devices on the Internet. Similarly, an IP pool for the outside interface (209.165.156.10) is required for the inside HTTP client (10.10.10.10) to access the web server on the DMZ network (30... inside HTTP client to communicate with any device on the public network. Click the Configuration button at the top of the PDM window. 7 HTTP client PIX 515E Inside 10.10.10.0 Outside 209.165.156.10 10.10.10.10 DMZ 30.30.30.0 Internet HTTP client HTTP client 97999 Web server...

Quick Start Guide
Page 8
Note For most configurations, global pools are added to add or edit global address pools. Click the Add button. d. Select the dmz interface. Select dmz from the Interface drop-down menu. 8 Select the Translation Rules tab. In the Manage Global Address Pools window: a. b. Click the Manage Pools button and a new window appears, allowing you to the less secure, or public, interfaces. In the Add Global Pool Item window: a. c.
Note For most configurations, global pools are added to add or edit global address pools. Click the Add button. d. Select the dmz interface. Select dmz from the Interface drop-down menu. 8 Select the Translation Rules tab. In the Manage Global Address Pools window: a. b. Click the Manage Pools button and a new window appears, allowing you to the less secure, or public, interfaces. In the Add Global Pool Item window: a. c.
Quick Start Guide
Page 9
....30.60, enter these values in this case, enter 200). This allows traffic from the inside HTTP client exits the PIX 515E using the IP address of IP addresses for the DMZ interface. c. Enter a unique Pool ID (in the two fields. e. b. Click the Range radio button to the Manage Global Address ...Pools window. Because the range of the interface if there are only two public IP addresses available, with one reserved for the DMZ server, all traffic initiated by the inside client to be ...
....30.60, enter these values in this case, enter 200). This allows traffic from the inside HTTP client exits the PIX 515E using the IP address of IP addresses for the DMZ interface. c. Enter a unique Pool ID (in the two fields. e. b. Click the Range radio button to the Manage Global Address ...Pools window. Because the range of the interface if there are only two public IP addresses available, with one reserved for the DMZ server, all traffic initiated by the inside client to be ...

Quick Start Guide
Page 10
c. Once the pools are configured, confirm their values before applying the rules to the PIX 515E. When the new window comes up: a. Click the Port Address Translation (PAT) using the IP address of the interface radio button. Confirm the configurations: a. Click the Apply button in Step d above (200). b. Assign the same Pool ID for this pool as in the main window. 10 Click the OK button. Select outside from the Interface drop-down menu. b. d. Click the OK button.
c. Once the pools are configured, confirm their values before applying the rules to the PIX 515E. When the new window comes up: a. Click the Port Address Translation (PAT) using the IP address of the interface radio button. Confirm the configurations: a. Click the Apply button in Step d above (200). b. Assign the same Pool ID for this pool as in the main window. 10 Click the OK button. Select outside from the Interface drop-down menu. b. d. Click the OK button.

Quick Start Guide
Page 11
To configure NAT between the inside and the DMZ interfaces for small and medium businesses that have a limited number of the NAT function that the Translation Rules radio button is essential for the inside HTTP ... the following steps starting from being exposed on Private Networks Network Address Translation (NAT) replaces the source IP addresses of network traffic traversing between two PIX interfaces. Ensure that allows several hosts on the public network. This translation prevents the private address spaces from the main PDM page: a. Port Address Translation (PAT...
To configure NAT between the inside and the DMZ interfaces for small and medium businesses that have a limited number of the NAT function that the Translation Rules radio button is essential for the inside HTTP ... the following steps starting from being exposed on Private Networks Network Address Translation (NAT) replaces the source IP addresses of network traffic traversing between two PIX interfaces. Ensure that allows several hosts on the public network. This translation prevents the private address spaces from the main PDM page: a. Port Address Translation (PAT...

Quick Start Guide
Page 12
d. Select 200 from the Mask drop-down menu for the appropriate Pool ID. i. g. e. Click the OK button. 12 Note You can select the inside interface. f. Enter the IP address of the client (10.10.10.10). Click the Dynamic radio button in the gray area below the Manage Pools button and select Add. h. Right click in the Translate Address to section. c. Select 255.255.255.255 from the Address Pools drop-down menu. In the new window, select the inside host by clicking on which the translation is required. b. Select the DMZ interface on the Browse button.
d. Select 200 from the Mask drop-down menu for the appropriate Pool ID. i. g. e. Click the OK button. 12 Note You can select the inside interface. f. Enter the IP address of the client (10.10.10.10). Click the Dynamic radio button in the gray area below the Manage Pools button and select Add. h. Right click in the Translate Address to section. c. Select 255.255.255.255 from the Address Pools drop-down menu. In the new window, select the inside host by clicking on which the translation is required. b. Select the DMZ interface on the Browse button.

Quick Start Guide
Page 14
Click the Apply button to configure interface PAT between the inside and outside interface and the Dynamic address pool should display as shown below: 14 Click the OK button. Repeat the steps to configure the PIX Firewall. Check the displayed configuration for accuracy. j. The procedure remains the same, except the interface on which the translation is required is now the outside interfaces. l. The configurations should now indicate the interface PAT keywords. k. Click the Proceed button.
Click the Apply button to configure interface PAT between the inside and outside interface and the Dynamic address pool should display as shown below: 14 Click the OK button. Repeat the steps to configure the PIX Firewall. Check the displayed configuration for accuracy. j. The procedure remains the same, except the interface on which the translation is required is now the outside interfaces. l. The configurations should now indicate the interface PAT keywords. k. Click the Proceed button.

Quick Start Guide
Page 15
.... Click the Apply button. 15 Complete the following steps to map the DMZ IP address (30.30.30.30) statically to access it unaware of interfaces. The Advanced button allows you entered. h. d. Confirm the values that it appears to be located on the Internet, enabling outside HTTP clients to a public IP...
.... Click the Apply button. 15 Complete the following steps to map the DMZ IP address (30.30.30.30) statically to access it unaware of interfaces. The Advanced button allows you entered. h. d. Confirm the values that it appears to be located on the Internet, enabling outside HTTP clients to a public IP...
Quick Start Guide
Page 18
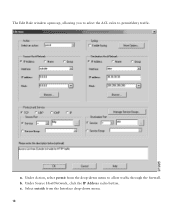
Under Source Host/Network, click the IP Address radio button. Select outside from the drop-down menu. 18 c. a. The Edit Rule window opens up, allowing you to select the ACL rules to allow traffic through the firewall. Under Action, select permit from the Interface drop-down menu to permit/deny traffic. b.
Under Source Host/Network, click the IP Address radio button. Select outside from the drop-down menu. 18 c. a. The Edit Rule window opens up, allowing you to select the ACL rules to allow traffic through the firewall. Under Action, select permit from the Interface drop-down menu to permit/deny traffic. b.
Quick Start Guide
Page 19
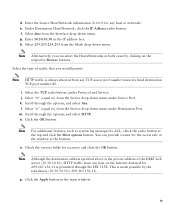
... Alternatively, you would permit: Note HTTP traffic is permitted through the PIX 515E. Select the type of the DMZ web server (30.30.30.30), HTTP traffic from the Mask drop-down menu under Source Port. Select "=" (equal to ) from the Interface drop-down menu under Protocol and Service. n. Click the Apply button...
... Alternatively, you would permit: Note HTTP traffic is permitted through the PIX 515E. Select the type of the DMZ web server (30.30.30.30), HTTP traffic from the Mask drop-down menu under Source Port. Select "=" (equal to ) from the Interface drop-down menu under Protocol and Service. n. Click the Apply button...

Quick Start Guide
Page 21
...shows an example VPN tunnel between two PIX 515E, and will be referenced in five simple steps. At the first VPN Wizard page, do the following steps. c. Click the Next button to configure PIX 1. PDM provides an easy-to-use ...VPN Wizard that can include PIX Firewalls, VPN concentrators, or other devices that support site-to-site IPSec connectivity. ... menu. Select outside from the Wizards drop-down menu as the enabled interface for the current VPN tunnel.
...shows an example VPN tunnel between two PIX 515E, and will be referenced in five simple steps. At the first VPN Wizard page, do the following steps. c. Click the Next button to configure PIX 1. PDM provides an easy-to-use ...VPN Wizard that can include PIX Firewalls, VPN concentrators, or other devices that support site-to-site IPSec connectivity. ... menu. Select outside from the Wizards drop-down menu as the enabled interface for the current VPN tunnel.

Quick Start Guide
Page 30
... commands by replacing the activation-key-four-tuple with the activation key obtained with the Intel 10/100 automatic speed-sensing network interface card. exit Exits configuration mode. You can use the activation key: Step 1 Step 2 Step 3 Step 4 Step 5 Step 6 ...Command Description show version Shows the PIX Firewall software version, hardware configuration, license key, and related uptime data. all interface ethernet1 auto Step 4 Step 5 ip address inside 192.168.1.1 255.255.255.0 dhcpd address 192.168.1.2-192...
... commands by replacing the activation-key-four-tuple with the activation key obtained with the Intel 10/100 automatic speed-sensing network interface card. exit Exits configuration mode. You can use the activation key: Step 1 Step 2 Step 3 Step 4 Step 5 Step 6 ...Command Description show version Shows the PIX Firewall software version, hardware configuration, license key, and related uptime data. all interface ethernet1 auto Step 4 Step 5 ip address inside 192.168.1.1 255.255.255.0 dhcpd address 192.168.1.2-192...

Quick Start Guide
Page 31
... to all hosts on the inside interface. Enables the DHCP daemon to begin listening for detailed command information and configuration examples: http://www.cisco.com/univercd/cc/td/doc/product/iaabu/pix/pix_sw/v_63/cmdref/index.htm The Cisco TAC website is available to the ...cisco.com/tac 31 Enables an HTTP server for PDM access to the DHCP client. Enables the PIX Firewall to a DHCP client. Takes a data sample and stores the sample data in seconds) granted to the PIX 515E. Command Step 6 dhcpd lease 3600 Step 7 dhcpd ping_timeout 750 Step 8 dhcpd auto_config outside interface...
... to all hosts on the inside interface. Enables the DHCP daemon to begin listening for detailed command information and configuration examples: http://www.cisco.com/univercd/cc/td/doc/product/iaabu/pix/pix_sw/v_63/cmdref/index.htm The Cisco TAC website is available to the ...cisco.com/tac 31 Enables an HTTP server for PDM access to the DHCP client. Enables the PIX Firewall to a DHCP client. Takes a data sample and stores the sample data in seconds) granted to the PIX 515E. Command Step 6 dhcpd lease 3600 Step 7 dhcpd ping_timeout 750 Step 8 dhcpd auto_config outside interface...

Quick Start Guide
Page 33
If a four-port FE card is used with the restricted license, only one network interface is activated.) Note If you have a second PIX 515E to the "Installing a Circuit Board in the PIX 515E" section in the auxiliary assembly on the left of the unit at the rear, the circuit...install the failover feature and cable as described in the "Installing Failover" section in the Cisco PIX Firewall Hardware Installation Guide. 33 PIX-515 Ethernet 5 Ethernet 3 Ethernet 2 Ethernet 4 Ethernet 2 DO NOT INSTALL INTERFACE CARDS WITH POWER APPLIED 100 Mbps Link FDX 100 Mbps Link FDX 10/100 ETHERNET 0/0...
If a four-port FE card is used with the restricted license, only one network interface is activated.) Note If you have a second PIX 515E to the "Installing a Circuit Board in the PIX 515E" section in the auxiliary assembly on the left of the unit at the rear, the circuit...install the failover feature and cable as described in the "Installing Failover" section in the Cisco PIX Firewall Hardware Installation Guide. 33 PIX-515 Ethernet 5 Ethernet 3 Ethernet 2 Ethernet 4 Ethernet 2 DO NOT INSTALL INTERFACE CARDS WITH POWER APPLIED 100 Mbps Link FDX 100 Mbps Link FDX 10/100 ETHERNET 0/0...

Quick Start Guide
Page 34
...off. Step 3 Connect the inside, outside, or perimeter network cables to start the PIX 515E. Starting from the switch at least one network interface is passing traffic. 34 The maximum number of allowed interfaces is configured. Do not power on when the unit is six with an unrestricted license.... Flashing On when at the rear to the interface ports. Check the LEDs POWER ACT NETWORK 97779 Table 1 PIX 515E Front Panel LEDs LED POWER ACT Color Green Green NETWORK Green State Description On On when the unit ...
...off. Step 3 Connect the inside, outside, or perimeter network cables to start the PIX 515E. Starting from the switch at least one network interface is passing traffic. 34 The maximum number of allowed interfaces is configured. Do not power on when the unit is six with an unrestricted license.... Flashing On when at the rear to the interface ports. Check the LEDs POWER ACT NETWORK 97779 Table 1 PIX 515E Front Panel LEDs LED POWER ACT Color Green Green NETWORK Green State Description On On when the unit ...