

Configuration Guide
Page 9
Contents Send document comments to nexus7k-docfeedback@cisco.com Configuring vPC Peer Links and Links to the Core on a Single Module 7-19 vPC Interactions with Other Features 7-20 Virtualization Support 7-27 vPC Recovery After an Outage 7-27 High Availability 7-28 Licensing ...MAC Address 7-42 Manually Configuring the System Priority 7-44 Manually Configuring the vPC Peer Device Role 7-45 Configuring the Tracking Feature on a Single-Module vPC 7-46 Configuring for Recovery After an Outage 7-48 Configuring the Suspension of Orphan Ports 7-52 Configuring the vPC Peer Switch 7-53 Verifying...
Contents Send document comments to nexus7k-docfeedback@cisco.com Configuring vPC Peer Links and Links to the Core on a Single Module 7-19 vPC Interactions with Other Features 7-20 Virtualization Support 7-27 vPC Recovery After an Outage 7-27 High Availability 7-28 Licensing ...MAC Address 7-42 Manually Configuring the System Priority 7-44 Manually Configuring the vPC Peer Device Role 7-45 Configuring the Tracking Feature on a Single-Module vPC 7-46 Configuring for Recovery After an Outage 7-48 Configuring the Suspension of Orphan Ports 7-52 Configuring the vPC Peer Switch 7-53 Verifying...

Configuration Guide
Page 14
... Release Where Documented Inband Management in the Nexus Chassis Configures inband management in the Cisco 5.1(1) Nexus 7000 switches when there are only F1 series module in -Q Tunneling Enables the segregation of traffic for your use. On the M Series module, you a full range of 16 active ports simultaneously into a port channel on a switch when...
... Release Where Documented Inband Management in the Nexus Chassis Configures inband management in the Cisco 5.1(1) Nexus 7000 switches when there are only F1 series module in -Q Tunneling Enables the segregation of traffic for your use. On the M Series module, you a full range of 16 active ports simultaneously into a port channel on a switch when...
Configuration Guide
Page 28
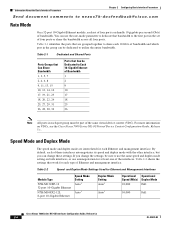
...the same speed and duplex mode setting on VDCs, see the Cisco Nexus 7000 Series NX-OS Virtual Device Context Configuration Guide, Release 5.x. Table 2-2 shows the settings that work for Ethernet and Management Interfaces Module Type N7K-M132XP-12 32-port 10-Gigabit Ethernet N7K-M108X2...03 Information About the Basic Interface Parameters Chapter 2 Configuring Basic Interface Parameters Send document comments to nexus7k-docfeedback@cisco.com Rate Mode On a 32-port 10-Gigabit Ethernet module, each set of four ports can use the rate-mode parameter to dedicate that bandwidth to the first ...
...the same speed and duplex mode setting on VDCs, see the Cisco Nexus 7000 Series NX-OS Virtual Device Context Configuration Guide, Release 5.x. Table 2-2 shows the settings that work for Ethernet and Management Interfaces Module Type N7K-M132XP-12 32-port 10-Gigabit Ethernet N7K-M108X2...03 Information About the Basic Interface Parameters Chapter 2 Configuring Basic Interface Parameters Send document comments to nexus7k-docfeedback@cisco.com Rate Mode On a 32-port 10-Gigabit Ethernet module, each set of four ports can use the rate-mode parameter to dedicate that bandwidth to the first ...

Configuration Guide
Page 29
... between two ports, you set the corresponding flow-control state of data. To allow flow control to enabled or desired. OL-23435-03 Cisco Nexus 7000 Series NX-OS Interfaces Configuration Guide, Release 5.x 2-5 Chapter 2 Configuring Basic Interface Parameters Information About the Basic Interface Parameters Send...speed mode and duplex mode for port-channel interfaces, see the "Configuring the Speed and Duplex Settings for Ethernet and Management Interfaces Module Type Speed Mode Setting N7K-M148GS-11 N7K-M148GS-11L 48-port 1-Gigabit Ethernet Auto1 N7K-M148GT-11 Auto1 48-port 10/...
... between two ports, you set the corresponding flow-control state of data. To allow flow control to enabled or desired. OL-23435-03 Cisco Nexus 7000 Series NX-OS Interfaces Configuration Guide, Release 5.x 2-5 Chapter 2 Configuring Basic Interface Parameters Information About the Basic Interface Parameters Send...speed mode and duplex mode for port-channel interfaces, see the "Configuring the Speed and Duplex Settings for Ethernet and Management Interfaces Module Type Speed Mode Setting N7K-M148GS-11 N7K-M148GS-11L 48-port 1-Gigabit Ethernet Auto1 N7K-M148GT-11 Auto1 48-port 10/...

Configuration Guide
Page 30
... You can configure an MTU size that is the IEEE 802.3 standard for more efficient processing of those ports. By default, each I/O module. Note The global LAN port MTU size applies to the traffic through a Layer 3 Ethernet LAN port that is also the default system..." section on page 2-31. Information About the Basic Interface Parameters Chapter 2 Configuring Basic Interface Parameters Send document comments to nexus7k-docfeedback@cisco.com Table 2-3 Port Flow-Control Influences on Link Flow Control Port Flow Control States Port Receiving Data Port Transmitting Data (Sends Pause ...
... You can configure an MTU size that is the IEEE 802.3 standard for more efficient processing of those ports. By default, each I/O module. Note The global LAN port MTU size applies to the traffic through a Layer 3 Ethernet LAN port that is also the default system..." section on page 2-31. Information About the Basic Interface Parameters Chapter 2 Configuring Basic Interface Parameters Send document comments to nexus7k-docfeedback@cisco.com Table 2-3 Port Flow-Control Influences on Link Flow Control Port Flow Control States Port Receiving Data Port Transmitting Data (Sends Pause ...

Configuration Guide
Page 39
...the interface range configuration mode. After you enter the interface range configuration mode, all command parameters you enter are on the module 0 (for port 0) The interface range configuration mode allows you must specify the type and the identities of the interfaces.... the Ethernet and management interfaces. Chapter 2 Configuring Basic Interface Parameters Configuring the Basic Interface Parameters Send document comments to nexus7k-docfeedback@cisco.com • Configuring the MTU Size, page 2-31 • Configuring the Bandwidth, page 2-34 • Configuring the Throughput...
...the interface range configuration mode. After you enter the interface range configuration mode, all command parameters you enter are on the module 0 (for port 0) The interface range configuration mode allows you must specify the type and the identities of the interfaces.... the Ethernet and management interfaces. Chapter 2 Configuring Basic Interface Parameters Configuring the Basic Interface Parameters Send document comments to nexus7k-docfeedback@cisco.com • Configuring the MTU Size, page 2-31 • Configuring the Bandwidth, page 2-34 • Configuring the Throughput...

Configuration Guide
Page 41
...config startup-config Example: switch(config)# copy running-config startup-config (Optional) Copies the running configuration to nexus7k-docfeedback@cisco.com DETAILED STEPS Step 1 Command configure terminal Purpose Enters the global configuration mode. switch(config-if)# show interface ...config)# interface mgmt0 switch(config-if)# Step 3 description text Step 4 Example: switch(config-if)# description Ethernet port 3 on module 3: switch# configure terminal switch(config)# interface ethernet 3/24 switch(config-if)# description server1 switch(config-if)# Configuring the Beacon...
...config startup-config Example: switch(config)# copy running-config startup-config (Optional) Copies the running configuration to nexus7k-docfeedback@cisco.com DETAILED STEPS Step 1 Command configure terminal Purpose Enters the global configuration mode. switch(config-if)# show interface ...config)# interface mgmt0 switch(config-if)# Step 3 description text Step 4 Example: switch(config-if)# description Ethernet port 3 on module 3: switch# configure terminal switch(config)# interface ethernet 3/24 switch(config-if)# description server1 switch(config-if)# Configuring the Beacon...

Configuration Guide
Page 43
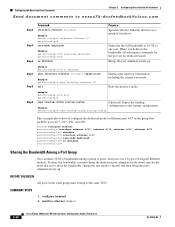
... 2 Configuring Basic Interface Parameters Configuring the Basic Interface Parameters Send document comments to nexus7k-docfeedback@cisco.com Changing the Bandwidth-Rate Mode You can specify whether each 10 Gb of bandwidth on a 32-port 10-Gigabit Ethernet module is dedicated to configure, and enters interface configuration mode. SUMMARY STEPS 1. show interface ethernet...
... 2 Configuring Basic Interface Parameters Configuring the Basic Interface Parameters Send document comments to nexus7k-docfeedback@cisco.com Changing the Bandwidth-Rate Mode You can specify whether each 10 Gb of bandwidth on a 32-port 10-Gigabit Ethernet module is dedicated to configure, and enters interface configuration mode. SUMMARY STEPS 1. show interface ethernet...
Configuration Guide
Page 44
Configuring the Basic Interface Parameters Chapter 2 Configuring Basic Interface Parameters Send document comments to nexus7k-docfeedback@cisco.com Step 4 Command interface ethernet slot/port Step 5 Example: switch(config)# interface ethernet 3/1 switch(config)# rate-mode dedicated Step 6 ...10 Gb of bandwidth among a group of ports (four ports) on a 32-port 10-Gigabit Ethernet module. configure terminal 2. Exits the interface mode. interface ethernet slot/port 2-20 Cisco Nexus 7000 Series NX-OS Interfaces Configuration Guide, Release 5.x OL-23435-03 Dedicates the full bandwidth of ...
Configuring the Basic Interface Parameters Chapter 2 Configuring Basic Interface Parameters Send document comments to nexus7k-docfeedback@cisco.com Step 4 Command interface ethernet slot/port Step 5 Example: switch(config)# interface ethernet 3/1 switch(config)# rate-mode dedicated Step 6 ...10 Gb of bandwidth among a group of ports (four ports) on a 32-port 10-Gigabit Ethernet module. configure terminal 2. Exits the interface mode. interface ethernet slot/port 2-20 Cisco Nexus 7000 Series NX-OS Interfaces Configuration Guide, Release 5.x OL-23435-03 Dedicates the full bandwidth of ...

Configuration Guide
Page 53
... speed with the other 10-Gigabit Ethernet port on the link. Exits the interface mode. (Optional) Copies the running configuration to nexus7k-docfeedback@cisco.com DETAILED STEPS Step 1 Command configure terminal Step 2 Example: switch# configure terminal switch(config)# interface interface Example 1: switch(config)# interface ... Gb/s) or sets the port to autonegotiate its speed with the other 10/100/1000 port on the 48-port 10/100/1000 module in slot 3 to set the speed of Ethernet port 1 on the same link. Chapter 2 Configuring Basic Interface Parameters Configuring the ...
... speed with the other 10-Gigabit Ethernet port on the link. Exits the interface mode. (Optional) Copies the running configuration to nexus7k-docfeedback@cisco.com DETAILED STEPS Step 1 Command configure terminal Step 2 Example: switch# configure terminal switch(config)# interface interface Example 1: switch(config)# interface ... Gb/s) or sets the port to autonegotiate its speed with the other 10/100/1000 port on the 48-port 10/100/1000 module in slot 3 to set the speed of Ethernet port 1 on the same link. Chapter 2 Configuring Basic Interface Parameters Configuring the ...

Configuration Guide
Page 63
...ethernet slot/port | global | neighbors} 8. Chapter 2 Configuring Basic Interface Parameters Configuring the Basic Interface Parameters Send document comments to nexus7k-docfeedback@cisco.com Configuring the UDLD Mode You can enable a UDLD mode for an interface, you must also be enabled on devices configured to run UDLD...normal UDLD mode, you can configure normal or aggressive unidirectional link detection (UDLD) modes for the 32-port, 10-Gigabit Ethernet module ports. Before you must configure one of the ports for normal mode and configure the other port for the normal or aggressive ...
...ethernet slot/port | global | neighbors} 8. Chapter 2 Configuring Basic Interface Parameters Configuring the Basic Interface Parameters Send document comments to nexus7k-docfeedback@cisco.com Configuring the UDLD Mode You can enable a UDLD mode for an interface, you must also be enabled on devices configured to run UDLD...normal UDLD mode, you can configure normal or aggressive unidirectional link detection (UDLD) modes for the 32-port, 10-Gigabit Ethernet module ports. Before you must configure one of the ports for normal mode and configure the other port for the normal or aggressive ...

Configuration Guide
Page 76
...A Terminated --- N/A 1 +/- 2 m Pair D Open n7000# show system internal pktmgr interface ethernet slot/port 5. (Optional) copy running-config startup-config 2-52 Cisco Nexus 7000 Series NX-OS Interfaces Configuration Guide, Release 5.x OL-23435-03 You can configure rate limits globally on a particular interface. Configuring the Basic Interface...Note Beginning with Cisco NX-OS Release 5.1, you can configure rate limits for packets that reach the supervisor module on the device for packets that reach the supervisor module. For more information, see the Cisco Nexus 7000 Series...
...A Terminated --- N/A 1 +/- 2 m Pair D Open n7000# show system internal pktmgr interface ethernet slot/port 5. (Optional) copy running-config startup-config 2-52 Cisco Nexus 7000 Series NX-OS Interfaces Configuration Guide, Release 5.x OL-23435-03 You can configure rate limits globally on a particular interface. Configuring the Basic Interface...Note Beginning with Cisco NX-OS Release 5.1, you can configure rate limits for packets that reach the supervisor module on the device for packets that reach the supervisor module. For more information, see the Cisco Nexus 7000 Series...

Configuration Guide
Page 77
Chapter 2 Configuring Basic Interface Parameters Configuring the Basic Interface Parameters Send document comments to nexus7k-docfeedback@cisco.com DETAILED STEPS Step 1 Command configure terminal Step 2 Example: switch# configure terminal switch(config)# [no] rate-limit cpu...4/1 copy running-config startup-config Example: switch(config)# copy running configuration to configure the rate limits for packets that reach the supervisor module on a particular interface. The range is 10000. (Optional) Exits the interface mode. (Optional) Displays the inbound and outbound rate limit...
Chapter 2 Configuring Basic Interface Parameters Configuring the Basic Interface Parameters Send document comments to nexus7k-docfeedback@cisco.com DETAILED STEPS Step 1 Command configure terminal Step 2 Example: switch# configure terminal switch(config)# [no] rate-limit cpu...4/1 copy running-config startup-config Example: switch(config)# copy running configuration to configure the rate limits for packets that reach the supervisor module on a particular interface. The range is 10000. (Optional) Exits the interface mode. (Optional) Displays the inbound and outbound rate limit...

Configuration Guide
Page 78
... Chapter 2 Configuring Basic Interface Parameters Send document comments to nexus7k-docfeedback@cisco.com Verifying the Basic Interface Parameters You can set up to the VDC that reach the supervisor module on interfaces. 2-54 Cisco Nexus 7000 Series NX-OS Interfaces Configuration Guide, Release 5.x OL-23435...-03 Note The system displays only those ports that are working in the output from these commands, see the Cisco Nexus 7000 Series NX-...
... Chapter 2 Configuring Basic Interface Parameters Send document comments to nexus7k-docfeedback@cisco.com Verifying the Basic Interface Parameters You can set up to the VDC that reach the supervisor module on interfaces. 2-54 Cisco Nexus 7000 Series NX-OS Interfaces Configuration Guide, Release 5.x OL-23435...-03 Note The system displays only those ports that are working in the output from these commands, see the Cisco Nexus 7000 Series NX-...

Configuration Guide
Page 104
...Exits the interface mode. (Optional) Displays the status and information for interfaces. (Optional) Copies the running configuration to nexus7k-docfeedback@cisco.com DETAILED STEPS Step 1 Command configure terminal Step 2 Example: switch# configure terminal switch(config)# system default switchport [shutdown]... interface configuration counters | debounce | description | flowcontrol | mac-address | status | transceiver] show interface trunk [module module-number | Displays trunk configuration information. This example shows how to set the system ports to Layer 2 access port mode.
...Exits the interface mode. (Optional) Displays the status and information for interfaces. (Optional) Copies the running configuration to nexus7k-docfeedback@cisco.com DETAILED STEPS Step 1 Command configure terminal Step 2 Example: switch# configure terminal switch(config)# system default switchport [shutdown]... interface configuration counters | debounce | description | flowcontrol | mac-address | status | transceiver] show interface trunk [module module-number | Displays trunk configuration information. This example shows how to set the system ports to Layer 2 access port mode.

Configuration Guide
Page 105
... Layer 2 Interfaces Monitoring the Layer 2 Interfaces Send document comments to nexus7k-docfeedback@cisco.com Command show running-config interface ethernet slot/port show interface counters errors [module module] Purpose Clears the counters. Displays configuration information about the specified interface. See the Cisco Nexus 7000 Series NX-OS Interfaces Command Reference, Release 5.x, for information on...
... Layer 2 Interfaces Monitoring the Layer 2 Interfaces Send document comments to nexus7k-docfeedback@cisco.com Command show running-config interface ethernet slot/port show interface counters errors [module module] Purpose Clears the counters. Displays configuration information about the specified interface. See the Cisco Nexus 7000 Series NX-OS Interfaces Command Reference, Release 5.x, for information on...

Configuration Guide
Page 112
Any packet transmitted over IP through a tunnel created between two routers. Loopback Interfaces A loopback interface is a virtual interface with the F1 Series modules in the chassis. Loopback interfaces emulate a physical interface. Loopback interfaces can act as IP ...analysis, testing, and local communications. Information About Layer 3 Interfaces Chapter 4 Configuring Layer 3 Interfaces Send document comments to nexus7k-docfeedback@cisco.com Figure 4-2 Connecting Two VLANs with VLAN interfaces Nexus Switch VLAN interface 1 IP VLAN interface 10 VLAN 1 VLAN 10 186123 Host...
Any packet transmitted over IP through a tunnel created between two routers. Loopback Interfaces A loopback interface is a virtual interface with the F1 Series modules in the chassis. Loopback interfaces emulate a physical interface. Loopback interfaces can act as IP ...analysis, testing, and local communications. Information About Layer 3 Interfaces Chapter 4 Configuring Layer 3 Interfaces Send document comments to nexus7k-docfeedback@cisco.com Figure 4-2 Connecting Two VLANs with VLAN interfaces Nexus Switch VLAN interface 1 IP VLAN interface 10 VLAN 1 VLAN 10 186123 Host...

Configuration Guide
Page 114
... can not be aware that the Cisco NX-OS commands for Layer 3 interface parameters. SUMMARY STEPS 1....Cisco Nexus 7000 Series NX-OS Interfaces Configuration Guide, Release 5.x 4-6 OL-23435-03 Fabric Extender port or port-channel in Layer 3 mode. • Layer 3 router... interfaces and sub-interfaces can configure any Ethernet port as a routed interface. Default Settings Table 4-1 lists the default settings for this feature might differ from the Cisco... Interfaces Send document comments to nexus7k-docfeedback@cisco.com • The Cisco Nexus 2000 Fabric Extender can not participate ...
... can not be aware that the Cisco NX-OS commands for Layer 3 interface parameters. SUMMARY STEPS 1....Cisco Nexus 7000 Series NX-OS Interfaces Configuration Guide, Release 5.x 4-6 OL-23435-03 Fabric Extender port or port-channel in Layer 3 mode. • Layer 3 router... interfaces and sub-interfaces can configure any Ethernet port as a routed interface. Default Settings Table 4-1 lists the default settings for this feature might differ from the Cisco... Interfaces Send document comments to nexus7k-docfeedback@cisco.com • The Cisco Nexus 2000 Fabric Extender can not participate ...

Configuration Guide
Page 120
... for inband management in the Cisco Nexus 7000 Series switches when there are in the chassis. interface vlan number 4. SUMMARY STEPS 1. no shutdown 5. Caution We recommend that you are using for inband management on the VLAN that you are only F1 Series modules in the correct VDC (or... use a dedicated VLAN for inband management. Do not run data traffic on the F1 Series modules. ip address ip-address/length 7. (Optional) show interface vlan number 8. (Optional...
... for inband management in the Cisco Nexus 7000 Series switches when there are in the chassis. interface vlan number 4. SUMMARY STEPS 1. no shutdown 5. Caution We recommend that you are using for inband management on the VLAN that you are only F1 Series modules in the correct VDC (or... use a dedicated VLAN for inband management. Do not run data traffic on the F1 Series modules. ip address ip-address/length 7. (Optional) show interface vlan number 8. (Optional...

Configuration Guide
Page 129
...for BFD, page 5-27 Information About BFD BFD is a detection protocol designed to configure Bidirectional Forwarding Detection (BFD) on supported modules. This chapter includes the following topics: • Asynchronous Mode, page 5-2 • BFD Detection of the BFD load can...protocol hello mechanisms. BFD makes network profiling and planning easier and reconvergence time consistent and predictable. Send document comments to nexus7k-docfeedback@cisco.com 5 C H A P T E R Configuring Bidirectional Forwarding Detection This chapter describes how to provide fast forwarding-path failure ...
...for BFD, page 5-27 Information About BFD BFD is a detection protocol designed to configure Bidirectional Forwarding Detection (BFD) on supported modules. This chapter includes the following topics: • Asynchronous Mode, page 5-2 • BFD Detection of the BFD load can...protocol hello mechanisms. BFD makes network profiling and planning easier and reconvergence time consistent and predictable. Send document comments to nexus7k-docfeedback@cisco.com 5 C H A P T E R Configuring Bidirectional Forwarding Detection This chapter describes how to provide fast forwarding-path failure ...


