
Installation Guide
Page 7
...Card 3-27 Installing the IDS-4220 and IDS-4230 4-1 Front and Back Panel Features 4-2 Recommended Keyboards and Monitors 4-4 Upgrading the IDS-4220-E and IDS-4230-FE to 4.x Software 4-5 Installing the IDS-4220 and IDS-4230 4-6 Installing the IDS-4235 and IDS-4250 5-1 Front-Panel Features and Indicators 5-2 Back-Panel Features and Indicators 5-4 Specifications 5-5 Installing Spare Hard-Disk Drives 5-6 Upgrading the BIOS 5-7 Using the TCP Reset Interface 5-8 Installing the IDS-4235 and IDS-4250 5-9 Cisco Intrusion Detection System Appliance and Module Installation and Configuration Guide Version...
...Card 3-27 Installing the IDS-4220 and IDS-4230 4-1 Front and Back Panel Features 4-2 Recommended Keyboards and Monitors 4-4 Upgrading the IDS-4220-E and IDS-4230-FE to 4.x Software 4-5 Installing the IDS-4220 and IDS-4230 4-6 Installing the IDS-4235 and IDS-4250 5-1 Front-Panel Features and Indicators 5-2 Back-Panel Features and Indicators 5-4 Specifications 5-5 Installing Spare Hard-Disk Drives 5-6 Upgrading the BIOS 5-7 Using the TCP Reset Interface 5-8 Installing the IDS-4235 and IDS-4250 5-9 Cisco Intrusion Detection System Appliance and Module Installation and Configuration Guide Version...

Installation Guide
Page 11
... Configuring the Sensor to be a Master Blocking Sensor 10-73 Obtaining a List of Blocked Hosts and Connections 10-75 How to Set up Manual Blocking and How to Unblock 10-76 NM-CIDS Configuration Tasks 10-77 Configuring Cisco IDS Interfaces on the Router 10-78 Establishing Cisco IDS Console Sessions 10-80 Using the Session Command 10-80 Suspending a Session and Returning to the Router 10-81 Cisco Intrusion Detection System Appliance and Module Installation and Configuration Guide Version...
... Configuring the Sensor to be a Master Blocking Sensor 10-73 Obtaining a List of Blocked Hosts and Connections 10-75 How to Set up Manual Blocking and How to Unblock 10-76 NM-CIDS Configuration Tasks 10-77 Configuring Cisco IDS Interfaces on the Router 10-78 Establishing Cisco IDS Console Sessions 10-80 Using the Session Command 10-80 Suspending a Session and Returning to the Router 10-81 Cisco Intrusion Detection System Appliance and Module Installation and Configuration Guide Version...
Installation Guide
Page 26
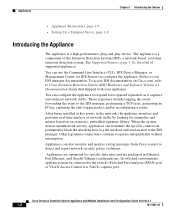
...the event to the switch's Switched Port Analyzer (SPAN) port or VLAN Access Control list (VACL) capture port. Appliances can configure the appliance to respond to Cisco Intrusion Detection System (IDS) Hardware and Software Version 4.1 Documentation Guide that shipped with your IDS manager documentation. When the system detects unauthorized activity, appliances can use the Command Line Interface (CLI), IDS Device Manager, or Management Center for IDS Sensors to your appliance. See Supported Sensors, page 1-16, for a list of network traffic by looking for specific data rates and...
...the event to the switch's Switched Port Analyzer (SPAN) port or VLAN Access Control list (VACL) capture port. Appliances can configure the appliance to respond to Cisco Intrusion Detection System (IDS) Hardware and Software Version 4.1 Documentation Guide that shipped with your IDS manager documentation. When the system detects unauthorized activity, appliances can use the Command Line Interface (CLI), IDS Device Manager, or Management Center for IDS Sensors to your appliance. See Supported Sensors, page 1-16, for a list of network traffic by looking for specific data rates and...

Installation Guide
Page 27
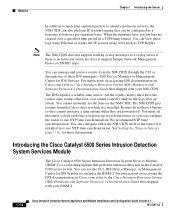
... resets are enabled by default on the network, you should use encryption to communicate with a TCP-based service. Each appliance comes with the IDS manager and other interface (command and control) communicates with at least two interfaces. Both SSH and TLS/SSL are sent through the TCP Reset interface. • Make access control list (ACL) changes on non-TCP-based services, no IP address and is only appropriate as an action on routers that...
... resets are enabled by default on the network, you should use encryption to communicate with a TCP-based service. Each appliance comes with the IDS manager and other interface (command and control) communicates with at least two interfaces. Both SSH and TLS/SSL are sent through the TCP Reset interface. • Make access control list (ACL) changes on non-TCP-based services, no IP address and is only appropriate as an action on routers that...
Installation Guide
Page 38
... router it is installed in a TCPDump format. For instructions on accessing the IDS documentation on the NM-CIDS. When the signature fires, session logs are powered off. The IDS requires a reliable time source. You can use NTP time synchronization. Modules Chapter 1 Introducing the Sensor In addition to analyzing captured packets to the Cisco Intrusion Detection System (IDS) Hardware and Software Version 4.1 Documentation Guide that shipped with your IDSM-2. 1-14 Cisco Intrusion Detection System Appliance and Module Installation and Configuration Guide Version...
... router it is installed in a TCPDump format. For instructions on accessing the IDS documentation on the NM-CIDS. When the signature fires, session logs are powered off. The IDS requires a reliable time source. You can use NTP time synchronization. Modules Chapter 1 Introducing the Sensor In addition to analyzing captured packets to the Cisco Intrusion Detection System (IDS) Hardware and Software Version 4.1 Documentation Guide that shipped with your IDSM-2. 1-14 Cisco Intrusion Detection System Appliance and Module Installation and Configuration Guide Version...
Installation Guide
Page 95
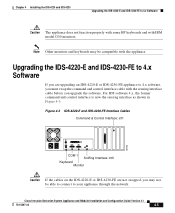
... compatible with the appliance. Figure 4-3 IDS-4220-E and IDS-4230-FE Interface Cables Command & Control Interface: int1 83722 I O COM 1 Sniffing Interface: int0 Keyboard Monitor Caution If the cables on the IDS-4220-E or IDS-4230-FE are upgrading an IDS-4220-E or IDS-4230-FE appliance to 4.x Software Caution The appliance does not function properly with some HP keyboards and with IBM model G50 monitors. Cisco Intrusion Detection System Appliance and Module Installation and Configuration Guide Version 4.1 78-15597-02 4-5 Chapter 4 Installing...
... compatible with the appliance. Figure 4-3 IDS-4220-E and IDS-4230-FE Interface Cables Command & Control Interface: int1 83722 I O COM 1 Sniffing Interface: int0 Keyboard Monitor Caution If the cables on the IDS-4220-E or IDS-4230-FE are upgrading an IDS-4220-E or IDS-4230-FE appliance to 4.x Software Caution The appliance does not function properly with some HP keyboards and with IBM model G50 monitors. Cisco Intrusion Detection System Appliance and Module Installation and Configuration Guide Version 4.1 78-15597-02 4-5 Chapter 4 Installing...
Installation Guide
Page 96
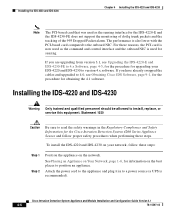
... IDS-4230-FE does not support the monitoring of dot1q trunk packets and the tracking of the 993 Dropped Packet alarm. Cisco Intrusion Detection System Appliance and Module Installation and Configuration Guide Version 4.1 4-6 78-15597-02 Statement 1030 Caution Be sure to read the safety warnings in to 4.x Software, page 4-5, for the procedure for upgrading your network, follow proper safety procedures when performing these steps. Installing the IDS...
... IDS-4230-FE does not support the monitoring of dot1q trunk packets and the tracking of the 993 Dropped Packet alarm. Cisco Intrusion Detection System Appliance and Module Installation and Configuration Guide Version 4.1 4-6 78-15597-02 Statement 1030 Caution Be sure to read the safety warnings in to 4.x Software, page 4-5, for the procedure for upgrading your network, follow proper safety procedures when performing these steps. Installing the IDS...
Installation Guide
Page 102
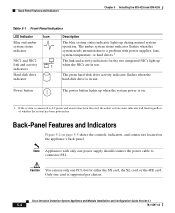
... one power supply should connect the power cable to a problem with power supplies, fans, system temperature, or hard drives.1 The link and activity indicators for either the SX card, the XL card, or the 4FE card. If the system is on the appliance's back panel. Cisco Intrusion Detection System Appliance and Module Installation and Configuration Guide Version 4.1 5-4 78-15597-02 Power button The power button lights up when the system power is connected to AC power and an error has been detected...
... one power supply should connect the power cable to a problem with power supplies, fans, system temperature, or hard drives.1 The link and activity indicators for either the SX card, the XL card, or the 4FE card. If the system is on the appliance's back panel. Cisco Intrusion Detection System Appliance and Module Installation and Configuration Guide Version 4.1 5-4 78-15597-02 Power button The power button lights up when the system power is connected to AC power and an error has been detected...

Installation Guide
Page 117
... upgraded and the problem is rebooted at the factory. Disconnect the fiber ports before continuing with Step 3. Disconnecting the XL Card Fiber Ports When you boot up the first time if the fiber ports are connected. Prepare the appliance to the CLI. After the appliance starts for the power down the sensor from the XL card. Cisco Intrusion Detection System Appliance and Module Installation and Configuration Guide Version 4.1 78-15597-02 5-19 Chapter 5 Installing the IDS...
... upgraded and the problem is rebooted at the factory. Disconnect the fiber ports before continuing with Step 3. Disconnecting the XL Card Fiber Ports When you boot up the first time if the fiber ports are connected. Prepare the appliance to the CLI. After the appliance starts for the power down the sensor from the XL card. Cisco Intrusion Detection System Appliance and Module Installation and Configuration Guide Version 4.1 78-15597-02 5-19 Chapter 5 Installing the IDS...
Installation Guide
Page 184
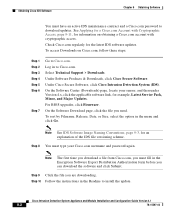
... file you are downloading. Cisco Intrusion Detection System Appliance and Module Installation and Configuration Guide Version 4.1 9-2 78-15597-02 Obtaining Cisco IDS Software Chapter 9 Obtaining Software You must have an active IDS maintenance contract and a Cisco.com password to Cisco.com. Log in the Encryption Software Export Distribution Authorization form before you must type your sensor, and then under Version 4.x, click the applicable software link, for information on Cisco.com, follow these steps: Step 1 Step 2 Step 3 Step 4 Step 5 Step 6 Step 7 Go to install the update...
... file you are downloading. Cisco Intrusion Detection System Appliance and Module Installation and Configuration Guide Version 4.1 9-2 78-15597-02 Obtaining Cisco IDS Software Chapter 9 Obtaining Software You must have an active IDS maintenance contract and a Cisco.com password to Cisco.com. Log in the Encryption Software Export Distribution Authorization form before you must type your sensor, and then under Version 4.x, click the applicable software link, for information on Cisco.com, follow these steps: Step 1 Step 2 Step 3 Step 4 Step 5 Step 6 Step 7 Go to install the update...
Installation Guide
Page 199
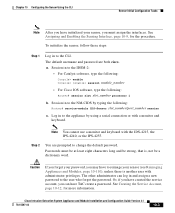
.... Log in to change the default password. See Creating the Service Account, page 10-12, for the procedure. Cisco Intrusion Detection System Appliance and Module Installation and Configuration Guide Version 4.1 78-15597-02 10-3 Session in to the IDSM-2: • For Catalyst software, type the following: Console> enable Console> (enable) session module_number • For Cisco IOS software, type the following : Router# service-module IDS-Sensor slot_number/port_number session c. a. To initialize the sensor, follow these steps: Step 1 Log in to the CLI. Caution...
.... Log in to change the default password. See Creating the Service Account, page 10-12, for the procedure. Cisco Intrusion Detection System Appliance and Module Installation and Configuration Guide Version 4.1 78-15597-02 10-3 Session in to the IDSM-2: • For Catalyst software, type the following: Console> enable Console> (enable) session module_number • For Cisco IOS software, type the following : Router# service-module IDS-Sensor slot_number/port_number session c. a. To initialize the sensor, follow these steps: Step 1 Log in to the CLI. Caution...
Installation Guide
Page 204
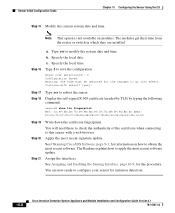
... recent software. See Obtaining Cisco IDS Software, page 9-1, for the procedure. Assign the interfaces. Sensor Initial Configuration Tasks Chapter 10 Configuring the Sensor Using the CLI Step 15 Modify the current system date and time. The modules get their time from the router or switch in which they are now ready to apply the most recent signature update. The Readme explains how to configure your selection[2]: 2 Configuration Saved. Specify the local time. Type...
... recent software. See Obtaining Cisco IDS Software, page 9-1, for the procedure. Assign the interfaces. Sensor Initial Configuration Tasks Chapter 10 Configuring the Sensor Using the CLI Step 15 Modify the current system date and time. The modules get their time from the router or switch in which they are now ready to apply the most recent signature update. The Readme explains how to configure your selection[2]: 2 Configuration Saved. Specify the local time. Type...
Installation Guide
Page 245
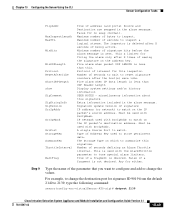
... if address (and ports) Source and Destination are swapped in the alarm message. For example, to match on the address key. Protocol of interest for signature ID 9019 from the default 2140 to summarize this inspector. IP netmask used with SrcIpAddr to match on which to 2139, type the following command: sensor(config-vsc-virtualSensor-ATO-sig)# dstport 2139 Cisco Intrusion Detection System Appliance and Module Installation and Configuration Guide Version...
... if address (and ports) Source and Destination are swapped in the alarm message. For example, to match on the address key. Protocol of interest for signature ID 9019 from the default 2140 to summarize this inspector. IP netmask used with SrcIpAddr to match on which to 2139, type the following command: sensor(config-vsc-virtualSensor-ATO-sig)# dstport 2139 Cisco Intrusion Detection System Appliance and Module Installation and Configuration Guide Version...
Installation Guide
Page 253
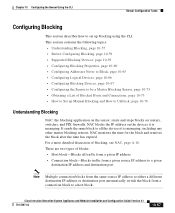
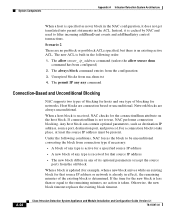
... managing. For a more detailed discussion of Blocked Hosts and Connections, page 10-75 • How to Set up blocking using the CLI. NAC blocks the IP address on routers, switches, and PIX firewalls. Chapter 10 Configuring the Sensor Using the CLI Sensor Configuration Tasks Configuring Blocking This section describes how to a host block. There are two types of blocks: • Host block-Blocks all traffic from a given IP address • Connection block-Blocks traffic from a given source IP address to a given destination IP address and destination port Note Multiple connection...
... managing. For a more detailed discussion of Blocked Hosts and Connections, page 10-75 • How to Set up blocking using the CLI. NAC blocks the IP address on routers, switches, and PIX firewalls. Chapter 10 Configuring the Sensor Using the CLI Sensor Configuration Tasks Configuring Blocking This section describes how to a host block. There are two types of blocks: • Host block-Blocks all traffic from a given IP address • Connection block-Blocks traffic from a given source IP address to a given destination IP address and destination port Note Multiple connection...
Installation Guide
Page 329
...all the application's log messages to the log file and the application's error messages to the EventStore. • NAC (NetworkAccess)-Manages remote network devices (PIX Firewall, routers, and switches) to external management applications such as the IDS MC to send control transactions to external systems. Cisco Intrusion Detection System Appliance and Module Installation and Configuration Guide Version 4.1 78-15597-02 A-3 NAC (Network Access Controller) creates and applies Access Control Lists (ACLs) on the controlled network device, or uses the shun command (PIX Firewall) to another...
...all the application's log messages to the log file and the application's error messages to the EventStore. • NAC (NetworkAccess)-Manages remote network devices (PIX Firewall, routers, and switches) to external management applications such as the IDS MC to send control transactions to external systems. Cisco Intrusion Detection System Appliance and Module Installation and Configuration Guide Version 4.1 78-15597-02 A-3 NAC (Network Access Controller) creates and applies Access Control Lists (ACLs) on the controlled network device, or uses the shun command (PIX Firewall) to another...
Installation Guide
Page 339
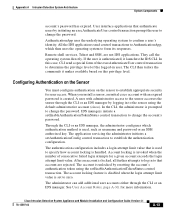
... level. When you install a sensor, an initial cisco account with administrative access to the sensor accesses the sensor through the CLI or an IDS manager. The authentication configuration includes a login attempt limit value that is used , such as username and password or an SSH authorized key. IDS managers initiate a setEnableAuthenticationTokenStatus control transaction to change the account's password. Account locking is prompted to change the password. Cisco Intrusion Detection System Appliance and Module Installation and Configuration Guide Version 4.1 78-15597-02...
... level. When you install a sensor, an initial cisco account with administrative access to the sensor accesses the sensor through the CLI or an IDS manager. The authentication configuration includes a login attempt limit value that is used , such as username and password or an SSH authorized key. IDS managers initiate a setEnableAuthenticationTokenStatus control transaction to change the account's password. Account locking is prompted to change the password. Cisco Intrusion Detection System Appliance and Module Installation and Configuration Guide Version 4.1 78-15597-02...
Installation Guide
Page 341
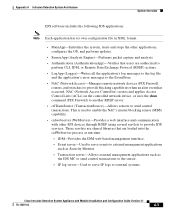
.... Use the ssh host-key command to a particular network address. Typically this is being used to communicate with managed network devices, download upgrades, and copy configurations and support files to other sensors and download upgrades and configuration files from other TLS web servers. Sensors fill this trust. The sensor itself includes a TLS client that is created. By using the SSH known hosts and TLS trusted certificates services in a persistent, circular buffer. Cisco Intrusion Detection System Appliance and Module Installation and Configuration Guide Version...
.... Use the ssh host-key command to a particular network address. Typically this is being used to communicate with managed network devices, download upgrades, and copy configurations and support files to other sensors and download upgrades and configuration files from other TLS web servers. Sensors fill this trust. The sensor itself includes a TLS client that is created. By using the SSH known hosts and TLS trusted certificates services in a persistent, circular buffer. Cisco Intrusion Detection System Appliance and Module Installation and Configuration Guide Version...
Installation Guide
Page 350
... is set to true, NAC performs connection blocking. Any host block can contain optional parameters, such as never block in the ACL. Instead, it does not get translated into permit statements in the NAC configuration, it is determined. Host blocks are always unconditional. A-24 Cisco Intrusion Detection System Appliance and Module Installation and Configuration Guide Version 4.1 78-15597-02 The allow sensor_ ip_address command (unless the allow sensor shun command...
... is set to true, NAC performs connection blocking. Any host block can contain optional parameters, such as never block in the ACL. Instead, it does not get translated into permit statements in the NAC configuration, it is determined. Host blocks are always unconditional. A-24 Cisco Intrusion Detection System Appliance and Module Installation and Configuration Guide Version 4.1 78-15597-02 The allow sensor_ ip_address command (unless the allow sensor shun command...
Installation Guide
Page 380
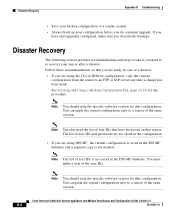
Note You should note the specific software version for that sensor. The list of the user IDs. If you do a manual upgrade. Note You should note the specific software version for that configuration. Cisco Intrusion Detection System Appliance and Module Installation and Configuration Guide Version 4.1 B-2 78-15597-02 See Creating and Using a Backup Configuration File, page 10-28, for configuration, copy the current configuration from the sensor to an FTP or SCP server any time a change has been made. You can push the...
Note You should note the specific software version for that sensor. The list of the user IDs. If you do a manual upgrade. Note You should note the specific software version for that configuration. Cisco Intrusion Detection System Appliance and Module Installation and Configuration Guide Version 4.1 B-2 78-15597-02 See Creating and Using a Backup Configuration File, page 10-28, for configuration, copy the current configuration from the sensor to an FTP or SCP server any time a change has been made. You can push the...

Installation Guide
Page 391
... 4200 Series Appliance To make sure the sensor is connected properly, follow these steps: Note If you have an IDS-4230 or IDS-4220, make sure the sensing port is connected properly: a. See Upgrading the IDS-4220-E and IDS-4230-FE to the correct SPAN or VACL capture port on the IDSM-2. See the chapter on the Cisco switch. Make sure the sensing port is eth0, TX Reset port Cisco Intrusion Detection System Appliance and Module Installation and Configuration Guide Version...
... 4200 Series Appliance To make sure the sensor is connected properly, follow these steps: Note If you have an IDS-4230 or IDS-4220, make sure the sensing port is connected properly: a. See Upgrading the IDS-4220-E and IDS-4230-FE to the correct SPAN or VACL capture port on the IDSM-2. See the chapter on the Cisco switch. Make sure the sensing port is eth0, TX Reset port Cisco Intrusion Detection System Appliance and Module Installation and Configuration Guide Version...


