
User Guide
Page 1
SRW224 ® A Division of Cisco Systems, Inc. 24 Port 10/100 + 2-Port Gigabit Switch with WebView User Guide WIRED Model No.
SRW224 ® A Division of Cisco Systems, Inc. 24 Port 10/100 + 2-Port Gigabit Switch with WebView User Guide WIRED Model No.

User Guide
Page 2
... is a note of interest and is a registered trademark or trademark of Cisco Systems, Inc. All rights reserved. How to Use this Guide Your guide to the 24-port 10/100 + 2-Port Gigabit Switch with WebView has been designed to make understanding networking with a reminder about ...Sample Figure Description Figure numbers and descriptions can also be found in the U.S. Copyright © 2004 Cisco Systems, Inc. Look for technical terms that could damage your property or the Switch. srw224-UG-61220ABW This exclamation point means there is a caution or warning and is provided with...
... is a note of interest and is a registered trademark or trademark of Cisco Systems, Inc. All rights reserved. How to Use this Guide Your guide to the 24-port 10/100 + 2-Port Gigabit Switch with WebView has been designed to make understanding networking with a reminder about ...Sample Figure Description Figure numbers and descriptions can also be found in the U.S. Copyright © 2004 Cisco Systems, Inc. Look for technical terms that could damage your property or the Switch. srw224-UG-61220ABW This exclamation point means there is a caution or warning and is provided with...

User Guide
Page 3
...this Guide? 2 Chapter 2: Getting to Know the Switch 4 The Front Panel 4 The Back Panel 5 The Side Panel 5 Chapter 3: Connecting the Switch 7 Overview 7 Pre-Installation Considerations 8 Hardware Installation 8 Placement Options 9 Uplinking the Switch 10 Chapter 4: Configuration using the Console Interface 11 ...Overview 11 Configuring the HyperTerminal Application 11 Configuring the Switch through the Console Interface 12 Chapter 5: Configuring the Switch through the Web Utility 19 Overview 19 System Tab 20 Port Tab 22 Trunk...
...this Guide? 2 Chapter 2: Getting to Know the Switch 4 The Front Panel 4 The Back Panel 5 The Side Panel 5 Chapter 3: Connecting the Switch 7 Overview 7 Pre-Installation Considerations 8 Hardware Installation 8 Placement Options 9 Uplinking the Switch 10 Chapter 4: Configuration using the Console Interface 11 ...Overview 11 Configuring the HyperTerminal Application 11 Configuring the Switch through the Console Interface 12 Chapter 5: Configuring the Switch through the Web Utility 19 Overview 19 System Tab 20 Port Tab 22 Trunk...

User Guide
Page 4
24-port 10/100 + 2-Port Gigabit Switch with WebView Appendix E: Specifications 38 Appendix F: Warranty Information 39 Appendix G: Regulatory Information 40 Appendix H: Contact Information 41
24-port 10/100 + 2-Port Gigabit Switch with WebView Appendix E: Specifications 38 Appendix F: Warranty Information 39 Appendix G: Regulatory Information 40 Appendix H: Contact Information 41

User Guide
Page 5
... Typical Network Configuration 7 Figure 3-2: Attaching the Rubber Feet to the Bottom of the Switch 9 Figure 3-3: Attaching the Brackets to the Switch (Front Panel Forward) 9 Figure 3-4: Mounting the Switch in A Rack 10 Figure 4-1: Finding HyperTerminal 11 Figure 4-2: Connection Description 11 Figure ...To 11 Figure 4-4: COM1 Properties 12 Figure 4-5: Login 12 Figure 4-6: Switch Main Menu 12 Figure 4-7: System Configuration 13 Figure 4-8: System Information 13 Figure 4-9: Advanced Switch Configuration 14 Figure 4-10: Password Setting 14 Figure 4-11: IP Configuration ...
... Typical Network Configuration 7 Figure 3-2: Attaching the Rubber Feet to the Bottom of the Switch 9 Figure 3-3: Attaching the Brackets to the Switch (Front Panel Forward) 9 Figure 3-4: Mounting the Switch in A Rack 10 Figure 4-1: Finding HyperTerminal 11 Figure 4-2: Connection Description 11 Figure ...To 11 Figure 4-4: COM1 Properties 12 Figure 4-5: Login 12 Figure 4-6: Switch Main Menu 12 Figure 4-7: System Configuration 13 Figure 4-8: System Information 13 Figure 4-9: Advanced Switch Configuration 14 Figure 4-10: Password Setting 14 Figure 4-11: IP Configuration ...

User Guide
Page 6
24-port 10/100 + 2-Port Gigabit Switch with WebView Figure 5-1: Addrees Field 19 Figure 5-2: Password Screen 19 Figure 5-3: Welcome Screen 19 Figure 5-4: System Tab-System Information 20 Figure 5-5: System Tab-MISC Configuration ...
24-port 10/100 + 2-Port Gigabit Switch with WebView Figure 5-1: Addrees Field 19 Figure 5-2: Password Screen 19 Figure 5-3: Welcome Screen 19 Figure 5-4: System Tab-System Information 20 Figure 5-5: System Tab-MISC Configuration ...

User Guide
Page 7
... in this User Guide to help you connect the Switch, set it up, and configure it easy to your different networks. All ports have automatic MDI/MDI-X crossover detection. Each port independently and automatically negotiates for connecting to manage the 26 VLANs and up your high-speed clients... from bogging down in half- And the mini GBIC port allows future expansion to run in lower-speed traffic and fast store-and-forward switching prevents damaged packets from being passed ...
... in this User Guide to help you connect the Switch, set it up, and configure it easy to your different networks. All ports have automatic MDI/MDI-X crossover detection. Each port independently and automatically negotiates for connecting to manage the 26 VLANs and up your high-speed clients... from bogging down in half- And the mini GBIC port allows future expansion to run in lower-speed traffic and fast store-and-forward switching prevents damaged packets from being passed ...

User Guide
Page 8
...2 What's in this User Guide. • Chapter 2: Getting to Know the Switch This chapter describes the physical features of the Switch. • Chapter 3: Connecting the Switch This chapter describes how to configure the Switch usign the Web Utility. • Appendix A: Fast Ethernet and Gigabit Ethernet This ... up and using the Console Interface This chapter instructs you on how to use the Switch's console interface for configuring the Switch. • Chapter 5: Configuring the Switch through the Web Utility This chapter shows you can use Windows Help for instructions about networking...
...2 What's in this User Guide. • Chapter 2: Getting to Know the Switch This chapter describes the physical features of the Switch. • Chapter 3: Connecting the Switch This chapter describes how to configure the Switch usign the Web Utility. • Appendix A: Fast Ethernet and Gigabit Ethernet This ... up and using the Console Interface This chapter instructs you on how to use the Switch's console interface for configuring the Switch. • Chapter 5: Configuring the Switch through the Web Utility This chapter shows you can use Windows Help for instructions about networking...

User Guide
Page 9
24-port 10/100 + 2-Port Gigabit Switch with WebView • Appendix H: Contact Information This appendix provides contact information for a variety of Linksys resources, including Technical Support. Chapter 1: Introduction 3 What's in this Guide?
24-port 10/100 + 2-Port Gigabit Switch with WebView • Appendix H: Contact Information This appendix provides contact information for a variety of Linksys resources, including Technical Support. Chapter 1: Introduction 3 What's in this Guide?

User Guide
Page 10
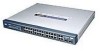
...The LAN (Local Area Network) ports connect to Know the Switch 4 The Front Panel Chapter 2: Getting to Ethernet network devices, such as other switches or routers. Gigabit1 /Gigabit2 / The switch is being supplied to indicate that the Switch is actively sending or receiving data over that is being used...equipped with two Gigabit ports and a mini GBIC port that port. Console The Console port is working in Gigabit mode. Blinks to the Switch. Figure 2-1: Front Panel LEDs System Green. Lights to indicate the port is where you connect a serial cable from a PC's serial port...
...The LAN (Local Area Network) ports connect to Know the Switch 4 The Front Panel Chapter 2: Getting to Ethernet network devices, such as other switches or routers. Gigabit1 /Gigabit2 / The switch is being supplied to indicate that the Switch is actively sending or receiving data over that is being used...equipped with two Gigabit ports and a mini GBIC port that port. Console The Console port is working in Gigabit mode. Blinks to the Switch. Figure 2-1: Front Panel LEDs System Green. Lights to indicate the port is where you connect a serial cable from a PC's serial port...

User Guide
Page 11
Chapter 2: Getting to Know the Switch 5 The Back Panel The Side Panel The security slot is located on the back panel of the Switch. Figure 2-3: Side Panel Security Slot The security slot is where you can attach a lock so the Switch will connect the power cord. 24-port 10/100 + 2-Port Gigabit Switch with WebView The Back Panel The power port is located on a side panel. Power Figure 2-2: Back Panel The Power port is where you will be protected from theft.
Chapter 2: Getting to Know the Switch 5 The Back Panel The Side Panel The security slot is located on the back panel of the Switch. Figure 2-3: Side Panel Security Slot The security slot is where you can attach a lock so the Switch will connect the power cord. 24-port 10/100 + 2-Port Gigabit Switch with WebView The Back Panel The power port is located on a side panel. Power Figure 2-2: Back Panel The Power port is where you will be protected from theft.

User Guide
Page 12
...to the Fiber Optic Cabling section. For more information on fiber optic cabling, refer to manage the Switch using the provided serial cable. for the installation of the device connected to Know the Switch 6 The Side Panel To establish a Gigabit Ethernet connection, you will need to high-... Auto-sensing technology enables each port to automatically detect the speed of one miniGBIC port and two Gigabit Ethernet ports that work with the Switch. Chapter 2: Getting to it (10Mbps or 100Mbps), and adjust its speed and duplex accordingly. These ports provide links to install an ...
...to the Fiber Optic Cabling section. For more information on fiber optic cabling, refer to manage the Switch using the provided serial cable. for the installation of the device connected to Know the Switch 6 The Side Panel To establish a Gigabit Ethernet connection, you will need to high-... Auto-sensing technology enables each port to automatically detect the speed of one miniGBIC port and two Gigabit Ethernet ports that work with the Switch. Chapter 2: Getting to it (10Mbps or 100Mbps), and adjust its speed and duplex accordingly. These ports provide links to install an ...

User Guide
Page 13
... typical network configuration, see the application diagram shown in the following table: Maximum Cabling Distances. Table 1: Maximum Cabling Distances From Switch Hub Switch or Hub To Switch or Hub Hub Computer Maximum Distance 100 meters (328 feet) 5 meters (16,4 feet) 100 meters (328 feet) *A ...hub refers to 100 meters (328 feet) Chapter 3: Connecting the Switch 7 Overview Figure 3-1: Typical Network Configuration When you connect your network devices, make sure you don't exceed the maximum cabling distances, which are...
... typical network configuration, see the application diagram shown in the following table: Maximum Cabling Distances. Table 1: Maximum Cabling Distances From Switch Hub Switch or Hub To Switch or Hub Hub Computer Maximum Distance 100 meters (328 feet) 5 meters (16,4 feet) 100 meters (328 feet) *A ...hub refers to 100 meters (328 feet) Chapter 3: Connecting the Switch 7 Overview Figure 3-1: Typical Network Configuration When you connect your network devices, make sure you don't exceed the maximum cabling distances, which are...

User Guide
Page 14
.... • Keep cabling away from sources of electrical noise, power lines, and fluorescent lighting fixtures. • Position the Switch away from water and moisture sources. • To ensure adequate air flow around the Switch, be sent and received simultaneously, doubling a port's potential data throughput. Connect the other end to one of two...
.... • Keep cabling away from sources of electrical noise, power lines, and fluorescent lighting fixtures. • Position the Switch away from water and moisture sources. • To ensure adequate air flow around the Switch, be sent and received simultaneously, doubling a port's potential data throughput. Connect the other end to one of two...

User Guide
Page 15
... mentioned in specifications as you are two ways to physically install the Switch, either set the Switch on the devices connected to connect additional devices. 5. Repeat steps 2 and 3 to the Switch. Place the Switch on the Switch. Attach the rubber feet to use the power cord that is supplied... WebView 4. If you are using the Gigabit port, connect a Category 5e Ethernet network cable to the Gigabit port on the bottom of the Switch and then reconnect it. Each active port's corresponding LED will light up on a desktop near an AC power source. 3. See Figure 3-1. ...
... mentioned in specifications as you are two ways to physically install the Switch, either set the Switch on the devices connected to connect additional devices. 5. Repeat steps 2 and 3 to the Switch. Place the Switch on the Switch. Attach the rubber feet to use the power cord that is supplied... WebView 4. If you are using the Gigabit port, connect a Category 5e Ethernet network cable to the Gigabit port on the bottom of the Switch and then reconnect it. Each active port's corresponding LED will light up on a desktop near an AC power source. 3. See Figure 3-1. ...

User Guide
Page 16
...brackets are attached to the Switch, use suitable screws to securely attach the brackets to set up the Switch. Connect the Switch to network devices according to the opposite side. 5. Uplinking the Switch To uplink the Switch, connect one end of the Switch with the supplied screws. ... follow the instructions described below. 1. Figure 3-4: Mounting the Switch in any standard 19-inch rack as shown in Figure 3-3. 6. Chapter 3: Connecting the Switch 10 Uplinking the Switch Follow the same steps to one of the Switch. 3. Attach a rack-mount bracket to attach the other ...
...brackets are attached to the Switch, use suitable screws to securely attach the brackets to set up the Switch. Connect the Switch to network devices according to the opposite side. 5. Uplinking the Switch To uplink the Switch, connect one end of the Switch with the supplied screws. ... follow the instructions described below. 1. Figure 3-4: Mounting the Switch in any standard 19-inch rack as shown in Figure 3-3. 6. Chapter 3: Connecting the Switch 10 Uplinking the Switch Follow the same steps to one of the Switch. 3. Attach a rack-mount bracket to attach the other ...

User Guide
Page 17
... this menu. Click OK. 3. Select a port to configure the HyperTerminal application. 24-port 10/100 + 2-Port Gigabit Switch with the switch. Before you can easily manage your network from the screens through the console port. In the example below, the name of the options listed in this ...connection. Select an icon for basic switch configuration. Bits per Second: 19200 Databits: 8 Parity: None Stop bits: 1 Flow control: None Figure...
... this menu. Click OK. 3. Select a port to configure the HyperTerminal application. 24-port 10/100 + 2-Port Gigabit Switch with the switch. Before you can easily manage your network from the screens through the console port. In the example below, the name of the options listed in this ...connection. Select an icon for basic switch configuration. Bits per Second: 19200 Databits: 8 Parity: None Stop bits: 1 Flow control: None Figure...

User Guide
Page 18
... strokes. You can set a new password later from the Password Setting screen. Each menu has several options, which are listed vertically. Switch Main Menu The Switch Main Menu screen displays four menu choices: System Configuration, Port Status, Port Configuration, and Logout. A highlight in each menu lets you... up or down, use the default username admin, and leave the password blank. 24-port 10/100 + 2-Port Gigabit Switch with WebView Configuring the Switch through the Console Interface Login When you wish to the previous selection; Click the Login button. Note that the bottom of ...
... strokes. You can set a new password later from the Password Setting screen. Each menu has several options, which are listed vertically. Switch Main Menu The Switch Main Menu screen displays four menu choices: System Configuration, Port Status, Port Configuration, and Logout. A highlight in each menu lets you... up or down, use the default username admin, and leave the password blank. 24-port 10/100 + 2-Port Gigabit Switch with WebView Configuring the Switch through the Console Interface Login When you wish to the previous selection; Click the Login button. Note that the bottom of ...

User Guide
Page 19
Advanced Switch Configuration 3. IP Configuration 5. Firmware Update 6. System Information In System Information, you can check the Firmware Version. Password Setting 4. Reboot System 0. Return to Main Menu. Restore System Default Setting 7. System Information 2. 24-port 10/100 + 2-Port Gigabit Switch with WebView System Configuration System Configuration displays: 1. Chapter 4: Configuration using the Console Interface Configuring the Switch through the Console Interface Figure 4-7: System Configuration Figure 4-8: System Information 13
Advanced Switch Configuration 3. IP Configuration 5. Firmware Update 6. System Information In System Information, you can check the Firmware Version. Password Setting 4. Reboot System 0. Return to Main Menu. Restore System Default Setting 7. System Information 2. 24-port 10/100 + 2-Port Gigabit Switch with WebView System Configuration System Configuration displays: 1. Chapter 4: Configuration using the Console Interface Configuring the Switch through the Console Interface Figure 4-7: System Configuration Figure 4-8: System Information 13

User Guide
Page 20
.... To disable this feature, select Disable. The Web interface will be a maximum of six characters, using the Console Interface 14 Configuring the Switch through 9. Select Off to disable the feature. Select from a choice of too many broadcasts from being sent at the same time. The ... network to prevent a storm of two algorithm types used to check the MAC address table to make advanced switch configuration settings. 24-port 10/100 + 2-Port Gigabit Switch with what port or destination on the network. This allows you to determine which MAC address is correct....
.... To disable this feature, select Disable. The Web interface will be a maximum of six characters, using the Console Interface 14 Configuring the Switch through 9. Select Off to disable the feature. Select from a choice of too many broadcasts from being sent at the same time. The ... network to prevent a storm of two algorithm types used to check the MAC address table to make advanced switch configuration settings. 24-port 10/100 + 2-Port Gigabit Switch with what port or destination on the network. This allows you to determine which MAC address is correct....


