User Guide
Page 3
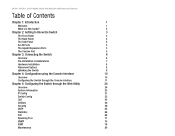
... Port 5 Chapter 3: Connecting the Switch 6 Overview 6 Pre-Installation Considerations 7 Hardware Installation 8 Placement Options 8 Uplinking the Switch 9 Chapter 4: Configuration using the Console Interface 10 Overview 10 Configuring the Switch through the Console Interface 11 Chapter 5: Configuring the Switch through the Web Utility 24 Overview 24 System Information 25 IP Config 31 Switch Config 33...
... Port 5 Chapter 3: Connecting the Switch 6 Overview 6 Pre-Installation Considerations 7 Hardware Installation 8 Placement Options 8 Uplinking the Switch 9 Chapter 4: Configuration using the Console Interface 10 Overview 10 Configuring the Switch through the Console Interface 11 Chapter 5: Configuring the Switch through the Web Utility 24 Overview 24 System Information 25 IP Config 31 Switch Config 33...

User Guide
Page 5
...Webview and Power over Ethernet List of Figures Figure 2-1: Front Panel 3 Figure 2-2: Back Panel 4 Figure 2-3: Side Panel 4 Figure 3-1: Typical Network Configuration 6 Figure 3-2: Attaching the Switch's Rubber Feet 8 Figure 3-3: Attaching Brackets to the Switch 9 Figure 3-4: Mounting the Switch 9 Figure 4-1: Finding... 4-13: User and Password Settings 15 Figure 4-14: IP Configuration 16 Figure 4-15: IP Address Configuration Screen 16 Figure 4-16: HTTP 16 Figure 4-17: SNMP 17 Figure 4-18: Network Configuration/PING 17 Figure 4-19: File Management 18 Figure 4-20: ...
...Webview and Power over Ethernet List of Figures Figure 2-1: Front Panel 3 Figure 2-2: Back Panel 4 Figure 2-3: Side Panel 4 Figure 3-1: Typical Network Configuration 6 Figure 3-2: Attaching the Switch's Rubber Feet 8 Figure 3-3: Attaching Brackets to the Switch 9 Figure 3-4: Mounting the Switch 9 Figure 4-1: Finding... 4-13: User and Password Settings 15 Figure 4-14: IP Configuration 16 Figure 4-15: IP Address Configuration Screen 16 Figure 4-16: HTTP 16 Figure 4-17: SNMP 17 Figure 4-18: Network Configuration/PING 17 Figure 4-19: File Management 18 Figure 4-20: ...

User Guide
Page 7
... Power over Ethernet Figure 5-28: QoS - IP Port 47 Figure 5-30: QoS - IP Precedence/DSCP 46 Figure 5-29: QoS - Setting Rules 54 Figure 5-38: DiffServ - Configuration 73 Information 72 Figure 5-60: Spanning Tree - Adding/Editing Standard ACL 57 Figure 5-41: ACL Conf - RMON Statistics 67 Figure 5-55: PoE - Adding a Policy 53...
... Power over Ethernet Figure 5-28: QoS - IP Port 47 Figure 5-30: QoS - IP Precedence/DSCP 46 Figure 5-29: QoS - Setting Rules 54 Figure 5-38: DiffServ - Configuration 73 Information 72 Figure 5-60: Spanning Tree - Adding/Editing Standard ACL 57 Figure 5-41: ACL Conf - RMON Statistics 67 Figure 5-55: PoE - Adding a Policy 53...

User Guide
Page 9
... MDI/MDI-X crossover detection. Use the instructions in half- These instructions should be all you connect the Switch, set it up, and configure it easy to manage the 128 VLANs and up your workstations, while the two integrated 10/100/1000BaseTX ports connect to each device. The... wire speed switching for your highspeed clients from the connected device. And the mini-GBIC ports allow you to non-PoE devices. Once configured to your network can detect connected 802.3af-compliant network devices, such as IP phones or wireless access points, and automatically supply the required...
... MDI/MDI-X crossover detection. Use the instructions in half- These instructions should be all you connect the Switch, set it up, and configure it easy to manage the 128 VLANs and up your workstations, while the two integrated 10/100/1000BaseTX ports connect to each device. The... wire speed switching for your highspeed clients from the connected device. And the mini-GBIC ports allow you to non-PoE devices. Once configured to your network can detect connected 802.3af-compliant network devices, such as IP phones or wireless access points, and automatically supply the required...
User Guide
Page 10
...describes the physical features of the Switch. • Chapter 3: Connecting the Switch This chapter describes how to connect the Switch. • Chapter 4: Configuration using the Console Interface This chapter instructs you on how to use the Switch's console interface for... configuring the Switch. • Chapter 5: Configuring the Switch through the Web Utility This chapter shows you how to configure the Switch using the Web Utility. • Appendix A: Fast Ethernet and Gigabit Ethernet This ...
...describes the physical features of the Switch. • Chapter 3: Connecting the Switch This chapter describes how to connect the Switch. • Chapter 4: Configuration using the Console Interface This chapter instructs you on how to use the Switch's console interface for... configuring the Switch. • Chapter 5: Configuring the Switch through the Web Utility This chapter shows you how to configure the Switch using the Web Utility. • Appendix A: Fast Ethernet and Gigabit Ethernet This ...
User Guide
Page 13
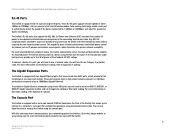
... standard -48 VDC voltage. This capability gives network administrators centralized power control for devices such as IP phones and wireless access points, which provide for configuration purposes) using a mini-GBIC port, you will need to automatically detect the speed of one expansion module. Each port can directly draw power from the...
... standard -48 VDC voltage. This capability gives network administrators centralized power control for devices such as IP phones and wireless access points, which provide for configuration purposes) using a mini-GBIC port, you will need to automatically detect the speed of one expansion module. Each port can directly draw power from the...

User Guide
Page 14
... (328 feet) 5 meters (16,4 feet) 100 meters (328 feet) *A hub refers to any type of 100Mbps hub. Figure 3-1: Typical Network Configuration When you connect your network devices, make sure you don't exceed the maximum cabling distances, which are listed in the following diagram shows a typical network... configuration. A 10Mbps hub connected to another 10Mbps hub can span up to the Switch. 24-Port 10/100 + 2-Port Gigabit Switch with Webview...
... (328 feet) 5 meters (16,4 feet) 100 meters (328 feet) *A hub refers to any type of 100Mbps hub. Figure 3-1: Typical Network Configuration When you connect your network devices, make sure you don't exceed the maximum cabling distances, which are listed in the following diagram shows a typical network... configuration. A 10Mbps hub connected to another 10Mbps hub can span up to the Switch. 24-Port 10/100 + 2-Port Gigabit Switch with Webview...

User Guide
Page 17
... the speed and cable type. Proceed to the opposite side. 5. Use of the 24 10/100 ports, and then connect the other bracket to Chapter 4: Configuration using the Console Interface, for directions on a hard flat surface with the Switch. Attach a rack-mount bracket to any standard 19-inch rack, follow the...
... the speed and cable type. Proceed to the opposite side. 5. Use of the 24 10/100 ports, and then connect the other bracket to Chapter 4: Configuration using the Console Interface, for directions on a hard flat surface with the Switch. Attach a rack-mount bracket to any standard 19-inch rack, follow the...
User Guide
Page 18
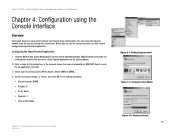
.... Select a port to run the utility program. 2. Select HyperTerminal to communicate with Webview and Power over Ethernet Chapter 4: Configuration using the Console Interface Overview Figure 4-1: Finding Hyperterminal Figure 4-2: Connection Description Figure 4-3: Password Screen 10 24-Port 10/100 ...through the console port. HyperTerminal should be one of connection is SRW224P. In the example shown, the name of the options listed in the next menu. Select an icon for the application. Configuring the HyperTerminal Application 1. These settings should be : • Bits...
.... Select a port to run the utility program. 2. Select HyperTerminal to communicate with Webview and Power over Ethernet Chapter 4: Configuration using the Console Interface Overview Figure 4-1: Finding Hyperterminal Figure 4-2: Connection Description Figure 4-3: Password Screen 10 24-Port 10/100 ...through the console port. HyperTerminal should be one of connection is SRW224P. In the example shown, the name of the options listed in the next menu. Select an icon for the application. Configuring the HyperTerminal Application 1. These settings should be : • Bits...
User Guide
Page 19
... to return to choose; A highlight in each menu lets you select the option you wish to the previous selection; Figure 4-4: COM1 Properties Chapter 4: Configuration using the Console Interface Configuring the Switch through the Console Interface use the Up Arrow or Down Arrow keys to move up or down, or use the number... highlight help) use the default username admin, and leave the password blank. 24-Port 10/100 + 2-Port Gigabit Switch with Webview and Power over Ethernet Configuring the Switch through the Console Interface Login When you finish...
... to return to choose; A highlight in each menu lets you select the option you wish to the previous selection; Figure 4-4: COM1 Properties Chapter 4: Configuration using the Console Interface Configuring the Switch through the Console Interface use the Up Arrow or Down Arrow keys to move up or down, or use the number... highlight help) use the default username admin, and leave the password blank. 24-Port 10/100 + 2-Port Gigabit Switch with Webview and Power over Ethernet Configuring the Switch through the Console Interface Login When you finish...

User Guide
Page 20
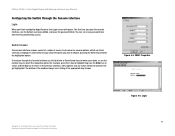
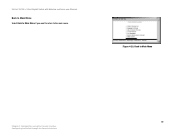
... displays: 1. User and Password Settings 4. IP Configuration 5. Restore System Default Setting 7. Chapter 4: Configuration using the Console Interface Configuring the Switch through the Console Interface Figure 4-6: Switch Main Menu Figure 4-7: System Configuration Menu 12 File Management 6. Back to Main Menu. System Configuration 2. Management Settings 3. Reboot System 8. 24-Port 10/100 + 2-Port Gigabit Switch with Webview and...
... displays: 1. User and Password Settings 4. IP Configuration 5. Restore System Default Setting 7. Chapter 4: Configuration using the Console Interface Configuring the Switch through the Console Interface Figure 4-6: Switch Main Menu Figure 4-7: System Configuration Menu 12 File Management 6. Back to Main Menu. System Configuration 2. Management Settings 3. Reboot System 8. 24-Port 10/100 + 2-Port Gigabit Switch with Webview and...
User Guide
Page 21
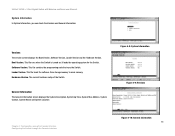
... displays the System Description, System Up Time, System Mac Address, System Contact, System Name and System Location Figure 4-8: System Information Figure 4-9: Versions Chapter 4: Configuration using the Console Interface Configuring the Switch through the Console Interface Figure 4-10: General Information 13 It loads the operating system for the Switch. Boot Version. This file...
... displays the System Description, System Up Time, System Mac Address, System Contact, System Name and System Location Figure 4-8: System Information Figure 4-9: Versions Chapter 4: Configuration using the Console Interface Configuring the Switch through the Console Interface Figure 4-10: General Information 13 It loads the operating system for the Switch. Boot Version. This file...
User Guide
Page 22
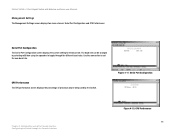
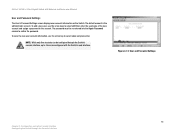
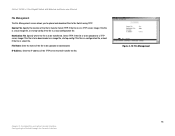
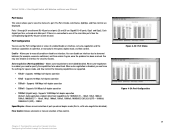
...with Webview and Power over Ethernet Management Settings The Management Settings screen displays two menu choices: Serial Port Configuration and CPU Performance Serial Port Configuration The Serial Port Configuration screen displays the current setting for the baud rate. Use the save action to toggle through the ... displays the percentage of processor power being used by selecting edit then using the Console Interface Configuring the Switch through the different baud rates. Figure 4-11: Serial Port Configuration Chapter 4: Configuration using the spacebar to set the new baud rate.
...with Webview and Power over Ethernet Management Settings The Management Settings screen displays two menu choices: Serial Port Configuration and CPU Performance Serial Port Configuration The Serial Port Configuration screen displays the current setting for the baud rate. Use the save action to toggle through the ... displays the percentage of processor power being used by selecting edit then using the Console Interface Configuring the Switch through the different baud rates. Figure 4-11: Serial Port Configuration Chapter 4: Configuration using the spacebar to set the new baud rate.
User Guide
Page 23
... to select save and press enter. The default account is the administrator account. To add a new user, use the arrow key to 16 can be configured with Webview and Power over Ethernet User and Password Settings The User & Password Settings screen displays user account information on the Switch. The password must... assign a password to cofirm the password. 24-Port 10/100 + 2-Port Gigabit Switch with the Switch's web interface. NOTE: While only five accounts can be configured through the Console Interface
... to select save and press enter. The default account is the administrator account. To add a new user, use the arrow key to 16 can be configured with Webview and Power over Ethernet User and Password Settings The User & Password Settings screen displays user account information on the Switch. The password must... assign a password to cofirm the password. 24-Port 10/100 + 2-Port Gigabit Switch with the Switch's web interface. NOTE: While only five accounts can be configured through the Console Interface
User Guide
Page 24
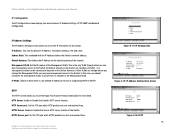
...packets are sent and received from . This sets the Switch's IP Address. Subnet Mask. Figure 4-14: IP Configuration Figure 4-15: IP Address Configuration Screen HTTP The HTTP screen allows you should reconnect the management station to set the Hyper Text Transfer Protocol information for...the Secure HTTP server function of the Management VLAN. Default Gateway. Set the ID number of the Switch. Chapter 4: Configuration using the Console Interface Configuring the Switch through which HTTP packets are sent and received from . Management VLAN. This is 192.168.1.254. IP ...
...packets are sent and received from . This sets the Switch's IP Address. Subnet Mask. Figure 4-14: IP Configuration Figure 4-15: IP Address Configuration Screen HTTP The HTTP screen allows you should reconnect the management station to set the Hyper Text Transfer Protocol information for...the Secure HTTP server function of the Management VLAN. Default Gateway. Set the ID number of the Switch. Chapter 4: Configuration using the Console Interface Configuring the Switch through which HTTP packets are sent and received from . Management VLAN. This is 192.168.1.254. IP ...
User Guide
Page 25
...test network connectivity. Set the TCP port that will be used for the Switch. Figure 4-18: Network Configuration/PING 17 Chapter 4: Configuration using the Console Interface Configuring the Switch through the Console Interface Enable or Disable the SNMP function for sending and receiving SNMP packets. Figure... 4-17: SNMP Network Configuration The Network Configuration Screen allows you to PING and select the Execute action. Enter the IP address of the interface or device ...
...test network connectivity. Set the TCP port that will be used for the Switch. Figure 4-18: Network Configuration/PING 17 Chapter 4: Configuration using the Console Interface Configuring the Switch through the Console Interface Enable or Disable the SNMP function for sending and receiving SNMP packets. Figure... 4-17: SNMP Network Configuration The Network Configuration Screen allows you to PING and select the Execute action. Enter the IP address of the interface or device ...
User Guide
Page 26
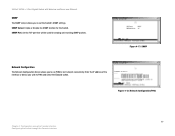
...Destination File. Specify where the file is to be downloaded as a image file, startup-config if the file is a configuration file, or boot if the file is a local configuration file. 24-Port 10/100 + 2-Port Gigabit Switch with Webview and Power over Ethernet File Management The File Management screen ...allows you to upload and download files to the Switch using the Console Interface Configuring the Switch through the Console Interface Enter the name of the file to be uploaded or downloaded. Figure 4-19: File Management 18 Chapter...
...Destination File. Specify where the file is to be downloaded as a image file, startup-config if the file is a configuration file, or boot if the file is a local configuration file. 24-Port 10/100 + 2-Port Gigabit Switch with Webview and Power over Ethernet File Management The File Management screen ...allows you to upload and download files to the Switch using the Console Interface Configuring the Switch through the Console Interface Enter the name of the file to be uploaded or downloaded. Figure 4-19: File Management 18 Chapter...

User Guide
Page 27
... the Console Interface Figure 4-20: Restore System Default Settings Reboot System If you would like to Default. A confirmation message will appear stating that All User Configuration data will be reset to reboot the Switch, select Reboot System and press Enter. Press the "y" key to continue or the "n" key to the factory...
... the Console Interface Figure 4-20: Restore System Default Settings Reboot System If you would like to Default. A confirmation message will appear stating that All User Configuration data will be reset to reboot the Switch, select Reboot System and press Enter. Press the "y" key to continue or the "n" key to the factory...
User Guide
Page 28
Figure 4-22: Back to the main menu. 24-Port 10/100 + 2-Port Gigabit Switch with Webview and Power over Ethernet Back to Main Menu Select Back to Main Menu if you want to return to Main Menu 20 Chapter 4: Configuration using the Console Interface Configuring the Switch through the Console Interface
Figure 4-22: Back to the main menu. 24-Port 10/100 + 2-Port Gigabit Switch with Webview and Power over Ethernet Back to Main Menu Select Back to Main Menu if you want to return to Main Menu 20 Chapter 4: Configuration using the Console Interface Configuring the Switch through the Console Interface
User Guide
Page 29
... you to abnormal behavior (for speed, mode, and flow control.The following capabilities are supported. • 10half - Port Configuration You can disable an interface due to manually enable or disable an interface. Allows you to advertise, or manually fix the ... 100 Mbps half-duplex operation • 100full - Ports 1 through the Console Interface Figure 4-23: Port Status Figure 4-24: Port Configuration 21 Auto-negotiation (Port Capabilities) - Supports 1000 Mbps full-duplex operation (Default: Autonegotiation enabled; Advertised capabilities for security reasons. Each Gigabit...
... you to abnormal behavior (for speed, mode, and flow control.The following capabilities are supported. • 10half - Port Configuration You can disable an interface due to manually enable or disable an interface. Allows you to advertise, or manually fix the ... 100 Mbps half-duplex operation • 100full - Ports 1 through the Console Interface Figure 4-23: Port Status Figure 4-24: Port Configuration 21 Auto-negotiation (Port Capabilities) - Supports 1000 Mbps full-duplex operation (Default: Autonegotiation enabled; Advertised capabilities for security reasons. Each Gigabit...

