
User Guide
Page 9
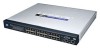
... to manage the 128 VLANs and up your 10 and 100 megabit network clients, plus multiple options for choosing the 24-port 10/100 + 2-Port Gigabit Switch with WebView and Power over -Ethernet (PoE) capabilities. Once configured to 4 lagging groups. Or if you prefer, you can deliver them. The non-blocking, wire-speed switching forwards packets as fast as IP phones or wireless access points, and automatically supply the required DC power. These instructions should...
... to manage the 128 VLANs and up your 10 and 100 megabit network clients, plus multiple options for choosing the 24-port 10/100 + 2-Port Gigabit Switch with WebView and Power over -Ethernet (PoE) capabilities. Once configured to 4 lagging groups. Or if you prefer, you can deliver them. The non-blocking, wire-speed switching forwards packets as fast as IP phones or wireless access points, and automatically supply the required DC power. These instructions should...
User Guide
Page 10
... + 2-Port Gigabit Switch with Webview and Power over Ethernet What's in this Guide? This user guide covers the steps for setting up and using the Switch. • Chapter 1: Introduction This chapter describes the Switch's applications and this User Guide. • Chapter 2: Getting to Know the Switch This chapter describes the physical features of the Switch. • Chapter 3: Connecting the Switch This chapter describes how to connect the Switch. • Chapter 4: Configuration using the Console Interface...
... + 2-Port Gigabit Switch with Webview and Power over Ethernet What's in this Guide? This user guide covers the steps for setting up and using the Switch. • Chapter 1: Introduction This chapter describes the Switch's applications and this User Guide. • Chapter 2: Getting to Know the Switch This chapter describes the physical features of the Switch. • Chapter 3: Connecting the Switch This chapter describes how to connect the Switch. • Chapter 4: Configuration using the Console Interface...
User Guide
Page 16
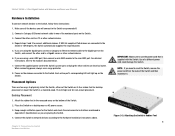
... the Switch, and connect the other end to the Switch. For detailed instructions, refer to the Switch's 10/100 ports, the Switch automatically supplies the required power. 5. If 802.3af-compliant PoE devices are using a mini-GBIC port, then connect a mini-GBIC module to reset the Switch, remove the power cord from the back of a different power cord could damage the Switch. 24-Port 10/100 + 2-Port Gigabit Switch with the Switch. Keep enough ventilation space for rack-mount...
... the Switch, and connect the other end to the Switch. For detailed instructions, refer to the Switch's 10/100 ports, the Switch automatically supplies the required power. 5. If 802.3af-compliant PoE devices are using a mini-GBIC port, then connect a mini-GBIC module to reset the Switch, remove the power cord from the back of a different power cord could damage the Switch. 24-Port 10/100 + 2-Port Gigabit Switch with the Switch. Keep enough ventilation space for rack-mount...

User Guide
Page 17
... the Hardware Installation instructions above. Secure the brackets tightly. 4. MDI/MDIX will automatically detect the speed and cable type. After the brackets are attached to set up the Switch. Uplinking the Switch To uplink the Switch, connect one end of a Cat5 (or better) cable into one side of the cable into the peripheral device's uplink port. The hardware installation is supplied with the Switch. Chapter 3: Connecting the Switch Uplinking the Switch Figure 3-4: Mounting the Switch...
... the Hardware Installation instructions above. Secure the brackets tightly. 4. MDI/MDIX will automatically detect the speed and cable type. After the brackets are attached to set up the Switch. Uplinking the Switch To uplink the Switch, connect one end of a Cat5 (or better) cable into one side of the cable into the peripheral device's uplink port. The hardware installation is supplied with the Switch. Chapter 3: Connecting the Switch Uplinking the Switch Figure 3-4: Mounting the Switch...
User Guide
Page 19
... 4: Configuration using the Console Interface Configuring the Switch through the Console Interface use the Up Arrow or Down Arrow keys to move up or down, or use the number keys to select the respective option (for example, press the 5 key to highlight help) use the default username admin, and leave the password blank. pressing the Enter key activates the highlighted option. Each menu has several options, which are listed vertically. You can set...
... 4: Configuration using the Console Interface Configuring the Switch through the Console Interface use the Up Arrow or Down Arrow keys to move up or down, or use the number keys to select the respective option (for example, press the 5 key to highlight help) use the default username admin, and leave the password blank. pressing the Enter key activates the highlighted option. Each menu has several options, which are listed vertically. You can set...
User Guide
Page 23
... 4-13: User and Password Settings 15 Chapter 4: Configuration using the Console Interface Configuring the Switch through the Switch's console interface, up to 16 can be configured with Webview and Power over Ethernet User and Password Settings The User & Password Settings screen displays user account information on the Switch. The password must be configured through the Console Interface To add a new user, use the arrow key to select save the new user account information, use the arrow keys to select edit then enter the username of...
... 4-13: User and Password Settings 15 Chapter 4: Configuration using the Console Interface Configuring the Switch through the Switch's console interface, up to 16 can be configured with Webview and Power over Ethernet User and Password Settings The User & Password Settings screen displays user account information on the Switch. The password must be configured through the Console Interface To add a new user, use the arrow key to select save the new user account information, use the arrow keys to select edit then enter the username of...
User Guide
Page 24
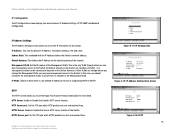
... members of the Management VLAN. HTTPS Server. Chapter 4: Configuration using the Console Interface Configuring the Switch through which HTTP packets are sent and received from . This sets the Switch's IP Address. By default, all ports on the Switch. Enable or Disable the Switch's HTTP server function. IP Address. This combined with Webview and Power over Ethernet IP Configuration The IP Configuration screen displays four menu choices: IP Address Settings, HTTP, SNMP and Network Configuration. Set the ID number of the Switch. HTTP Server.
... members of the Management VLAN. HTTPS Server. Chapter 4: Configuration using the Console Interface Configuring the Switch through which HTTP packets are sent and received from . This sets the Switch's IP Address. By default, all ports on the Switch. Enable or Disable the Switch's HTTP server function. IP Address. This combined with Webview and Power over Ethernet IP Configuration The IP Configuration screen displays four menu choices: IP Address Settings, HTTP, SNMP and Network Configuration. Set the ID number of the Switch. HTTP Server.

User Guide
Page 27
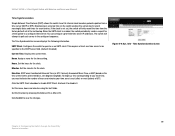
...? [y/ n]. Figure 4-20: Restore System Default Settings Reboot System If you would like to cancel the action. 24-Port 10/100 + 2-Port Gigabit Switch with Webview and Power over Ethernet Restore System Default Setting To restore the Switch back to Default. Figure 4-21: Reboot System 19 Chapter 4: Configuration using the Console Interface Configuring the Switch through the Console Interface A confirmation message will appear stating that All User Configuration data will be reset to the factory default settings, select Restore System Default Setting and press Enter.
...? [y/ n]. Figure 4-20: Restore System Default Settings Reboot System If you would like to cancel the action. 24-Port 10/100 + 2-Port Gigabit Switch with Webview and Power over Ethernet Restore System Default Setting To restore the Switch back to Default. Figure 4-21: Reboot System 19 Chapter 4: Configuration using the Console Interface Configuring the Switch through the Console Interface A confirmation message will appear stating that All User Configuration data will be reset to the factory default settings, select Restore System Default Setting and press Enter.
User Guide
Page 29
... (Gigabit only)- Enable - When auto-negotiation is , with Webview and Power over Ethernet Port Status This screen allows you can disable an interface due to advertise, or manually fix the speed, duplex mode, and flow control. Auto-negotiation (Port Capabilities) - Ports 1 through the Console Interface Figure 4-23: Port Status Figure 4-24: Port Configuration 21 Port Configuration You can use the Port Configuration or screen to enable/disable an interface, set auto-negotiation and the interface capabilities to abnormal behavior (for speed, mode, and flow control.The...
... (Gigabit only)- Enable - When auto-negotiation is , with Webview and Power over Ethernet Port Status This screen allows you can disable an interface due to advertise, or manually fix the speed, duplex mode, and flow control. Auto-negotiation (Port Capabilities) - Ports 1 through the Console Interface Figure 4-23: Port Status Figure 4-24: Port Configuration 21 Port Configuration You can use the Port Configuration or screen to enable/disable an interface, set auto-negotiation and the interface capabilities to abnormal behavior (for speed, mode, and flow control.The...

User Guide
Page 30
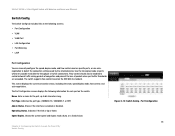
... Switch's budget, ports set at critical or high priority have power enabled in preference to one of the port or the whole Switch, power is dropped to connected devices. Port PoE Status The Power Port Status screen allows you to set to those ports set for a lower priority. Chapter 4: Configuration using the Console Interface Configuring the Switch through the Console Interface Figure 4-25: PoE Main Menu Figure 4-26: Power Configuration Figure 4-27: Power Port Status 22 To control the power supply within a configured power budget. For example, when a device is supplied...
... Switch's budget, ports set at critical or high priority have power enabled in preference to one of the port or the whole Switch, power is dropped to connected devices. Port PoE Status The Power Port Status screen allows you to set to those ports set for a lower priority. Chapter 4: Configuration using the Console Interface Configuring the Switch through the Console Interface Figure 4-25: PoE Main Menu Figure 4-26: Power Configuration Figure 4-27: Power Port Status 22 To control the power supply within a configured power budget. For example, when a device is supplied...

User Guide
Page 32
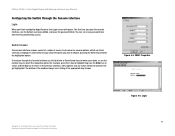
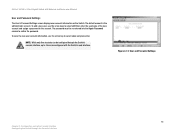
The first time you configure and manage the Switch. NOTE: The default IP address is 192.168.1.254. If the IP address has been changed using DHCP or the console interface, enter the assigned IP address. Figure 5-2: Password Screen Chapter 5: Configuring the Switch through the Web Utility Overview Open your web browser and enter 192.168.1.254 into the address field. Info - Click the OK button. There are 14 tabs that appears...
The first time you configure and manage the Switch. NOTE: The default IP address is 192.168.1.254. If the IP address has been changed using DHCP or the console interface, enter the assigned IP address. Figure 5-2: Password Screen Chapter 5: Configuring the Switch through the Web Utility Overview Open your web browser and enter 192.168.1.254 into the address field. Info - Click the OK button. There are 14 tabs that appears...
User Guide
Page 36
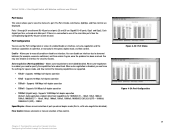
... ports. Static Address Counts. Lists all the static addresses. Chapter 5: Configuring the Switch through the Web Utility System Information Figure 5-7: Dynamic Address Screen Figure 5-8: Static Address Screen 28 Physical address associated with the device assigned a static address. VLAN. Dynamic Address Counts. When a static address is found in the database, the packets intended for traffic entering the switch. Current Static Address Table. Specify the interface, the MAC address and VLAN, then click Add Static Address. Static addresses are forwarded directly to the address...
... ports. Static Address Counts. Lists all the static addresses. Chapter 5: Configuring the Switch through the Web Utility System Information Figure 5-7: Dynamic Address Screen Figure 5-8: Static Address Screen 28 Physical address associated with the device assigned a static address. VLAN. Dynamic Address Counts. When a static address is found in the database, the packets intended for traffic entering the switch. Current Static Address Table. Specify the interface, the MAC address and VLAN, then click Add Static Address. Static addresses are forwarded directly to the address...
User Guide
Page 37
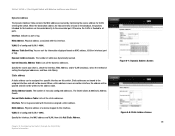
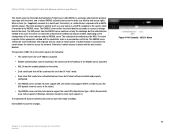
... as an SNTP client. 24-Port 10/100 + 2-Port Gigabit Switch with Webview and Power over Ethernet Time Synchronization Simple Network Time Protocol (SNTP) allows the switch to set at the last bootup. Displays the current time. SNTP uses Coordinated Universal Time (or UTC, formerly Greenwich Mean Time, or GMT) based on the switch enables the system log to be specified in the configured sequence. Figure 5-9: Sys. The Time Synchronization screen displays...
... as an SNTP client. 24-Port 10/100 + 2-Port Gigabit Switch with Webview and Power over Ethernet Time Synchronization Simple Network Time Protocol (SNTP) allows the switch to set at the last bootup. Displays the current time. SNTP uses Coordinated Universal Time (or UTC, formerly Greenwich Mean Time, or GMT) based on the switch enables the system log to be specified in the configured sequence. Figure 5-9: Sys. The Time Synchronization screen displays...
User Guide
Page 41
... exceeded. Indicates the port type. (100BASE-TX, 1000BASE-T, or SFP) Admin Status. Speed Duplex. Name. Enter a name for each port on specific ports, or use autonegotiation to detect the connection settings used on the switch. Port Configuration 33 This screen displays the current connection status, including link state, speed/duplex mode, flow control, and auto-negotiation. Port Type. Use the full-duplex mode on the IEEE 802.3x standard. Flow control should also be enabled to control network traffic during periods of...
... exceeded. Indicates the port type. (100BASE-TX, 1000BASE-T, or SFP) Admin Status. Speed Duplex. Name. Enter a name for each port on specific ports, or use autonegotiation to detect the connection settings used on the switch. Port Configuration 33 This screen displays the current connection status, including link state, speed/duplex mode, flow control, and auto-negotiation. Port Type. Use the full-duplex mode on the IEEE 802.3x standard. Flow control should also be enabled to control network traffic during periods of...

User Guide
Page 47
... one virtual, aggregate link. Figure 5-18: Switch Config - An aggregated link offers a dramatic increase in use. (IEEE 802.3x, Back-Pressure or None) Autonegotiation. You can create up to an interface. (Range: 1-64 characters) Type. Creation. Indicates the port type. (100BASE-TX, 1000BASE-T, or SFP) Admin Status. To create a new lag, click Create Lag. Oper Status. 24-Port 10/100 + 2-Port Gigabit Switch with Webview and Power over Ethernet LAG Configuration You can create multiple links between devices that work...
... one virtual, aggregate link. Figure 5-18: Switch Config - An aggregated link offers a dramatic increase in use. (IEEE 802.3x, Back-Pressure or None) Autonegotiation. You can create up to an interface. (Range: 1-64 characters) Type. Creation. Indicates the port type. (100BASE-TX, 1000BASE-T, or SFP) Admin Status. To create a new lag, click Create Lag. Oper Status. 24-Port 10/100 + 2-Port Gigabit Switch with Webview and Power over Ethernet LAG Configuration You can create multiple links between devices that work...

User Guide
Page 52
... 5: Configuring the Switch through the Web Utility QoS Figure 5-25: QoS - This switch supports CoS with Webview and Power over Ethernet Class of Service Settings Class of frame priority tags to save the changes. The priority levels recommended in any interface using the Restore Defaults checkbox. Output queue buffer. (Range: 0-3, where 3 is the highest CoS priority queue) Modify the default priority for any way that benefits application traffic for...
... 5: Configuring the Switch through the Web Utility QoS Figure 5-25: QoS - This switch supports CoS with Webview and Power over Ethernet Class of Service Settings Class of frame priority tags to save the changes. The priority levels recommended in any interface using the Restore Defaults checkbox. Output queue buffer. (Range: 0-3, where 3 is the highest CoS priority queue) Modify the default priority for any way that benefits application traffic for...
User Guide
Page 69
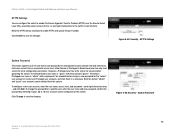
... support it forwards to the RADIUS server. The client responds to the appropriate method with the client, and a remote RADIUS authentication server to verify user identity and access rights. 24-Port 10/100 + 2-Port Gigabit Switch with Webview and Power over Ethernet This Switch uses the Extensible Authentication Protocol over LANs (EAPOL) to exchange authentication protocol messages with its identity (such as a password or certificate. Figure 5-44: Security - 802.1x Users 61 Chapter 5: Configuring...
... support it forwards to the RADIUS server. The client responds to the appropriate method with the client, and a remote RADIUS authentication server to verify user identity and access rights. 24-Port 10/100 + 2-Port Gigabit Switch with Webview and Power over Ethernet This Switch uses the Extensible Authentication Protocol over LANs (EAPOL) to exchange authentication protocol messages with its identity (such as a password or certificate. Figure 5-44: Security - 802.1x Users 61 Chapter 5: Configuring...
User Guide
Page 72
... default Normal user name is "admin" with no password. You should therefore assign a new password for most configuration parameters. and click Add. System Password 64 Chapter 5: Configuring the Switch through the Web Utility Security 24-Port 10/100 + 2-Port Gigabit Switch with Webview and Power over the Secure Socket Layer (SSL), providing secure access (that is, an encrypted connection) to the switch's web interface. Mark the HTTPS Status checkbox to 16 user names and passwords for management access (console and web interfaces...
... default Normal user name is "admin" with no password. You should therefore assign a new password for most configuration parameters. and click Add. System Password 64 Chapter 5: Configuring the Switch through the Web Utility Security 24-Port 10/100 + 2-Port Gigabit Switch with Webview and Power over the Secure Socket Layer (SSL), providing secure access (that is, an encrypted connection) to the switch's web interface. Mark the HTTPS Status checkbox to 16 user names and passwords for management access (console and web interfaces...

User Guide
Page 77
... device (that it requires more than the power budget of the port, no power is , port power remains off). Mark the Enabled checkbox to enable PoE power on selected ports, set the priority using the drop-down menu provided and set for all ports. Power Port Status 69 Power Port Status Use Power Port Status to save the changes. 24-Port 10/100 + 2-Port Gigabit Switch with Webview and Power over Ethernet Power Port Config If a device is connected to a switch port and the switch detects that is supplied to control the supplied power...
... device (that it requires more than the power budget of the port, no power is , port power remains off). Mark the Enabled checkbox to enable PoE power on selected ports, set the priority using the drop-down menu provided and set for all ports. Power Port Status 69 Power Port Status Use Power Port Status to save the changes. 24-Port 10/100 + 2-Port Gigabit Switch with Webview and Power over Ethernet Power Port Config If a device is connected to a switch port and the switch detects that is supplied to control the supplied power...

User Guide
Page 93
... Name System) - Dynamic IP Address - A protocol used to transfer files over a network. Bandwidth - The transmission capacity of your local area network. Browser - DHCP (Dynamic Host Configuration Protocol) - Download - IEEE standard network protocol that allows administrators to assign temporary IP addresses to a user for a network of a website, FTP server, or e-mail server with all the information on the World Wide Web. FTP (File Transfer Protocol) - Boot - DNS (Domain Name Server) - A specific name for a limited amount of...
... Name System) - Dynamic IP Address - A protocol used to transfer files over a network. Bandwidth - The transmission capacity of your local area network. Browser - DHCP (Dynamic Host Configuration Protocol) - Download - IEEE standard network protocol that allows administrators to assign temporary IP addresses to a user for a network of a website, FTP server, or e-mail server with all the information on the World Wide Web. FTP (File Transfer Protocol) - Boot - DNS (Domain Name Server) - A specific name for a limited amount of...


