
User Guide
Page 5
... Menu 12 Figure 4-8: System Information 13 Figure 4-9: Versions 13 Figure 4-10: General Information 13 Figure 4-11: Serial Port Configuration 14 Figure 4-12: CPU Performance 14 Figure 4-13: User and Password Settings 15 Figure 4-14: IP Configuration 16 Figure 4-15: IP Address Configuration Screen 16 Figure 4-16: HTTP 16 ...Figure 4-17: SNMP 17 Figure 4-18: Network Configuration/PING 17 Figure 4-19: File Management 18 Figure 4-20: Restore System Default Settings 19 Figure 4-21: Reboot System 19 Figure 4-22: Back to Main Menu 20 Figure 4-23: Port Status 21
... Menu 12 Figure 4-8: System Information 13 Figure 4-9: Versions 13 Figure 4-10: General Information 13 Figure 4-11: Serial Port Configuration 14 Figure 4-12: CPU Performance 14 Figure 4-13: User and Password Settings 15 Figure 4-14: IP Configuration 16 Figure 4-15: IP Address Configuration Screen 16 Figure 4-16: HTTP 16 ...Figure 4-17: SNMP 17 Figure 4-18: Network Configuration/PING 17 Figure 4-19: File Management 18 Figure 4-20: Restore System Default Settings 19 Figure 4-21: Reboot System 19 Figure 4-22: Back to Main Menu 20 Figure 4-23: Port Status 21
User Guide
Page 18
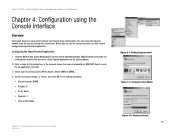
... Ethernet Chapter 4: Configuration using the Console Interface Overview Figure 4-1: Finding Hyperterminal Figure 4-2: Connection Description Figure 4-3: Password Screen 10 Select COM1 or COM2. 4. These settings should be : • Bits per Second: 38400 • Databits: 8 • Parity: None • Stop bits: 1 • Flow control:... 2. In the example shown, the name of the options listed in the next menu. Select an icon for this connection. Set the serial port settings, as follows, then click OK. Click the Start button. 24-Port 10/100 + 2-Port Gigabit Switch with the Switch....
... Ethernet Chapter 4: Configuration using the Console Interface Overview Figure 4-1: Finding Hyperterminal Figure 4-2: Connection Description Figure 4-3: Password Screen 10 Select COM1 or COM2. 4. These settings should be : • Bits per Second: 38400 • Databits: 8 • Parity: None • Stop bits: 1 • Flow control:... 2. In the example shown, the name of the options listed in the next menu. Select an icon for this connection. Set the serial port settings, as follows, then click OK. Click the Start button. 24-Port 10/100 + 2-Port Gigabit Switch with the Switch....
User Guide
Page 22
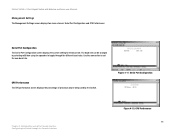
... 24-Port 10/100 + 2-Port Gigabit Switch with Webview and Power over Ethernet Management Settings The Management Settings screen displays two menu choices: Serial Port Configuration and CPU Performance Serial Port Configuration The Serial Port Configuration screen displays the current setting for the baud rate. CPU Performance The CPU performance screen displays the percentage of processor...
... 24-Port 10/100 + 2-Port Gigabit Switch with Webview and Power over Ethernet Management Settings The Management Settings screen displays two menu choices: Serial Port Configuration and CPU Performance Serial Port Configuration The Serial Port Configuration screen displays the current setting for the baud rate. CPU Performance The CPU performance screen displays the percentage of processor...


