
User Guide
Page 1
® A Division of Cisco Systems, Inc. 24-Port 10/100 + 2-Port Gigabit Switch with WebView and Power over Ethernet User Guide WIRED Model No. SRW224P
® A Division of Cisco Systems, Inc. 24-Port 10/100 + 2-Port Gigabit Switch with WebView and Power over Ethernet User Guide WIRED Model No. SRW224P

User Guide
Page 2
...and/or its affiliates in the "Table of interest and is something you might need to change without notice. Copyright © 2005 Cisco Systems, Inc. Other brands and product names are definitions for the following items when reading this User Guide: This checkmark means there ...while using the Switch. All rights reserved. Wash hands after handling. This question mark provides you with a figure number and description, like this : Figure 0-1: Sample Figure Description Figure numbers and descriptions can also be found in the "List of Figures" section in the U.S. SRW224P-UG-51008 ...
...and/or its affiliates in the "Table of interest and is something you might need to change without notice. Copyright © 2005 Cisco Systems, Inc. Other brands and product names are definitions for the following items when reading this User Guide: This checkmark means there ...while using the Switch. All rights reserved. Wash hands after handling. This question mark provides you with a figure number and description, like this : Figure 0-1: Sample Figure Description Figure numbers and descriptions can also be found in the "List of Figures" section in the U.S. SRW224P-UG-51008 ...
User Guide
Page 3
... 5 The Gigabit Expansion Ports 5 The Console Port 5 Chapter 3: Connecting the Switch 6 Overview 6 Pre-Installation Considerations 7 Hardware Installation 8 Placement Options 8 Uplinking the Switch 9 Chapter 4: Configuration using the Console Interface 10 Overview 10 Configuring the Switch through the Console Interface 11 Chapter 5: Configuring the Switch through the Web Utility 24 Overview 24 System Information 25 IP...
... 5 The Gigabit Expansion Ports 5 The Console Port 5 Chapter 3: Connecting the Switch 6 Overview 6 Pre-Installation Considerations 7 Hardware Installation 8 Placement Options 8 Uplinking the Switch 9 Chapter 4: Configuration using the Console Interface 10 Overview 10 Configuring the Switch through the Console Interface 11 Chapter 5: Configuring the Switch through the Web Utility 24 Overview 24 System Information 25 IP...

User Guide
Page 4
24-Port 10/100 + 2-Port Gigabit Switch with Webview and Power over Ethernet Help 82 Appendix A: Fast Ethernet and Gigabit Ethernet 83 About Fast Ethernet 83 About Gigabit Ethernet 83 Appendix B: Cabling 84 Overview 84 Twisted Pair Cabling 84 Fiber Optic Cabling 84 Appendix C: Glossary 85 Appendix D: Specifications 88 Appendix E: Warranty Information 89 Appendix F: Regulatory Information 90 Appendix G: Contact Information 96
24-Port 10/100 + 2-Port Gigabit Switch with Webview and Power over Ethernet Help 82 Appendix A: Fast Ethernet and Gigabit Ethernet 83 About Fast Ethernet 83 About Gigabit Ethernet 83 Appendix B: Cabling 84 Overview 84 Twisted Pair Cabling 84 Fiber Optic Cabling 84 Appendix C: Glossary 85 Appendix D: Specifications 88 Appendix E: Warranty Information 89 Appendix F: Regulatory Information 90 Appendix G: Contact Information 96

User Guide
Page 5
... Back Panel 4 Figure 2-3: Side Panel 4 Figure 3-1: Typical Network Configuration 6 Figure 3-2: Attaching the Switch's Rubber Feet 8 Figure 3-3: Attaching Brackets to the Switch 9 Figure 3-4: Mounting the Switch 9 Figure 4-1: Finding Hyperterminal 10 Figure 4-2: Connection Description 10 Figure 4-3: Password Screen 10 Figure 4-4: ...COM1 Properties 11 Figure 4-5: Login 11 Figure 4-6: Switch Main Menu 12 Figure 4-7: System Configuration Menu 12 Figure 4-8: System Information 13 Figure 4-9: Versions 13 ...
... Back Panel 4 Figure 2-3: Side Panel 4 Figure 3-1: Typical Network Configuration 6 Figure 3-2: Attaching the Switch's Rubber Feet 8 Figure 3-3: Attaching Brackets to the Switch 9 Figure 3-4: Mounting the Switch 9 Figure 4-1: Finding Hyperterminal 10 Figure 4-2: Connection Description 10 Figure 4-3: Password Screen 10 Figure 4-4: ...COM1 Properties 11 Figure 4-5: Login 11 Figure 4-6: Switch Main Menu 12 Figure 4-7: System Configuration Menu 12 Figure 4-8: System Information 13 Figure 4-9: Versions 13 ...

User Guide
Page 7
... ACL 57 Figure 5-41: ACL Conf - Global Settings 65 Figure 5-52: Statistics - Power Status 70 Figure 5-59: Spanning Tree - 24-Port 10/100 + 2-Port Gigabit Switch with Webview and Power over Ethernet Figure 5-28: QoS - Adding/Editing Extended ACL 57 Figure 5-42: ACL Conf - Port Security 63 Figure 5-48: Security - HTTPS...
... ACL 57 Figure 5-41: ACL Conf - Global Settings 65 Figure 5-52: Statistics - Power Status 70 Figure 5-59: Spanning Tree - 24-Port 10/100 + 2-Port Gigabit Switch with Webview and Power over Ethernet Figure 5-28: QoS - Adding/Editing Extended ACL 57 Figure 5-42: ACL Conf - Port Security 63 Figure 5-48: Security - HTTPS...

User Guide
Page 8
... - Information 74 Figure 5-63: SNMP - Restore Defaults 81 Figure 5-73: Maintenance - Port/LAG Info 73 Figure 5-62: Spanning Tree - 24-Port 10/100 + 2-Port Gigabit Switch with Webview and Power over Ethernet Figure 5-61: Spanning Tree -
... - Information 74 Figure 5-63: SNMP - Restore Defaults 81 Figure 5-73: Maintenance - Port/LAG Info 73 Figure 5-62: Spanning Tree - 24-Port 10/100 + 2-Port Gigabit Switch with Webview and Power over Ethernet Figure 5-61: Spanning Tree -

User Guide
Page 9
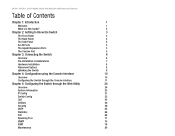
...expansion through alternate transmission media like optical fiber. And the mini-GBIC ports allow you can use the integrated console port to configure the Switch. Each port can detect connected 802.3af-compliant network devices, such as your network can provide DC power to a wide range of... the 24-port 10/100 + 2-Port Gigabit Switch with WebView and Power over Ethernet. All ports have automatic MDI/MDI-X crossover detection. Head-of-line blocking prevention keeps your highspeed clients from...
...expansion through alternate transmission media like optical fiber. And the mini-GBIC ports allow you can use the integrated console port to configure the Switch. Each port can detect connected 802.3af-compliant network devices, such as your network can provide DC power to a wide range of... the 24-port 10/100 + 2-Port Gigabit Switch with WebView and Power over Ethernet. All ports have automatic MDI/MDI-X crossover detection. Head-of-line blocking prevention keeps your highspeed clients from...

User Guide
Page 10
...chapter instructs you on how to use the Switch's console interface for configuring the Switch. • Chapter 5: Configuring the Switch through the Web Utility This chapter shows you how to configure the Switch using the Web Utility. • Appendix .... • Appendix D: Specifications This appendix provides the Switch's technical specifications. • Appendix E: Warranty Information This appendix supplies the Switch's warranty information. • Appendix F: Regulatory Information This appendix supplies the Switch's regulatory information. • Appendix G: Contact Information This...
...chapter instructs you on how to use the Switch's console interface for configuring the Switch. • Chapter 5: Configuring the Switch through the Web Utility This chapter shows you how to configure the Switch using the Web Utility. • Appendix .... • Appendix D: Specifications This appendix provides the Switch's technical specifications. • Appendix E: Warranty Information This appendix supplies the Switch's warranty information. • Appendix F: Regulatory Information This appendix supplies the Switch's regulatory information. • Appendix G: Contact Information This...

User Guide
Page 11
...a link operating at 1000Mbps. A green LED indicates a powered device is actively sending or receiving data over Ethernet Chapter 2: Getting to Know the Switch The Front Panel LEDs System Link/Act PoE Speed Figure 2-1: Front Panel A green LED indicates that power is in progress, but when this blinks...to the corresponding port (Gigabit ports 25 and 26) is operating at a speed of 10/100Mbps. 3 Chapter 2: Getting to Know the Switch The Front Panel The Switch's LEDs and ports are located on -self-test (POST) is being supplied to the corresponding port (1 through 26) with Webview and ...
...a link operating at 1000Mbps. A green LED indicates a powered device is actively sending or receiving data over Ethernet Chapter 2: Getting to Know the Switch The Front Panel LEDs System Link/Act PoE Speed Figure 2-1: Front Panel A green LED indicates that power is in progress, but when this blinks...to the corresponding port (Gigabit ports 25 and 26) is operating at a speed of 10/100Mbps. 3 Chapter 2: Getting to Know the Switch The Front Panel The Switch's LEDs and ports are located on -self-test (POST) is being supplied to the corresponding port (1 through 26) with Webview and ...

User Guide
Page 12
... with two Gigabit RJ-45 ports that are shared with Webview and Power over Ethernet Ports LAN (1-24) The LAN ports connect to protect the Switch, is where you will connect the power cord. Console The Console port is located on the back panel. Chapter 2: Getting to 1000Mbps. The ...Side Panel A security slot, where you can attach a lock to Ethernet network devices, such as other switches or routers. The Back Panel The power port is where you connect a serial cable from a PC's serial port. Gigabit1 (25)/Gigabit 2 (26) The...
... with two Gigabit RJ-45 ports that are shared with Webview and Power over Ethernet Ports LAN (1-24) The LAN ports connect to protect the Switch, is where you will connect the power cord. Console The Console port is located on the back panel. Chapter 2: Getting to 1000Mbps. The ...Side Panel A security slot, where you can attach a lock to Ethernet network devices, such as other switches or routers. The Back Panel The power port is where you connect a serial cable from a PC's serial port. Gigabit1 (25)/Gigabit 2 (26) The...
User Guide
Page 13
.... To establish a Gigabit Ethernet connection using the console port. Any 802.3afcompliant device attached to a port can provide up to manage the Switch using a mini-GBIC port, you will need to use Category 5e cabling or fiber optic cabling. You will need to use HyperTerminal to ...that work with a serial port labeled CONSOLE (located on twisted-pair cabling, refer to attached devices using the provided serial cable. The Switch's RJ-45 ports also support the IEEE 802.3af Power-over the twisted-pair cable without requiring its speed and duplex accordingly. Each ...
.... To establish a Gigabit Ethernet connection using the console port. Any 802.3afcompliant device attached to a port can provide up to manage the Switch using a mini-GBIC port, you will need to use Category 5e cabling or fiber optic cabling. You will need to use HyperTerminal to ...that work with a serial port labeled CONSOLE (located on twisted-pair cabling, refer to attached devices using the provided serial cable. The Switch's RJ-45 ports also support the IEEE 802.3af Power-over the twisted-pair cable without requiring its speed and duplex accordingly. Each ...

User Guide
Page 14
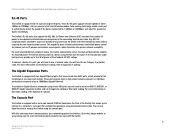
... explain how to connect network devices to 100 meters (328 feet). 6 Chapter 3: Connecting the Switch Overview A 10Mbps hub connected to another 10Mbps hub can span up to the Switch. Figure 3-1: Typical Network Configuration When you connect your network devices, make sure you don't exceed... cabling distances, which are listed in the following diagram shows a typical network configuration. The following table: Maximum Cabling Distances From Switch Hub Switch or Hub To Switch or Hub Hub Computer Maximum Distance 100 meters (328 feet) 5 meters (16,4 feet) 100 meters (328 feet) *A hub...
... explain how to connect network devices to 100 meters (328 feet). 6 Chapter 3: Connecting the Switch Overview A 10Mbps hub connected to another 10Mbps hub can span up to the Switch. Figure 3-1: Typical Network Configuration When you connect your network devices, make sure you don't exceed... cabling distances, which are listed in the following diagram shows a typical network configuration. The following table: Maximum Cabling Distances From Switch Hub Switch or Hub To Switch or Hub Hub Computer Maximum Distance 100 meters (328 feet) 5 meters (16,4 feet) 100 meters (328 feet) *A hub...

User Guide
Page 15
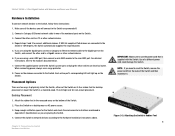
...-Installation Considerations If you will be using Category 5 cable is accessible and that the Switch is 328 feet (100 meters). Positioning the Switch Before you choose a location for its RJ-45 ports. Make sure that the cables can be sure to be sent and ... doubling a port's potential data throughput. To ensure adequate air flow around the Switch, be connected easily. 2. Position the Switch away from sources of two inches (50mm). 5. 24-Port 10/100 + 2-Port Gigabit Switch with Webview and Power over Ethernet Pre-Installation Considerations Fast Ethernet Considerations If you will...
...-Installation Considerations If you will be using Category 5 cable is accessible and that the Switch is 328 feet (100 meters). Positioning the Switch Before you choose a location for its RJ-45 ports. Make sure that the cables can be sure to be sent and ... doubling a port's potential data throughput. To ensure adequate air flow around the Switch, be connected easily. 2. Position the Switch away from sources of two inches (50mm). 5. 24-Port 10/100 + 2-Port Gigabit Switch with Webview and Power over Ethernet Pre-Installation Considerations Fast Ethernet Considerations If you will...
User Guide
Page 16
...mount placement. NOTE: If you will light up on the Switch. Desktop Placement 1. Connect the Switch to network devices according to reset the Switch, remove the power cord from the back of the Switch. 2. Chapter 3: Connecting the Switch Hardware Installation IMPORTANT: Make sure to a PC or other ... 8. Each active port's corresponding LED will connect to the Switch are two ways to the Switch. Use of the numbered ports on the Switch, and connect the other end to the Switch's 10/100 ports, the Switch automatically supplies the required power. 5. Make sure all the devices...
...mount placement. NOTE: If you will light up on the Switch. Desktop Placement 1. Connect the Switch to network devices according to reset the Switch, remove the power cord from the back of the Switch. 2. Chapter 3: Connecting the Switch Hardware Installation IMPORTANT: Make sure to a PC or other ... 8. Each active port's corresponding LED will connect to the Switch are two ways to the Switch. Use of the numbered ports on the Switch, and connect the other end to the Switch's 10/100 ports, the Switch automatically supplies the required power. 5. Make sure all the devices...

User Guide
Page 17
... After the brackets are attached to the opposite side. 5. Use of the Switch with the supplied screws. 3. Chapter 3: Connecting the Switch Uplinking the Switch Figure 3-4: Mounting the Switch 9 Figure 3-3: Attaching Brackets to the Switch IMPORTANT: Make sure to use suitable screws to securely attach the brackets to...Power over Ethernet Rack-Mount Placement To rack-mount the Switch in any standard 19-inch rack. 6. Connect the Switch to network devices according to set up the Switch. The hardware installation is supplied with the Switch. Attach a rack-mount bracket to any standard 19-...
... After the brackets are attached to the opposite side. 5. Use of the Switch with the supplied screws. 3. Chapter 3: Connecting the Switch Uplinking the Switch Figure 3-4: Mounting the Switch 9 Figure 3-3: Attaching Brackets to the Switch IMPORTANT: Make sure to use suitable screws to securely attach the brackets to...Power over Ethernet Rack-Mount Placement To rack-mount the Switch in any standard 19-inch rack. 6. Connect the Switch to network devices according to set up the Switch. The hardware installation is supplied with the Switch. Attach a rack-mount bracket to any standard 19-...
User Guide
Page 18
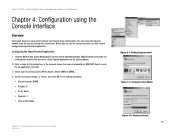
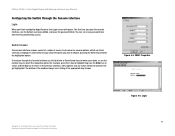
... application. Before you can easily manage your network from the screens through the console port. HyperTerminal should be one of connection is SRW224P. Select HyperTerminal to run the utility program. 2. Click OK. 3. Select Accessories and then select Communications. Select an icon for this... connection. Select COM1 or COM2. 4. 24-Port 10/100 + 2-Port Gigabit Switch with the Switch. Set the serial port settings, as follows, then click OK. You can use the console interface, you will need to communicate with...
... application. Before you can easily manage your network from the screens through the console port. HyperTerminal should be one of connection is SRW224P. Select HyperTerminal to run the utility program. 2. Click OK. 3. Select Accessories and then select Communications. Select an icon for this... connection. Select COM1 or COM2. 4. 24-Port 10/100 + 2-Port Gigabit Switch with the Switch. Set the serial port settings, as follows, then click OK. You can use the console interface, you will need to communicate with...
User Guide
Page 19
...return to choose; Each menu has several options, which are listed vertically. The bottom of the window always has a listing of menus. Switch Screens The console interface screens consist of a series of the appropriate key strokes. A highlight in each menu lets you select the option... menu options and any values entered or present will appear. Figure 4-4: COM1 Properties Chapter 4: Configuration using the Console Interface Configuring the Switch through the Console Interface Figure 4-5: Login 11 To navigate through the Console Interface use the Up Arrow or Down Arrow keys to move...
...return to choose; Each menu has several options, which are listed vertically. The bottom of the window always has a listing of menus. Switch Screens The console interface screens consist of a series of the appropriate key strokes. A highlight in each menu lets you select the option... menu options and any values entered or present will appear. Figure 4-4: COM1 Properties Chapter 4: Configuration using the Console Interface Configuring the Switch through the Console Interface Figure 4-5: Login 11 To navigate through the Console Interface use the Up Arrow or Down Arrow keys to move...

User Guide
Page 20
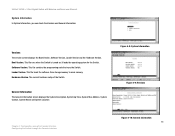
24-Port 10/100 + 2-Port Gigabit Switch with Webview and Power over Ethernet Switch Main Menu The Main Menu screen displays six menu choices: System Configuration Menu, Port Status, Port Configuration, PoE ... to Main Menu. System Configuration Menu System Configuration Menu displays: 1. Management Settings 3. Chapter 4: Configuration using the Console Interface Configuring the Switch through the Console Interface Figure 4-6: Switch Main Menu Figure 4-7: System Configuration Menu 12 IP Configuration 5. Restore System Default Setting 7. Reboot System 8. User and Password Settings 4....
24-Port 10/100 + 2-Port Gigabit Switch with Webview and Power over Ethernet Switch Main Menu The Main Menu screen displays six menu choices: System Configuration Menu, Port Status, Port Configuration, PoE ... to Main Menu. System Configuration Menu System Configuration Menu displays: 1. Management Settings 3. Chapter 4: Configuration using the Console Interface Configuring the Switch through the Console Interface Figure 4-6: Switch Main Menu Figure 4-7: System Configuration Menu 12 IP Configuration 5. Restore System Default Setting 7. Reboot System 8. User and Password Settings 4....
User Guide
Page 21
It loads the operating system for the Switch. 24-Port 10/100 + 2-Port Gigabit Switch with Webview and Power over Ethernet System Information In System Information, you can check the Versions and General Information. Software Version. General... 4-8: System Information Figure 4-9: Versions Chapter 4: Configuration using the Console Interface Configuring the Switch through the Console Interface Figure 4-10: General Information 13 The current hardware setup of the Switch. This file runs when the Switch is turned on. This file loads the software from storage memory to main memory. ...
It loads the operating system for the Switch. 24-Port 10/100 + 2-Port Gigabit Switch with Webview and Power over Ethernet System Information In System Information, you can check the Versions and General Information. Software Version. General... 4-8: System Information Figure 4-9: Versions Chapter 4: Configuration using the Console Interface Configuring the Switch through the Console Interface Figure 4-10: General Information 13 The current hardware setup of the Switch. This file runs when the Switch is turned on. This file loads the software from storage memory to main memory. ...


