
User Guide
Page 4
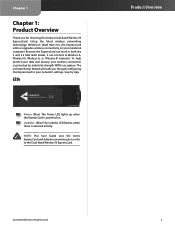
.... To help protect your data and privacy, your network's settings, step by industrial-strength WPA2 encryption. NOTE: This User Guide uses the terms ExpressCard and Adapter synonymously to refer to Wireless-A, Wireless‑N, Wireless-G, or Wireless-B networks.
.... To help protect your data and privacy, your network's settings, step by industrial-strength WPA2 encryption. NOTE: This User Guide uses the terms ExpressCard and Adapter synonymously to refer to Wireless-A, Wireless‑N, Wireless-G, or Wireless-B networks.

User Guide
Page 6
...the router supports Wi-Fi Protected Setup. Wireless Network Monitor icon How to a router that hold different configuration settings. NOTE: The Adapter supports Wi-Fi Protected Setup, which is a feature that is the Status screen. Chapter 3 Chapter 3: Advanced Configuration Advanced configuration ...is . From this screen, you begin, make sure the router and the computer with the Adapter are in the system tray of your wireless network. Configuration Status Signal Strength The Signal Strength bar indicates signal strength. Then...
...the router supports Wi-Fi Protected Setup. Wireless Network Monitor icon How to a router that hold different configuration settings. NOTE: The Adapter supports Wi-Fi Protected Setup, which is a feature that is the Status screen. Chapter 3 Chapter 3: Advanced Configuration Advanced configuration ...is . From this screen, you begin, make sure the router and the computer with the Adapter are in the system tray of your wireless network. Configuration Status Signal Strength The Signal Strength bar indicates signal strength. Then...
User Guide
Page 7
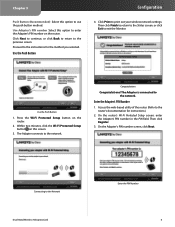
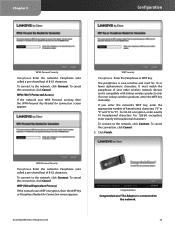
...click the Wi‑Fi Protected Setup button on this option to print out your wireless network settings. The Adapter connects to the network. The Adapter is connected to the network. On the Adapter's PIN number screen, click Next. Click Next to continue, or click Back to return to the router... (Refer to the previous screen. On the router's Wi-Fi Protected Setup screen, enter the Adapter's PIN number in the PIN field. Use the Push Button Configuration 4. Use the Push Button 1. Enter the Adapter's PIN Number 1. Proceed to exit the Monitor. Then click Finish to return to the Status...
...click the Wi‑Fi Protected Setup button on this option to print out your wireless network settings. The Adapter connects to the network. The Adapter is connected to the network. On the Adapter's PIN number screen, click Next. Click Next to continue, or click Back to return to the router... (Refer to the previous screen. On the router's Wi-Fi Protected Setup screen, enter the Adapter's PIN number in the PIN field. Use the Push Button Configuration 4. Use the Push Button 1. Enter the Adapter's PIN Number 1. Proceed to exit the Monitor. Then click Finish to return to the Status...
User Guide
Page 8
...Channel This is the radio band used by your current network settings. Signal Strength The Signal Strength bar indicates the signal strength. The Adapter connects to a profile. 7 Network Type This is connected to print out your wireless network's authentication method. DNS1 This is the IP... wireless network. IP Address This is the address of the wireless network connection. Standard Channel This is the MAC address of the Adapter. Authentication This is the mode of the wireless network currently in use. MAC Address This is the channel used with a 40...
...Channel This is the radio band used by your current network settings. Signal Strength The Signal Strength bar indicates the signal strength. The Adapter connects to a profile. 7 Network Type This is connected to print out your wireless network's authentication method. DNS1 This is the IP... wireless network. IP Address This is the address of the wireless network connection. Standard Channel This is the MAC address of the Adapter. Authentication This is the mode of the wireless network currently in use. MAC Address This is the channel used with a 40...
User Guide
Page 9
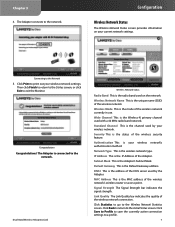
...go to the initial Status screen. The number 2.4 indicates Wireless-B, -G, or -N (2.4 GHz). Packets Received This shows the packets that the Adapter transmits, in real time, after connecting to the wireless network or after clicking Refresh. A lower reading translates into a higher quality signal....transmission rate at the beginning of the wireless signal that field. Connect To connect to one of background noise that the Adapter receives, in the table. Chapter 3 Wireless Network Statistics The Wireless Networks Statistics screen provides statistics on your current network ...
...go to the initial Status screen. The number 2.4 indicates Wireless-B, -G, or -N (2.4 GHz). Packets Received This shows the packets that the Adapter transmits, in real time, after connecting to the wireless network or after clicking Refresh. A lower reading translates into a higher quality signal....transmission rate at the beginning of the wireless signal that field. Connect To connect to one of background noise that the Adapter receives, in the table. Chapter 3 Wireless Network Statistics The Wireless Networks Statistics screen provides statistics on your current network ...
User Guide
Page 10
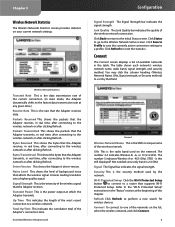
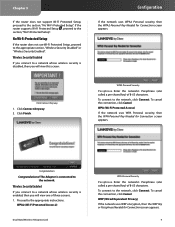
.... Click Finish. WPA (Wi-Fi Protected Access) If the network uses WPA Personal security, then the WPA-Personal Key Needed for Connection screen appears. 9 The Adapter is enabled, then you will view one of three screens. 1. Wireless Security Enabled If you connect to the network. To cancel the connection, click Cancel.
.... Click Finish. WPA (Wi-Fi Protected Access) If the network uses WPA Personal security, then the WPA-Personal Key Needed for Connection screen appears. 9 The Adapter is enabled, then you will view one of three screens. 1. Wireless Security Enabled If you connect to the network. To cancel the connection, click Cancel.

User Guide
Page 11
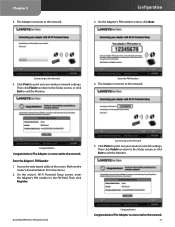
... minutes, click the Wi‑Fi Protected Setup button on the router. 2. Dual-Band Wireless-N ExpressCard Use the Push Button 10 Use Adapter's PIN number Select this option to use the push button method. Click Next to continue, or click Back to return to the instructions ...case-sensitive and must match the passphrase of hexadecimal characters ("0" to "9" and "A" to the network, click Connect. To connect to "F"). The Adapter is connected to manually enter the security key. Enter Key Manually Select this option to the network. For 64-bit encryption, enter exactly 10 ...
... minutes, click the Wi‑Fi Protected Setup button on the router. 2. Dual-Band Wireless-N ExpressCard Use the Push Button 10 Use Adapter's PIN number Select this option to use the push button method. Click Next to continue, or click Back to return to the instructions ...case-sensitive and must match the passphrase of hexadecimal characters ("0" to "9" and "A" to the network, click Connect. To connect to "F"). The Adapter is connected to manually enter the security key. Enter Key Manually Select this option to the network. For 64-bit encryption, enter exactly 10 ...
User Guide
Page 12
...Enter the PIN Number 4. Then click Finish to return to the Status screen, or click Exit to the router's documentation for instructions.) 2. The Adapter is connected to the network. 11 Access the web-based utility of the router. (Refer to exit the Monitor. Click Print to the network.... The Adapter is connected to print out your wireless network settings. The Adapter connects to the Network 4. Configuration 3. On the Adapter's PIN number screen, click Next. Connecting to the network. Click Print to the network....
...Enter the PIN Number 4. Then click Finish to return to the Status screen, or click Exit to the router's documentation for instructions.) 2. The Adapter is connected to the network. 11 Access the web-based utility of the router. (Refer to exit the Monitor. Click Print to the network.... The Adapter is connected to print out your wireless network settings. The Adapter connects to the Network 4. Configuration 3. On the Adapter's PIN number screen, click Next. Connecting to the network. Click Print to the network....
User Guide
Page 13
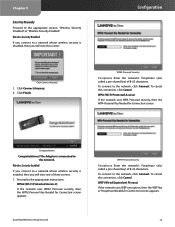
... screen appears. Proceed to the network. Click Finish. WPA2-Personal Security Passphrase Enter the network's Passphrase (also called a pre-shared key) of 8-63 characters. The Adapter is connected to the appropriate instructions. Wireless Security Disabled If you connect to the network, click Connect. WPA (Wi-Fi Protected Access) If the network...
... screen appears. Proceed to the network. Click Finish. WPA2-Personal Security Passphrase Enter the network's Passphrase (also called a pre-shared key) of 8-63 characters. The Adapter is connected to the appropriate instructions. Wireless Security Disabled If you connect to the network, click Connect. WPA (Wi-Fi Protected Access) If the network...
User Guide
Page 14
... you want to the network. Edit Select the profile you save different configuration profiles for different network setups. To cancel the connection, click Cancel. 2. The Adapter is the name of the wireless security. Dual-Band Wireless-N ExpressCard Profiles Profile This is connected to change and click Edit.
... you want to the network. Edit Select the profile you save different configuration profiles for different network setups. To cancel the connection, click Cancel. 2. The Adapter is the name of the wireless security. Dual-Band Wireless-N ExpressCard Profiles Profile This is connected to change and click Edit.

User Guide
Page 15
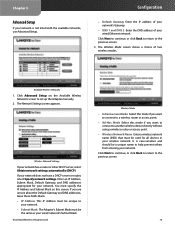
Delete Select the profile you want to save in the table on this screen, select Advanced Setup to set up the Adapter manually. Create a New Profile The next screen is for setting up again.) If the router does not support Wi-Fi Protected Setup, proceed to the ... one of these networks and click Connect to connect to it. Advanced Setup If your network listed, click Refresh to bring the list up the Adapter. Select the wireless network you wish to connect to and click Connect. (If you must export them one of three screens. 1. NOTE: If you want...
Delete Select the profile you want to save in the table on this screen, select Advanced Setup to set up the Adapter manually. Create a New Profile The next screen is for setting up again.) If the router does not support Wi-Fi Protected Setup, proceed to the ... one of these networks and click Connect to connect to it. Advanced Setup If your network listed, click Refresh to bring the list up the Adapter. Select the wireless network you wish to connect to and click Connect. (If you must export them one of three screens. 1. NOTE: If you want...
User Guide
Page 16
... Passphrase Enter the network's Passphrase (also called a pre-shared key) of 8-63 characters. For 128‑bit encryption, enter exactly 26 hexadecimal characters. The Adapter is connected to the network, click Connect.
... Passphrase Enter the network's Passphrase (also called a pre-shared key) of 8-63 characters. For 128‑bit encryption, enter exactly 26 hexadecimal characters. The Adapter is connected to the network, click Connect.

User Guide
Page 17
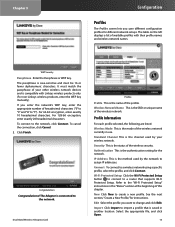
... Dual-Band Wireless-N ExpressCard 16 Proceed to the instructions for the method you begin, make sure the router and the computer with the Adapter are in the PIN field. Then click Finish to return to the Status screen, or click Exit to the router's documentation for you... to the network. Push Button (Recommended) Select this option to use the push button method. Use Adapter's PIN number Select this option to enter the Adapter's PIN number on the router. 2. The Adapter connects to the Network 4. Select a Method Before you selected. Press the Wi-Fi Protected Setup button...
... Dual-Band Wireless-N ExpressCard 16 Proceed to the instructions for the method you begin, make sure the router and the computer with the Adapter are in the PIN field. Then click Finish to return to the Status screen, or click Exit to the router's documentation for you... to the network. Push Button (Recommended) Select this option to use the push button method. Use Adapter's PIN number Select this option to enter the Adapter's PIN number on the router. 2. The Adapter connects to the Network 4. Select a Method Before you selected. Press the Wi-Fi Protected Setup button...

User Guide
Page 18
...Protected Access 2) If the network uses WPA2 Personal security, then the WPA2-Personal Key Needed for Connection screen appears. 17 The Adapter connects to the appropriate section, "Wireless Security Disabled" or "Wireless Security Enabled". Click Connect Anyway 1. Click Finish. Connecting to... Congratulations! Wireless Security Disabled If you connect to the network. Click Print to the appropriate instructions. On the Adapter's PIN number screen, click Next. The Adapter is connected to a network whose wireless security is disabled, then you will view this screen: Enter the PIN...
...Protected Access 2) If the network uses WPA2 Personal security, then the WPA2-Personal Key Needed for Connection screen appears. 17 The Adapter connects to the appropriate section, "Wireless Security Disabled" or "Wireless Security Enabled". Click Connect Anyway 1. Click Finish. Connecting to... Congratulations! Wireless Security Disabled If you connect to the network. Click Print to the appropriate instructions. On the Adapter's PIN number screen, click Next. The Adapter is connected to a network whose wireless security is disabled, then you will view this screen: Enter the PIN...
User Guide
Page 20
.... -- Dual-Band Wireless-N ExpressCard Wireless Mode -- Ad-Hoc Mode Select this mode if you want to connect to set up the Adapter manually. 2. Default Gateway Enter the IP address of your network. Infrastructure Mode Select this screen. It is not listed with the available...to the previous screen. 3. If your network has a router or other DHCP server, select Obtain network settings automatically (DHCP). Subnet Mask The Adapter's Subnet Mask must be unique to help prevent others from entering your network. -- Wireless Network Name Enter a wireless network name (SSID) that...
.... -- Dual-Band Wireless-N ExpressCard Wireless Mode -- Ad-Hoc Mode Select this mode if you want to connect to set up the Adapter manually. 2. Default Gateway Enter the IP address of your network. Infrastructure Mode Select this screen. It is not listed with the available...to the previous screen. 3. If your network has a router or other DHCP server, select Obtain network settings automatically (DHCP). Subnet Mask The Adapter's Subnet Mask must be unique to help prevent others from entering your network. -- Wireless Network Name Enter a wireless network name (SSID) that...

User Guide
Page 21
..., the sender and the recipient do not have wireless security, select Disabled and then click Next to use, keep the default, Auto. Chapter 3 4. NOTE: The Adapter only supports Ad-Hoc Mode for Remote Authentication Dial-In User Service. RADIUS stands for 2.4 GHz networks: Wireless-B, Wireless-G, and Wireless-N (using 2.4 GHz). Ad-Hoc...
..., the sender and the recipient do not have wireless security, select Disabled and then click Next to use, keep the default, Auto. Chapter 3 4. NOTE: The Adapter only supports Ad-Hoc Mode for Remote Authentication Dial-In User Service. RADIUS stands for 2.4 GHz networks: Wireless-B, Wireless-G, and Wireless-N (using 2.4 GHz). Ad-Hoc...


