
User Guide
Page 3
...Other brands and product names are subject to do while using the IP Phone. Wash hands after handling. How to Use this : Also, each figure (diagram, screenshot, or other image) is a registered trademark or trademark of Cisco Systems, Inc. Look for technical terms that could damage ... registered trademarks of their respective holders. Figure 0-1: Sample Figure Description WIP330_V1.1-UG-60120NC JL Wireless-G IP Phone Copyright © 2005 Cisco Systems, Inc. Linksys is provided with the IP Phone easier than ever. and/or its affiliates in the "List of California ...
...Other brands and product names are subject to do while using the IP Phone. Wash hands after handling. How to Use this : Also, each figure (diagram, screenshot, or other image) is a registered trademark or trademark of Cisco Systems, Inc. Look for technical terms that could damage ... registered trademarks of their respective holders. Figure 0-1: Sample Figure Description WIP330_V1.1-UG-60120NC JL Wireless-G IP Phone Copyright © 2005 Cisco Systems, Inc. Linksys is provided with the IP Phone easier than ever. and/or its affiliates in the "List of California ...

User Guide
Page 5
...Chapter 2: Getting to Know the Wireless-G IP Phone The Bottom Panel The Front and Side Panels The Back Panel Chapter 3: Installing and Using the Wireless-G IP Phone Overview Inserting the Battery into the Wireless-G IP Phone Powering on the Wireless-G IP Phone Navigating the Wireless-G... IP Phone Setting up the Wireless-G IP Phone Using the Wireless-G IP Phone Chapter 4: Configuring the Wireless-G IP Phone Instructions for Configuring the Wireless-G IP Phone Status Information Settings of Contents ...
...Chapter 2: Getting to Know the Wireless-G IP Phone The Bottom Panel The Front and Side Panels The Back Panel Chapter 3: Installing and Using the Wireless-G IP Phone Overview Inserting the Battery into the Wireless-G IP Phone Powering on the Wireless-G IP Phone Navigating the Wireless-G... IP Phone Setting up the Wireless-G IP Phone Using the Wireless-G IP Phone Chapter 4: Configuring the Wireless-G IP Phone Instructions for Configuring the Wireless-G IP Phone Status Information Settings of Contents ...

User Guide
Page 9
... on your Internet phone service provider. You will allow you to the materials provided by your cable or DSL Internet connection. Networks are useful tools for the purpose of the Wireless-G IP Phone. So, networks not only are at a public hotspot. Chapter 1: Introduction 1 ...Welcome It connects to make phone calls using the account you set up with its built-in your high-speed Internet connection. network: a series of this User Guide. These instructions should...
... on your Internet phone service provider. You will allow you to the materials provided by your cable or DSL Internet connection. Networks are useful tools for the purpose of the Wireless-G IP Phone. So, networks not only are at a public hotspot. Chapter 1: Introduction 1 ...Welcome It connects to make phone calls using the account you set up with its built-in your high-speed Internet connection. network: a series of this User Guide. These instructions should...

User Guide
Page 10
...chapter describes the physical features of the IP Phone. • Chapter 3: Installing and Using the Wireless-G IP Phone This chapter explains how to install the IP Phone and use it. • Chapter 4: Configuring the Wireless-G IP Phone This chapter discusses how to...This appendix describes some potential problems and solutions, as well as frequently asked questions, regarding use of the IP Phone. • Appendix B: Glossary This appendix gives a brief glossary of terms frequently used in networking. • Appendix C: Specifications This appendix provides the technical specifications for the...
...chapter describes the physical features of the IP Phone. • Chapter 3: Installing and Using the Wireless-G IP Phone This chapter explains how to install the IP Phone and use it. • Chapter 4: Configuring the Wireless-G IP Phone This chapter discusses how to...This appendix describes some potential problems and solutions, as well as frequently asked questions, regarding use of the IP Phone. • Appendix B: Glossary This appendix gives a brief glossary of terms frequently used in networking. • Appendix C: Specifications This appendix provides the technical specifications for the...

User Guide
Page 12
... power LED is located at the top of the IP Phone, while its web browser Navigation Pad and Center Selection Key Soft Key Call Call Uses Internet phone line Different Key Choices or + Sign Soft Key Power or End Call Enter Symbol or Space Figure 2-2: Front Panel 4 Chapter 2: Getting to Know...
... power LED is located at the top of the IP Phone, while its web browser Navigation Pad and Center Selection Key Soft Key Call Call Uses Internet phone line Different Key Choices or + Sign Soft Key Power or End Call Enter Symbol or Space Figure 2-2: Front Panel 4 Chapter 2: Getting to Know...

User Guide
Page 13
Enter Symbol or Space Press the * (star) key twice to move through the menu. Use the navigation pad to enter the + sign. Press the # (pound) key twice to open the Symbol Selection menu. When you have the appropriate symbol highlighted, ... uppercase letters (A, B, C), lowercase letters (a, b, c), or numbers (1, 2, 3). Ends the call or exits the current menu Different Key Choices or + Sign To enter an entry or setting, use the keypad.
Enter Symbol or Space Press the * (star) key twice to move through the menu. Use the navigation pad to enter the + sign. Press the # (pound) key twice to open the Symbol Selection menu. When you have the appropriate symbol highlighted, ... uppercase letters (A, B, C), lowercase letters (a, b, c), or numbers (1, 2, 3). Ends the call or exits the current menu Different Key Choices or + Sign To enter an entry or setting, use the keypad.

User Guide
Page 14
Battery Compartment Figure 2-4: Side Panel Figure 2-5: Back Panel 6 Chapter 2: Getting to "Chapter 3: Installing and Using the Wireless-G IP Phone." For directions on the back panel of the IP Phone. Wireless-G IP Phone Icon Button Name Volume Function Increases or decreases the volume The Back Panel Volume The IP Phone's battery compartment is located on how to insert the battery, refer to Know the Wireless-G IP Phone The Back Panel
Battery Compartment Figure 2-4: Side Panel Figure 2-5: Back Panel 6 Chapter 2: Getting to "Chapter 3: Installing and Using the Wireless-G IP Phone." For directions on the back panel of the IP Phone. Wireless-G IP Phone Icon Button Name Volume Function Increases or decreases the volume The Back Panel Volume The IP Phone's battery compartment is located on how to insert the battery, refer to Know the Wireless-G IP Phone The Back Panel

User Guide
Page 15
... down on the Wireless-G IP Phone." Metal Contacts Button Figure 3-1: Press Figure 3-2: Insert the Button the Battery Chapter 3: Installing and Using the Wireless-G IP Phone 7 Overview Remove the cover of the IP Phone. Insert the door and slide it upward until it up with...the battery. Make sure the metal contacts of the battery line up for first-time installation and use of the battery compartment. Wireless-G IP Phone Chapter 3: Installing and Using the Wireless-G IP Phone Overview This chapter provides instructions for your wireless network and Internet phone ...
... down on the Wireless-G IP Phone." Metal Contacts Button Figure 3-1: Press Figure 3-2: Insert the Button the Battery Chapter 3: Installing and Using the Wireless-G IP Phone 7 Overview Remove the cover of the IP Phone. Insert the door and slide it upward until it up with...the battery. Make sure the metal contacts of the battery line up for first-time installation and use of the battery compartment. Wireless-G IP Phone Chapter 3: Installing and Using the Wireless-G IP Phone Overview This chapter provides instructions for your wireless network and Internet phone ...
User Guide
Page 16
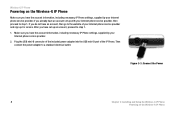
... mini-B connector of the included power adapter into the USB mini-B port of your Internet phone service provider. Figure 3-3: Connect the Power 8 Chapter 3: Installing and Using the Wireless-G IP Phone Powering on the Wireless-G IP Phone Make sure you have the account information, including necessary IP Phone settings, supplied by your...
... mini-B connector of the included power adapter into the USB mini-B port of your Internet phone service provider. Figure 3-3: Connect the Power 8 Chapter 3: Installing and Using the Wireless-G IP Phone Powering on the Wireless-G IP Phone Make sure you have the account information, including necessary IP Phone settings, supplied by your...

User Guide
Page 17
3. NOTE: When the battery is low on the Wireless-G IP Phone This maximizes battery performance and life. Wireless-G IP Phone Chapter 3: Installing and Using the Wireless-G IP Phone 9 Powering on power, it will flash, alternating between blue and purple. The power LED will emit one warning sound or vibration, ...
3. NOTE: When the battery is low on the Wireless-G IP Phone This maximizes battery performance and life. Wireless-G IP Phone Chapter 3: Installing and Using the Wireless-G IP Phone 9 Powering on power, it will flash, alternating between blue and purple. The power LED will emit one warning sound or vibration, ...

User Guide
Page 18
... to make menu choices. Icon Button Name Function Soft Key Press the left - or righthand side of the buttons you will use the navigation pad. Call Uses Internet phone line Power or End Call To exit a menu without making changes, press this button. Wireless-G IP Phone Navigating the...Soft Key Power or End Call Different Key Choices or + Sign Enter Symbol or Space Figure 3-4: Front Panel 10 Chapter 3: Installing and Using the Wireless-G IP Phone Navigating the Wireless-G IP Phone Navigation Pad and Center Selection Key To navigate menus and control the cursor for the...
... to make menu choices. Icon Button Name Function Soft Key Press the left - or righthand side of the buttons you will use the navigation pad. Call Uses Internet phone line Power or End Call To exit a menu without making changes, press this button. Wireless-G IP Phone Navigating the...Soft Key Power or End Call Different Key Choices or + Sign Enter Symbol or Space Figure 3-4: Front Panel 10 Chapter 3: Installing and Using the Wireless-G IP Phone Navigating the Wireless-G IP Phone Navigation Pad and Center Selection Key To navigate menus and control the cursor for the...

User Guide
Page 19
...." Proceed to Know the Wireless-G IP Phone." Enter Symbol or Space Press the * (star) key twice to open the Symbol Selection menu. Chapter 3: Installing and Using the Wireless-G IP Phone Navigating the Wireless-G IP Phone Wireless-G IP Phone Figure 3-5: Symbol Selection 11 Press the # (pound) key to enter the + sign. Icon...
...." Proceed to Know the Wireless-G IP Phone." Enter Symbol or Space Press the * (star) key twice to open the Symbol Selection menu. Chapter 3: Installing and Using the Wireless-G IP Phone Navigating the Wireless-G IP Phone Wireless-G IP Phone Figure 3-5: Symbol Selection 11 Press the # (pound) key to enter the + sign. Icon...

User Guide
Page 20
A list of the navigation pad) to use. Wireless-G IP Phone Setting up the Wireless-G IP Phone Before you want to select the wireless network you want is indicated by a bar graph. Figure 3-6: ... sure your network has an active Internet connection. 1. Press and hold the Power button for Wireless Networks Figure 3-7: Select Wireless Network 12 Chapter 3: Installing and Using the Wireless-G IP Phone Setting up and automatically scan for a new scan.
A list of the navigation pad) to use. Wireless-G IP Phone Setting up the Wireless-G IP Phone Before you want to select the wireless network you want is indicated by a bar graph. Figure 3-6: ... sure your network has an active Internet connection. 1. Press and hold the Power button for Wireless Networks Figure 3-7: Select Wireless Network 12 Chapter 3: Installing and Using the Wireless-G IP Phone Setting up and automatically scan for a new scan.

User Guide
Page 21
... navigation pad, select the appropriate transmit key number and then move to Figure 3-9: Enter WEP Wireless Network Key (Secured Network) Chapter 3: Installing and Using the Wireless-G IP Phone Setting up the Wireless-G IP Phone Figure 3-10: Enter WPA Key (Secured Network) Figure 3-11: Successful Connection 13 Press the center ...
... navigation pad, select the appropriate transmit key number and then move to Figure 3-9: Enter WEP Wireless Network Key (Secured Network) Chapter 3: Installing and Using the Wireless-G IP Phone Setting up the Wireless-G IP Phone Figure 3-10: Enter WPA Key (Secured Network) Figure 3-11: Successful Connection 13 Press the center ...

User Guide
Page 22
Navigate the menu choices, and then select SIP Settings. (SIP stands for Session Initiation Protocol.) Figure 3-12: Select Menu Figure 3-13: Select SIP Settings 14 Chapter 3: Installing and Using the Wireless-G IP Phone Setting up the Wireless-G IP Phone Phone Settings will appear. Select Menu. 7. Wireless-G IP Phone 6. The standby screen will be highlighted.
Navigate the menu choices, and then select SIP Settings. (SIP stands for Session Initiation Protocol.) Figure 3-12: Select Menu Figure 3-13: Select SIP Settings 14 Chapter 3: Installing and Using the Wireless-G IP Phone Setting up the Wireless-G IP Phone Phone Settings will appear. Select Menu. 7. Wireless-G IP Phone 6. The standby screen will be highlighted.

User Guide
Page 23
If you do not have been supplied by your Internet phone service provider. 9. Wireless-G IP Phone Figure 3-14: Edit Proxy IP Chapter 3: Installing and Using the Wireless-G IP Phone Setting up the Wireless-G IP Phone Figure 3-15: Save Proxy IP 15 For the Proxy IP setting, select Edit. Enter the Proxy IP address in the new window, and then press the center selection key. 8. A list of SIP settings will be displayed. NOTE: The Proxy IP address and other information should have this information, contact your Internet phone service provider.
If you do not have been supplied by your Internet phone service provider. 9. Wireless-G IP Phone Figure 3-14: Edit Proxy IP Chapter 3: Installing and Using the Wireless-G IP Phone Setting up the Wireless-G IP Phone Figure 3-15: Save Proxy IP 15 For the Proxy IP setting, select Edit. Enter the Proxy IP address in the new window, and then press the center selection key. 8. A list of SIP settings will be displayed. NOTE: The Proxy IP address and other information should have this information, contact your Internet phone service provider.

User Guide
Page 24
Scroll down to Register Proxy IP, and select Edit. 13. Figure 3-16: Save Proxy Port Figure 3-17: Save Register Proxy IP 16 Chapter 3: Installing and Using the Wireless-G IP Phone Setting up the Wireless-G IP Phone Enter the Proxy Port number address in the new window, and then press the center selection key. Scroll down to Proxy Port, and select Edit. 11. Enter the Register Proxy IP address in the new window, and then press the center selection key. 12. Wireless-G IP Phone 10.
Scroll down to Register Proxy IP, and select Edit. 13. Figure 3-16: Save Proxy Port Figure 3-17: Save Register Proxy IP 16 Chapter 3: Installing and Using the Wireless-G IP Phone Setting up the Wireless-G IP Phone Enter the Proxy Port number address in the new window, and then press the center selection key. Scroll down to Proxy Port, and select Edit. 11. Enter the Register Proxy IP address in the new window, and then press the center selection key. 12. Wireless-G IP Phone 10.

User Guide
Page 25
Scroll down to Outbound Proxy IP, and select Edit. 17. Enter the Outbound Proxy IP address in the new window, and then press the center selection key. 16. 14. Chapter 3: Installing and Using the Wireless-G IP Phone Setting up the Wireless-G IP Phone Wireless-G IP Phone Figure 3-18: Save Register Proxy Port Figure 3-19: Save Outbound Proxy IP 17 Scroll down to Register Proxy Port, and select Edit. 15. Enter the Register Proxy Port number in the new window, and then press the center selection key.
Scroll down to Outbound Proxy IP, and select Edit. 17. Enter the Outbound Proxy IP address in the new window, and then press the center selection key. 16. 14. Chapter 3: Installing and Using the Wireless-G IP Phone Setting up the Wireless-G IP Phone Wireless-G IP Phone Figure 3-18: Save Register Proxy Port Figure 3-19: Save Outbound Proxy IP 17 Scroll down to Register Proxy Port, and select Edit. 15. Enter the Register Proxy Port number in the new window, and then press the center selection key.

User Guide
Page 26
... the new window, and then press the center selection key. Figure 3-20: Edit Outbound Proxy Port Figure 3-21: Save Expire Time 18 Chapter 3: Installing and Using the Wireless-G IP Phone Setting up the Wireless-G IP Phone Enter the Expire Time in the new window, and then press the center selection key...
... the new window, and then press the center selection key. Figure 3-20: Edit Outbound Proxy Port Figure 3-21: Save Expire Time 18 Chapter 3: Installing and Using the Wireless-G IP Phone Setting up the Wireless-G IP Phone Enter the Expire Time in the new window, and then press the center selection key...

User Guide
Page 27
Scroll down to Phone Number, and select Edit. 23. Enter the User Name in the new window, and then press the center selection key. 22. Scroll down to User Name, and select Edit. 25. Wireless-G IP Phone 24. Enter the Phone Number you will use for Internet phone calls, and then press the center selection key. Figure 3-22: Save Phone Number Chapter 3: Installing and Using the Wireless-G IP Phone Setting up the Wireless-G IP Phone Figure 3-23: Save User Name 19
Scroll down to Phone Number, and select Edit. 23. Enter the User Name in the new window, and then press the center selection key. 22. Scroll down to User Name, and select Edit. 25. Wireless-G IP Phone 24. Enter the Phone Number you will use for Internet phone calls, and then press the center selection key. Figure 3-22: Save Phone Number Chapter 3: Installing and Using the Wireless-G IP Phone Setting up the Wireless-G IP Phone Figure 3-23: Save User Name 19


