User Manual
Page 2
English Table of Contents Foreword 4 Thank You 4 Getting Started 4 Features...4 Package Contents 5 Unit Overview 6 Front panel 6 Back panel 6 Top panel 7 Remote control 8 Setting the Clock 12 Setting Mode 12 To set the CLOCK TIME 12 To set the ALARM 12 Wake to iPod Alarm 13 Wake to Radio Alarm 13 Wake to Buzzer Alarm 13 Wake to AUX Alarm 13 To stop the ALARM 14 To use the SNOOZE function 14 To set AUTO OFF time 14 Radio Mode 15 Using the Radio 15 iPod Mode 17 iPod Adapters 17 Playback Operation 18 Page 2 Coby Electronics Corporation
English Table of Contents Foreword 4 Thank You 4 Getting Started 4 Features...4 Package Contents 5 Unit Overview 6 Front panel 6 Back panel 6 Top panel 7 Remote control 8 Setting the Clock 12 Setting Mode 12 To set the CLOCK TIME 12 To set the ALARM 12 Wake to iPod Alarm 13 Wake to Radio Alarm 13 Wake to Buzzer Alarm 13 Wake to AUX Alarm 13 To stop the ALARM 14 To use the SNOOZE function 14 To set AUTO OFF time 14 Radio Mode 15 Using the Radio 15 iPod Mode 17 iPod Adapters 17 Playback Operation 18 Page 2 Coby Electronics Corporation
User Manual
Page 4
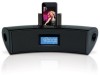
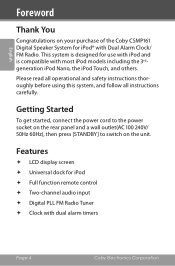
... Digital Speaker System for iPod® with Dual Alarm Clock/ FM Radio. English Foreword Thank You Congratulations on the unit. Features LCD display screen Universal dock for use with iPod and is compatible with dual alarm timers Page 4 Coby Electronics Corporation Please read all operational and safety instructions thoroughly before using this system, and follow all instructions carefully. This system is designed for iPod Full function remote control Two-channel audio input...
... Digital Speaker System for iPod® with Dual Alarm Clock/ FM Radio. English Foreword Thank You Congratulations on the unit. Features LCD display screen Universal dock for use with iPod and is compatible with dual alarm timers Page 4 Coby Electronics Corporation Please read all operational and safety instructions thoroughly before using this system, and follow all instructions carefully. This system is designed for iPod Full function remote control Two-channel audio input...
User Manual
Page 7
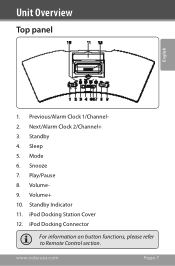
Volume+ 10. Standby Indicator 11. Standby 4. Unit Overview Top panel English 1. Sleep 5. www.cobyusa.com Page 7 Mode 6. Snooze 7. Play/Pause 8. iPod Docking Connector For information on button functions, please refer to Remote Control section. Volume9. iPod Docking Station Cover 12. Previous/Alarm Clock 1/Channel2. Next/Alarm Clock 2/Channel+ 3.
Volume+ 10. Standby Indicator 11. Standby 4. Unit Overview Top panel English 1. Sleep 5. www.cobyusa.com Page 7 Mode 6. Snooze 7. Play/Pause 8. iPod Docking Connector For information on button functions, please refer to Remote Control section. Volume9. iPod Docking Station Cover 12. Previous/Alarm Clock 1/Channel2. Next/Alarm Clock 2/Channel+ 3.

User Manual
Page 9
Note: IPOD mode is not available when no iPod is docked in device. In IPOD mode, skip to previous available frequency. English Unit Overview Key 2 MODE 3 FAST FORWARD/ SEARCH 4 FAST REWIND/ SEARCH 5, 7, Direction Keypad 18, 21 6 PLAYLIST + 8 PLAYLIST - 9 MENU/MEMORY Description Switch between IPOD, TUNER (radio) and AUX-IN modes. In TUNER mode, press to tune radio to previous playlist. In IPOD mode, skip to display iPod menu. www.cobyusa.com...
Note: IPOD mode is not available when no iPod is docked in device. In IPOD mode, skip to previous available frequency. English Unit Overview Key 2 MODE 3 FAST FORWARD/ SEARCH 4 FAST REWIND/ SEARCH 5, 7, Direction Keypad 18, 21 6 PLAYLIST + 8 PLAYLIST - 9 MENU/MEMORY Description Switch between IPOD, TUNER (radio) and AUX-IN modes. In TUNER mode, press to tune radio to previous playlist. In IPOD mode, skip to display iPod menu. www.cobyusa.com...

User Manual
Page 10
... mode, press and hold to display CLOCK TIME, ALARM TIME 1 - 2, ALARM TYPE 1 - 2, SNOOZE TIME. When unit is turned on Clock Functions, see Clock Settings section. In IPOD mode, press to skip to the next preset radio frequency. In TUNER mode, press to skip to the next track. In STANDBY mode, press to mute sound in IPOD, TUNER or AUX mode. Page 10 Coby Electronics Corporation For more information on , press repeatedly to restore default settings and reset all clock functions. English...
... mode, press and hold to display CLOCK TIME, ALARM TIME 1 - 2, ALARM TYPE 1 - 2, SNOOZE TIME. When unit is turned on Clock Functions, see Clock Settings section. In IPOD mode, press to skip to the next preset radio frequency. In TUNER mode, press to skip to the next track. In STANDBY mode, press to mute sound in IPOD, TUNER or AUX mode. Page 10 Coby Electronics Corporation For more information on , press repeatedly to restore default settings and reset all clock functions. English...

User Manual
Page 11
.... In IPOD mode, skips playback to auto scan all radio frequencies. www.cobyusa.com Page 11 In TUNER mode, press to next track. Stops playback in IPOD, TUNER and AUX modes. In IPOD mode, skips playback to play or pause audio. Description In IPOD mode, press to previous track. Press to view ALARM 1 TIME. In STANDBY mode, press to confirm IPOD menu selection or device settings. In IPOD mode, press to switch playback repeat settings.
.... In IPOD mode, skips playback to auto scan all radio frequencies. www.cobyusa.com Page 11 In TUNER mode, press to next track. Stops playback in IPOD, TUNER and AUX modes. In IPOD mode, skips playback to play or pause audio. Description In IPOD mode, press to previous track. Press to view ALARM 1 TIME. In STANDBY mode, press to confirm IPOD menu selection or device settings. In IPOD mode, press to switch playback repeat settings.

User Manual
Page 12
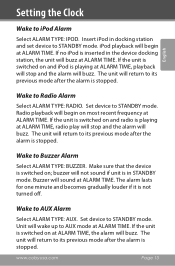
English Setting the Clock Setting Mode To access the clock's SETTING Mode, place the device in the SETTING menu. Select CLOCK TIME using instructions provided above. To set the CLOCK TIME Press [SLEEP/TIME] to 2 preset alarm times. Press [SLEEP/TIME] to adjust value or switch options. For more information on ALARM TYPE, see below . Page 12 Coby Electronics Corporation To set the ALARM This device includes a dual alarm clock which allows up to access CLOCK TIME Setting Mode. Select ALARM TIME and ALARM TYPE using instructions provided below . Press [SLEEP/ TIME] to...
English Setting the Clock Setting Mode To access the clock's SETTING Mode, place the device in the SETTING menu. Select CLOCK TIME using instructions provided above. To set the CLOCK TIME Press [SLEEP/TIME] to 2 preset alarm times. Press [SLEEP/TIME] to adjust value or switch options. For more information on ALARM TYPE, see below . Page 12 Coby Electronics Corporation To set the ALARM This device includes a dual alarm clock which allows up to access CLOCK TIME Setting Mode. Select ALARM TIME and ALARM TYPE using instructions provided below . Press [SLEEP/ TIME] to...
User Manual
Page 13
... buzz at ALARM TIME. Setting the Clock English Wake to Buzzer Alarm Select ALARM TYPE: BUZZER. If the unit is in the device docking station, the unit will return to AUX Alarm Select ALARM TYPE: AUX. buzzer will return to Radio Alarm Select ALARM TYPE: RADIO. www.cobyusa.com Page 13 Wake to iPod Alarm Select ALARM TYPE: IPOD. The unit will not sound if unit is switched on and radio is stopped. Wake to its previous mode after the alarm is stopped. Radio playback...
... buzz at ALARM TIME. Setting the Clock English Wake to Buzzer Alarm Select ALARM TYPE: BUZZER. If the unit is in the device docking station, the unit will return to AUX Alarm Select ALARM TYPE: AUX. buzzer will return to Radio Alarm Select ALARM TYPE: RADIO. www.cobyusa.com Page 13 Wake to iPod Alarm Select ALARM TYPE: IPOD. The unit will not sound if unit is switched on and radio is stopped. Wake to its previous mode after the alarm is stopped. Radio playback...
User Manual
Page 14
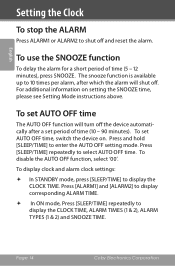
... ON mode, Press [SLEEP/TIME] repeatedly to display the CLOCK TIME. To disable the AUTO OFF function, select '00'. To use the SNOOZE function To delay the alarm for a short period of time (10 - 90 minutes). To display clock and alarm clock settings: In STANDBY mode, press [SLEEP/TIME] to display the CLOCK TIME, ALARM TIMES (1 & 2), ALARM TYPES (1 & 2) and SNOOZE TIME. Page 14 Coby Electronics Corporation English Setting the Clock To stop the ALARM Press ALARM1 or ALARM2 to 10 times per alarm, after which the alarm will turn...
... ON mode, Press [SLEEP/TIME] repeatedly to display the CLOCK TIME. To disable the AUTO OFF function, select '00'. To use the SNOOZE function To delay the alarm for a short period of time (10 - 90 minutes). To display clock and alarm clock settings: In STANDBY mode, press [SLEEP/TIME] to display the CLOCK TIME, ALARM TIMES (1 & 2), ALARM TYPES (1 & 2) and SNOOZE TIME. Page 14 Coby Electronics Corporation English Setting the Clock To stop the ALARM Press ALARM1 or ALARM2 to 10 times per alarm, after which the alarm will turn...

User Manual
Page 15
... [SEARCH --] to 20 preset radio frequencies. English Autoscan Press [REPEAT/SCAN] to perform a full scan of all available frequencies from 87.5 to increase/decrease frequency by pressing CH+/CH -. To set a frequency, press [MENU/MEMORY] to enter programming mode. (Screen will store up to scan for next available radio frequency. www.cobyusa.com Page 15 Radio Mode Using the Radio To listen to...
... [SEARCH --] to 20 preset radio frequencies. English Autoscan Press [REPEAT/SCAN] to perform a full scan of all available frequencies from 87.5 to increase/decrease frequency by pressing CH+/CH -. To set a frequency, press [MENU/MEMORY] to enter programming mode. (Screen will store up to scan for next available radio frequency. www.cobyusa.com Page 15 Radio Mode Using the Radio To listen to...

User Manual
Page 16
English Radio Mode Press [STEREO] to the Remote Control chapter. If the system is in TUNER mode, please refer to change the FM mode reception settings. For information on using [EQ], [MUTE] and [VOL+/-] in programming mode, you must confirm your selection and exit by pressing [MENU/MEMORY] before using scan functions. Page 16 Coby Electronics Corporation
English Radio Mode Press [STEREO] to the Remote Control chapter. If the system is in TUNER mode, please refer to change the FM mode reception settings. For information on using [EQ], [MUTE] and [VOL+/-] in programming mode, you must confirm your selection and exit by pressing [MENU/MEMORY] before using scan functions. Page 16 Coby Electronics Corporation
User Manual
Page 18
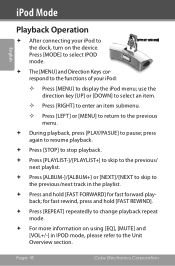
... IPOD mode. The [MENU] and Direction Keys correspond to the functions of your iPod to the dock, turn on using [EQ], [MUTE] and [VOL+/-] in the playlist. Press and hold [FAST REWIND]. Press [REPEAT] repeatedly to change playback repeat mode. For more information on the device. press again to resume playback. Press [STOP] to stop...
... IPOD mode. The [MENU] and Direction Keys correspond to the functions of your iPod to the dock, turn on using [EQ], [MUTE] and [VOL+/-] in the playlist. Press and hold [FAST REWIND]. Press [REPEAT] repeatedly to change playback repeat mode. For more information on the device. press again to resume playback. Press [STOP] to stop...

User Manual
Page 19
... white cable/plug to the left channel auxiliary audio input, and the red cable/plug to the right. After the connections have been made, power on the unit's back panel. Select playback on the external device to play audio through this unit's speaker system. For information on using [EQ], [MUTE] and [VOL+/-] in AUX-IN mode, please refer to the Remote Control...
... white cable/plug to the left channel auxiliary audio input, and the red cable/plug to the right. After the connections have been made, power on the unit's back panel. Select playback on the external device to play audio through this unit's speaker system. For information on using [EQ], [MUTE] and [VOL+/-] in AUX-IN mode, please refer to the Remote Control...
User Manual
Page 20
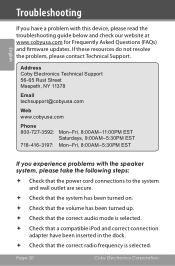
... the dock. Check that a compatible iPod and correct connection adapter have a problem with the speaker system, please take the following steps: Check that the power cord connections to the system and wall outlet are secure. Check that the system has been turned on. Check that the volume has been turned up. Check that the correct audio mode...
... the dock. Check that a compatible iPod and correct connection adapter have a problem with the speaker system, please take the following steps: Check that the power cord connections to the system and wall outlet are secure. Check that the system has been turned on. Check that the volume has been turned up. Check that the correct audio mode...
User Manual
Page 21
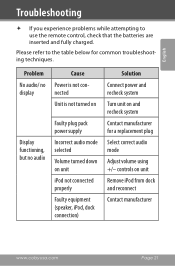
... display Display functioning, but no audio Cause Power is not connected Unit is not turned on Faulty plug pack power supply Incorrect audio mode selected Volume turned down on unit iPod not connected properly Faulty equipment (speaker, iPod, dock connection) Solution Connect power and recheck system Turn unit on unit Remove iPod from dock and reconnect Contact manufacturer www.cobyusa.com Page 21 English Troubleshooting If you experience problems while attempting to the table below for a replacement plug Select correct audio mode Adjust volume using...
... display Display functioning, but no audio Cause Power is not connected Unit is not turned on Faulty plug pack power supply Incorrect audio mode selected Volume turned down on unit iPod not connected properly Faulty equipment (speaker, iPod, dock connection) Solution Connect power and recheck system Turn unit on unit Remove iPod from dock and reconnect Contact manufacturer www.cobyusa.com Page 21 English Troubleshooting If you experience problems while attempting to the table below for a replacement plug Select correct audio mode Adjust volume using...
User Manual
Page 22
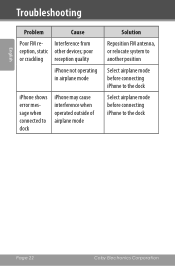
poor or crackling reception quality iPhone not operating in airplane mode iPhone shows error message when connected to dock iPhone may cause interference when operated outside of airplane mode Solution Reposition FM antenna, or relocate system to another position Select airplane mode before connecting iPhone to the dock Select airplane mode before connecting iPhone to the dock Page 22 Coby Electronics Corporation English Troubleshooting Problem Cause Poor FM re- Interference from ception, static other devices;
poor or crackling reception quality iPhone not operating in airplane mode iPhone shows error message when connected to dock iPhone may cause interference when operated outside of airplane mode Solution Reposition FM antenna, or relocate system to another position Select airplane mode before connecting iPhone to the dock Select airplane mode before connecting iPhone to the dock Page 22 Coby Electronics Corporation English Troubleshooting Problem Cause Poor FM re- Interference from ception, static other devices;
User Manual
Page 24
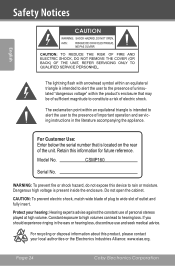
... of uninsulated "dangerous voltage" within an equilateral triangle is intended to alert the user to the presence of personal stereos played at high volume. The exclamation point within the product's enclosure that is present inside the enclosure. Retain this product, please contact your hearing: Hearing experts advise against the constant use of important operation and servicing instructions in the ears or...
... of uninsulated "dangerous voltage" within an equilateral triangle is intended to alert the user to the presence of personal stereos played at high volume. The exclamation point within the product's enclosure that is present inside the enclosure. Retain this product, please contact your hearing: Hearing experts advise against the constant use of important operation and servicing instructions in the ears or...

User Manual
Page 25
... or an experienced radio/TV technician for Class B digital devices, pursuant to provide reasonable protection against harmful interference in a particular installation. Note: This equipment has been tested and found to stop operation of the FCC rules. This equipment generates, uses and can be required to comply with the instructions, may cause undesired operation. If such changes or modifications should...
... or an experienced radio/TV technician for Class B digital devices, pursuant to provide reasonable protection against harmful interference in a particular installation. Note: This equipment has been tested and found to stop operation of the FCC rules. This equipment generates, uses and can be required to comply with the instructions, may cause undesired operation. If such changes or modifications should...

User Manual
Page 26
... lightning or power-line surges. Follow Instructions: All operating and usage instructions should be routed so that they exit from overheating. Attachments: Use only attachments recommended by items placed upon or against them, paying particular attention to cords at plugs, convenience receptacles, and at the point which they are not sure of the type of time. Power-Cord Protection: Power supply cords should never...
... lightning or power-line surges. Follow Instructions: All operating and usage instructions should be routed so that they exit from overheating. Attachments: Use only attachments recommended by items placed upon or against them, paying particular attention to cords at plugs, convenience receptacles, and at the point which they are not sure of the type of time. Power-Cord Protection: Power supply cords should never...

User Manual
Page 27
... the power-supply or plug is in performance-this product, ask the service technician to perform safety checks to ensure that your service technician has used replacement parts specified by the operating instructions as radiators, heat registers, stoves, or other hazards. 17. e) if the product has been dropped or damaged in a fire or electric shock. Refer all servicing to rain or water; www.cobyusa...
... the power-supply or plug is in performance-this product, ask the service technician to perform safety checks to ensure that your service technician has used replacement parts specified by the operating instructions as radiators, heat registers, stoves, or other hazards. 17. e) if the product has been dropped or damaged in a fire or electric shock. Refer all servicing to rain or water; www.cobyusa...


