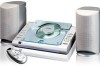
User Guide
Page 2
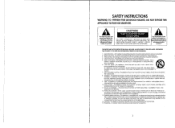
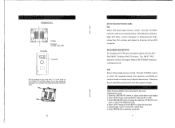
... water; SAFETY INSTRUCTIONS WARNING: TO PREVENT FIRE OR SHOCK HAZARD, DO NOT EXPOSE THIS APPLIANCE TO RAIN OR MOISTURE. REFER accompanying the SERVICING TO QUALIFIED SERVICE PERSONNEL. AJI operating and use instructionsshould be read before 1I1e product Isoperated. 2. Carts and stands - Power supp~ cords should be sure the servlce technician has used near a swimming ~ .-!!! An outdoor antenna should be routed...
... water; SAFETY INSTRUCTIONS WARNING: TO PREVENT FIRE OR SHOCK HAZARD, DO NOT EXPOSE THIS APPLIANCE TO RAIN OR MOISTURE. REFER accompanying the SERVICING TO QUALIFIED SERVICE PERSONNEL. AJI operating and use instructionsshould be read before 1I1e product Isoperated. 2. Carts and stands - Power supp~ cords should be sure the servlce technician has used near a swimming ~ .-!!! An outdoor antenna should be routed...
User Guide
Page 3
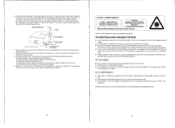
... period of time, make sure that described in a heated room where it a practice to rain; Remove all power sources are not spilled into the appliance; CLASS 1 LASER PRODUCT CLASS 1 LASER PRODUCT APPAREIL LASER DE CLASSE 1 PRODUCTO LASER DE CLASE 1 CAUTION INVISIBLE LASER RADIATION WHEN OPEN AND INTERLOCKS DEFEATED. Care should be used in this compact disc player is not to be serviced by pulling the cord. •...
... period of time, make sure that described in a heated room where it a practice to rain; Remove all power sources are not spilled into the appliance; CLASS 1 LASER PRODUCT CLASS 1 LASER PRODUCT APPAREIL LASER DE CLASSE 1 PRODUCTO LASER DE CLASE 1 CAUTION INVISIBLE LASER RADIATION WHEN OPEN AND INTERLOCKS DEFEATED. Care should be used in this compact disc player is not to be serviced by pulling the cord. •...
User Guide
Page 4
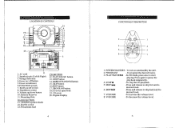
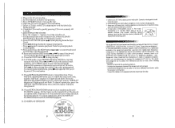
... start playing.Press again to desired track. 6. SKIPt4..... -Press and release to skip backward to desired track. 7. Remote Receiver 11. BAND switch 23.FM antenna lead CD SECTION 12. Digital Display 4 FUNCTION KEY DESCRIPTION 2 J U 7I I \ 2 3 ~v r ! To program the desired tracks. 3. SKIP button 17. PROGRAM - VOLUME -To decrease the volume level. 5 I c---,_~L:::;: 1 ;L3 §I ~ 0 0 1. AC cord 11 2. SKIP button 16. POWER STANDBY - Volume up /down button 10. TUNING up /down knob 22. PROGRAM button l8.CD cover open...
... start playing.Press again to desired track. 6. SKIPt4..... -Press and release to skip backward to desired track. 7. Remote Receiver 11. BAND switch 23.FM antenna lead CD SECTION 12. Digital Display 4 FUNCTION KEY DESCRIPTION 2 J U 7I I \ 2 3 ~v r ! To program the desired tracks. 3. SKIP button 17. PROGRAM - VOLUME -To decrease the volume level. 5 I c---,_~L:::;: 1 ;L3 §I ~ 0 0 1. AC cord 11 2. SKIP button 16. POWER STANDBY - Volume up /down button 10. TUNING up /down knob 22. PROGRAM button l8.CD cover open...
User Guide
Page 5
... directional. Turn the TUNING control to select the hour data. 5. Press PROGRAM button to keeps the selection of a FM stereo broadcast station, Set the AM / FM /FM ST. Press UPIFF button or Down/REW to select the required station. Therefore; Fastener (to hitch on the wall if you need. 6 Set the function switch to fixed the clock data. 7 For operation on band selector switch. Repeat st~ps 3 and 4 to next clock adjusting mode...
... directional. Turn the TUNING control to select the hour data. 5. Press PROGRAM button to keeps the selection of a FM stereo broadcast station, Set the AM / FM /FM ST. Press UPIFF button or Down/REW to select the required station. Therefore; Fastener (to hitch on the wall if you need. 6 Set the function switch to fixed the clock data. 7 For operation on band selector switch. Repeat st~ps 3 and 4 to next clock adjusting mode...
User Guide
Page 6
... cleaning. Connect the equipment into an outiet on to repeat function. Plug in random order. Open the CD cover by press CD cover button. 13. buttons to start playing from the first Track. • Press ~II during play at all volume levels, switch the BASS SWITCH on a circuit different from the point playback is no guarantee that to which can radiate radio frequency energy and, if not installed and used . 2. In STOP mode, press PROGRAM button...
... cleaning. Connect the equipment into an outiet on to repeat function. Plug in random order. Open the CD cover by press CD cover button. 13. buttons to start playing from the first Track. • Press ~II during play at all volume levels, switch the BASS SWITCH on a circuit different from the point playback is no guarantee that to which can radiate radio frequency energy and, if not installed and used . 2. In STOP mode, press PROGRAM button...
User Guide
Page 7
... dealer for receiving. 10 POWER SUPPLY: AC ll0/220V-60Hz/50Hz OUTPUT POWER: 2.2 WATTSRMS X 2 UNIT DIMENSION: 291(L)X201(W)X77(H)MM SPEAKER DIMENSION: 11O(L)X 162(W) X 205(H)MM N.W.: 2.85KG RADIO SECTION FREQUENCY RANGE: FM 88-108 Mhz AM 530-1710 KHz COMPACT DISC SECTION OPTICAL PICKUP: 3-BEAM LASER FREQUENCY RESPONSE: 100HZ-16KHZ 11 Press relevant button to another position for instructions. Re-plug into the headphone jack firmly. • Noise...
... dealer for receiving. 10 POWER SUPPLY: AC ll0/220V-60Hz/50Hz OUTPUT POWER: 2.2 WATTSRMS X 2 UNIT DIMENSION: 291(L)X201(W)X77(H)MM SPEAKER DIMENSION: 11O(L)X 162(W) X 205(H)MM N.W.: 2.85KG RADIO SECTION FREQUENCY RANGE: FM 88-108 Mhz AM 530-1710 KHz COMPACT DISC SECTION OPTICAL PICKUP: 3-BEAM LASER FREQUENCY RESPONSE: 100HZ-16KHZ 11 Press relevant button to another position for instructions. Re-plug into the headphone jack firmly. • Noise...


