
User Manual
Page 2
..., match wide blade of plug to wide slot of important operation and servicing instructions in the ears or hearing loss, discontinue use of electric shock. Do not open the cabinet. PROTECT YOUR HEARING: Hearing experts advise against the constant use and seek medical advice. If...number that may be of sufficient magnitude to constitute a risk of personal stereos played at high volume. WARNING: To prevent fire or shock hazard, do not expose this information for future reference. Wash hands after handling. Page 2 Coby Electronics Corporation WARNING: Handling the cords...
..., match wide blade of plug to wide slot of important operation and servicing instructions in the ears or hearing loss, discontinue use of electric shock. Do not open the cabinet. PROTECT YOUR HEARING: Hearing experts advise against the constant use and seek medical advice. If...number that may be of sufficient magnitude to constitute a risk of personal stereos played at high volume. WARNING: To prevent fire or shock hazard, do not expose this information for future reference. Wash hands after handling. Page 2 Coby Electronics Corporation WARNING: Handling the cords...

User Manual
Page 3
... PROTECTION AGAINST LASER ENERGY EXPOSURE As the laser beam used for a long period of time, make sure that all batteries from the battery compartment, and unplug the AC-DC adapter from the unit. For recycling or disposal information about this compact disc player is...open. If the unit is condensation inside the unit, the unit may form inside the unit. When there is not to 2 hours before turning the power on a carpet. Should any trouble occur, remove the power source and refer servicing to disassemble the casing. Stop operation...
... PROTECTION AGAINST LASER ENERGY EXPOSURE As the laser beam used for a long period of time, make sure that all batteries from the battery compartment, and unplug the AC-DC adapter from the unit. For recycling or disposal information about this compact disc player is...open. If the unit is condensation inside the unit, the unit may form inside the unit. When there is not to 2 hours before turning the power on a carpet. Should any trouble occur, remove the power source and refer servicing to disassemble the casing. Stop operation...

User Manual
Page 4
... of power source indicated on a bed, sofa, rug, or other attachments may cause the product and cart combination to the operating instructions. Read Instructions: All the safety and operating instructions should use a mounting accessory recommended by the manufacturer. Retain Instructions: The safety and operating instructions should be retained for future reference. 3. Do not use this product on the product and in installation such...
... of power source indicated on a bed, sofa, rug, or other attachments may cause the product and cart combination to the operating instructions. Read Instructions: All the safety and operating instructions should use a mounting accessory recommended by the manufacturer. Retain Instructions: The safety and operating instructions should be retained for future reference. 3. Do not use this product on the product and in installation such...

User Manual
Page 5
... not defeat the safety purpose of the plug. See the operating instructions for the grounding electrode (see figure). Protective Attachment Plug: The product may be sure the service technician has used a replacement plug that they are unable to cords at plugs, convenience receptacles, and at the point which they exit from the product. 14. Power-Cord Protection: Power supply cords should still fail to fit, contact...
... not defeat the safety purpose of the plug. See the operating instructions for the grounding electrode (see figure). Protective Attachment Plug: The product may be sure the service technician has used a replacement plug that they are unable to cords at plugs, convenience receptacles, and at the point which they exit from the product. 14. Power-Cord Protection: Power supply cords should still fail to fit, contact...

User Manual
Page 6
... change in a risk of time. Power Lines: An outside antenna system, extreme care should not be fatal. 18. Lightning: For added protection for this indicates a need for long periods of fire or electric shock. 19. Overloading: Do not overload wall outlets, extension cords, or integral convenience receptacles as the original part. d) if the product does not operate normally by the operating instructions...
... change in a risk of time. Power Lines: An outside antenna system, extreme care should not be fatal. 18. Lightning: For added protection for this indicates a need for long periods of fire or electric shock. 19. Overloading: Do not overload wall outlets, extension cords, or integral convenience receptacles as the original part. d) if the product does not operate normally by the operating instructions...

User Manual
Page 8
... the instructions, may cause harmful interference to which can radiate radio frequency energy and, if not installed and used in accordance with the limits for help. Page 8 Coby Electronics Corporation These limits are designed to Part 15 of the following measures: Reorient or relocate the receiving antenna. Increase the separation between the equipment and receiver. Connect...
... the instructions, may cause harmful interference to which can radiate radio frequency energy and, if not installed and used in accordance with the limits for help. Page 8 Coby Electronics Corporation These limits are designed to Part 15 of the following measures: Reorient or relocate the receiving antenna. Increase the separation between the equipment and receiver. Connect...

User Manual
Page 9
...few times. If the lens is very dirty, the CD may not work at all. use chemicals such as follows: For Dust or Dry Particles - Cleaning the CD Player Lens A dirty lens can cause CD playback to direct sunlight, high humidity, or high temperatures. Do not ... the disc. To remove a CD from the playing surface of the disc. CD CARE & MAINTENANCE Handling CDs Hold a CD by its storage case, press down on the center retention mechanism of the case and lift the disc out. Small dust particles and light stains will not affect playback quality. Never use a ...
...few times. If the lens is very dirty, the CD may not work at all. use chemicals such as follows: For Dust or Dry Particles - Cleaning the CD Player Lens A dirty lens can cause CD playback to direct sunlight, high humidity, or high temperatures. Do not ... the disc. To remove a CD from the playing surface of the disc. CD CARE & MAINTENANCE Handling CDs Hold a CD by its storage case, press down on the center retention mechanism of the case and lift the disc out. Small dust particles and light stains will not affect playback quality. Never use a ...

User Manual
Page 10
... at a Glance 14 Bottom View 15 Top View 15 Remote Control 15 Digital Display 15 Mounting the CX-CD377 16 Connections 17 Speakers 17 Auxiliary (optional 17 Power 17 CD MODE 18 Basic Operation 18 CD Functions 18 Play/Pause/Stop 18 Previous/Next (Skip 18 Reverse/Forward (Scan 18 Repeat/Random Mode 19 Program (Memory 19 RADIO MODE 20 Basic Operation 20 Tuning 20 Reception 20 Page 10...
... at a Glance 14 Bottom View 15 Top View 15 Remote Control 15 Digital Display 15 Mounting the CX-CD377 16 Connections 17 Speakers 17 Auxiliary (optional 17 Power 17 CD MODE 18 Basic Operation 18 CD Functions 18 Play/Pause/Stop 18 Previous/Next (Skip 18 Reverse/Forward (Scan 18 Repeat/Random Mode 19 Program (Memory 19 RADIO MODE 20 Basic Operation 20 Tuning 20 Reception 20 Page 10...

User Manual
Page 12
If any items are included in Cable Mounting Plate with Screws (3 x 10 PWA) Pedestal Base Page 12 Coby Electronics Corporation PACKAGE CONTENTS Please make sure the following items are missing, contact your local dealer. CX-CD377 Main Unit Stereo Speakers (x 2) Remote Control 3.5mm male-to-male Line-in the package.
If any items are included in Cable Mounting Plate with Screws (3 x 10 PWA) Pedestal Base Page 12 Coby Electronics Corporation PACKAGE CONTENTS Please make sure the following items are missing, contact your local dealer. CX-CD377 Main Unit Stereo Speakers (x 2) Remote Control 3.5mm male-to-male Line-in the package.

User Manual
Page 13
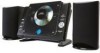
FEATURES Vertical Loading CD Player Multi-Function Backlit LCD Display Electronic Volume Control Analog AM/FM Stereo Tuner (Rotary Tuning, Digital Readout) Dynamic Bass Boost System (DBBS) Full-Range Speaker System 110/220V Dual Voltage www.cobyusa.com Page 13
FEATURES Vertical Loading CD Player Multi-Function Backlit LCD Display Electronic Volume Control Analog AM/FM Stereo Tuner (Rotary Tuning, Digital Readout) Dynamic Bass Boost System (DBBS) Full-Range Speaker System 110/220V Dual Voltage www.cobyusa.com Page 13

User Manual
Page 15
Function Switch (CD/Aux/Radio) 7. Remote Sensor 12. Previous 17. CD Door 20. AM/FM Tuning Dial 22. Power/Standby 2. Stop 5. Volume Down Digital Display Page 15 FM Antenna Lead Top View 4. Auxiliary Line-In Jack 9. Program 18. Open CD Door 19. Next 6. Bass Switch (On/Off) 8. Speaker Out Jacks (Left, Right) 3. GETTING STARTED Bottom View 1. AC Power Cord 2. Volume Down / Up / 10. Next 16. Mounting Slots 23. Power (On/Off) 5. Power Indicator 6. Play/Pause 13. Repeat/Random...
Function Switch (CD/Aux/Radio) 7. Remote Sensor 12. Previous 17. CD Door 20. AM/FM Tuning Dial 22. Power/Standby 2. Stop 5. Volume Down Digital Display Page 15 FM Antenna Lead Top View 4. Auxiliary Line-In Jack 9. Program 18. Open CD Door 19. Next 6. Bass Switch (On/Off) 8. Speaker Out Jacks (Left, Right) 3. GETTING STARTED Bottom View 1. AC Power Cord 2. Volume Down / Up / 10. Next 16. Mounting Slots 23. Power (On/Off) 5. Power Indicator 6. Play/Pause 13. Repeat/Random...

User Manual
Page 17
... jack. Make sure that the voltage selector on AC 110V or 220V power. 1. Plug the power cord into an AC wall socket. 3. www.cobyusa.com Page 17 If you purchased this product. 2. Power This unit runs on the bottom of the unit is set the POWER switch to the "On" position. To turn the player on the rear of the main unit. GETTING STARTED Connections Speakers...
... jack. Make sure that the voltage selector on AC 110V or 220V power. 1. Plug the power cord into an AC wall socket. 3. www.cobyusa.com Page 17 If you purchased this product. 2. Power This unit runs on the bottom of the unit is set the POWER switch to the "On" position. To turn the player on the rear of the main unit. GETTING STARTED Connections Speakers...

User Manual
Page 18
... player on. 2. Insert a CD with its label facing up. Press POWER to the next track. CD Functions Play/Pause/Stop Press to scan through the current track in a reverse Press and hold direction. To open the CD Door, press . Press to start playback. Press during playback to pause. CD MODE Basic Operation...
... player on. 2. Insert a CD with its label facing up. Press POWER to the next track. CD Functions Play/Pause/Stop Press to scan through the current track in a reverse Press and hold direction. To open the CD Door, press . Press to start playback. Press during playback to pause. CD MODE Basic Operation...

User Manual
Page 19
... in sequential order (no indicator) Program (Memory) Press Program to set the repeat/random mode of up to 20 tracks to enter Program mode. 3. Press to be played. 1. To cancel program playback, press or open the CD Door. cessive press of will change the mode as follows: Repeat One: repeat the current track (flashing REPEAT display) Repeat All: repeat...
... in sequential order (no indicator) Program (Memory) Press Program to set the repeat/random mode of up to 20 tracks to enter Program mode. 3. Press to be played. 1. To cancel program playback, press or open the CD Door. cessive press of will change the mode as follows: Repeat One: repeat the current track (flashing REPEAT display) Repeat All: repeat...

User Manual
Page 20
... AM broadcasts, the unit should be positioned for best signal strength (the AM antenna is weak). —— FM ST: Listen to a lower station fre- RADIO MODE Basic Operation 1. quency. Turn the AM/FM Tuning Dial up to tune to the "Radio" position. 3. Page 20 Coby Electronics Corporation Tuning Turn the AM/FM Tuning Dial down to tune to FM Stereo broadcasts. quency.
... AM broadcasts, the unit should be positioned for best signal strength (the AM antenna is weak). —— FM ST: Listen to a lower station fre- RADIO MODE Basic Operation 1. quency. Turn the AM/FM Tuning Dial up to tune to the "Radio" position. 3. Page 20 Coby Electronics Corporation Tuning Turn the AM/FM Tuning Dial down to tune to FM Stereo broadcasts. quency.

User Manual
Page 21
Basic Operation 1. Set the FUNCTION switch to play any audio device (e.g., MP3, cassette player, etc.) through your CX-CD377 system. AUX MODE Auxiliary (Aux) mode allows you to the "AUX" position. 4. Press POWER to very high levels. www.cobyusa.com Page 21 Start playback on the external audio device. —— You must use the external audio device to control playback —— To avoid distortion, do not set the volume from...
Basic Operation 1. Set the FUNCTION switch to play any audio device (e.g., MP3, cassette player, etc.) through your CX-CD377 system. AUX MODE Auxiliary (Aux) mode allows you to the "AUX" position. 4. Press POWER to very high levels. www.cobyusa.com Page 21 Start playback on the external audio device. —— You must use the external audio device to control playback —— To avoid distortion, do not set the volume from...

User Manual
Page 22
... save your changes. Press once more to change the setting. 2. Press . Press to change the setting. —— 12H: Displays the time in 12-hour time. —— 24H: Displays the time in Standby. 2. The hour setting will flash. The minutes setting will flash. Press or to enter Setup mode. Page 22 Coby Electronics Corporation SETUP MODE Clock/Display 1. Place in the player in Standby mode (press POWER if the player is in...
... save your changes. Press once more to change the setting. 2. Press . Press to change the setting. —— 12H: Displays the time in 12-hour time. —— 24H: Displays the time in Standby. 2. The hour setting will flash. The minutes setting will flash. Press or to enter Setup mode. Page 22 Coby Electronics Corporation SETUP MODE Clock/Display 1. Place in the player in Standby mode (press POWER if the player is in...

User Manual
Page 23
... proper wall outlet. Ensure that headphones are not connected to the device. Ensure that the power cord is in the proper mode (CD, Aux, Radio). Ensure that the voltage selector has been set properly (110V or 220V). The device does not play. Moisture may have a problem with this device, please read the troubleshooting guide...
... proper wall outlet. Ensure that headphones are not connected to the device. Ensure that the power cord is in the proper mode (CD, Aux, Radio). Ensure that the voltage selector has been set properly (110V or 220V). The device does not play. Moisture may have a problem with this device, please read the troubleshooting guide...

User Manual
Page 24
... has been loaded with the remote signal. Ensure that the radio is in broadcast reception range. Decrease the volume level. If possible, turn the appliance off (press REPEAT to cancel). direct sunlight, fluorescent lights, strobe lights) may be positioned too closely to a large appliance (e.g, a TV or refrigerator). The Function mode is not working. Ensure that there...
... has been loaded with the remote signal. Ensure that the radio is in broadcast reception range. Decrease the volume level. If possible, turn the appliance off (press REPEAT to cancel). direct sunlight, fluorescent lights, strobe lights) may be positioned too closely to a large appliance (e.g, a TV or refrigerator). The Function mode is not working. Ensure that there...

User Manual
Page 25
SPECIFICATIONS Power Supply Tuning System Audio Output Audio Input Peak Output Power RMS Output Power Speaker Dimensions Unit Dimensions Net Weight AC 110/220V 60/50Hz (Dual Voltage) AM: 530 - 1710kHz FM: 88 - 108MHz Stereo Speakers (x2) 3.5mm Aux Line-In 20W total (4 Ohms at 1kHz, THD 10%) 2.2W x 2 4.33" x 8.07" x 6.38" (WHD) 11.46" x 3.03" x 7.91" (WHD) 6.28 lbs Specifications and manual are subject to change without notice. www.cobyusa.com Page 25
SPECIFICATIONS Power Supply Tuning System Audio Output Audio Input Peak Output Power RMS Output Power Speaker Dimensions Unit Dimensions Net Weight AC 110/220V 60/50Hz (Dual Voltage) AM: 530 - 1710kHz FM: 88 - 108MHz Stereo Speakers (x2) 3.5mm Aux Line-In 20W total (4 Ohms at 1kHz, THD 10%) 2.2W x 2 4.33" x 8.07" x 6.38" (WHD) 11.46" x 3.03" x 7.91" (WHD) 6.28 lbs Specifications and manual are subject to change without notice. www.cobyusa.com Page 25


