User Manual
Page 1
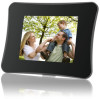
COBY Electronics Corp. 1991 Marcus Avenue, Suite 301 Lake Success, NY 11042 www.cobyusa.com www.ecoby.com 850 / 852 / 854 AC 8″ Widescreen Digital Photo Frame with Multimedia Playback DP850 DP852 DP854 INSTRUCTION MANUAL Please read this manual carefully before operation
COBY Electronics Corp. 1991 Marcus Avenue, Suite 301 Lake Success, NY 11042 www.cobyusa.com www.ecoby.com 850 / 852 / 854 AC 8″ Widescreen Digital Photo Frame with Multimedia Playback DP850 DP852 DP854 INSTRUCTION MANUAL Please read this manual carefully before operation
User Manual
Page 5
... Screen Music Controls CALENDAR 25 Date & Clock Screen 25 CREATING SLIDESHOWS 26 Opening the Vividshare 26 Photo Set 27 Buttons in the Storyboard 27 Buttons in the Timeline 28 Editing the Length of Photos and Music in the Timeline 28 Style 29 On the Style Screen 29 Decoration 30 Text 30... MODE 34 Enjoying Your slideshows 34 FILE MANAGER 35 File List 35 18 Deleting / Copying a File 35 18 36 19 System Setup 36 19 Photo Setup 37 20 Calendar Setup 37 20 Video Setup 38 20 Music Setup 38 20 VividShare Setup 38 21 39 21 39 22 KICKSTAND 40...
... Screen Music Controls CALENDAR 25 Date & Clock Screen 25 CREATING SLIDESHOWS 26 Opening the Vividshare 26 Photo Set 27 Buttons in the Storyboard 27 Buttons in the Timeline 28 Editing the Length of Photos and Music in the Timeline 28 Style 29 On the Style Screen 29 Decoration 30 Text 30... MODE 34 Enjoying Your slideshows 34 FILE MANAGER 35 File List 35 18 Deleting / Copying a File 35 18 36 19 System Setup 36 19 Photo Setup 37 20 Calendar Setup 37 20 Video Setup 38 20 Music Setup 38 20 VividShare Setup 38 21 39 21 39 22 KICKSTAND 40...
User Manual
Page 6
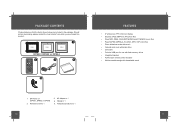
... DP854 DP850 / DP852 or DP854 CHANGE VIEW CLOCK ROTATE COPY /DEL + MENU - 2 3 4 5 1. Please make sure that the items shown below are included in the package. Manual x 1 5. AC Adapter x 1 4. Kickstand and Screw x 1 • 8" widescreen TFT LCD color display • Displays JPEG, BMP and JPG photo files • Plays MP3..., WMA, OGG,ADPCM-WAV and PCM-WAV music files • Plays MJPEG, MPEG-4, AVI, MOV, MP4, 3GP video files • Photo slideshow mode with music • Calendar and clock with alarm timer • Card slots • Full-size USB port for use with flash memory...
... DP854 DP850 / DP852 or DP854 CHANGE VIEW CLOCK ROTATE COPY /DEL + MENU - 2 3 4 5 1. Please make sure that the items shown below are included in the package. Manual x 1 5. AC Adapter x 1 4. Kickstand and Screw x 1 • 8" widescreen TFT LCD color display • Displays JPEG, BMP and JPG photo files • Plays MP3..., WMA, OGG,ADPCM-WAV and PCM-WAV music files • Plays MJPEG, MPEG-4, AVI, MOV, MP4, 3GP video files • Photo slideshow mode with music • Calendar and clock with alarm timer • Card slots • Full-size USB port for use with flash memory...
User Manual
Page 7
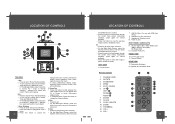
LOCATION OF CONTROLS 3 2 5 1 4 6 7 8 9 10 14 DP850 DP852 DP854 13 11 12 16 15 TOP VIEW 1. VOL + • Press for right in Photo Thumbnail Mode. • To turn down during menu selection. • On the Main Menu Screen, select the desired memory device, and then ... (SD) / Multi Media Card (MMC) / Memory Stick (MS) / XD-Picture (XD) 12. ENTER 8. Detachable Kickstand 16. CHANGE VIEW 2. USB-Mini ( for left in Photo Thumbnail Mode. • To turn up during menu selection. • On the Main Menu Screen, select the desired memory device, and then press the ENTER...
LOCATION OF CONTROLS 3 2 5 1 4 6 7 8 9 10 14 DP850 DP852 DP854 13 11 12 16 15 TOP VIEW 1. VOL + • Press for right in Photo Thumbnail Mode. • To turn down during menu selection. • On the Main Menu Screen, select the desired memory device, and then ... (SD) / Multi Media Card (MMC) / Memory Stick (MS) / XD-Picture (XD) 12. ENTER 8. Detachable Kickstand 16. CHANGE VIEW 2. USB-Mini ( for left in Photo Thumbnail Mode. • To turn up during menu selection. • On the Main Menu Screen, select the desired memory device, and then press the ENTER...
User Manual
Page 8
...care to a power outlet other than 60 degrees. • Batteries will not be disposed of the type specified here. DC OUT: 9V 1.5A DP850 / DP852 / DP854 Do not connect the power plug to orient the card in the compartment with wet hands. Used batteries should be in use the.... Use only AC adapters of safely and not incinerated. Replace the batteries if the remote is indicated here or on the left panel of the photo frame. Slide the compartment out 3. The battery used in the risk of fire or electric shock. Keep batteries out of the reach of ...
...care to a power outlet other than 60 degrees. • Batteries will not be disposed of the type specified here. DC OUT: 9V 1.5A DP850 / DP852 / DP854 Do not connect the power plug to orient the card in the compartment with wet hands. Used batteries should be in use the.... Use only AC adapters of safely and not incinerated. Replace the batteries if the remote is indicated here or on the left panel of the photo frame. Slide the compartment out 3. The battery used in the risk of fire or electric shock. Keep batteries out of the reach of ...
User Manual
Page 9
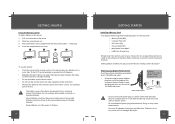
... operation details. Connecting to a Computer Connect the photo frame to your photo frame will display the " Main Menu " screen shown below. • Press the MENU button and then press the UP/DOWN button to select an available card slot. USB Port (computer) USB Port (mini) DP850 / DP852 / DP854 Make sure that a memory card...
... operation details. Connecting to a Computer Connect the photo frame to your photo frame will display the " Main Menu " screen shown below. • Press the MENU button and then press the UP/DOWN button to select an available card slot. USB Port (computer) USB Port (mini) DP850 / DP852 / DP854 Make sure that a memory card...
User Manual
Page 10
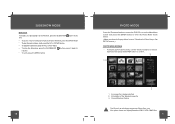
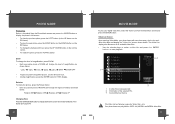
...press it again to resume. • To exit, press the MENU button. 180 PHOTO MODE Press the Thumbnail button or select the PHOTO icon on the Main Menu screen and press the ENTER button to enter the Photo Mode shown below: ( Make sure that the Display Mode is being selected. 2.... To adjust the volume level, press the VOL- Current Memory Device The Photo List will display supported Photo files, only. An image file is set to Thumbnail in Photo Setup, See SETUP section.) PHOTO MODE SCREEN • To display a photo (full screen), use the direction buttons to select a thumbnail and press the...
...press it again to resume. • To exit, press the MENU button. 180 PHOTO MODE Press the Thumbnail button or select the PHOTO icon on the Main Menu screen and press the ENTER button to enter the Photo Mode shown below: ( Make sure that the Display Mode is being selected. 2.... To adjust the volume level, press the VOL- Current Memory Device The Photo List will display supported Photo files, only. An image file is set to Thumbnail in Photo Setup, See SETUP section.) PHOTO MODE SCREEN • To display a photo (full screen), use the direction buttons to select a thumbnail and press the...
User Manual
Page 11
... the Rotate button. • Each successive press of ROTATE will change the level of magnification as shown below . Your photo frame can play your photo frame will display supported Video files, only. The Video List displays the filenames of ZOOM will change the background music... press the UP / DOWN button on the remote control. • To rotate the photo, press the ROTATE button. Zoom To change the level of magnification, press ZOOM. • Each successive press of all available video ...
... the Rotate button. • Each successive press of ROTATE will change the level of magnification as shown below . Your photo frame can play your photo frame will display supported Video files, only. The Video List displays the filenames of ZOOM will change the background music... press the UP / DOWN button on the remote control. • To rotate the photo, press the ROTATE button. Zoom To change the level of magnification, press ZOOM. • Each successive press of all available video ...
User Manual
Page 12
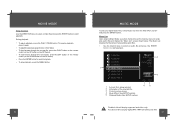
... A FLODER B FLODER C FLODER D 1 MUSIC FILE A MUSIC FILE B MUSIC FILE C MUSIC FILE D Music MUSIC FILE A 2 4MB ARTIST TRACK'S NAME ALBUM 5/16 3 Once Normal 1. Your photo frame can play your photo frame will display supported audio files, only. MOVIE MODE Video Controls Use the DIRECTION keys to select a video file and press...
... A FLODER B FLODER C FLODER D 1 MUSIC FILE A MUSIC FILE B MUSIC FILE C MUSIC FILE D Music MUSIC FILE A 2 4MB ARTIST TRACK'S NAME ALBUM 5/16 3 Once Normal 1. Your photo frame can play your photo frame will display supported audio files, only. MOVIE MODE Video Controls Use the DIRECTION keys to select a video file and press...

User Manual
Page 14
...the background color of the selected disk. 3. Disks / Folders on this button to confirm. Preview Panel: displays photo thumbnails of the current slideshow. Edit Photo: Select a photo file from the computer, press the OK button to delete it in Storyboard / Timeline. Click Cancel to a ...color / brightness / contrast of the current image file. • To save the settings, click Save. Storyboard / Timeline 6. Delete Photo: Select the unwanted photo from the Preview Panel for adding text. • Select Rotate / Crop to rotate / crop the current image. • Select...
...the background color of the selected disk. 3. Disks / Folders on this button to confirm. Preview Panel: displays photo thumbnails of the current slideshow. Edit Photo: Select a photo file from the computer, press the OK button to delete it in Storyboard / Timeline. Click Cancel to a ...color / brightness / contrast of the current image file. • To save the settings, click Save. Storyboard / Timeline 6. Delete Photo: Select the unwanted photo from the Preview Panel for adding text. • Select Rotate / Crop to rotate / crop the current image. • Select...

User Manual
Page 15
...in the Timeline. • To delete a style file, select an unwanted style from A_Modern / B_Theme / C_Photon to preview it . • Editing the length of photos and music in the Timeline Music Bar Music AA.wma Connection Line • Move the cursor to the connection line of images, click the line... of the bar to the left / right in the Timeline. • Details of operation for this style. 29 You can edit the length of photos, music, Text, Clipart and Effect 28 in the Timeline. CREATING SLIDESHOWS • Buttons in the Timeline Click the Timeline button on the animated style...
...in the Timeline. • To delete a style file, select an unwanted style from A_Modern / B_Theme / C_Photon to preview it . • Editing the length of photos and music in the Timeline Music Bar Music AA.wma Connection Line • Move the cursor to the connection line of images, click the line... of the bar to the left / right in the Timeline. • Details of operation for this style. 29 You can edit the length of photos, music, Text, Clipart and Effect 28 in the Timeline. CREATING SLIDESHOWS • Buttons in the Timeline Click the Timeline button on the animated style...

User Manual
Page 16
... it in the Timeline. • Effect • Click Effect button and select a file from the File List. • Click the Add button to make your photo slideshows more funny and lively. Decoration Screen • Text Click the Add Text button for editing texts, click the Advanced button for advanced text effect.
... it in the Timeline. • Effect • Click Effect button and select a file from the File List. • Click the Add button to make your photo slideshows more funny and lively. Decoration Screen • Text Click the Add Text button for editing texts, click the Advanced button for advanced text effect.

User Manual
Page 17
...cursor beocmes ,drag the end of the bar to confirm. 32 33 You can preview and pick your favorite Intro / Credit file and add your photo slideshow in Timeline Intro/Credit You can also slide the bar to create your movie information, such as title, director, cast, etc, and set... the text effects like movie style. CREATING SLIDESHOWS Create After you preview the whole photo slideshow and feel satisfied with the effect, click the Create VVD button to the left / right. Create VVD Button Preview Window Play button Stop button...
...cursor beocmes ,drag the end of the bar to confirm. 32 33 You can preview and pick your favorite Intro / Credit file and add your photo slideshow in Timeline Intro/Credit You can also slide the bar to create your movie information, such as title, director, cast, etc, and set... the text effects like movie style. CREATING SLIDESHOWS Create After you preview the whole photo slideshow and feel satisfied with the effect, click the Create VVD button to the left / right. Create VVD Button Preview Window Play button Stop button...

User Manual
Page 18
...and Video Mode sections of this manual for all supported digital files of Selected Folder / File 3. File List Upon entering File Manager, your photo frame will be displayed in the middle, press the ENTER button to start playback. 34 FILE MANAGER You can browse all available files...64257;le and press the ENTER button to view its information. • Press the MENU button to access the " COPY / DEL" dialogue box. FLODER A PHOTO VIDEO 1 VVD MUSIC FILE A MUSIC FILE B LYH55144. Select and confirm VividShare on the DP frame. Select DEL and then Confirm YES. • To copy ...
...and Video Mode sections of this manual for all supported digital files of Selected Folder / File 3. File List Upon entering File Manager, your photo frame will be displayed in the middle, press the ENTER button to start playback. 34 FILE MANAGER You can browse all available files...64257;le and press the ENTER button to view its information. • Press the MENU button to access the " COPY / DEL" dialogue box. FLODER A PHOTO VIDEO 1 VVD MUSIC FILE A MUSIC FILE B LYH55144. Select and confirm VividShare on the DP frame. Select DEL and then Confirm YES. • To copy ...
User Manual
Page 19
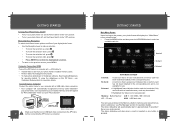
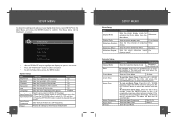
... time, and press the LEFT/RIGHT button to adjust. The Setup Menu will sound again 9 minutes, 18 mintues and 27 minutes later. System Setup Photo Setup Calendar Setup Video Setup Music Setup VividShare Setup • Use the DOWN/UP keys to highlight and display an option / sub-menu. •... the Saturation of the screen. 50 Hue Language Sets the Hue of slideshow 5Sec. Auto-Power On 1. Auto-Power Off 2. Random Sets the photo slideshow repeat On function on screen. Sets the Clock Mode 12-Hour To set Date: Press the UP / DOWN button to select the number ...
... time, and press the LEFT/RIGHT button to adjust. The Setup Menu will sound again 9 minutes, 18 mintues and 27 minutes later. System Setup Photo Setup Calendar Setup Video Setup Music Setup VividShare Setup • Use the DOWN/UP keys to highlight and display an option / sub-menu. •... the Saturation of the screen. 50 Hue Language Sets the Hue of slideshow 5Sec. Auto-Power On 1. Auto-Power Off 2. Random Sets the photo slideshow repeat On function on screen. Sets the Clock Mode 12-Hour To set Date: Press the UP / DOWN button to select the number ...

User Manual
Page 21
Please check the COBY web site periodically at www.cobyusa.com to tighten the kickstand. Using the Kickstand 1 KICKSTAND Attach the kickstand to the DP frame. 2 Turn the screw to the right to see if new firmware has been released for your photo frame. 431 DP850,DP852 or DP854 40 FIRMWARE UPGRADES From time to time, COBY may release firmware updates to improve the performance of the DP frame or to add additional features.
Please check the COBY web site periodically at www.cobyusa.com to tighten the kickstand. Using the Kickstand 1 KICKSTAND Attach the kickstand to the DP frame. 2 Turn the screw to the right to see if new firmware has been released for your photo frame. 431 DP850,DP852 or DP854 40 FIRMWARE UPGRADES From time to time, COBY may release firmware updates to improve the performance of the DP frame or to add additional features.
User Manual
Page 23
...-0000-00R/907-DP85-2000-00R/907-DP85-4000-00R 4315 TROUBLESHOOTING 44 SPECIFICATIONS Display Type Display Resolution Memory Audio Format Support Video Format Support Photo Format Support USB Host Audio Output Power Supply Built-in lithium battery Calendar 8″ Full-Color TFT LCD 800 (H) x 480 (V) MS Card Slot CF Card...
...-0000-00R/907-DP85-2000-00R/907-DP85-4000-00R 4315 TROUBLESHOOTING 44 SPECIFICATIONS Display Type Display Resolution Memory Audio Format Support Video Format Support Photo Format Support USB Host Audio Output Power Supply Built-in lithium battery Calendar 8″ Full-Color TFT LCD 800 (H) x 480 (V) MS Card Slot CF Card...


