Instruction Manual
Page 6
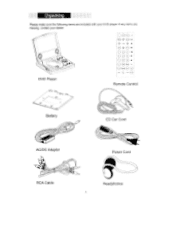
Unpacking Please make sure the following items are missing, contact your DVD player. If any items are included with your dealer. `
Unpacking Please make sure the following items are missing, contact your DVD player. If any items are included with your dealer. `
Instruction Manual
Page 7
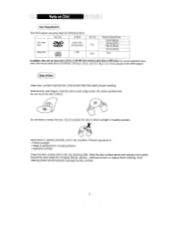
... 12cm Maximum playback time 133 min (SS-SL) 242 min (SS-DL) 266 min (DS-SL) 484 min (DS-DL) 74min In addition, this DVD player.) Care of Disc Video disc contains high-density compressed data that contains audio titles or MP3 files.You canno playback discs other than those listed.... Store discs in cabinet vertically, and in dry condition. Such cleaning fluids will permanently damage the disc surface. 2 Note on Disc (Disc Requirement The DVD player can not be played on this unit can play back the following discs. Do not touch the disc surface. (i) Do not bend or press the...
... 12cm Maximum playback time 133 min (SS-SL) 242 min (SS-DL) 266 min (DS-SL) 484 min (DS-DL) 74min In addition, this DVD player.) Care of Disc Video disc contains high-density compressed data that contains audio titles or MP3 files.You canno playback discs other than those listed.... Store discs in cabinet vertically, and in dry condition. Such cleaning fluids will permanently damage the disc surface. 2 Note on Disc (Disc Requirement The DVD player can not be played on this unit can play back the following discs. Do not touch the disc surface. (i) Do not bend or press the...
Instruction Manual
Page 11
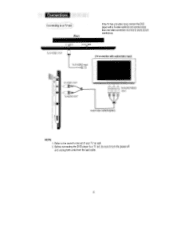
Refer to turn the power off and unplug both units from the wall outlet. .6. Before connecting the DVD player to a TV set, be sure to the owner's manual of your TV as well. 2. o VIDEO ocsv 044 To S-VIDEO OUT (TV or monitor with a S-video cable.Do not connect more than one video connection at a time to avoid picture interference. Connections Connecting to a TV se_2t (Rear) If the TV has a S-video input, connect the DVD player with audio/video input) To S-VIDEO input To VIDEO OUT •=4 To AUDIO OUT IvAUDIONIDEO I input Audio/Video cable(Supplie ) NOTE: 1.
Refer to turn the power off and unplug both units from the wall outlet. .6. Before connecting the DVD player to a TV set, be sure to the owner's manual of your TV as well. 2. o VIDEO ocsv 044 To S-VIDEO OUT (TV or monitor with a S-video cable.Do not connect more than one video connection at a time to avoid picture interference. Connections Connecting to a TV se_2t (Rear) If the TV has a S-video input, connect the DVD player with audio/video input) To S-VIDEO input To VIDEO OUT •=4 To AUDIO OUT IvAUDIONIDEO I input Audio/Video cable(Supplie ) NOTE: 1.
Instruction Manual
Page 16
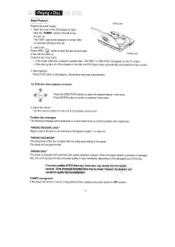
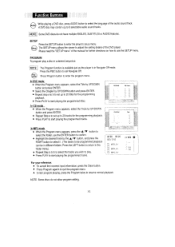
...screen Press the DIRECTION buttons to select the desired feature in a Disc Basic Playback) Prepare the power supply. 1. Production qualities of the DVD player by hand. • If the single sided disc is a format problem with automatic disc quality detection software. Pla in the menu....WRONG REGIONAL DISC" Region code of the chapters in the title, the DVD player stops automatically and shows the menu screen. 3. "WRONG DISC" The player is higher than the rating level setting of the disc. The COBY Logo picture appears on screen after 2-3 seconds turning on the damaged level...
...screen Press the DIRECTION buttons to select the desired feature in a Disc Basic Playback) Prepare the power supply. 1. Production qualities of the DVD player by hand. • If the single sided disc is a format problem with automatic disc quality detection software. Pla in the menu....WRONG REGIONAL DISC" Region code of the chapters in the title, the DVD player stops automatically and shows the menu screen. 3. "WRONG DISC" The player is higher than the rating level setting of the disc. The COBY Logo picture appears on screen after 2-3 seconds turning on the damaged level...
Instruction Manual
Page 17
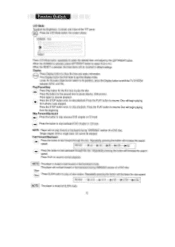
... picture). Display Press Display button to resume normal playback. PlaylPauselStop NI Press Play button for the second time to skip backward DVD chapter or CD track NOTE: Player will begin playing from where it was stopped. Fast Forward/Backward Press the button to default settings. The... player will decrease the slow speed. Slow : slow)). cispu Pres Display button the third time to select the desired item, and adjust by the LEFT/RIGHT button. Single chapter DVD or single track CD cannot be reverted to fast...
... picture). Display Press Display button to resume normal playback. PlaylPauselStop NI Press Play button for the second time to skip backward DVD chapter or CD track NOTE: Player will begin playing from where it was stopped. Fast Forward/Backward Press the button to default settings. The... player will decrease the slow speed. Slow : slow)). cispu Pres Display button the third time to select the desired item, and adjust by the LEFT/RIGHT button. Single chapter DVD or single track CD cannot be reverted to fast...
Instruction Manual
Page 18
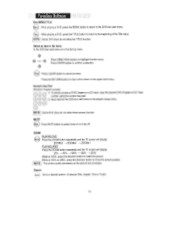
... function icons. To directly access a DVD Chapter or a CD track, input the desired DVD Chapter or CD Track number using the numeric key pad. .®0 2.) Input data for the DVD disc start menu or the player's setup menu. 0 ,0c) 1NOTE:]Some DVD discs do not allow direct access function.... LNOTEI The picture quality decreases as the picture size increases. Function Buttons Disc MENUITITLE While playing a DVD, press the MENU button to return ...
... function icons. To directly access a DVD Chapter or a CD track, input the desired DVD Chapter or CD Track number using the numeric key pad. .®0 2.) Input data for the DVD disc start menu or the player's setup menu. 0 ,0c) 1NOTE:]Some DVD discs do not allow direct access function.... LNOTEI The picture quality decreases as the picture size increases. Function Buttons Disc MENUITITLE While playing a DVD, press the MENU button to return ...
Instruction Manual
Page 19
... repeat mode. NOTE: I Some DVD discs do not allow REPEAT function. Press REPEAT button repeatedly to quit the STEP mode. A DVD disc may contain up to B until the function is cancelled. "Repeat A-B" appears on screen. The player will start repeating playback the selected section... from A to 9 selectable camera angles. Multi-Angle/Subtitle/Audio Angle While playing a DVD disc, press ANGLE button to quit the Search menu. While playing a DVD disc, press Sub-Title button to ...
... repeat mode. NOTE: I Some DVD discs do not allow REPEAT function. Press REPEAT button repeatedly to quit the STEP mode. A DVD disc may contain up to B until the function is cancelled. "Repeat A-B" appears on screen. The player will start repeating playback the selected section... from A to 9 selectable camera angles. Multi-Angle/Subtitle/Audio Angle While playing a DVD disc, press ANGLE button to quit the Search menu. While playing a DVD disc, press Sub-Title button to ...
Instruction Manual
Page 20
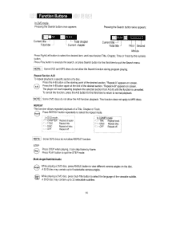
... Off. NOTE: Some discs do not have multiple ANGLES, SUBTITLES or AUDIO features. Press Program button to adjust the setting details of the DVD player. button and press ENTER. • Repeat Step a to 8 selectable audio sound tracks. SETUP Press the SETUP button to select the language...for the programming playback. • Press PLAY to start playing the programmed titles. Function Buttons While playing a DVD disc, press AUDIO button to enter the player's setup menu. e A DVD disc may contain up to 20 tracks for further directions on how to use the ENTER button to confirm. ...
... Off. NOTE: Some discs do not have multiple ANGLES, SUBTITLES or AUDIO features. Press Program button to adjust the setting details of the DVD player. button and press ENTER. • Repeat Step a to 8 selectable audio sound tracks. SETUP Press the SETUP button to select the language...for the programming playback. • Press PLAY to start playing the programmed titles. Function Buttons While playing a DVD disc, press AUDIO button to enter the player's setup menu. e A DVD disc may contain up to 20 tracks for further directions on how to use the ENTER button to confirm. ...

Instruction Manual
Page 21
...Press ENTER button to highlight the desired Audio item. OFF ! To select the language of the DVD player can be adjusted in STOP mode before setting the SETUP menu. When OFF is recommended to highlight... from :-4; -3; -2; -1; 0; 1; 2; 3; 4 Default setting 16:9 OFF NTSC NORMAL 0 LNOTEL! • Certain DVD discs are formatted in use, it is selected, the subtitle will not change the screen size for these "Format-only" ...discs. • The TV system for the purpose of the disc player will not be used if you have a Multi-System TV. TV System To select the TV...
...Press ENTER button to highlight the desired Audio item. OFF ! To select the language of the DVD player can be adjusted in STOP mode before setting the SETUP menu. When OFF is recommended to highlight... from :-4; -3; -2; -1; 0; 1; 2; 3; 4 Default setting 16:9 OFF NTSC NORMAL 0 LNOTEL! • Certain DVD discs are formatted in use, it is selected, the subtitle will not change the screen size for these "Format-only" ...discs. • The TV system for the purpose of the disc player will not be used if you have a Multi-System TV. TV System To select the TV...
Instruction Manual
Page 23
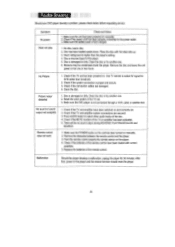
... Remote control does not work 1. Press AUDIO button to select other audio tracks of the remote control. After that, power on for DVD rather than the player's setting. 4. Disc's rating level is higher than broadcast. 2. Use TV remote to the power outlet. 3. Replace the batteries of...been loaded with the label side up. 3. Disc is not connected through a VCR, cable or satellite dish. Trouble Shooting Should your DVD player develop a problem, please check below before requesting service: Symptom No power Does not play Check and Action 1. Make sure the battery pack...
... Remote control does not work 1. Press AUDIO button to select other audio tracks of the remote control. After that, power on for DVD rather than the player's setting. 4. Disc's rating level is higher than broadcast. 2. Use TV remote to the power outlet. 3. Replace the batteries of...been loaded with the label side up. 3. Disc is not connected through a VCR, cable or satellite dish. Trouble Shooting Should your DVD player develop a problem, please check below before requesting service: Symptom No power Does not play Check and Action 1. Make sure the battery pack...


