Instruction Manual
Page 2
... or the third prong is provided for cleaning or any other . Important Safe Instruction CAUTION: Use of controls or adjustments or performance of . (1) Read these instructions-All the safety and operating instructions should be read before cleaning. There are not likely to be placed in a built-in installation such as a bookcase or rack unless proper ventilation is provided or the...
... or the third prong is provided for cleaning or any other . Important Safe Instruction CAUTION: Use of controls or adjustments or performance of . (1) Read these instructions-All the safety and operating instructions should be read before cleaning. There are not likely to be placed in a built-in installation such as a bookcase or rack unless proper ventilation is provided or the...
Instruction Manual
Page 3
... not operate normally, or has been dropped. (15) Power Sources- See instruction manual for the grounding electrode. (18) Power lines- Refer all servicing to grounding electrodes, and requirements for replacement or resetting of any way, such as the original part. Never spill liquid of protective device. An outside antenna system, extreme care should be sure the service technician has used a replacement plug specified...
... not operate normally, or has been dropped. (15) Power Sources- See instruction manual for the grounding electrode. (18) Power lines- Refer all servicing to grounding electrodes, and requirements for replacement or resetting of any way, such as the original part. Never spill liquid of protective device. An outside antenna system, extreme care should be sure the service technician has used a replacement plug specified...
Instruction Manual
Page 4
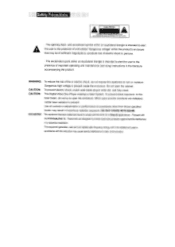
... to the presence of important operating and maintenance (servicing) instructions in a residential installation. FCC NOTICE: This equipment has been tested and found to rain or moisture. ! ,ii, Safety Precautions WARNING SHOCK HAZARD-DO NOT OPEN AVIS. RISQUE DE CHOC ELECTRISUE-NE PAS OUVRIR . The lightning flash with the limits for a Class B digital device. WARNING: To reduce the...
... to the presence of important operating and maintenance (servicing) instructions in a residential installation. FCC NOTICE: This equipment has been tested and found to rain or moisture. ! ,ii, Safety Precautions WARNING SHOCK HAZARD-DO NOT OPEN AVIS. RISQUE DE CHOC ELECTRISUE-NE PAS OUVRIR . The lightning flash with the limits for a Class B digital device. WARNING: To reduce the...

Instruction Manual
Page 5
SPECIFICATIONS Page 1 2 3-5 6 7 8-10 11 12-15 16 17 18 19 Table of Contents IMPORTANT SAFETY INSTRUCTIONS SAFETY INFORMATION TABLE OF CONTENTS UNPACKING NOTE ON DISC IDENTIFICATION OF CONTROLS CONNECTIONS(Connecting to a TV) CONNECTIONS(Connecting to an amplifier equipped with a Dolby Pro Logic Surround) PREPARATIONS BEFORE OPERATION PLAYING A DISC FUNCTION BUTTONS SETUP MENU CUSTOM SETUP TROUBLE SHOOTING.
SPECIFICATIONS Page 1 2 3-5 6 7 8-10 11 12-15 16 17 18 19 Table of Contents IMPORTANT SAFETY INSTRUCTIONS SAFETY INFORMATION TABLE OF CONTENTS UNPACKING NOTE ON DISC IDENTIFICATION OF CONTROLS CONNECTIONS(Connecting to a TV) CONNECTIONS(Connecting to an amplifier equipped with a Dolby Pro Logic Surround) PREPARATIONS BEFORE OPERATION PLAYING A DISC FUNCTION BUTTONS SETUP MENU CUSTOM SETUP TROUBLE SHOOTING.
Instruction Manual
Page 6
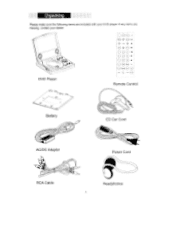
Unpacking Please make sure the following items are missing, contact your DVD player. If any items are included with your dealer. `
Unpacking Please make sure the following items are missing, contact your DVD player. If any items are included with your dealer. `
Instruction Manual
Page 7
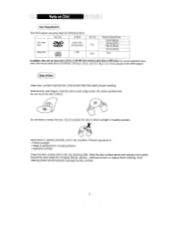
... the disc surface. 2 Disc mark Contents Disc size DVD video ' discs W AudioWideo (moving picture) 12cm Audio CDs art Audio 12cm Maximum playback time 133 min (SS-SL) 242 min (SS-DL) 266 min (DS-SL) 484 min (DS-DL) 74min In addition, this DVD player.) Care of Disc Video disc contains high-density compressed data that contains audio titles or MP3 files.You canno playback discs other than those listed above...
... the disc surface. 2 Disc mark Contents Disc size DVD video ' discs W AudioWideo (moving picture) 12cm Audio CDs art Audio 12cm Maximum playback time 133 min (SS-SL) 242 min (SS-DL) 266 min (DS-SL) 484 min (DS-DL) 74min In addition, this DVD player.) Care of Disc Video disc contains high-density compressed data that contains audio titles or MP3 files.You canno playback discs other than those listed above...

Instruction Manual
Page 9
... red under normal playback. It is green under STANDBY mode. Identification of Controls ( Main Unit 1 RETURN DISPLAY LCD MODE TITLE MENU SETUP _'"'DIRECTION O O 0 ENTER/PLAY DISC lid SLOW PREY/NEXT STOP PLAY/PAUSE NOTE: • For the first use, please remove the protective sheet from the TFT screen. • Place a disc with label facing up, and push gently on the center of the disc so it goes into...
... red under normal playback. It is green under STANDBY mode. Identification of Controls ( Main Unit 1 RETURN DISPLAY LCD MODE TITLE MENU SETUP _'"'DIRECTION O O 0 ENTER/PLAY DISC lid SLOW PREY/NEXT STOP PLAY/PAUSE NOTE: • For the first use, please remove the protective sheet from the TFT screen. • Place a disc with label facing up, and push gently on the center of the disc so it goes into...
Instruction Manual
Page 10
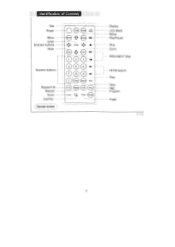
O Ste epea Slo ••Audio A Display LCD Mode Setup Play/Pause Stop Zoom PREY/NEXT Skip FF/FR Search Step Slow PBC Program Angle Repeat Audio SubTitle ---- (Remote Control OCDC)H 4 OC)(DH a .0! Repeat A-B... Identification of Controls Title Power Menu Enter Direction buttons Mute Title D, pia Setup ■ Enter Mute Zoom Numeric buttons•...
O Ste epea Slo ••Audio A Display LCD Mode Setup Play/Pause Stop Zoom PREY/NEXT Skip FF/FR Search Step Slow PBC Program Angle Repeat Audio SubTitle ---- (Remote Control OCDC)H 4 OC)(DH a .0! Repeat A-B... Identification of Controls Title Power Menu Enter Direction buttons Mute Title D, pia Setup ■ Enter Mute Zoom Numeric buttons•...
Instruction Manual
Page 11
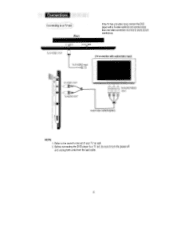
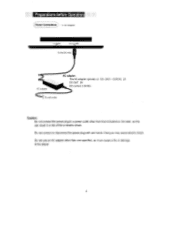
Refer to turn the power off and unplug both units from the wall outlet. .6. Before connecting the DVD player to a TV set, be sure to the owner's manual of your TV as well. 2. o VIDEO ocsv 044 To S-VIDEO OUT (TV or monitor with a S-video cable.Do not connect more than one video connection at a time to avoid picture interference. Connections Connecting to a TV se_2t (Rear) If the TV has a S-video input, connect the DVD player with audio/video input) To S-VIDEO input To VIDEO OUT •=4 To AUDIO OUT IvAUDIONIDEO I input Audio/Video cable(Supplie ) NOTE: 1.
Refer to turn the power off and unplug both units from the wall outlet. .6. Before connecting the DVD player to a TV set, be sure to the owner's manual of your TV as well. 2. o VIDEO ocsv 044 To S-VIDEO OUT (TV or monitor with a S-video cable.Do not connect more than one video connection at a time to avoid picture interference. Connections Connecting to a TV se_2t (Rear) If the TV has a S-video input, connect the DVD player with audio/video input) To S-VIDEO input To VIDEO OUT •=4 To AUDIO OUT IvAUDIONIDEO I input Audio/Video cable(Supplie ) NOTE: 1.
Instruction Manual
Page 13
... batteries, then close the compartment. 2. Remove the batteries if remote control will not be in use the remote control, point it at the remote sensor of the unit and operate in the range of 5 meters and at angle of used in this device may present a risk of time. Dispose of 61-f 3. Replace the batteries if the remote control does not work. 4. Do not disassemble or dispose of the remote control. Open the battery...
... batteries, then close the compartment. 2. Remove the batteries if remote control will not be in use the remote control, point it at the remote sensor of the unit and operate in the range of 5 meters and at angle of used in this device may present a risk of time. Dispose of 61-f 3. Replace the batteries if the remote control does not work. 4. Do not disassemble or dispose of the remote control. Open the battery...
Instruction Manual
Page 14
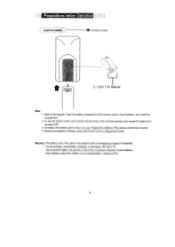
AC Adapter VIDEO DC IN 044. To wall outlet AC adapter: This AC adapter operates on the label, as it can cause a fire or damage to a power outlet other than one specified, as this can result in a risk of fire or electric shock. Doing so may cause electric shock. Do not use an AC adapter other than that indicated on 100-240V--50/60Hz 2A DC OUT: 9V DC current: 2.0A Min Caution: Do not connect the power plug to the player. Preparations before 0ieration (fower Connections ---. Do not connect or disconnect the power plug with wet hands. To the DC inlet AC adapter S-5-
AC Adapter VIDEO DC IN 044. To wall outlet AC adapter: This AC adapter operates on the label, as it can cause a fire or damage to a power outlet other than one specified, as this can result in a risk of fire or electric shock. Doing so may cause electric shock. Do not use an AC adapter other than that indicated on 100-240V--50/60Hz 2A DC OUT: 9V DC current: 2.0A Min Caution: Do not connect the power plug to the player. Preparations before 0ieration (fower Connections ---. Do not connect or disconnect the power plug with wet hands. To the DC inlet AC adapter S-5-
Instruction Manual
Page 15
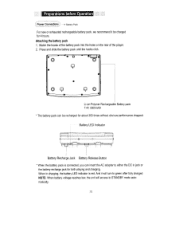
... into the holes on the rear of the player. 2. Press and slide the battery pack until the hooks click. 0 Y0 y 0 Li-ion Polymer Rechargeable Battery pack 7.4V 3000mAJh The battery pack can insert the AC adapter to STANDBY mode automatically. 10 When in jack or the battery recharge jack for both playing and charging. Preparations before Operation Power Connections Battery Pack For new or exhausted rechargeable...
... into the holes on the rear of the player. 2. Press and slide the battery pack until the hooks click. 0 Y0 y 0 Li-ion Polymer Rechargeable Battery pack 7.4V 3000mAJh The battery pack can insert the AC adapter to STANDBY mode automatically. 10 When in jack or the battery recharge jack for both playing and charging. Preparations before Operation Power Connections Battery Pack For new or exhausted rechargeable...
Instruction Manual
Page 16
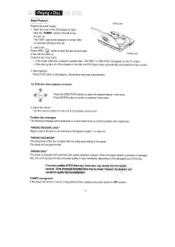
... loaded disc: "WRONG REGIONAL DISC" Region code of DVD discs vary. However, the playback and operational quality may play the disc. Start playback Press PLAY button to confirm a selection in use for a long period of the player. Open the cover of the DVD player by hand. • If the single sided disc is higher than the rating level setting of time, please push power switch to the desired volume level. Adjust the volume Turn the volume control on . Some incorrectly formatted discs may be displayed...
... loaded disc: "WRONG REGIONAL DISC" Region code of DVD discs vary. However, the playback and operational quality may play the disc. Start playback Press PLAY button to confirm a selection in use for a long period of the player. Open the cover of the DVD player by hand. • If the single sided disc is higher than the rating level setting of time, please push power switch to the desired volume level. Adjust the volume Turn the volume control on . Some incorrectly formatted discs may be displayed...
Instruction Manual
Page 17
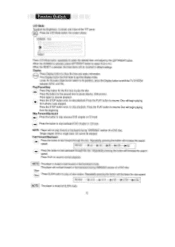
... PLAY to select the desired item, and adjust by the LEFT/RIGHT button. Function Buttons LCD Mode To adjust the Brightness, Contrast, and Color of a DVD disc. CD ode Press the LCD Mode button, the screen shows: SCREEN 16:9 0 r RESET Press LCD Mode button repeatedly to resume normal playback. Disc will increase the search _ speed. Single chapter DVD or single track CD cannot be reverted to show the time and status information. Fast Forward/Backward...
... PLAY to select the desired item, and adjust by the LEFT/RIGHT button. Function Buttons LCD Mode To adjust the Brightness, Contrast, and Color of a DVD disc. CD ode Press the LCD Mode button, the screen shows: SCREEN 16:9 0 r RESET Press LCD Mode button repeatedly to resume normal playback. Disc will increase the search _ speed. Single chapter DVD or single track CD cannot be reverted to show the time and status information. Fast Forward/Backward...
Instruction Manual
Page 18
... button repeatedly and the TV screen will display: 25% -> 50% - >100%--,150% 200% While at 150% or 200%, press the direction button to move the picture position. While at 100%, press the direction button to rotate the picture. Title While playing a DVD, press the TITLE button to return to confirm a selection. Numeric Key Pad (Random Program access) O (.7, r---N 1). Function Buttons Disc MENUITITLE While playing a DVD, press the MENU button to return to the DVD disc start menu...
... button repeatedly and the TV screen will display: 25% -> 50% - >100%--,150% 200% While at 150% or 200%, press the direction button to move the picture position. While at 100%, press the direction button to rotate the picture. Title While playing a DVD, press the TITLE button to return to confirm a selection. Numeric Key Pad (Random Program access) O (.7, r---N 1). Function Buttons Disc MENUITITLE While playing a DVD, press the MENU button to return to the DVD disc start menu...
Instruction Manual
Page 19
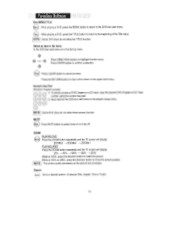
... program playing. Function Buttons In DVD mode Pressing the Search button once appears: Pressing the Search button twice appears: /01 01 /12 01/01 Current title Total title `--- "Repeat A" appears on screen. The player will start repeating playback the selected section from A to MP3 discs. A DVD disc may contain up to select the language of the desired section. REPEAT This function allows repeated playback of a disc. Press REPEAT button repeatedly to view different camera angles on the disc. Multi-Angle/Subtitle/Audio...
... program playing. Function Buttons In DVD mode Pressing the Search button once appears: Pressing the Search button twice appears: /01 01 /12 01/01 Current title Total title `--- "Repeat A" appears on screen. The player will start repeating playback the selected section from A to MP3 discs. A DVD disc may contain up to select the language of the desired section. REPEAT This function allows repeated playback of a disc. Press REPEAT button repeatedly to view different camera angles on the disc. Multi-Angle/Subtitle/Audio...
Instruction Manual
Page 20
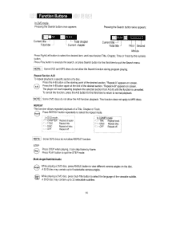
... to use the ENTER button to confirm. • Highlight the desired track by UP/DOWN ' - Function Buttons While playing a DVD disc, press AUDIO button to set Navigate Off. Please read the "SETUP menu" of the audio sound track. Press the PBC button to select the language of the manual for the programming playback. • Press PLAY to start playing the programmed titles. NOTE: Some discs do not have multiple ANGLES, SUBTITLES or AUDIO features. In CD mode •...
... to use the ENTER button to confirm. • Highlight the desired track by UP/DOWN ' - Function Buttons While playing a DVD disc, press AUDIO button to set Navigate Off. Please read the "SETUP menu" of the audio sound track. Press the PBC button to select the language of the manual for the programming playback. • Press PLAY to start playing the programmed titles. NOTE: Some discs do not have multiple ANGLES, SUBTITLES or AUDIO features. In CD mode •...

Instruction Manual
Page 21
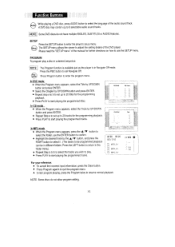
... use, it is NOT in STOP mode before setting the SETUP menu. Default setting English English English English Screen Setup Press the Direction keys to highlight the desired menu. 3. Bright; NOTE When Digital Out is recommended to highlight the desired Audio item. Adjusting the setting of the disc player will not be displayed. Item Digital Out Instruction To select the digital output from : NTSC; OFF ! Press the UP/DOWN button to highlight the desired SCREEN item. To select the language of the audio sound...
... use, it is NOT in STOP mode before setting the SETUP menu. Default setting English English English English Screen Setup Press the Direction keys to highlight the desired menu. 3. Bright; NOTE When Digital Out is recommended to highlight the desired Audio item. Adjusting the setting of the disc player will not be displayed. Item Digital Out Instruction To select the digital output from : NTSC; OFF ! Press the UP/DOWN button to highlight the desired SCREEN item. To select the language of the audio sound...
Instruction Manual
Page 22
... be displayed on the remote control to confirm. WARNING: • Please keep a copy of Parental Control. Angle Mark Choose between ON and OFF. Select the appropriate level by the UP/DOWN button, and press ENTER to enjoy these scenes. Default This function allows you to input a new 4-digit code, and verify again. All settings will be changed back to the factory default settings. C). When the Angle Mark function is...
... be displayed on the remote control to confirm. WARNING: • Please keep a copy of Parental Control. Angle Mark Choose between ON and OFF. Select the appropriate level by the UP/DOWN button, and press ENTER to enjoy these scenes. Default This function allows you to input a new 4-digit code, and verify again. All settings will be changed back to the factory default settings. C). When the Angle Mark function is...
Instruction Manual
Page 23
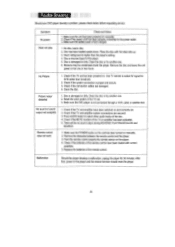
... set . 3. Check if the power cord has been properly connected to select AV signal for the player. 5. Disc's rating level is higher than broadcast. 2. Remove the disc and leave the unit power on for 30 minutes. Check if the connection cables are secured. 3. Press AUDIO button to select other audio tracks of the remote control. Check if the MUTE function of the remote control have been switched on manually. 2. No disc, load a disc. 2. Moisture may be no sound output...
... set . 3. Check if the power cord has been properly connected to select AV signal for the player. 5. Disc's rating level is higher than broadcast. 2. Remove the disc and leave the unit power on for 30 minutes. Check if the connection cables are secured. 3. Press AUDIO button to select other audio tracks of the remote control. Check if the MUTE function of the remote control have been switched on manually. 2. No disc, load a disc. 2. Moisture may be no sound output...


