Instruction Manual
Page 2
... and openings in the operating instructions should be adhered to protect it available. A grounding type plug has two blades and a third grounding prong. Power-supply cords should be placed in a built-in 131.8(5) 7) Do not block any heat sources such as radiators, heat registers, stoves, or...not use this apparatus near any ventilatioh openings. ratus. This product should be retained for replacement of the obsolete outlet. (10) Protect the power cord from being walked on a bed. When a cart is used, use caution when moving the cart/apparatus combination to cords at plugs,...
... and openings in the operating instructions should be adhered to protect it available. A grounding type plug has two blades and a third grounding prong. Power-supply cords should be placed in a built-in 131.8(5) 7) Do not block any heat sources such as radiators, heat registers, stoves, or...not use this apparatus near any ventilatioh openings. ratus. This product should be retained for replacement of the obsolete outlet. (10) Protect the power cord from being walked on a bed. When a cart is used, use caution when moving the cart/apparatus combination to cords at plugs,...
Instruction Manual
Page 3
...surges and built-up static charges. Do not overload wall outlets, extension cords, or integral convenience receptacles as to operate from touching such power lines or circuits as the original plug. (17) Outdoor Antenna Grounding- Never push objects of any kind into the apparatus, the .... (16) Protective Attachment Plug-The product is in the vicinity of protective device. See instruction manual for the grounding electrode. (18) Power lines- If an outside antenna system should be sure the service technician has used a replacement plug specified by the manufacturer or have fallen...
...surges and built-up static charges. Do not overload wall outlets, extension cords, or integral convenience receptacles as to operate from touching such power lines or circuits as the original plug. (17) Outdoor Antenna Grounding- Never push objects of any kind into the apparatus, the .... (16) Protective Attachment Plug-The product is in the vicinity of protective device. See instruction manual for the grounding electrode. (18) Power lines- If an outside antenna system should be sure the service technician has used a replacement plug specified by the manufacturer or have fallen...
Instruction Manual
Page 6
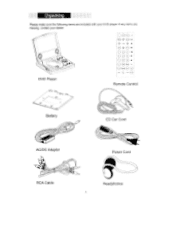
Unpacking Please make sure the following items are missing, contact your DVD player. If any items are included with your dealer. `
Unpacking Please make sure the following items are missing, contact your DVD player. If any items are included with your dealer. `

Instruction Manual
Page 9
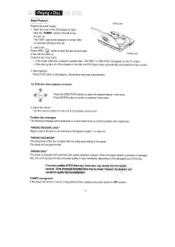
... Backward, press the PREV/NEXT li•• . • To Fast Forward/Fast Backward, press and hold the PREVINEXT button for about two seconds. • Power ON LED status: a).
... Backward, press the PREV/NEXT li•• . • To Fast Forward/Fast Backward, press and hold the PREVINEXT button for about two seconds. • Power ON LED status: a).
Instruction Manual
Page 10
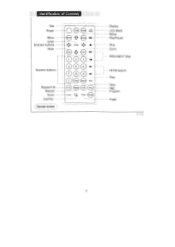
Identification of Controls Title Power Menu Enter Direction buttons Mute Title D, pia Setup ■ Enter Mute Zoom Numeric buttons•... Repeat Audio SubTitle ---- (Remote Control OCDC)H 4 OC)(DH a .0! Repeat A-B... O Ste epea Slo ••Audio A Display LCD Mode Setup Play/Pause Stop Zoom PREY/NEXT Skip FF/FR Search Step Slow PBC Program Angle
Identification of Controls Title Power Menu Enter Direction buttons Mute Title D, pia Setup ■ Enter Mute Zoom Numeric buttons•... Repeat Audio SubTitle ---- (Remote Control OCDC)H 4 OC)(DH a .0! Repeat A-B... O Ste epea Slo ••Audio A Display LCD Mode Setup Play/Pause Stop Zoom PREY/NEXT Skip FF/FR Search Step Slow PBC Program Angle
Instruction Manual
Page 11
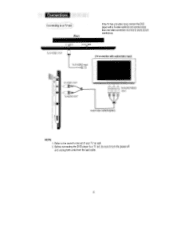
Connections Connecting to a TV se_2t (Rear) If the TV has a S-video input, connect the DVD player with audio/video input) To S-VIDEO input To VIDEO OUT •=4 To AUDIO OUT IvAUDIONIDEO I input Audio/Video cable(Supplie ) NOTE: 1. Refer to avoid picture interference. Before connecting the DVD player to a TV set, be sure to turn the power off and unplug both units from the wall outlet. .6. o VIDEO ocsv 044 To S-VIDEO OUT (TV or monitor with a S-video cable.Do not connect more than one video connection at a time to the owner's manual of your TV as well. 2.
Connections Connecting to a TV se_2t (Rear) If the TV has a S-video input, connect the DVD player with audio/video input) To S-VIDEO input To VIDEO OUT •=4 To AUDIO OUT IvAUDIONIDEO I input Audio/Video cable(Supplie ) NOTE: 1. Refer to avoid picture interference. Before connecting the DVD player to a TV set, be sure to turn the power off and unplug both units from the wall outlet. .6. o VIDEO ocsv 044 To S-VIDEO OUT (TV or monitor with a S-video cable.Do not connect more than one video connection at a time to the owner's manual of your TV as well. 2.
Instruction Manual
Page 14
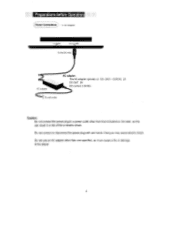
To the DC inlet AC adapter S-5- To wall outlet AC adapter: This AC adapter operates on 100-240V--50/60Hz 2A DC OUT: 9V DC current: 2.0A Min Caution: Do not connect the power plug to a power outlet other than that indicated on the label, as it can result in a risk of fire or electric shock. Doing so may cause electric shock. Do not use an AC adapter other than one specified, as this can cause a fire or damage to the player. Do not connect or disconnect the power plug with wet hands. AC Adapter VIDEO DC IN 044. Preparations before 0ieration (fower Connections ---.
To the DC inlet AC adapter S-5- To wall outlet AC adapter: This AC adapter operates on 100-240V--50/60Hz 2A DC OUT: 9V DC current: 2.0A Min Caution: Do not connect the power plug to a power outlet other than that indicated on the label, as it can result in a risk of fire or electric shock. Doing so may cause electric shock. Do not use an AC adapter other than one specified, as this can cause a fire or damage to the player. Do not connect or disconnect the power plug with wet hands. AC Adapter VIDEO DC IN 044. Preparations before 0ieration (fower Connections ---.
Instruction Manual
Page 15
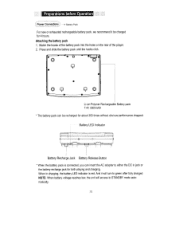
NOTE: When battery voltage reaches low, the unit will turn to green after fully charged. Preparations before Operation Power Connections Battery Pack For new or exhausted rechargeable battery pack, we recommend it will access to STANDBY mode automatically. 10 Attaching the battery pack 1. Battery ... without obvious performance dropped. And it be recharged for 4 hours. Match the hooks of the battery pack into the holes on the rear of the player. 2.
NOTE: When battery voltage reaches low, the unit will turn to green after fully charged. Preparations before Operation Power Connections Battery Pack For new or exhausted rechargeable battery pack, we recommend it will access to STANDBY mode automatically. 10 Attaching the battery pack 1. Battery ... without obvious performance dropped. And it be recharged for 4 hours. Match the hooks of the battery pack into the holes on the rear of the player. 2.
Instruction Manual
Page 16
...Production qualities of the DVD player by hand. • If the single sided disc is equipped with automatic disc quality detection software. The player will not be displayed on screen Press the DIRECTION buttons to select the desired feature in a Disc Basic Playback) Prepare the power supply. 1. Open ...title, the DVD player stops automatically and shows the menu screen. 3. Some incorrectly formatted discs may play the disc. "WRONG DISC" The player is placed in upside down, "NO DISC" or "BAD DISC" will be in use for a long period of the disc. The COBY Logo picture ...
...Production qualities of the DVD player by hand. • If the single sided disc is equipped with automatic disc quality detection software. The player will not be displayed on screen Press the DIRECTION buttons to select the desired feature in a Disc Basic Playback) Prepare the power supply. 1. Open ...title, the DVD player stops automatically and shows the menu screen. 3. Some incorrectly formatted discs may play the disc. "WRONG DISC" The player is placed in upside down, "NO DISC" or "BAD DISC" will be in use for a long period of the disc. The COBY Logo picture ...
Instruction Manual
Page 23
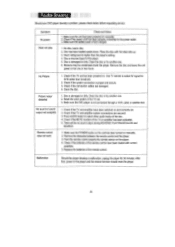
...minutes. Check if the connection cables are secured. 3. Clean the disc or try another one. 2. Make sure the DVD player is fully charged. 1. Make sure the POWER button on the unit has been turned on . Make sure the battery pack is not connected through a VCR, ...and amplifier have been loaded with the label side up. 3. Make sure the unit has been powered on the player and the restore function should reset the player. .18. After that, power on manually. 2. Trouble Shooting Should your DVD player develop a problem, please check below before requesting service: Symptom No...
...minutes. Check if the connection cables are secured. 3. Clean the disc or try another one. 2. Make sure the DVD player is fully charged. 1. Make sure the POWER button on the unit has been turned on . Make sure the battery pack is not connected through a VCR, ...and amplifier have been loaded with the label side up. 3. Make sure the unit has been powered on the player and the restore function should reset the player. .18. After that, power on manually. 2. Trouble Shooting Should your DVD player develop a problem, please check below before requesting service: Symptom No...

Instruction Manual
Page 24
c to 35' c. Operation status : Horizontal 194 x152x30 mm (main unit) 993g (main unit) Specification Power supply DC 9.0V 2A (AC adapter TERMINAL) Power consumption u 9.8W Signal system Video output S-video output Audio output Earphone terminal Signal /Noise ratio(audio) Dynamic range(audio) Panel size Resolution Laser Operating conditions ...
c to 35' c. Operation status : Horizontal 194 x152x30 mm (main unit) 993g (main unit) Specification Power supply DC 9.0V 2A (AC adapter TERMINAL) Power consumption u 9.8W Signal system Video output S-video output Audio output Earphone terminal Signal /Noise ratio(audio) Dynamic range(audio) Panel size Resolution Laser Operating conditions ...


