User Manual
Page 2
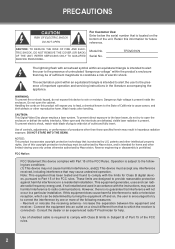
...(2) This device must be authorized by Macrovision, and is intended for future reference. To prevent direct exposure to radio communications. Use of controls, adjustments, or performance of the FCC Rules. Use of outlet and fully insert. These limits are defeated, visible laser radiation is present inside the enclosure. TFDVD7379 The lightning flash with the instructions, may cause undesired operation...
...(2) This device must be authorized by Macrovision, and is intended for future reference. To prevent direct exposure to radio communications. Use of controls, adjustments, or performance of the FCC Rules. Use of outlet and fully insert. These limits are defeated, visible laser radiation is present inside the enclosure. TFDVD7379 The lightning flash with the instructions, may cause undesired operation...
User Manual
Page 4
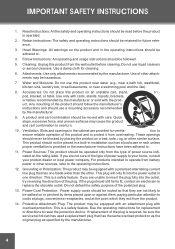
... in the cabinet are provided for replacement or directions to replace the obsolete outlet. Power-Cord Protection: Power supply cords should still fail to fit, contact an electrician to reset the protective device. See the operating instructions for ventila- Use only with carts, stands, tripods, brackets, or tables recommended by the manufacturer. Ventilation: Slots and openings in one blade wider than the other...
... in the cabinet are provided for replacement or directions to replace the obsolete outlet. Power-Cord Protection: Power supply cords should still fail to fit, contact an electrician to reset the protective device. See the operating instructions for ventila- Use only with carts, stands, tripods, brackets, or tables recommended by the manufacturer. Ventilation: Slots and openings in one blade wider than the other...
User Manual
Page 5
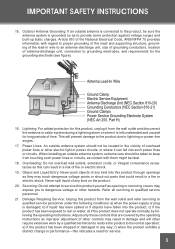
... require extensive work by following conditions: a) when the power-supply or plug is damaged; Object and Liquid Entry: Never push objects of time. Servicing: Do not attempt to dangerous voltage or other hazards. Outdoor Antenna Grounding: If an outside antenna is connected to provide some protection against voltage surges and built-up static charges. Lightning: For...
... require extensive work by following conditions: a) when the power-supply or plug is damaged; Object and Liquid Entry: Never push objects of time. Servicing: Do not attempt to dangerous voltage or other hazards. Outdoor Antenna Grounding: If an outside antenna is connected to provide some protection against voltage surges and built-up static charges. Lightning: For...
User Manual
Page 7
... Right View...11 Remote Control...12 CONNECTIONS...13 Audio/Video Connections...13 Audio Connections...13 Power Connection...14 Using The Built-in battery...14 Headphone Connection...15 USB/SD Card Connection...15 GETTING STARTED...16 Power Supply...16 BASIC OPERATIONS...17 Basic Playback...17 Play/Pause/Stop...17 Previous /Next (Skip)...17 Forward/Reverse (Search 17 Slow/Step...17 Menu Navigation...17 Numeric Keypad...18 Disc Error Messages...18 Power Management...18 FUNCTIONS BUTTONS...19 Display/Setup...19 Zoom...19 Multi-Subtitle/Audio...
... Right View...11 Remote Control...12 CONNECTIONS...13 Audio/Video Connections...13 Audio Connections...13 Power Connection...14 Using The Built-in battery...14 Headphone Connection...15 USB/SD Card Connection...15 GETTING STARTED...16 Power Supply...16 BASIC OPERATIONS...17 Basic Playback...17 Play/Pause/Stop...17 Previous /Next (Skip)...17 Forward/Reverse (Search 17 Slow/Step...17 Menu Navigation...17 Numeric Keypad...18 Disc Error Messages...18 Power Management...18 FUNCTIONS BUTTONS...19 Display/Setup...19 Zoom...19 Multi-Subtitle/Audio...
User Manual
Page 8
TABLE OF CONTENTS Angle...19 Menu/Title...19 Menu...19 Title...19 Repeat A-B Mode...19 Repeat Playback Of Chapter/Title/All of a Disc 20 LCD Mode/USB Menu...20 To access the USB/SD mode 20 SETUP...21 Language Setup...21 Video Setup...21 Audio Setup...22 Rating...22 Misc...22 SPECIFICATIONS...23 TROUBLESHOOTING...24 8
TABLE OF CONTENTS Angle...19 Menu/Title...19 Menu...19 Title...19 Repeat A-B Mode...19 Repeat Playback Of Chapter/Title/All of a Disc 20 LCD Mode/USB Menu...20 To access the USB/SD mode 20 SETUP...21 Language Setup...21 Video Setup...21 Audio Setup...22 Rating...22 Misc...22 SPECIFICATIONS...23 TROUBLESHOOTING...24 8

User Manual
Page 10
... the playing surface of a disc. Small dust particles and light stains will damage the surface of the following discs. Type DVD-Video Discs Disc Mark Content Type Disc Size Audio + Video (moving picture) 12 cm Max. Cleaning a Disc Use a dry, soft cloth to direct sunlight, high humidity, or high temperatures. • Do not bend or press discs. • To reduce the risk of the disc. Discs not listed above are not supported...
... the playing surface of a disc. Small dust particles and light stains will damage the surface of the following discs. Type DVD-Video Discs Disc Mark Content Type Disc Size Audio + Video (moving picture) 12 cm Max. Cleaning a Disc Use a dry, soft cloth to direct sunlight, high humidity, or high temperatures. • Do not bend or press discs. • To reduce the risk of the disc. Discs not listed above are not supported...

User Manual
Page 11
LOCATION OF CONTROLS Front View OPEN BUTTON TFT LCD PLAY/PAUSE BUTTON SLOW NEXT/FAST FORWARD STOP PREVIOUS/FAST REVERSE DVD/USB/SD DISPLAY LCD MODE TITLE MENU SETUP OK BUTTON DIRECTION BUTTON SD SLOT POWER ON INDICATOR REMOTE CONTROL BATTERY CHARGE INDICATOR BACK View TFDVD7309D 2 POWER SWITCH RIGHT View DC 9V IN JACK USB PORT AV IN/OUT SWITCH VIDEO JACK OPTICAL/AUDIO JACK HEADPHONE JACK VOLUME DIAL VENTILATION SLOTS RECHARGEABLE BATTERY 11
LOCATION OF CONTROLS Front View OPEN BUTTON TFT LCD PLAY/PAUSE BUTTON SLOW NEXT/FAST FORWARD STOP PREVIOUS/FAST REVERSE DVD/USB/SD DISPLAY LCD MODE TITLE MENU SETUP OK BUTTON DIRECTION BUTTON SD SLOT POWER ON INDICATOR REMOTE CONTROL BATTERY CHARGE INDICATOR BACK View TFDVD7309D 2 POWER SWITCH RIGHT View DC 9V IN JACK USB PORT AV IN/OUT SWITCH VIDEO JACK OPTICAL/AUDIO JACK HEADPHONE JACK VOLUME DIAL VENTILATION SLOTS RECHARGEABLE BATTERY 11
User Manual
Page 12
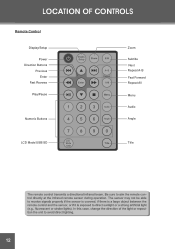
LOCATION OF CONTROLS Remote Control Display/Setup Power Direction Buttons Previous Enter Fast Reverse Play/Pause Numeric Buttons Menu Zoom Subtitle Next Repeat A-B Fast Forward Repeat All Menu Audio Angle LCD Mode/USB/SD Title Title 12
LOCATION OF CONTROLS Remote Control Display/Setup Power Direction Buttons Previous Enter Fast Reverse Play/Pause Numeric Buttons Menu Zoom Subtitle Next Repeat A-B Fast Forward Repeat All Menu Audio Angle LCD Mode/USB/SD Title Title 12
User Manual
Page 13
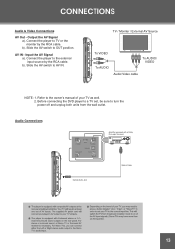
Output the AV Signal a). AV IN - b). Before connecting the DVD player to a TV set, be sure to TV or the moniter by the RCA cable. Connect the player to turn the power off and unplug both units from the wall outlet. TV / Moniter / External AV Source To VIDEO To AUDIO Audio/Video cable To AUDIO/ VIDEO NOTE: 1. Connect the player to the owner's manual of your TV as well. 2. Refer to the external...
Output the AV Signal a). AV IN - b). Before connecting the DVD player to a TV set, be sure to TV or the moniter by the RCA cable. Connect the player to turn the power off and unplug both units from the wall outlet. TV / Moniter / External AV Source To VIDEO To AUDIO Audio/Video cable To AUDIO/ VIDEO NOTE: 1. Connect the player to the owner's manual of your TV as well. 2. Refer to the external...
User Manual
Page 14
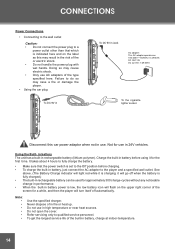
... get the longest service life of in battery, just connect the AC adapter to the Off position before using it is charging; CONNECTIONS Power Connections • Connecting to the wall outlet Caution: • Do not connect the power plug to a power outlet other than that the power switch is set to the player and a specified wall outlet. Charge the built-in battery before charging. • To charge the built-in fire...
... get the longest service life of in battery, just connect the AC adapter to the Off position before using it is charging; CONNECTIONS Power Connections • Connecting to the wall outlet Caution: • Do not connect the power plug to a power outlet other than that the power switch is set to the player and a specified wall outlet. Charge the built-in battery before charging. • To charge the built-in fire...

User Manual
Page 15
...'s reading data. Press the Up/Down direction buttons to select USB or SD and press the ENTER button to start playback. 3. It takes a short while for your unit is not at work. After the device is detected, the screen will display the working menu, press the direction buttons to Display DISC/ SD/USB menu. 2. CAUTION: Hearing experts advise against the constant use of personal stereos played at low volume level before connecting the...
...'s reading data. Press the Up/Down direction buttons to select USB or SD and press the ENTER button to start playback. 3. It takes a short while for your unit is not at work. After the device is detected, the screen will display the working menu, press the direction buttons to Display DISC/ SD/USB menu. 2. CAUTION: Hearing experts advise against the constant use of personal stereos played at low volume level before connecting the...

User Manual
Page 16
...; Replace the batteries if the remote is no longer working. • Do not spill water on the remote control. • Do not use for other equipment at the same time. • Remove the batteries if the remote control will not be in the direction of time. . Pull in use the remote control for an extended period of the arrow. 2. See Power Connections section. 16 GETTING STARTED Using the Remote Control To load a battery in...
...; Replace the batteries if the remote is no longer working. • Do not spill water on the remote control. • Do not use for other equipment at the same time. • Remove the batteries if the remote control will not be in the direction of time. . Pull in use the remote control for an extended period of the arrow. 2. See Power Connections section. 16 GETTING STARTED Using the Remote Control To load a battery in...
User Manual
Page 17
... press of DOWN/UP direction button will change the rate of slow-motion playback. • Press to stop playback completely. (When is loaded upside-down, the player will change the rate of fast-forward / reverse playback. Forward/Reverse (Search) Press / for the first time. • Press during playback to resume normal playback. 17 Close the lid manually. Press Play/Pause button to start playback (some discs may start playing from the beginning.) Next...
... press of DOWN/UP direction button will change the rate of slow-motion playback. • Press to stop playback completely. (When is loaded upside-down, the player will change the rate of fast-forward / reverse playback. Forward/Reverse (Search) Press / for the first time. • Press during playback to resume normal playback. 17 Close the lid manually. Press Play/Pause button to start playback (some discs may start playing from the beginning.) Next...
User Manual
Page 18
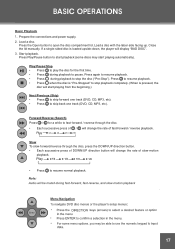
... player will be substandard. Power Management If the player will not be in use for a long period of the disc may play the disc at a lower quality or stop play the disc. • BAD DISC. The parental rating level of the disc is equipped with the format of the loaded disc. • WRONG REGIONAL DISC. Note: DVD disc production quality may deviate from the industry standard. BASIC OPERATIONS Adjusting the Volume • Turn the Volume Control...
... player will be substandard. Power Management If the player will not be in use for a long period of the disc may play the disc at a lower quality or stop play the disc. • BAD DISC. The parental rating level of the disc is equipped with the format of the loaded disc. • WRONG REGIONAL DISC. Note: DVD disc production quality may deviate from the industry standard. BASIC OPERATIONS Adjusting the Volume • Turn the Volume Control...

User Manual
Page 19
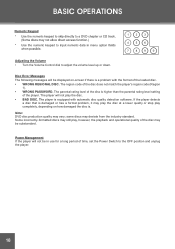
FUNCTIONS BUTTONS Display/Setup • Press the DISPLAY button once to show playback information. • Press it twice to adjust the player's internal settings, please see the SETUP section for more details. Multi-Subtitle / Audio / Angle • During playback of a DVD that has been mastered with subtitles, press SUBTITLE to view the available subtitle tracks. (A DVD may have up to 32 selectable subtitles.) • During playback of a DVD that has been mastered with alternate language/audio tracks, press...
FUNCTIONS BUTTONS Display/Setup • Press the DISPLAY button once to show playback information. • Press it twice to adjust the player's internal settings, please see the SETUP section for more details. Multi-Subtitle / Audio / Angle • During playback of a DVD that has been mastered with subtitles, press SUBTITLE to view the available subtitle tracks. (A DVD may have up to 32 selectable subtitles.) • During playback of a DVD that has been mastered with alternate language/audio tracks, press...
User Manual
Page 20
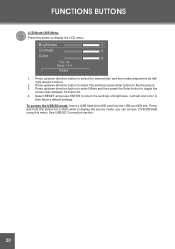
... screen ratio between 16:9 and 4:3. 4. Press up /down direction button to flip the picture. 3. FUNCTIONS BUTTONS LCD Mode/USB Menu Press this menu. Press up/down direction button to select Flip and then press Enter button to select the desired item and then make adjustment by left/ right direction button. 2. Press and hold this button for a short while to display the source mode, you can access DVD/SD/USB using this button to their factory default settings. To access the USB/SD mode: insert a USB...
... screen ratio between 16:9 and 4:3. 4. Press up /down direction button to flip the picture. 3. FUNCTIONS BUTTONS LCD Mode/USB Menu Press this menu. Press up/down direction button to select Flip and then press Enter button to select the desired item and then make adjustment by left/ right direction button. 2. Press and hold this button for a short while to display the source mode, you can access DVD/SD/USB using this button to their factory default settings. To access the USB/SD mode: insert a USB...

User Manual
Page 21
ASCII Auto Fit 21 English English ASCII English English Language Setup Video View Mode Sets the view mode of the player can be adjusted in the SETUP menu. 1. SETUP Various features of DivX DVDs. Press the direction buttons to enter the player's setup menu. 2. Press twice to select the desired item. 3. Press ENTER to confirm.
ASCII Auto Fit 21 English English ASCII English English Language Setup Video View Mode Sets the view mode of the player can be adjusted in the SETUP menu. 1. SETUP Various features of DivX DVDs. Press the direction buttons to enter the player's setup menu. 2. Press twice to select the desired item. 3. Press ENTER to confirm.

User Manual
Page 22
... setting is password protected (the initial password is default) Change the Parental Ctrl password. This will not play any discs rated higher than this password cannot be reset. Misc Use Default Settings Resets all settings to the player's screen. 22 Levels 1 to 8. (8: ADULT is : 8888). SETUP Digital Out Set the digital output mode(off,PCM,RAW) Channel Output RAW Rating Parental Control Set Password Sets the maturity rating level of the player. Screen saver The screen saver prevents burn-in damage On to their factory default state...
... setting is password protected (the initial password is default) Change the Parental Ctrl password. This will not play any discs rated higher than this password cannot be reset. Misc Use Default Settings Resets all settings to the player's screen. 22 Levels 1 to 8. (8: ADULT is : 8888). SETUP Digital Out Set the digital output mode(off,PCM,RAW) Channel Output RAW Rating Parental Control Set Password Sets the maturity rating level of the player. Screen saver The screen saver prevents burn-in damage On to their factory default state...

User Manual
Page 24
... dirty. TROUBLESHOOTING If you have condensed inside the player. Remove the disc and leave the player on for Frequently Asked Questions (FAQs) and firmware updates. cobyusa.com for 1-2 hours and then try another one. • Reset your player from the Setup menu. • Select a different aspect ratio option from the DVD disc menu. The device will not play the disc. • Ensure that a supported disc is loaded in the player label-side...
... dirty. TROUBLESHOOTING If you have condensed inside the player. Remove the disc and leave the player on for Frequently Asked Questions (FAQs) and firmware updates. cobyusa.com for 1-2 hours and then try another one. • Reset your player from the Setup menu. • Select a different aspect ratio option from the DVD disc menu. The device will not play the disc. • Ensure that a supported disc is loaded in the player label-side...

User Manual
Page 25
... the remote retain a charge and have been installed correctly. • Try replacing the remote's batteries. The player has malfunctioned. • Unplug the player. the restore function should reset the player. 25 TROUBLESHOOTING • Ensure that the TV and amplifier connections are no obstacles between the remote and the player. • Point the remote at the remote sensor on the player -- The remote control doesn't work. • Ensure that the Power Switch...
... the remote retain a charge and have been installed correctly. • Try replacing the remote's batteries. The player has malfunctioned. • Unplug the player. the restore function should reset the player. 25 TROUBLESHOOTING • Ensure that the TV and amplifier connections are no obstacles between the remote and the player. • Point the remote at the remote sensor on the player -- The remote control doesn't work. • Ensure that the Power Switch...


