User Manual
Page 1
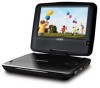
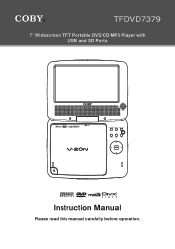
TFDVD7379 7″ Widescreen TFT Portable DVD/CD/MP3 Player with USB and SD Ports Instruction Manual Please read this manual carefully before operation.
TFDVD7379 7″ Widescreen TFT Portable DVD/CD/MP3 Player with USB and SD Ports Instruction Manual Please read this manual carefully before operation.

User Manual
Page 10
... exposure to clean a disc. Small dust particles and light stains will damage the surface of the following discs. ABOUT OPTICAL DISCS Disc Requirements This DVD player supports playback of the disc permanently. 10 Discs not listed above are not supported by its storage case, press down on either side of the... min JPEG CDs -- Still Picture 12 cm -- This unit can play back CD-R and CD-RW discs that contain JPEG picture files. To remove a DVD/CD from the center to wipe off any fingerprints and dusts from the playing surface of the disc. Wipe in a straight line radially from its...
... exposure to clean a disc. Small dust particles and light stains will damage the surface of the following discs. ABOUT OPTICAL DISCS Disc Requirements This DVD player supports playback of the disc permanently. 10 Discs not listed above are not supported by its storage case, press down on either side of the... min JPEG CDs -- Still Picture 12 cm -- This unit can play back CD-R and CD-RW discs that contain JPEG picture files. To remove a DVD/CD from the center to wipe off any fingerprints and dusts from the playing surface of the disc. Wipe in a straight line radially from its...
User Manual
Page 13
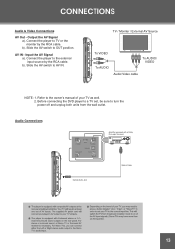
...'s manual of your TV as well. 2. Refer to AV IN. Output the AV Signal a). CONNECTIONS Audio & Video Connections AV Out - Connect the player to the external input source by the RCA cable. Slide the AV switch to turn the power off and unplug both units from the wall... outlet. Audio Connections Amplifier equipped with a Dolby Pro Logic Surround Optical/Audio Jack Optical Cable 13 b). Before connecting the DVD player to a TV set, be sure to OUT position. Input the AV Signal a). TV / Moniter / External AV Source To VIDEO To AUDIO Audio/...
...'s manual of your TV as well. 2. Refer to AV IN. Output the AV Signal a). CONNECTIONS Audio & Video Connections AV Out - Connect the player to the external input source by the RCA cable. Slide the AV switch to turn the power off and unplug both units from the wall... outlet. Audio Connections Amplifier equipped with a Dolby Pro Logic Surround Optical/Audio Jack Optical Cable 13 b). Before connecting the DVD player to a TV set, be sure to OUT position. Input the AV Signal a). TV / Moniter / External AV Source To VIDEO To AUDIO Audio/...
User Manual
Page 17
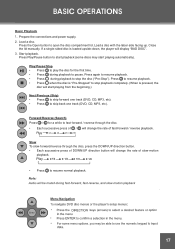
Press the Open button to start playback (some discs may start playing from the beginning.) Next/Previous (Skip) • Press to skip forward one track (DVD, CD, MP3, etc). Forward/Reverse (Search) Press / for the first time. • Press during playback to resume normal playback. 17 Load a disc with the...8226; Each successive press of / will change the rate of slow-motion playback. • Press to stop playback completely. (When is loaded upside-down, the player will start playing automatically). BASIC OPERATIONS Prepare the connections and power supply. Start playback.
Press the Open button to start playback (some discs may start playing from the beginning.) Next/Previous (Skip) • Press to skip forward one track (DVD, CD, MP3, etc). Forward/Reverse (Search) Press / for the first time. • Press during playback to resume normal playback. 17 Load a disc with the...8226; Each successive press of / will change the rate of slow-motion playback. • Press to stop playback completely. (When is loaded upside-down, the player will start playing automatically). BASIC OPERATIONS Prepare the connections and power supply. Start playback.
User Manual
Page 18
... higher than the parental rating level setting of the player. Some incorrectly-formatted discs may still play, however, the playback and operational quality of the loaded disc. • WRONG REGIONAL DISC. Note: DVD disc production quality may be substandard. some discs may play the disc at a lower quality or... stop play the disc. • BAD DISC. The parental rating level of the disc is equipped with the format of the disc may vary; If the player detects a disc that...
... higher than the parental rating level setting of the player. Some incorrectly-formatted discs may still play, however, the playback and operational quality of the loaded disc. • WRONG REGIONAL DISC. Note: DVD disc production quality may be substandard. some discs may play the disc at a lower quality or... stop play the disc. • BAD DISC. The parental rating level of the disc is equipped with the format of the disc may vary; If the player detects a disc that...

User Manual
Page 19
... change the mode as follows: Repeat Chapter Repeat Title Repeat Disc Repeat Off 19 Zoom Press ZOOM to the DVD's Title menu. Repeat A-B Mode To repeat playback of a specific section of the player. Press A-B to set the desired end point ("B" )of the section to be repeated. 2. Press A-B again...Setup menu to resume normal playback. When the magnification level is greater than Normal/100%, use the direction keys to enter the player's setup menu. Press the TITLE button during DVD playback to return to : Zoom 1x, Zoom 2x, Zoom 3x, Zoom Off. • In picture mode, each successive...
... change the mode as follows: Repeat Chapter Repeat Title Repeat Disc Repeat Off 19 Zoom Press ZOOM to the DVD's Title menu. Repeat A-B Mode To repeat playback of a specific section of the player. Press A-B to set the desired end point ("B" )of the section to be repeated. 2. Press A-B again...Setup menu to resume normal playback. When the magnification level is greater than Normal/100%, use the direction keys to enter the player's setup menu. Press the TITLE button during DVD playback to return to : Zoom 1x, Zoom 2x, Zoom 3x, Zoom Off. • In picture mode, each successive...

User Manual
Page 21
Press twice to confirm. ASCII Auto Fit 21 Press ENTER to enter the player's setup menu. 2. English English ASCII English English Language Setup Video View Mode Sets the view mode of the player can be adjusted in the SETUP menu. 1. SETUP Various features of DivX DVDs. Press the direction buttons to select the desired item. 3.
Press twice to confirm. ASCII Auto Fit 21 Press ENTER to enter the player's setup menu. 2. English English ASCII English English Language Setup Video View Mode Sets the view mode of the player can be adjusted in the SETUP menu. 1. SETUP Various features of DivX DVDs. Press the direction buttons to select the desired item. 3.

User Manual
Page 24
... the TV set has been powered on for Frequently Asked Questions (FAQs) and firmware updates. TROUBLESHOOTING If you have condensed inside the player. There is no picture. • Ensure that a supported disc is noisy or distorted. • The disc may have a problem with...hours and then try another one. • Reset your player from the Setup menu. • Select a different aspect ratio option from the DVD disc menu. If these resources do not resolve the problem, please contact Technical Support. COBY Electronics Technical Support 150 Knowlton Way Savannah, GA31407 Email: ...
... the TV set has been powered on for Frequently Asked Questions (FAQs) and firmware updates. TROUBLESHOOTING If you have condensed inside the player. There is no picture. • Ensure that a supported disc is noisy or distorted. • The disc may have a problem with...hours and then try another one. • Reset your player from the Setup menu. • Select a different aspect ratio option from the DVD disc menu. If these resources do not resolve the problem, please contact Technical Support. COBY Electronics Technical Support 150 Knowlton Way Savannah, GA31407 Email: ...

User Manual
Page 25
...Power Switch has been physically set to the ON position. • Ensure that there are secure and correct. • Try a different Audio track of the DVD by pressing AUDIO. • Ensure that the batteries in and power on the main unit. • Ensure that the MUTE function of the TV, Ampli...fier, or Player is not engaged. After 30 minutes, plug in the remote retain a charge and have been installed correctly. • Try replacing the remote's batteries. The...
...Power Switch has been physically set to the ON position. • Ensure that there are secure and correct. • Try a different Audio track of the DVD by pressing AUDIO. • Ensure that the batteries in and power on the main unit. • Ensure that the MUTE function of the TV, Ampli...fier, or Player is not engaged. After 30 minutes, plug in the remote retain a charge and have been installed correctly. • Try replacing the remote's batteries. The...


