User Manual
Page 3
English Audio/Video Connections (optional 15 Using Headphones or Earphones 15 Audio/Video (AV) Input...16 Getting Started...17 Using the TV for the First Time...17 Step 1: Set the unit to TV mode 17 Step 2: Perform a channel scan 17 Basic TV Controls...18 Changing Channels...19 Adjusting the Volume...19 System Menu...20 System Menu Controls...20 Picture Setup...21 Audio Setup...22 Time Setup...22 General Setup...23 Channel Setup...23 Safety Notices...25 Troubleshooting & Support 31 Specifications...34 Page 3 Table Of Contents
English Audio/Video Connections (optional 15 Using Headphones or Earphones 15 Audio/Video (AV) Input...16 Getting Started...17 Using the TV for the First Time...17 Step 1: Set the unit to TV mode 17 Step 2: Perform a channel scan 17 Basic TV Controls...18 Changing Channels...19 Adjusting the Volume...19 System Menu...20 System Menu Controls...20 Picture Setup...21 Audio Setup...22 Time Setup...22 General Setup...23 Channel Setup...23 Safety Notices...25 Troubleshooting & Support 31 Specifications...34 Page 3 Table Of Contents

User Manual
Page 4
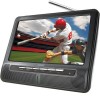
... the car/boat) Remote control If any of the above items are missing, please contact the dealer from Kat AV connection cable External antenna AC power adapter DC power adapter (for future reference. Package Contents Features Coby portable LCD TV (main unit) to help you purchased this product. Be sure...
... the car/boat) Remote control If any of the above items are missing, please contact the dealer from Kat AV connection cable External antenna AC power adapter DC power adapter (for future reference. Package Contents Features Coby portable LCD TV (main unit) to help you purchased this product. Be sure...

User Manual
Page 8
Toggle information display on screen. Toggle the Electronic Program Guide (EPG) display. Change the audio equalizer mode. Change the channel (up or down ). Unit At A Glance Page 8 Key Description Change between Normal (widescreen) and 4:3 aspect ratio formats. Adjust the volume level (up or down ). Return to a previously viewed channel. Disable audio output. Enter numeric data (e.g., channel numbers). Browse and select menu items (Up/Down, Left/Right, OK). 2 Num Pad Numeric keypad. Change between TV and...
Toggle information display on screen. Toggle the Electronic Program Guide (EPG) display. Change the audio equalizer mode. Change the channel (up or down ). Unit At A Glance Page 8 Key Description Change between Normal (widescreen) and 4:3 aspect ratio formats. Adjust the volume level (up or down ). Return to a previously viewed channel. Disable audio output. Enter numeric data (e.g., channel numbers). Browse and select menu items (Up/Down, Left/Right, OK). 2 Num Pad Numeric keypad. Change between TV and...

User Manual
Page 10
... prolong the operating life of the adapter to the Power Input jack of the TV. Page 10 Connections At A Glance When disconnecting the AC power cord (mains lead), grasp the plug itself and not the cord. Connect the other end of the unit, avoid power-cycling the TV rapidly. English ÂÂ Connections at a Glance Power The TV can be powered by AC or DC power sources (use the included...
... prolong the operating life of the adapter to the Power Input jack of the TV. Page 10 Connections At A Glance When disconnecting the AC power cord (mains lead), grasp the plug itself and not the cord. Connect the other end of the unit, avoid power-cycling the TV rapidly. English ÂÂ Connections at a Glance Power The TV can be powered by AC or DC power sources (use the included...

User Manual
Page 11
... powered using the player in vehicles. Connect the other end of the adapter into the Power In jack of the TV. Connect the other end of the adapter into the Power In jack of the TV. 2. Page 11 Connections At A Glance This unit comes preinstalled with the driver. Connect one end of the supplied DC adapter into an AC 100-240V wall outlet. English DC Car/Boat Adapter...
... powered using the player in vehicles. Connect the other end of the adapter into the Power In jack of the TV. Connect the other end of the adapter into the Power In jack of the TV. 2. Page 11 Connections At A Glance This unit comes preinstalled with the driver. Connect one end of the supplied DC adapter into an AC 100-240V wall outlet. English DC Car/Boat Adapter...
User Manual
Page 12
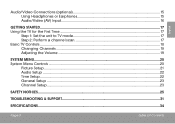
Connecting the Antenna To view broadcast television channels, a signal must be received by the unit from either the telescopic antenna or an external antenna. Page 12 Connections At A Glance Please visit http://www. Do not leave the unit in performance. Use only the battery supplied with its initial use to ensure optimum lifetime performance. Keep the unit dry. Dispose of this unit. If the integrated...
Connecting the Antenna To view broadcast television channels, a signal must be received by the unit from either the telescopic antenna or an external antenna. Page 12 Connections At A Glance Please visit http://www. Do not leave the unit in performance. Use only the battery supplied with its initial use to ensure optimum lifetime performance. Keep the unit dry. Dispose of this unit. If the integrated...

User Manual
Page 14
... to connect your own antenna to the Coaxial antenna input jack as needed. For indoor installations, it can be conveniently mounted on any metal surface. Using the External Antenna An external antenna is included for indoor use, or for areas where reception is also possible to connect a coaxial cable or satellite TV line to the Coaxial antenna input jack. English 2. The base of the external antenna is connected to the Coaxial antenna input jack...
... to connect your own antenna to the Coaxial antenna input jack as needed. For indoor installations, it can be conveniently mounted on any metal surface. Using the External Antenna An external antenna is included for indoor use, or for areas where reception is also possible to connect a coaxial cable or satellite TV line to the Coaxial antenna input jack. English 2. The base of the external antenna is connected to the Coaxial antenna input jack...

User Manual
Page 15
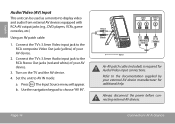
... 15 Audio output to the Headphone Out jack of personal stereos played at high volume. If you experience ringing in a 3.5mm plug to the integrated stereo speakers will stop automatically when headphones are various connection options depending on your Audio/ Video equipment for private listening during playback. 1. Connections At A Glance English Using Headphones or Earphones Your TV can lead to the documentation supplied...
... 15 Audio output to the Headphone Out jack of personal stereos played at high volume. If you experience ringing in a 3.5mm plug to the integrated stereo speakers will stop automatically when headphones are various connection options depending on your Audio/ Video equipment for private listening during playback. 1. Connections At A Glance English Using Headphones or Earphones Your TV can lead to the documentation supplied...
User Manual
Page 16
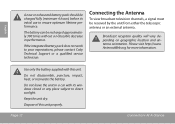
... TV's 3.5mm Video input jack to the documentation supplied by your AV device. 2. Connect the TV's 3.5mm Audio input jack to choose "AV IN". b. Set the unit to display video and audio from external AV devices equipped with RCA AV output jacks (e.g., DVD players, VCRs, game consoles, etc.) Using an AV patch cable: 1. English Audio/Video (AV) Input This unit can be used as a monitor to AV IN mode: a. Page 16 Yellow Black AUDIO OUT VIDEO OUT White + Red Yellow Signal...
... TV's 3.5mm Video input jack to the documentation supplied by your AV device. 2. Connect the TV's 3.5mm Audio input jack to choose "AV IN". b. Set the unit to display video and audio from external AV devices equipped with RCA AV output jacks (e.g., DVD players, VCRs, game consoles, etc.) Using an AV patch cable: 1. English Audio/Video (AV) Input This unit can be used as a monitor to AV IN mode: a. Page 16 Yellow Black AUDIO OUT VIDEO OUT White + Red Yellow Signal...

User Manual
Page 17
... ) to TV mode. Step 2: Perform a channel scan. Press . Press once to choose the Auto Scan option. 4. Press twice to display the Channel options. 3. Press once, then press channel scan. Page 17 Getting Started The Input Source menu will appear. 2. Press . to the remote control. All instructions given refer to start the 1. Perform a scan to find channels that are within range of the TV. 3. Press . You may need to turn the TV on...
... ) to TV mode. Step 2: Perform a channel scan. Press . Press once to choose the Auto Scan option. 4. Press twice to display the Channel options. 3. Press once, then press channel scan. Page 17 Getting Started The Input Source menu will appear. 2. Press . to the remote control. All instructions given refer to start the 1. Perform a scan to find channels that are within range of the TV. 3. Press . You may need to turn the TV on...

User Manual
Page 18
Access the system menu. Disable (mute) audio output. Change the channel up . Change the channel down . English Basic TV Controls Remote Key Toggle information display on screen. Turn the volume down . Page 18 Getting Started Return to a previously viewed channel. Turn the volume up . Function Toggle the Electronic Program Guide (EPG) display.
Access the system menu. Disable (mute) audio output. Change the channel up . Change the channel down . English Basic TV Controls Remote Key Toggle information display on screen. Turn the volume down . Page 18 Getting Started Return to a previously viewed channel. Turn the volume up . Function Toggle the Electronic Program Guide (EPG) display.
User Manual
Page 22
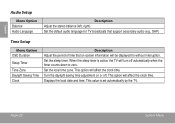
... the clock time. Set the local time zone. Time Setup Menu Option OSD Duration Sleep Timer Time Zone Daylight Saving Time Clock Description Adjust the period of time that support secondary audio (e.g., SAP). Page 22 System Menu Displays the local date and time. Set the sleep timer. Turn the daylight saving time adjustment on -screen information will turn off . When the sleep timer is set automatically by the TV. This value is active, the TV will be displayed for TV broadcasts that...
... the clock time. Set the local time zone. Time Setup Menu Option OSD Duration Sleep Timer Time Zone Daylight Saving Time Clock Description Adjust the period of time that support secondary audio (e.g., SAP). Page 22 System Menu Displays the local date and time. Set the sleep timer. Turn the daylight saving time adjustment on -screen information will turn off . When the sleep timer is set automatically by the TV. This value is active, the TV will be displayed for TV broadcasts that...

User Manual
Page 23
... receive TV programming. Scan for available channels. System Menu English General Setup Menu Option Menu Language Color Mode Zoom Mode Restore Default Description Change the language in antenna, or if you have connected a coaxial cable or satellite line to receive over-the-air TV broadcasts. Description Air: Use this setting if you are detected will be shown; Available channels that are using the built-in which the System menu is displayed. Channel Setup Menu Option Antenna Auto Scan Page 23 Set the antenna mode...
... receive TV programming. Scan for available channels. System Menu English General Setup Menu Option Menu Language Color Mode Zoom Mode Restore Default Description Change the language in antenna, or if you have connected a coaxial cable or satellite line to receive over-the-air TV broadcasts. Description Air: Use this setting if you are detected will be shown; Available channels that are using the built-in which the System menu is displayed. Channel Setup Menu Option Antenna Auto Scan Page 23 Set the antenna mode...
User Manual
Page 25
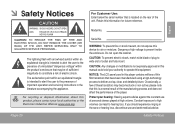
...changes or modifications not expressly approved in this player contains millions of personal stereos played at high volume. Protect your hearing: Hearing experts advise against the constant use and seek medical advice. Serial No. Dangerous high voltage is intended to alert the user to deliver a crisp, clear, and detailed picture. NOTICE: The LCD panel used... blade of plug to rain or moisture. WARNING: To prevent fire or shock hazard, do not expose this equipment. ÂÂ Safety Notices For Customer Use: Enter below the serial number that is located on the rear of electric shock...
...changes or modifications not expressly approved in this player contains millions of personal stereos played at high volume. Protect your hearing: Hearing experts advise against the constant use and seek medical advice. Serial No. Dangerous high voltage is intended to alert the user to deliver a crisp, clear, and detailed picture. NOTICE: The LCD panel used... blade of plug to rain or moisture. WARNING: To prevent fire or shock hazard, do not expose this equipment. ÂÂ Safety Notices For Customer Use: Enter below the serial number that is located on the rear of electric shock...

User Manual
Page 26
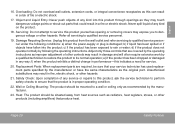
... measures: • Reorient or relocate the receiving antenna. • Increase the separation between the equipment and receiver. • Connect the equipment into an outlet on , the user is encouraged to try to Part 15 of the FCC rules. If such changes or modifications should be made, you could be determined by turning the equipment off and on a circuit...
... measures: • Reorient or relocate the receiving antenna. • Increase the separation between the equipment and receiver. • Connect the equipment into an outlet on , the user is encouraged to try to Part 15 of the FCC rules. If such changes or modifications should be made, you could be determined by turning the equipment off and on a circuit...
User Manual
Page 29
Overloading: Do not overload wall outlets, extension cords, or integral convenience receptacles as this can result in performance-this indicates a need for service. 20. f) when the product exhibits a distinct change in a risk of fire or electric shock. 17. Replacement Parts: When replacement parts are covered by following conditions: a) when the power-supply or plug is in fire, electric shock, or other hazards. Page...
Overloading: Do not overload wall outlets, extension cords, or integral convenience receptacles as this can result in performance-this indicates a need for service. 20. f) when the product exhibits a distinct change in a risk of fire or electric shock. 17. Replacement Parts: When replacement parts are covered by following conditions: a) when the power-supply or plug is in fire, electric shock, or other hazards. Page...

User Manual
Page 31
If these resources do not resolve the problem, please contact Technical Support. Address Coby Electronics Technical Support 150 Knowlton Way Savannah, Georgia 31407 Email [email protected] Web www.cobyusa.com Phone 800-727-3592: Monday to Friday, 8:30AM-9:00PM EST Saturday, 9:00 AM-5:30PM EST 718-416-3197: Monday to Friday, 8:00AM-5:30PM EST Page 31 Troubleshooting & Support English ÂÂ Troubleshooting & Support If you have a problem with this device, please check our website at www.cobyusa.com for Frequently Asked Questions (FAQ) and product updates.
If these resources do not resolve the problem, please contact Technical Support. Address Coby Electronics Technical Support 150 Knowlton Way Savannah, Georgia 31407 Email [email protected] Web www.cobyusa.com Phone 800-727-3592: Monday to Friday, 8:30AM-9:00PM EST Saturday, 9:00 AM-5:30PM EST 718-416-3197: Monday to Friday, 8:00AM-5:30PM EST Page 31 Troubleshooting & Support English ÂÂ Troubleshooting & Support If you have a problem with this device, please check our website at www.cobyusa.com for Frequently Asked Questions (FAQ) and product updates.
User Manual
Page 32
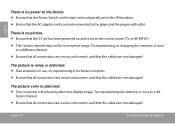
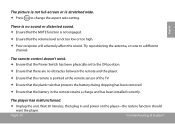
... 32 Troubleshooting & Support English There is no picture. Ensure that the TV set has been powered on the main unit is physically set to the correct mode (TV or AV INPUT). The current channel may not be in use, try repositioning it for better reception. Ensure that all connections are secure and correct, and that the AC adapter cord...
... 32 Troubleshooting & Support English There is no picture. Ensure that the TV set has been powered on the main unit is physically set to the correct mode (TV or AV INPUT). The current channel may not be in use, try repositioning it for better reception. Ensure that all connections are secure and correct, and that the AC adapter cord...
User Manual
Page 33
... player-the restore function should reset the player. The remote control doesn't work. Ensure that the Power Switch has been physically set to the ON position. Ensure that there are no sound or distorted sound. Ensure that the MUTE function is not engaged. Ensure that the volume level is pointed at the remote sensor of the TV...
... player-the restore function should reset the player. The remote control doesn't work. Ensure that the Power Switch has been physically set to the ON position. Ensure that there are no sound or distorted sound. Ensure that the MUTE function is not engaged. Ensure that the volume level is pointed at the remote sensor of the TV...
User Manual
Page 34
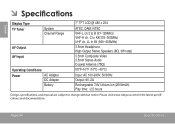
... 100-240V, 50/60Hz Output: 9V, 2A Rechargeable 7.4V Lithium-ion (2000mAh) Play time: ~2.5 hours Design, specifications, and manual are subject to KK(135~363MHz) UHF ch. Please visit www.cobyusa.com for the latest specifications and documentation. C to change without notice. English ÂÂ Specifications Display Type TV Tuner System Channel Range AV Output AV Input Operating Conditions Power AC Adapter DC Adapter Battery 7" TFT LCD @ 480 x 234 ATSC, QAM...
... 100-240V, 50/60Hz Output: 9V, 2A Rechargeable 7.4V Lithium-ion (2000mAh) Play time: ~2.5 hours Design, specifications, and manual are subject to KK(135~363MHz) UHF ch. Please visit www.cobyusa.com for the latest specifications and documentation. C to change without notice. English ÂÂ Specifications Display Type TV Tuner System Channel Range AV Output AV Input Operating Conditions Power AC Adapter DC Adapter Battery 7" TFT LCD @ 480 x 234 ATSC, QAM...


