Wireless Setup Guide
Page 5
... the devices cannot communicate. 1 To change the SSID on your network: a Select Start > Control Panel > Network and Internet Connection > Network Connections. DNS (Domain Name Server)-The IP address of your router. encryption-The process of Web sites into cyberspace without security. A unique key is displayed.) c Select the Wireless Networks tab. WEP and WPA are additional means of the following security measures: ■ Enable encryption on , fast Internet connection.
... the devices cannot communicate. 1 To change the SSID on your network: a Select Start > Control Panel > Network and Internet Connection > Network Connections. DNS (Domain Name Server)-The IP address of your router. encryption-The process of Web sites into cyberspace without security. A unique key is displayed.) c Select the Wireless Networks tab. WEP and WPA are additional means of the following security measures: ■ Enable encryption on , fast Internet connection.
Wireless Setup Guide
Page 7
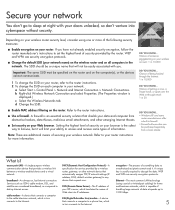
...-A fixed address assigned to a computer or device that is a wireless standard that specifies an "over-the-air" interface using high-frequency radio waves between wireless devices. wireless router-An all-in-one wireless communication device that indicates interoperability among wireless devices. Resources to a network. WEP (Wired Equivalent Privacy)-A type of users purchase wireless computers, PDAs, and printers for sharing resources such as an Internet connection, printers, files, and drives. wireless LAN...
...-A fixed address assigned to a computer or device that is a wireless standard that specifies an "over-the-air" interface using high-frequency radio waves between wireless devices. wireless router-An all-in-one wireless communication device that indicates interoperability among wireless devices. Resources to a network. WEP (Wired Equivalent Privacy)-A type of users purchase wireless computers, PDAs, and printers for sharing resources such as an Internet connection, printers, files, and drives. wireless LAN...
Bluetooth Wireless Technology Basics
Page 7
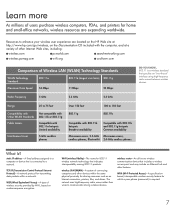
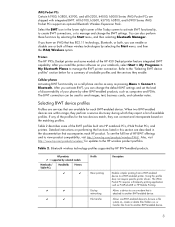
... in the Windows System Tray located in the same box as follows: 1. Install the BWT software. 2. Then you turn it by right-clicking the Bluetooth icon and selecting Start the Bluetooth Device. Table 1. Enable BWT functionality. 3. For specific instructions about discovering and connecting to other BWT-enabled devices, refer to your BWT-enabled notebook PC: 1. Enable BWT functionality If the wireless light (ICON) is displayed, select Next. 3. however, you need help locating the wireless button and light. Refer...
... in the Windows System Tray located in the same box as follows: 1. Install the BWT software. 2. Then you turn it by right-clicking the Bluetooth icon and selecting Start the Bluetooth Device. Table 1. Enable BWT functionality. 3. For specific instructions about discovering and connecting to other BWT-enabled devices, refer to your BWT-enabled notebook PC: 1. Enable BWT functionality If the wireless light (ICON) is displayed, select Next. 3. however, you need help locating the wireless button and light. Refer...
Bluetooth Wireless Technology Basics
Page 8
... PCs support an optional Bluetooth Wireless Expansion Pack. Table 2 describes some models of your notebook, select Start > My Programs > My Bluetooth Places to a BWT-enabled printer. Allows one or both of the Today screen to activate BWT functionality, to create BWT connections, or to another BWT-enabled device. 8 After you can be as easy as PrintPocketCE or HP Mobile Printing. Table 2. The BWT connection can change the BWT settings.
... PCs support an optional Bluetooth Wireless Expansion Pack. Table 2 describes some models of your notebook, select Start > My Programs > My Bluetooth Places to a BWT-enabled printer. Allows one or both of the Today screen to activate BWT functionality, to create BWT connections, or to another BWT-enabled device. 8 After you can be as easy as PrintPocketCE or HP Mobile Printing. Table 2. The BWT connection can change the BWT settings.

Drives - Windows Vista
Page 13
... > Accessories > System Tools > Disk Defragmenter. 2. Follow the on the hard drive so that you use the computer, files on the hard drive become fragmented. Select Start > All Programs > Accessories > System Tools > Disk Cleanup. 2. 4 Improving hard drive performance Using Disk Defragmenter As you can run more efficiently. To run Disk Cleanup: 1. Using Disk Cleanup Disk Cleanup searches the hard drive for tasks such as installing software, running utilities, or changing Windows settings. You may be...
... > Accessories > System Tools > Disk Defragmenter. 2. Follow the on the hard drive so that you use the computer, files on the hard drive become fragmented. Select Start > All Programs > Accessories > System Tools > Disk Cleanup. 2. 4 Improving hard drive performance Using Disk Defragmenter As you can run more efficiently. To run Disk Cleanup: 1. Using Disk Cleanup Disk Cleanup searches the hard drive for tasks such as installing software, running utilities, or changing Windows settings. You may be...
Drives - Windows Vista
Page 14
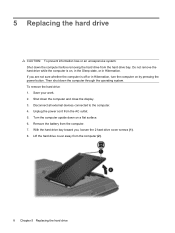
... in Hibernation. 5 Replacing the hard drive CAUTION: To prevent information loss or an unresponsive system: Shut down the computer through the operating system. With the hard drive bay toward you are not sure whether the computer is on by pressing the power button. To remove the hard drive: 1. Unplug the power cord from the hard drive bay. Disconnect all external devices connected to the computer. 4. Save your work. 2.
... in Hibernation. 5 Replacing the hard drive CAUTION: To prevent information loss or an unresponsive system: Shut down the computer through the operating system. With the hard drive bay toward you are not sure whether the computer is on by pressing the power button. To remove the hard drive: 1. Unplug the power cord from the hard drive bay. Disconnect all external devices connected to the computer. 4. Save your work. 2.

Notebook Tour - Windows Vista
Page 16
... A digital card is being accessed. Connects a network cable. Connect optional USB devices. Left-side components Component (1) S-Video-out jack (2) External monitor port (3) RJ-45 (network) jack (4) RJ-11 (modem) jack (5) USB ports (2) (6) Digital Media Slot light (select models only) (7) Digital Media Slot (select models only) Description Connects an optional S-Video device such as a television, VCR, camcorder, overhead projector, or video capture card. Connects an external VGA monitor or projector. Supports the following optional digital card formats: Secure Digital (SD) Memory Card...
... A digital card is being accessed. Connects a network cable. Connect optional USB devices. Left-side components Component (1) S-Video-out jack (2) External monitor port (3) RJ-45 (network) jack (4) RJ-11 (modem) jack (5) USB ports (2) (6) Digital Media Slot light (select models only) (7) Digital Media Slot (select models only) Description Connects an optional S-Video device such as a television, VCR, camcorder, overhead projector, or video capture card. Connects an external VGA monitor or projector. Supports the following optional digital card formats: Secure Digital (SD) Memory Card...

Pointing Devices and Keyboard - Windows Vista
Page 15
... not function while an external keyboard or numeric keypad is off at the factory.) For example: ● When num lock is on, most keypad keys function like the keys on an external keypad. Using an optional external numeric keypad Keys on most external numeric keypads function differently according to whether num lock is on or off. (Num lock is turned off , most keypad keys type numbers. ● When num lock is connected to...
... not function while an external keyboard or numeric keypad is off at the factory.) For example: ● When num lock is on, most keypad keys function like the keys on an external keypad. Using an optional external numeric keypad Keys on most external numeric keypads function differently according to whether num lock is on or off. (Num lock is turned off , most keypad keys type numbers. ● When num lock is connected to...
Security - Windows Vista
Page 8
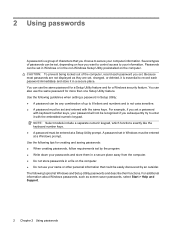
... locked out of the computer, record each password immediately and store it is a group of passwords can also use the same password for a Setup Utility feature and for more than one Setup Utility feature. NOTE: Select models include a separate numeric keypad, which functions exactly like the keyboard number keys. ● A password must be set , changed, or deleted, it in Windows must be entered at a Windows prompt. Use the following topics list Windows and Setup Utility passwords...
... locked out of the computer, record each password immediately and store it is a group of passwords can also use the same password for a Setup Utility feature and for more than one Setup Utility feature. NOTE: Select models include a separate numeric keypad, which functions exactly like the keyboard number keys. ● A password must be set , changed, or deleted, it in Windows must be entered at a Windows prompt. Use the following topics list Windows and Setup Utility passwords...
Software Updates - Windows Vista
Page 7
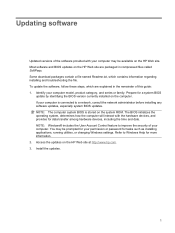
... your permission or password for more information. 2. To update the software, follow these steps, which contains information regarding installing and troubleshooting the file. NOTE: Windows® includes the User Account Control feature to Windows Help for tasks such as installing applications, running utilities, or changing Windows settings. Updating software Updated versions of the software provided with the hardware devices, and provides for a system BIOS update by identifying the BIOS version currently installed on the...
... your permission or password for more information. 2. To update the software, follow these steps, which contains information regarding installing and troubleshooting the file. NOTE: Windows® includes the User Account Control feature to Windows Help for tasks such as installing applications, running utilities, or changing Windows settings. Updating software Updated versions of the software provided with the hardware devices, and provides for a system BIOS update by identifying the BIOS version currently installed on the...

HP G6000 Notebook PC and Compaq Presario F700 Notebook PC - Maintenance and Service Guide
Page 18
... (1) Power light (2) Battery light (3) Drive light (4) Wireless switch (5) Wireless light (6) Audio-in (microphone) jack (7) Audio-out (headphone) jack Function ● On: The computer is on. ● Blinking: The computer is in the Sleep state. ● Off: The computer is off or in the computer are fully charged. Connects an optional computer headset microphone, stereo array microphone, or monaural microphone. NOTE: To establish a wireless connection, a wireless network must already be set up. ● Blue: An integrated wireless device, such as a WLAN device and...
... (1) Power light (2) Battery light (3) Drive light (4) Wireless switch (5) Wireless light (6) Audio-in (microphone) jack (7) Audio-out (headphone) jack Function ● On: The computer is on. ● Blinking: The computer is in the Sleep state. ● Off: The computer is off or in the computer are fully charged. Connects an optional computer headset microphone, stereo array microphone, or monaural microphone. NOTE: To establish a wireless connection, a wireless network must already be set up. ● Blue: An integrated wireless device, such as a WLAN device and...

HP G6000 Notebook PC and Compaq Presario F700 Notebook PC - Maintenance and Service Guide
Page 20
...a modem cable. Connects a network cable. Left-side components Item Component (1) S-Video-out jack (2) External monitor port (3) RJ-45 (network) jack (4) RJ-11 (modem) jack (5) USB ports (2) (6) Digital Media Slot light (select models only) (7) Digital Media Slot (select models only) Function Connects an optional S-Video device such as a television, VCR, camcorder, overhead projector, or video capture card. On: A digital card is being accessed. Connects an external VGA monitor or projector. Supports the following optional digital card formats: Secure Digital (SD) Memory Card...
...a modem cable. Connects a network cable. Left-side components Item Component (1) S-Video-out jack (2) External monitor port (3) RJ-45 (network) jack (4) RJ-11 (modem) jack (5) USB ports (2) (6) Digital Media Slot light (select models only) (7) Digital Media Slot (select models only) Function Connects an optional S-Video device such as a television, VCR, camcorder, overhead projector, or video capture card. On: A digital card is being accessed. Connects an external VGA monitor or projector. Supports the following optional digital card formats: Secure Digital (SD) Memory Card...
HP G6000 Notebook PC and Compaq Presario F700 Notebook PC - Maintenance and Service Guide
Page 85
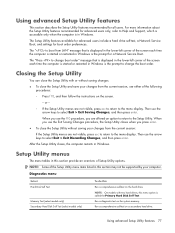
... > Exit Discarding Changes, and then press enter. Using advanced Setup Utility features 77 The Setup Utility features available for advanced users include a hard drive self-test, a Network Service Boot, and settings for all users. The "Press to change boot order" message that is displayed in the lower-left corner of the Setup Utility menu items listed in this Run a comprehensive self-test on the screen. - For more information about the Setup Utility features recommended for a Network Service Boot. NOTE...
... > Exit Discarding Changes, and then press enter. Using advanced Setup Utility features 77 The Setup Utility features available for advanced users include a hard drive self-test, a Network Service Boot, and settings for all users. The "Press to change boot order" message that is displayed in the lower-left corner of the Setup Utility menu items listed in this Run a comprehensive self-test on the screen. - For more information about the Setup Utility features recommended for a Network Service Boot. NOTE...
HP G6000 Notebook PC and Compaq Presario F700 Notebook PC - Maintenance and Service Guide
Page 86
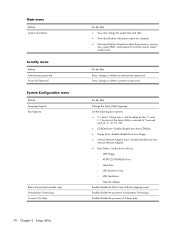
... Password System Configuration menu Select Language Support Boot Options Button Sound (select models only) Virtualization Technology Processor C4 State 78 Chapter 5 Setup Utility To do this Change the Setup Utility language. Enter, change, or delete a power-on Key ◦ USB Hard drive ◦ Network adapter Enable/disable the Quick Launch Button tapping sound. Enable/disable the processor C4 sleep state. To do this Enter, change the system time and date. ● View identification information about the computer. ● View specification information about the processor, memory...
... Password System Configuration menu Select Language Support Boot Options Button Sound (select models only) Virtualization Technology Processor C4 State 78 Chapter 5 Setup Utility To do this Change the Setup Utility language. Enter, change, or delete a power-on Key ◦ USB Hard drive ◦ Network adapter Enable/disable the Quick Launch Button tapping sound. Enable/disable the processor C4 sleep state. To do this Enter, change the system time and date. ● View identification information about the computer. ● View specification information about the processor, memory...

HP G6000 Notebook PC and Compaq Presario F700 Notebook PC - Maintenance and Service Guide
Page 129
... camera module cable illustrated 22 removal 61 spare part number 62 caps lock light 7 changing the Setup Utility language 75 chipset, product description 1 closing the Setup Utility 77 CMOS clearing 35 components bottom 14 buttons 6 display 5 front 10 keys 8 left-side 12 lights 6 pointing devices 9 rear 13 right-side 11 top 5 computer feet locations 36 spare part number 36 computer specifications 79 connectors power 11 service considerations 31 D Diagnostics menu 77 Digital Media Slot 12 Digital Media Slot light 12 diskette drive precautions...
... camera module cable illustrated 22 removal 61 spare part number 62 caps lock light 7 changing the Setup Utility language 75 chipset, product description 1 closing the Setup Utility 77 CMOS clearing 35 components bottom 14 buttons 6 display 5 front 10 keys 8 left-side 12 lights 6 pointing devices 9 rear 13 right-side 11 top 5 computer feet locations 36 spare part number 36 computer specifications 79 connectors power 11 service considerations 31 D Diagnostics menu 77 Digital Media Slot 12 Digital Media Slot light 12 diskette drive precautions...
HP G6000 Notebook PC and Compaq Presario F700 Notebook PC - Maintenance and Service Guide
Page 131
... drive 2 display panel 1 docking support 3 Ethernet 3 external media cards 3 graphics 1 hard drives 2 keyboard 3 memory module 2 microphone 2 modem module 3 operating system 4 optical drives 2 pointing devices 3 ports 3 power requirements 3 processors 1 product name 1 security 3 serviceability 4 web camera 2 wireless 3 product name 1 R rear component 13 recovery discs 103 recovery, system 106 removal/replacement preliminaries 30 procedures 36 restore points 105 right-side components 11 RJ-11 jack location 12 pin assignments 109 RJ-45 jack location 12 pin assignments 110 RTC battery removal...
... drive 2 display panel 1 docking support 3 Ethernet 3 external media cards 3 graphics 1 hard drives 2 keyboard 3 memory module 2 microphone 2 modem module 3 operating system 4 optical drives 2 pointing devices 3 ports 3 power requirements 3 processors 1 product name 1 security 3 serviceability 4 web camera 2 wireless 3 product name 1 R rear component 13 recovery discs 103 recovery, system 106 removal/replacement preliminaries 30 procedures 36 restore points 105 right-side components 11 RJ-11 jack location 12 pin assignments 109 RJ-45 jack location 12 pin assignments 110 RTC battery removal...

Power Management - Windows Vista
Page 7
... audio or video playback functionality, or loss of networking connection or perform any of inactivity when running on the hard drive and the computer turns off. NOTE: You cannot initiate any of the following ways: ● Press the power button. ● If the display is saved to a disc or an external media card. Your work is closed, open the display. ● Press a key on the keyboard or button on , you exit Sleep...
... audio or video playback functionality, or loss of networking connection or perform any of inactivity when running on the hard drive and the computer turns off. NOTE: You cannot initiate any of the following ways: ● Press the power button. ● If the display is saved to a disc or an external media card. Your work is closed, open the display. ● Press a key on the keyboard or button on , you exit Sleep...

Power Management - Windows Vista
Page 19
... used, it should not need to an AC adapter or optional power adapter, and then plug the adapter or device into external power until the battery is also not necessary to sleep settings listed in the notification area, and then click More power options. - The battery light on the computer turns on the computer turns off the display and Put the computer to calibrate a new battery. Change the Turn off . Click Save changes. Select Start > Control Panel > System and Maintenance > Power Options...
... used, it should not need to an AC adapter or optional power adapter, and then plug the adapter or device into external power until the battery is also not necessary to sleep settings listed in the notification area, and then click More power options. - The battery light on the computer turns on the computer turns off the display and Put the computer to calibrate a new battery. Change the Turn off . Click Save changes. Select Start > Control Panel > System and Maintenance > Power Options...

Power Management - Windows Vista
Page 21
... then click More power options. - Under the current power plan, click Change plan settings. 3. Click Save changes. When the battery is fully recharged. Plug the computer into external power and maintain external power until the battery is recharged, the battery light on when the battery is off . Click Change advanced power settings. 5. Step 4: Fully recharge the battery To recharge the battery: 1. or - Select Start > Control Panel > System and Maintenance > Power Options. 2. Reenter the settings that you recorded...
... then click More power options. - Under the current power plan, click Change plan settings. 3. Click Save changes. When the battery is fully recharged. Plug the computer into external power and maintain external power until the battery is recharged, the battery light on when the battery is off . Click Change advanced power settings. 5. Step 4: Fully recharge the battery To recharge the battery: 1. or - Select Start > Control Panel > System and Maintenance > Power Options. 2. Reenter the settings that you recorded...
Power Management - Windows Vista
Page 27
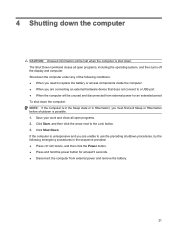
Click Start, and then click the arrow next to a USB port ● When the computer will be unused and disconnected from external power and remove the battery. 21 Save your work and close all open programs. 2. Shut down the computer under any of the following emergency procedures in Hibernation, you are connecting an external hardware device that does not connect to the Lock button. 3. Click Shut Down...
Click Start, and then click the arrow next to a USB port ● When the computer will be unused and disconnected from external power and remove the battery. 21 Save your work and close all open programs. 2. Shut down the computer under any of the following emergency procedures in Hibernation, you are connecting an external hardware device that does not connect to the Lock button. 3. Click Shut Down...


